
In this blog post, we're going to explore how to Auto-Scale Palo Alto VM-Series Firewalls in AWS. It's a known fact that running heavy instances in AWS can be costly, and it's not wise to have more firewalls running than necessary. But what happens when demand spikes unexpectedly? If we're not prepared, things can get messy quickly.
Auto-scaling these firewalls isn't as simple as pressing a button. There are several components to consider, but don't worry - once you grasp the basics, it's as straightforward as any other topic in the cloud and network world.
This blog post is based on the ideas from the Palo Alto Github repo - https://github.com/PaloAltoNetworks/terraform-aws-vmseries-modules/tree/main/examples/centralized_design_autoscale
Assumptions
As we get into the specifics of auto-scaling Palo Alto VM-Series firewalls in AWS, there are a few assumptions I'd like to lay out. This will help ensure we're all on the same page.
- Familiarity with AWS and Palo Alto: I'm assuming you already have a good grasp of AWS and Palo Alto. This includes understanding how to use Gateway Load Balancers (GWLB), Elastic Network Interfaces (ENIs), Lambda, CloudWatch alarms and Panorama.
- Focus on Auto-Scaling: This post is specifically about the auto-scaling aspect of VM-Series firewalls. For those new to VM-Series or needing a refresher, check out my other blog posts where I've covered the basics of VM-Series firewalls in detail.
- Python Knowledge: Some steps in our process will involve Python scripting. While it's not mandatory, having basic Python knowledge will definitely make things easier for you.
Here are some of the posts I've written on VM-Series Firewalls in AWS if you need a quick refresher.
If you want to learn more about, GWLB and Palo Alto Firewalls - https://www.packetswitch.co.uk/aws-gwlb-palo-alto-example/
Automating VM-Series Firewalls in AWS - https://www.packetswitch.co.uk/automating-palo-alto-deployment-with-aws-gwlb/
Bootstraping Palo Alto Firewalls in AWS - https://www.packetswitch.co.uk/how-to-bootstrap-palo-alto-firewalls-in-aws/
Using PanOS Python Library - https://www.packetswitch.co.uk/automating-palo-alto-firewalls-panorama-with-pan-os-python/
Event Bridge Rules - https://www.packetswitch.co.uk/schedule-aws-lambda-functions-using-eventbridge-rules/
Problems with Auto Scaling Groups and Palo Alto Firewalls
When it comes to managing Palo Alto firewalls in AWS, it's not as straightforward as launching the instances and forgetting about them. Here are a few key things to keep in mind.
- Licensing and Panorama: Each firewall needs to be properly licensed and configured to connect back to Panorama. Additionally, the firewalls typically require multiple interfaces, such as data and management interfaces, which adds complexity.
- License Deactivation and Management: It's crucial to remember that when a firewall instance is terminated, the associated licenses need to be deactivated. Also, the firewall must be unmanaged from Panorama.
- Auto-Scaling Actions: During the auto-scaling process, all these actions – licensing, connecting to Panorama, and interface management – need to be performed automatically. This ensures that as the number of firewall instances increases or decreases, your network remains secure and compliant without manual intervention.
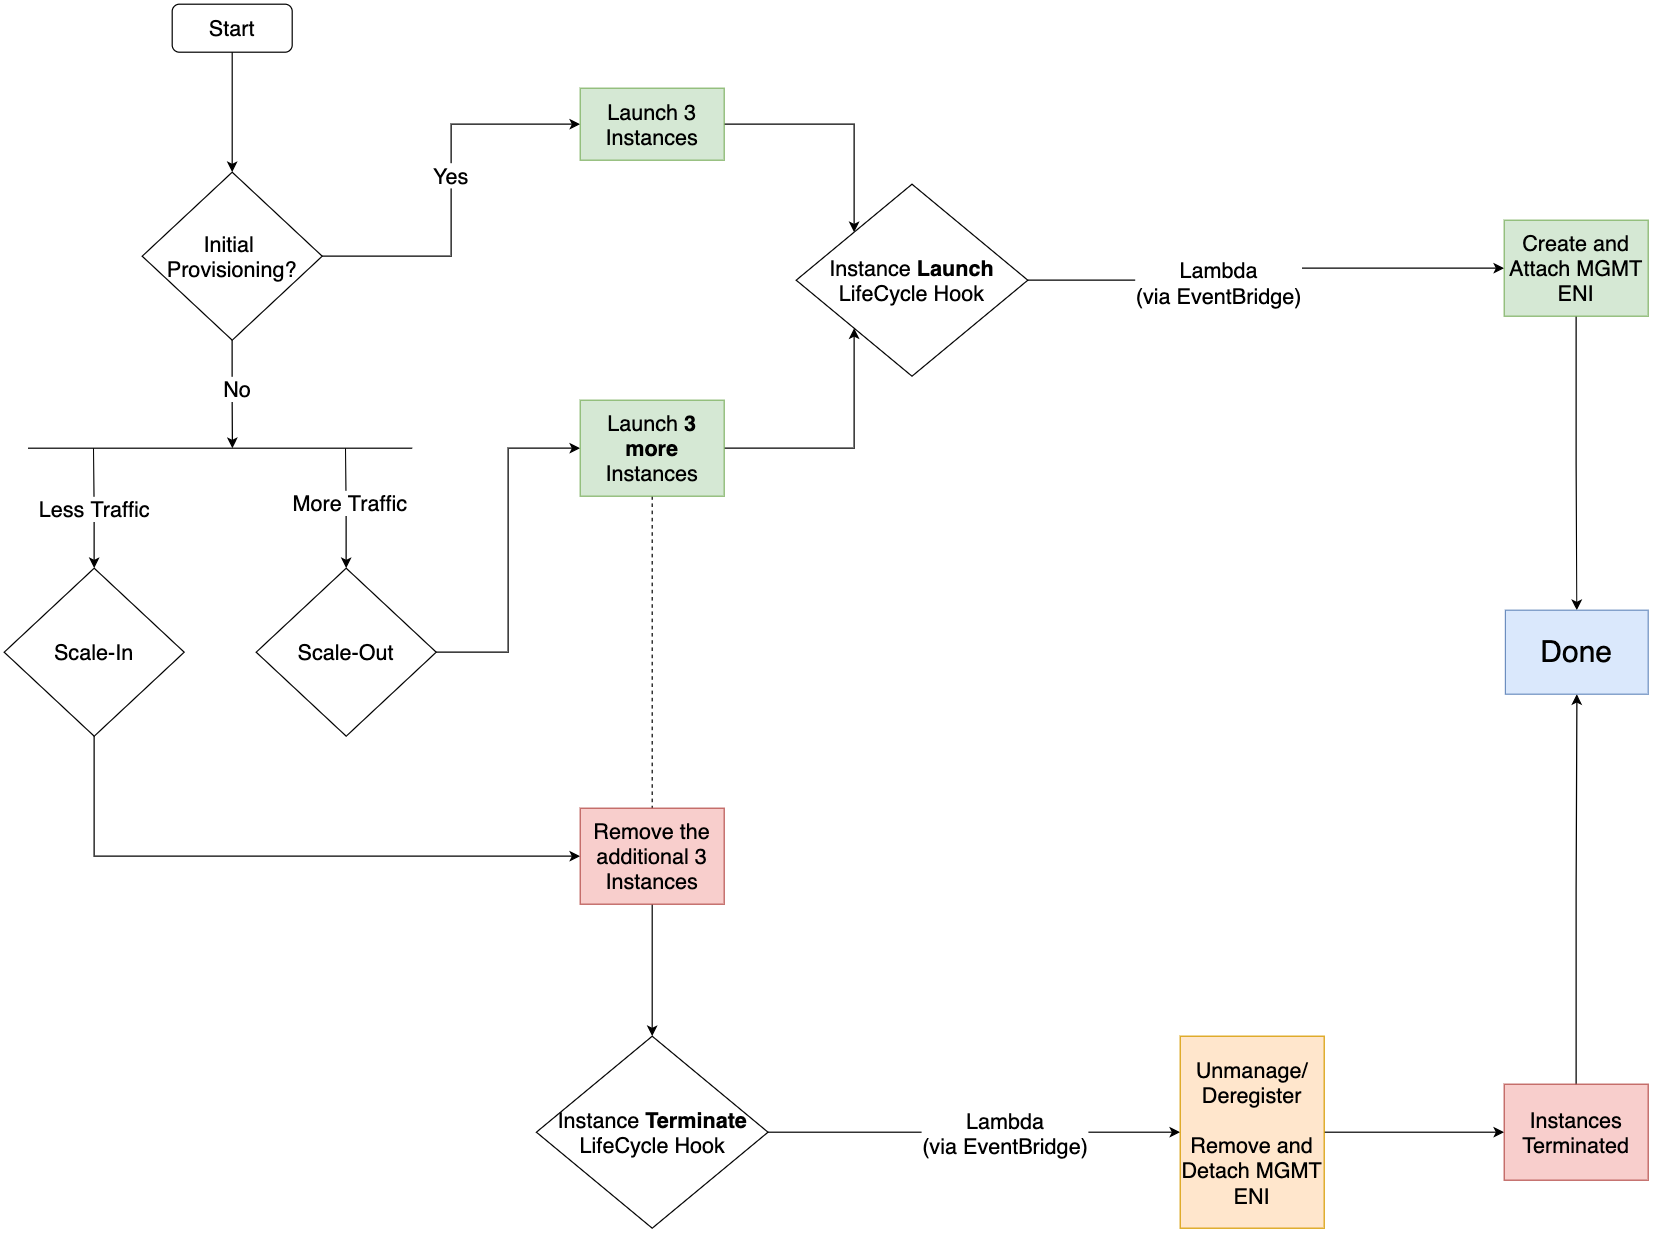
Auto-Scaling Components
To effectively automate the auto-scaling of VM-Series firewalls in AWS, a few key components need to be configured and understood. At the heart of this setup are the Auto Scaling Group and Launch Template, which lay the groundwork for scaling your firewall instances. While this article won't cover Gateway Load Balancer (GWLB) components in detail, it's important to note they are a part of the overall architecture.
Another important piece of this process is managing the secondary Elastic Network Interface (ENI). This ENI needs to be created and attached to instances during a scale-out event, and conversely, detached and removed when scaling in. Please note that this is due to the fact that ASG doesn't support multiple interfaces from multiple subnets. If you are using the two-arm approach with trust and untrust interfaces then you will need to attach two more ENIs during scale-out.
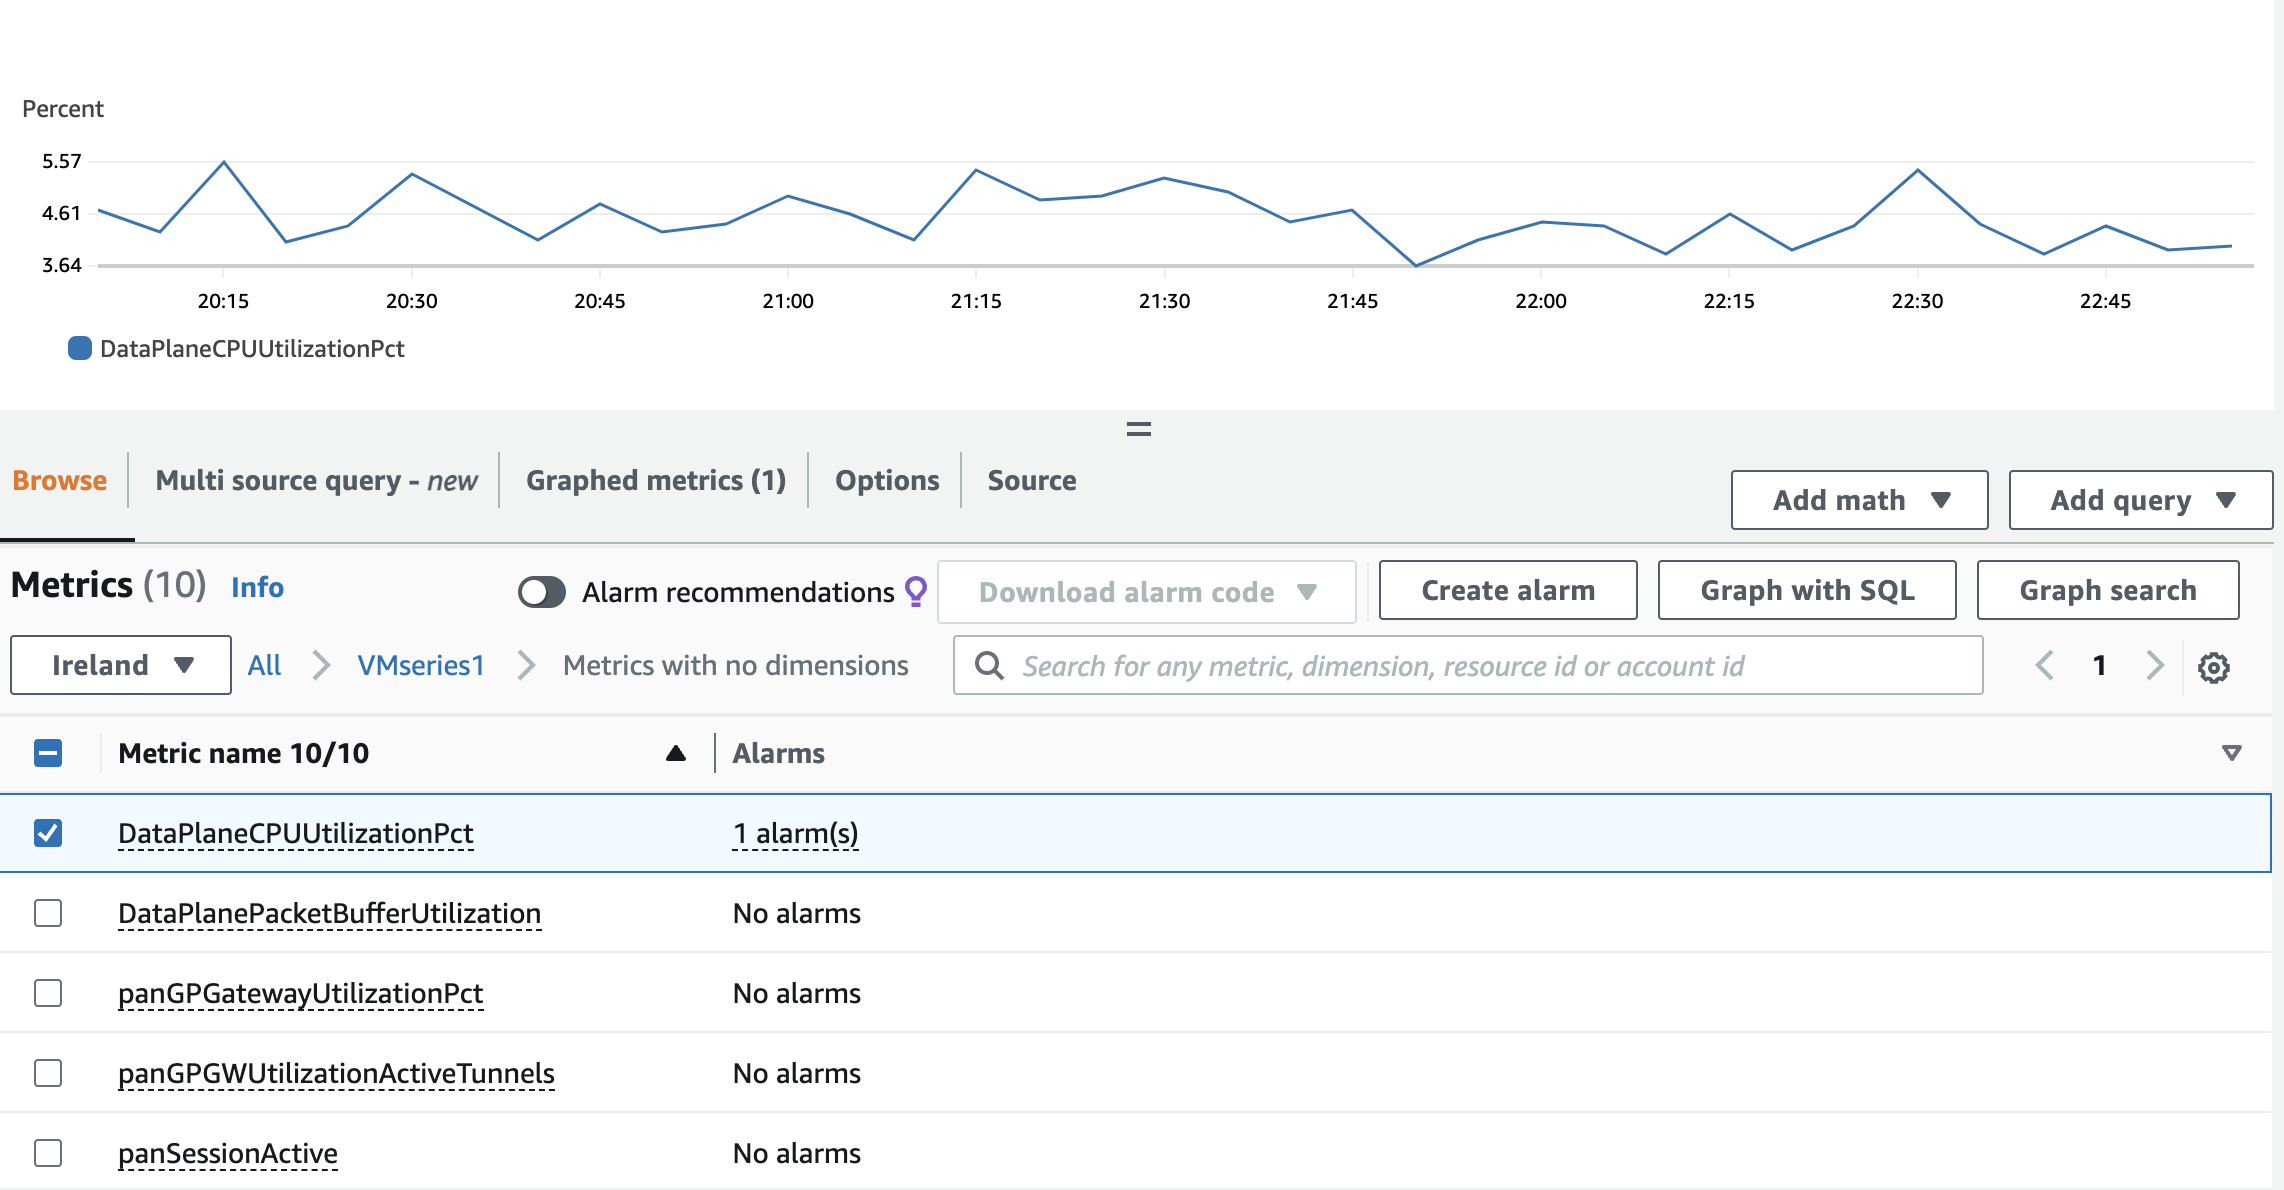
Monitoring is another vital component, achieved through Palo Alto VM-Series CloudWatch Metrics. By keeping an eye on metrics like Data Plane CPU usage, session count, and session utilization, you can set thresholds that trigger the Auto Scaling Group to launch more instances as demand increases. Again, we can't use the native AWS metric like the CPU utilization because it is not the actual representation of the Data Plane CPU.
Conversely, when utilization drops, the ASG responds by terminating instances. This step includes deregistering licenses and removing the firewalls from Panorama management. All these processes must work together seamlessly and automatically, adapting to the changing demands without manual intervention.
Palo Alto VM-Series CloudWatch Metrics
The VM-Series firewall on AWS can publish native PAN-OS metrics to AWS CloudWatch such as data plane CPU, active sessions, session utilization, throughput etc. These metrics allow you to assess performance and usage patterns that you can use to take action for launching or terminating instances of the VM-Series firewalls.
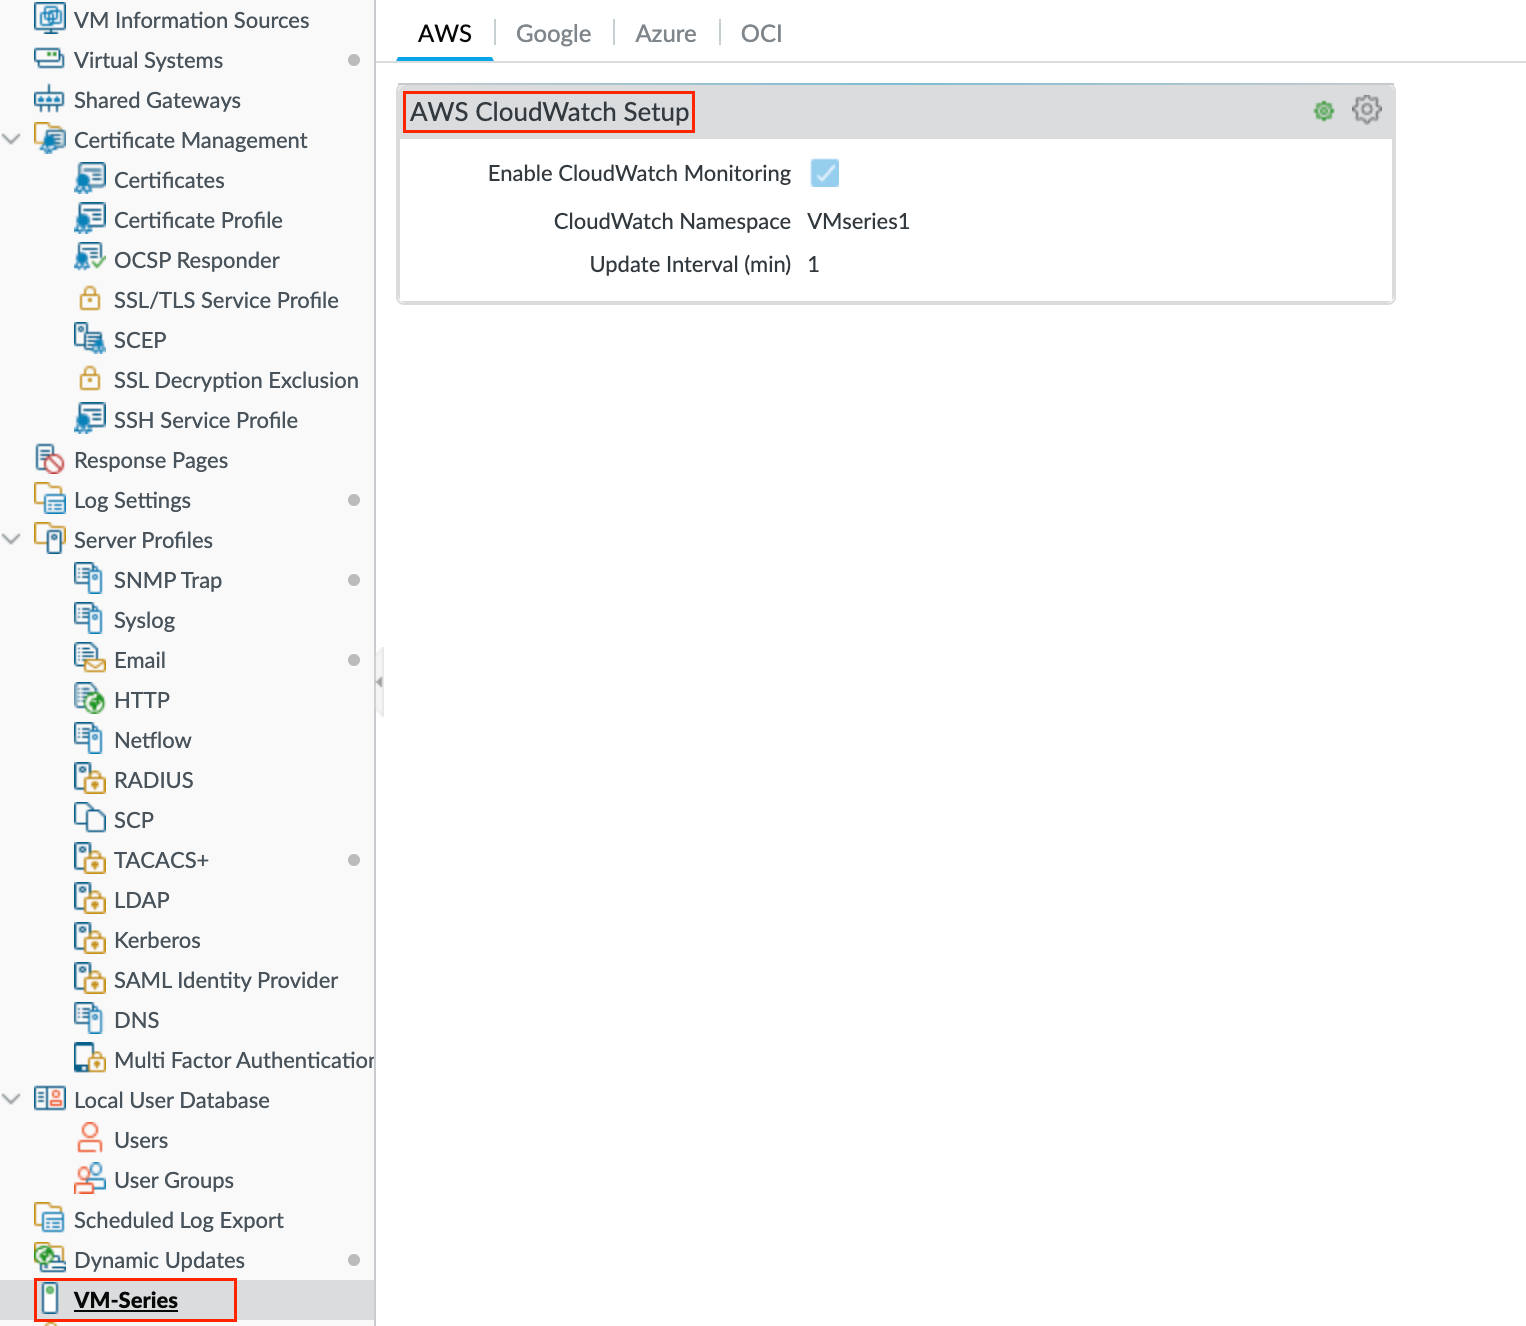
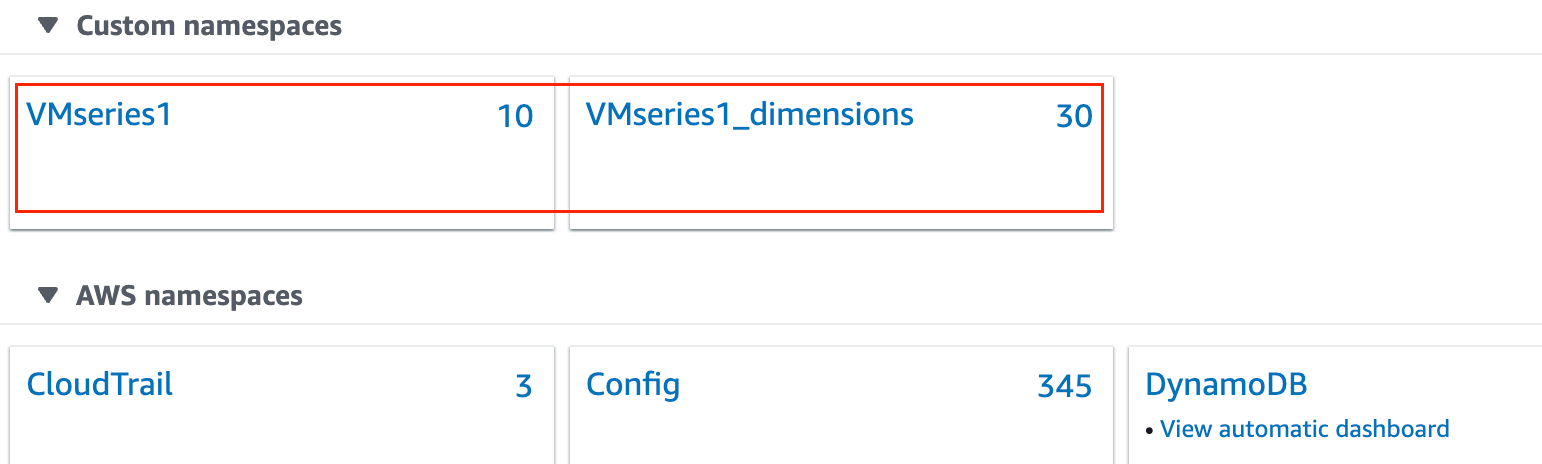
The firewalls use AWS APIs to publish the metric to a namespace, which is the location on AWS where the metrics are collected at a specified time interval. When you configure the firewalls to publish metrics to AWS CloudWatch, there are two namespaces where you can view metrics— the primary namespace collects and aggregates the selected metric for all instances configured to use the namespace, and the secondary namespace that is automatically created with the suffix _dimensions allows you to filter the metrics using the hostname and AWS instance ID metadata (or dimensions) and get visibility into individual VM-Series firewalls.
Launch Template and Auto Scaling Group
An essential component of auto-scaling in AWS is the Launch Template. Think of a launch template as a blueprint for your instances; it outlines all the necessary configurations required to launch an EC2 instance. It includes the AMI, the instance type, a key pair, security groups, and other parameters used to launch EC2 instances.
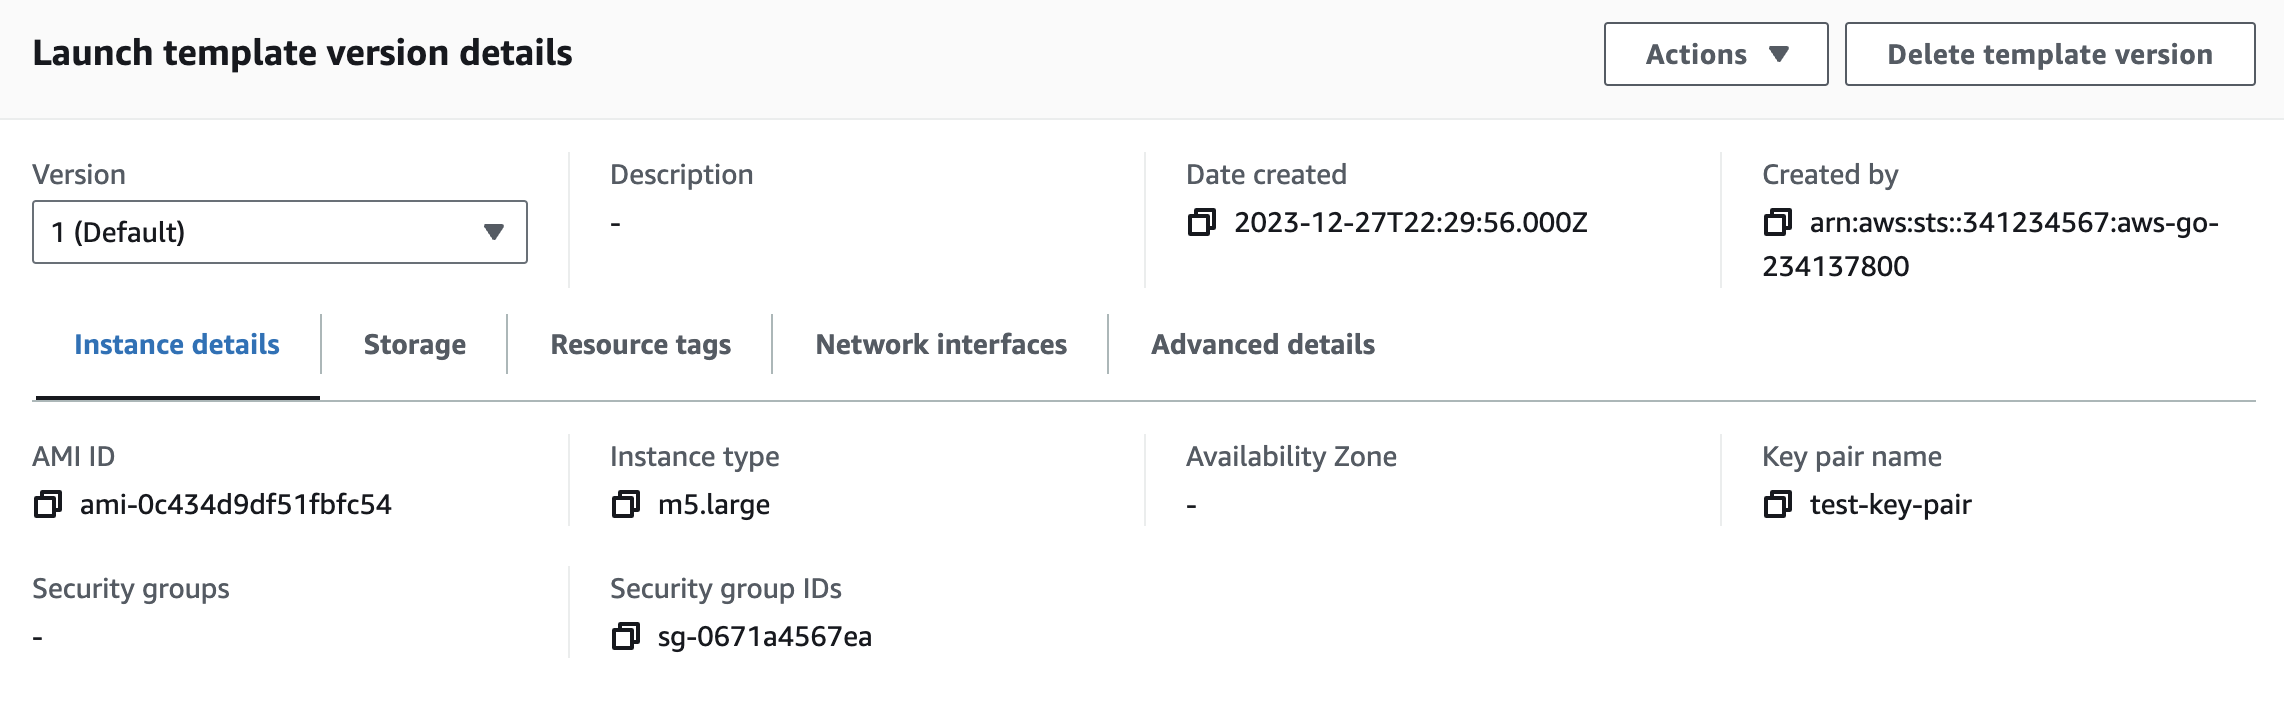

In conjunction with the Launch Template, the Auto Scaling Group (ASG) plays a pivotal role. The ASG uses the specifications laid out in the Launch Template to dynamically manage the number of instances. It automates the scaling process, adding or removing EC2 instances based on predefined rules and conditions, such as changes in demand or workload. The ASG ensures that you have the right number of instances running at all times, balancing performance needs with cost efficiency.
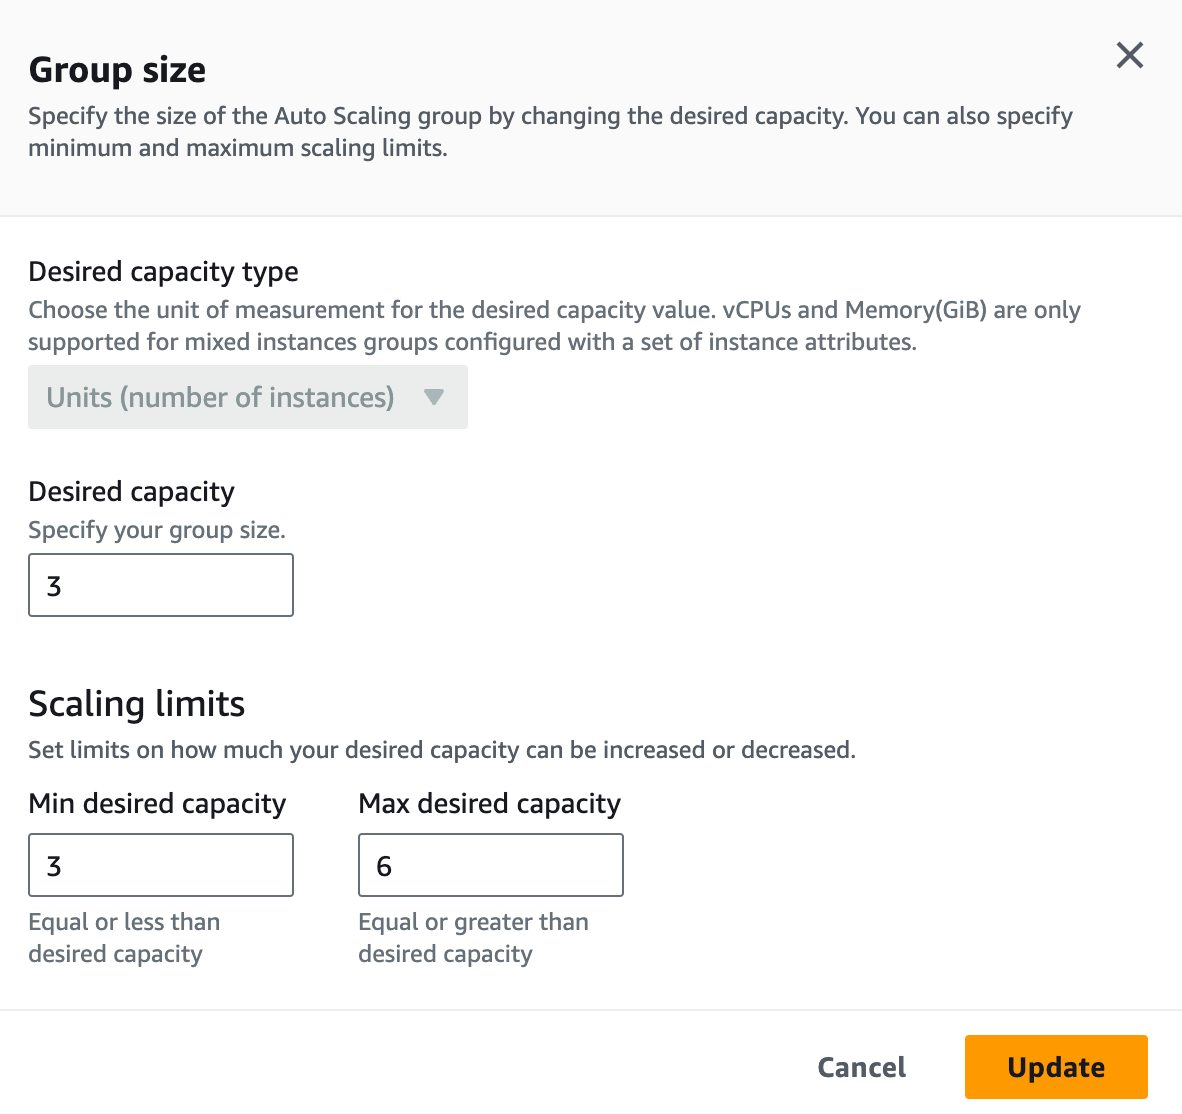
In ASG, you can define the minimum, maximum and desired number of instances to run. For example, you can say that your desired capacity is 3, so the ASG will ensure that we always have 3 instances running during normal operation. The maximum can be set to 6 for example, so the ASG will never launch more than 6 instances regardless of the load. When there is a demand, ASG will launch 3 more instances to meet the workload. Of course, this one can be tweaked to suit our environment.
The instances will be automatically added to the GWLB as the target. So, if you have 3 AZs, then it will launch one instance in each AZ. When there is a demand, one more instance in each AZ.
The Challenge with Multiple ENIs
With ASG, we encounter a specific challenge with Elastic Network Interfaces (ENIs). Currently, AWS Auto Scaling Groups (ASG) support launching instances with ENIs only within the same subnet. However, for Palo Alto firewalls, we need two ENIs on each instance, and these must be in different subnets, one for Data and the other for Management (you need three ENIs if you want to use two-arm design)
So, how do we overcome this issue? This is where Lambda functions come in. By using the AWS boto3 library with Lambda, we can dynamically create and attach the second ENI every time a new instance is launched. This approach allows us to bypass the limitation and ensure that each instance has the necessary ENIs in different subnets, meeting our specific requirements.
- ENI Creation - It creates a new ENI in the management subnet. This ENI is created in the same Availability Zone (AZ) as the data ENI.
- ENI Attachment - As a new instance launches, the function attaches this newly created management ENI to the instance.
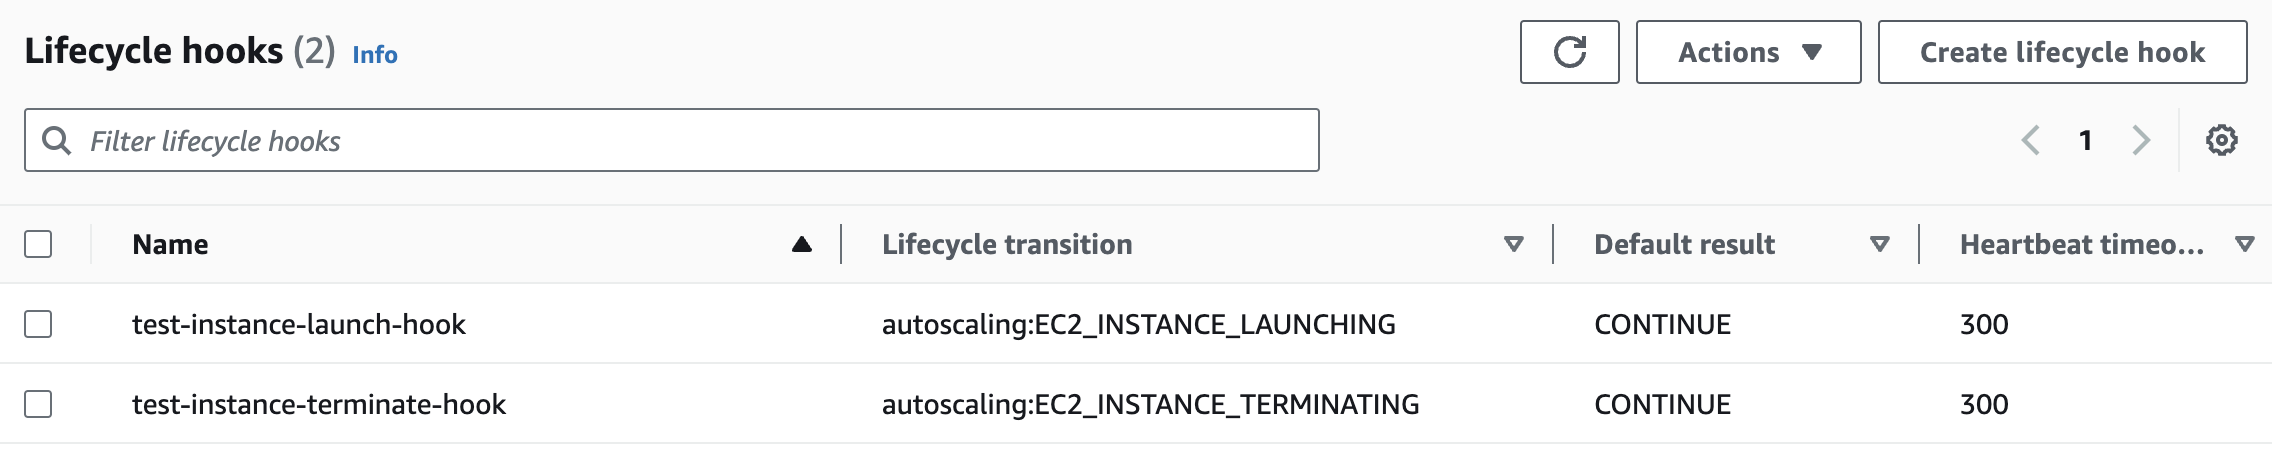
Now, another question arises, how do we ensure this Lambda function triggers precisely when a new instance launches? This is where ASG Lifecycle Hooks come into play. Lifecycle Hooks in ASG provide us with the ability to execute custom actions, like triggering our Lambda function, at specific moments during the instance's launch and termination process. By leveraging these hooks, we can seamlessly integrate our Lambda function to work in tandem with the instance launch, thus solving the ENI challenge.
This approach ensures that every auto-scaled instance of the Palo Alto VM-Series instance is properly configured with two ENIs. Here is a sample Python function that creates the ENI and attaches it to the instance as it launches.
def create_eni(instanceid):
    try:
        ec2_client = boto3.client('ec2', region_name=region)
        response = ec2_client.describe_instances(
            InstanceIds=[instanceid]
        )

        instance_id = response['Reservations'][0]['Instances'][0]['InstanceId']
        instance_zone = response['Reservations'][0]['Instances'][0]['Placement']['AvailabilityZone']
        subnet_id = response['Reservations'][0]['Instances'][0]['SubnetId']
        network_interfaces = response['Reservations'][0]['Instances'][0]['NetworkInterfaces'][0]['NetworkInterfaceId']

        mgmt_subnet_details = dict(zip(availability_zones, management_subnets))
        subnet = mgmt_subnet_details[instance_zone]

        response = ec2_client.describe_subnets(
            Filters=[
                {
                    'Name': 'cidr-block',
                    'Values': [ subnet,]
                },
            ],
        )

        mgmt_subnet_id = response['Subnets'][0]['SubnetId']

        response = ec2_client.create_network_interface(
            Description=f'test-mgmt-eni',
            Groups=[
                mgmt_sg,
            ],
            SubnetId=mgmt_subnet_id,
        )

        mgmt_eni = response['NetworkInterface']['NetworkInterfaceId']
        mgmt_ip = response['NetworkInterface']['PrivateIpAddress']


        response = ec2_client.attach_network_interface(
            NetworkInterfaceId=mgmt_eni,
            InstanceId=instance_id,
            DeviceIndex=1
        )

        eni_results_attachment_id = response['AttachmentId']
        return eni_results_attachment_id
    except Exception as e :
        print(f'Error running code: {str(e)}')
Code Explanation
The create_eni function automates the creation and attachment of a secondary Elastic Network Interface (ENI) for an EC2 instance in AWS. The function takes an instanceid as an input, which is used to identify the EC2 instance that needs the additional ENI.
Upon execution, it retrieves detailed information about the specified instance using ec2_client.describe_instances(). From the response, it extracts the instance's ID, its availability zone, the subnet ID, and the network interface ID.
The function then constructs a mapping of subnets to availability zones. This mapping is crucial as it helps in determining the correct management subnet for the new ENI based on the instance’s availability zone. It queries the available subnets using ec2_client.describe_subnets(), filtering by the CIDR block of the relevant management subnet.
Once the appropriate management subnet ID is identified, the function proceeds to create a new network interface in this subnet using ec2_client.create_network_interface(). This new ENI is configured with a description and associated with the relevant security group.
Following the creation of the new ENI, the function attaches it to the specified instance. It does this by calling ec2_client.attach_network_interface(), specifying the newly created ENI ID, the instance ID, and the device index. The device index is crucial as it specifies the order in which the network interfaces are attached to the instance.
Finally, the function captures the attachment ID from the response, which serves as a confirmation of the successful attachment of the ENI to the instance. In case of any exceptions during the process, these are caught and printed out, making it easier to debug issues.
The script starts by establishing a connection to the EC2 client using boto3, specifying the AWS region. It then retrieves details of a specified instance, such as its ID, availability zone, and associated subnet ID. The script maps management subnets to availability zones, ensuring that the new management ENI is created in the correct subnet corresponding to the instance's availability zone.
The create_network_interface method is called to create a new management ENI, with appropriate security group settings and in the correct management subnet. This new ENI is attached to the specified instance using the attach_network_interface method, which returns an attachment ID indicating successful attachment.
Event Bridge Rules
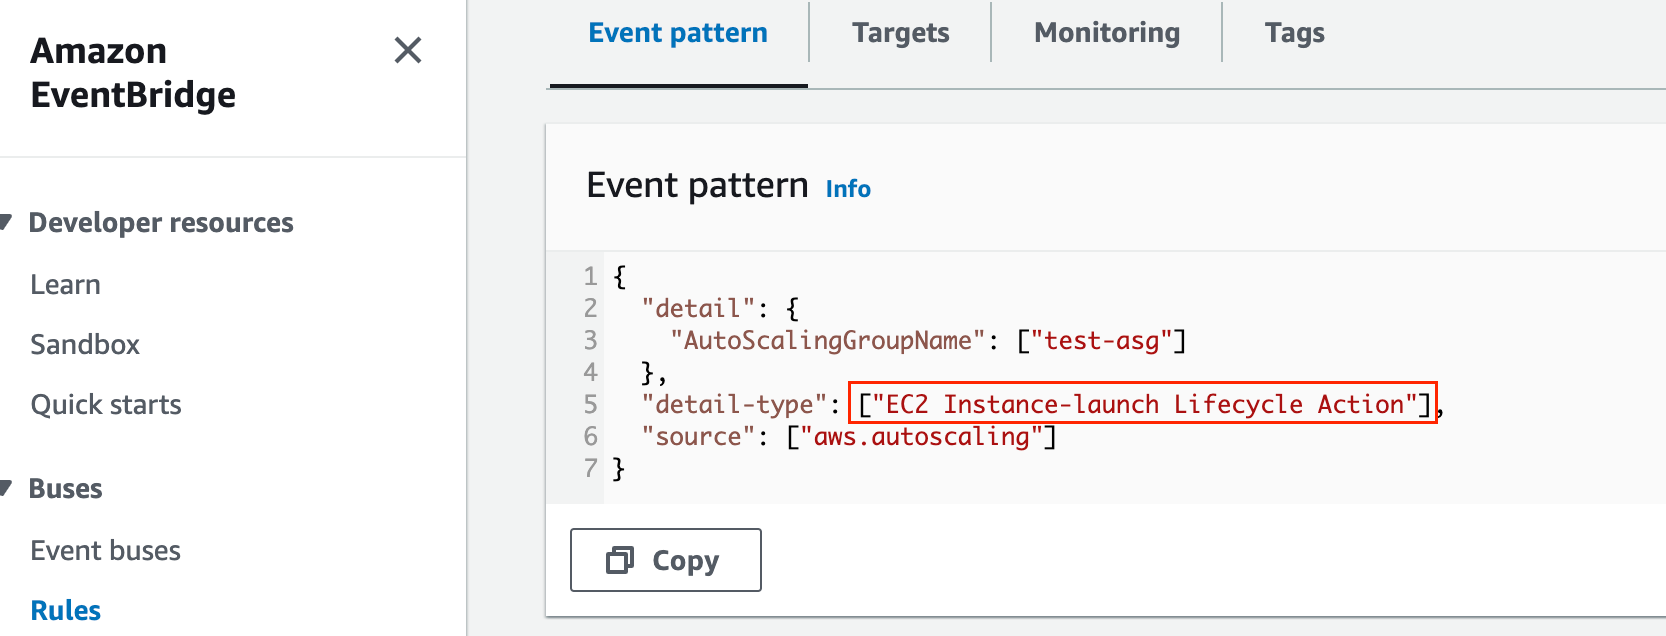
Please note that the lifecycle hook can’t invoke the lambda function directly, this needs to happen via event bridge rules. When you create an Amazon EventBridge rule that includes a filter pattern that when matched, invokes an AWS Lambda function as the rule target.
The Lambda function also performs a callback to let the lifecycle of the instance to proceed (launch or termination). In summary, the event bridge rule looks for a specific pattern and if it finds that pattern, it will invoke the lambda function. Here is the example of the EC2 Instance-launch Lifecycle Action event bridge rule.
Target Tracking Scaling Policy
A target-tracking scaling policy automatically scales the capacity of your Auto Scaling group based on a target metric value. With target tracking, you select a metric and a target value to represent the ideal average utilization. ASG automatically creates and manages the CloudWatch alarms that trigger scaling events when the metric deviates from the target.
Palo Alto recommends configuring an alarm for when the session utilization metric is greater than 60% for 15 minutes. Conversely, if Session Utilization is less than 50% for 30 minutes, terminate the instances of the VM-Series firewalls.
Please note that by default Target tracking scaling works with CPU utilization, network in/out traffic, the request count to an Application Load Balancer target group, and custom metrics. To use custom metrics, you must create your scaling policy from the AWS CLI or an SDK. So, you can't configure and use custom metrics via the web GUI. For this example, I'm going to use Terraform.
resource "aws_autoscaling_policy" "test" {
  autoscaling_group_name = aws_autoscaling_group.asg.name
  name                   = "test-scaling-policy"
  policy_type            = "TargetTrackingScaling"
  target_tracking_configuration {
    target_value = 60
    customized_metric_specification {
      metrics {
        label = "test-label"
        id    = "a1"
        metric_stat {
          metric {
            namespace   = "VMseries1"
            metric_name = "DataPlaneCPUUtilizationPct"
          }
          stat = "Average"
        }
      }
    }
  }
}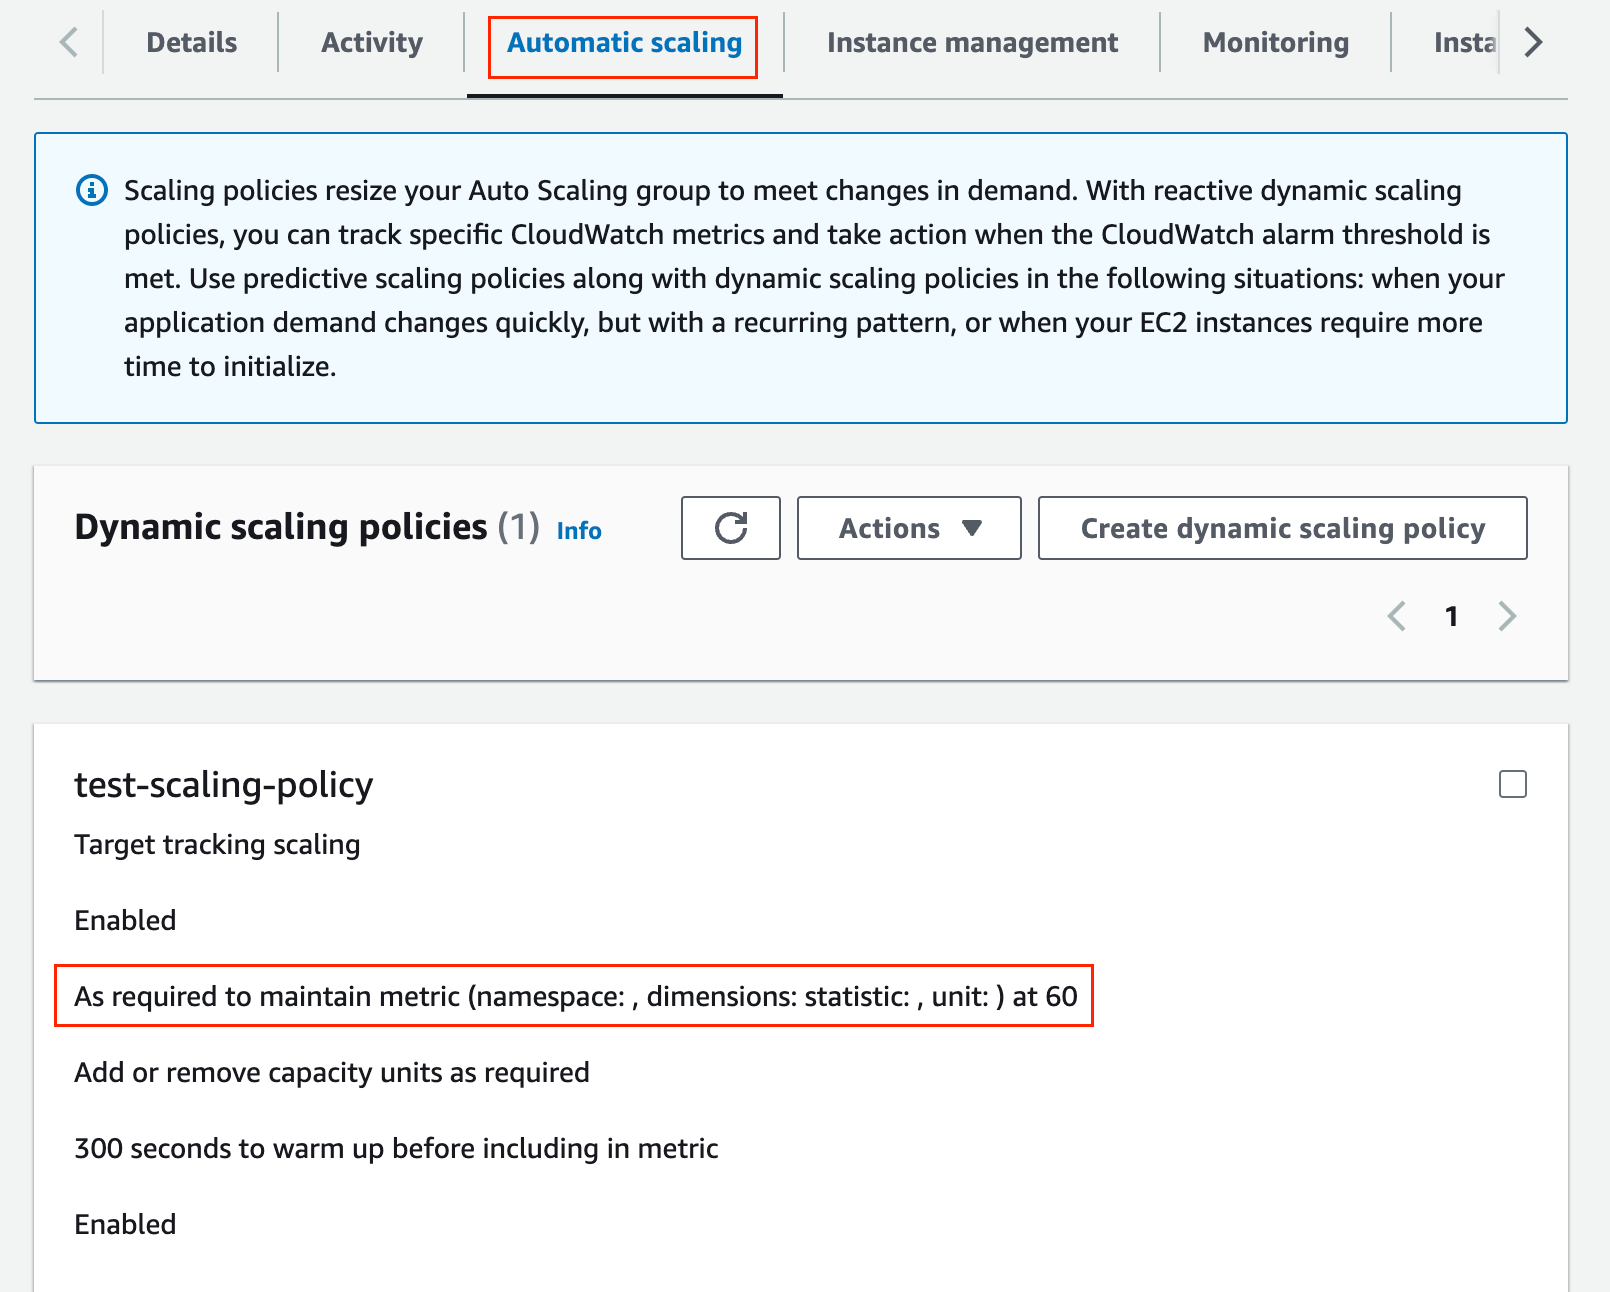
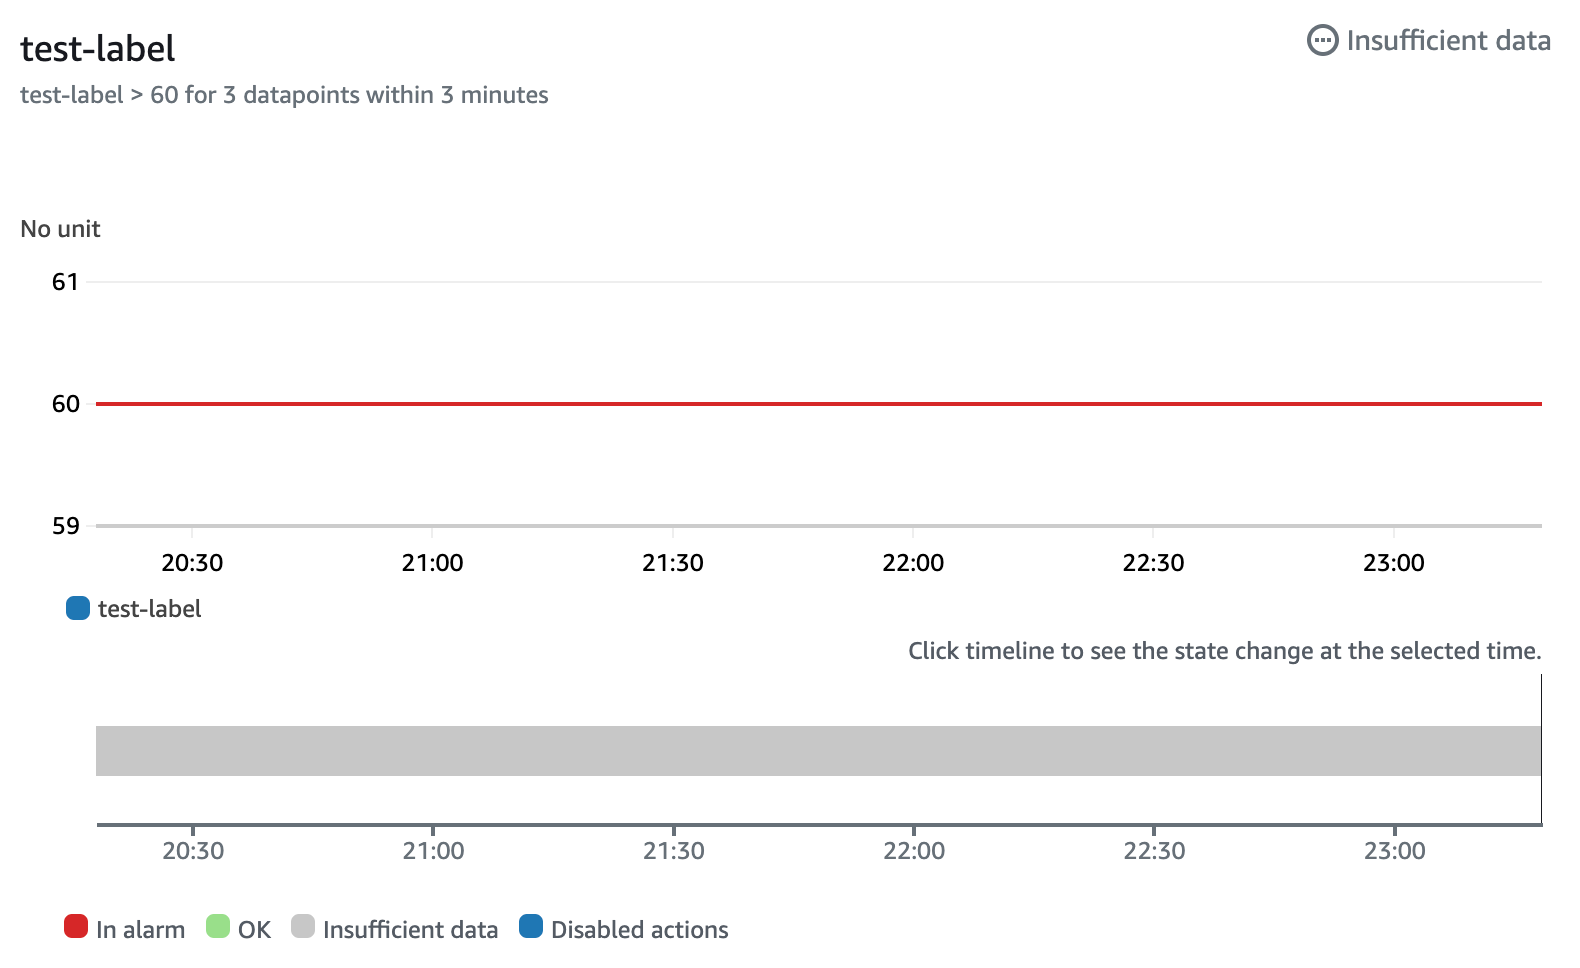
So, to summarize, if the average data plane CPU of the firewalls go above 60%, the ASG will scale out and launch three more firewalls.
Scale-In (Terminating the Firewalls)
When the demand goes down, the ASG will start terminating the firewalls. It first goes through the connection-draining process. During connection draining, the GWLB will not send any new traffic to the instances. Once the draining completes, the ASG will trigger the terminate lifecycle hook. The process is slightly different during the scale-in process. Not only do we need to detach the secondary ENI but also need to unmanage the firewalls from Panorama and deregister the licenses. again, the lifecycle hook will trigger the lambda function that executes a Python script.
from panos.firewall import Firewall
from panos.panorama import Panorama
import xml.etree.ElementTree as ET
from xml.dom import minidom

def unamanage_firewalls(mgmt_ip):
    username, password = 'admin', 'admin'
    panorama_ip = '10.1.1.1'

    #Firewalls
    fw = Firewall(mgmt_ip, username, password )
    print(f"Connected to {mgmt_ip} deleting license")

    key = 'my_api_key'
    fw.op(f'request license api-key set key "{key}"', xml=True)
    fw.op('request license deactivate VM-Capacity mode "auto"', xml=True)

    #Panorama
    pano = Panorama(panorama_ip, username, password)

    print('Get serial numbers')
    response = pano.op('show devices all')
    response_xml_str = ET.tostring(response, encoding='unicode')
    pretty_xml_as_string = minidom.parseString(response_xml_str).toprettyxml(indent="   ")
    root = ET.fromstring(pretty_xml_as_string)

    for entry in root.findall('.//devices/entry'):
        ip_address = entry.find('ip-address').text
        serial = entry.find('serial').text
        if ip_address == mgmt_ip:
            print("Delete the device from the Template-Stack")
            config_xpath = f"/config/devices/entry[@name='localhost.localdomain']/template-stack/entry[@name='test_tp_stack']/devices/entry[@name='{serial}']"
            response = pano.xapi.delete(xpath=config_xpath)
            response_xml_str = ET.tostring(response, encoding='unicode')
            print(response_xml_str)

            print("Delete the device from the Device-Group")
            config_xpath = f"/config/devices/entry[@name='localhost.localdomain']/device-group/entry[@name='test_dg']/devices/entry[@name='{serial}']"
            response = pano.xapi.delete(xpath=config_xpath)
            response_xml_str = ET.tostring(response, encoding='unicode')
            print(response_xml_str)

            print("Delete the device from the Log Collector Group")
            config_xpath = f"/config/devices/entry[@name='localhost.localdomain']/log-collector-group/entry[@name='default']/logfwd-setting/devices/entry[@name='{serial}']"
            response = pano.xapi.delete(xpath=config_xpath)
            response_xml_str = ET.tostring(response, encoding='unicode')
            print(response_xml_str)

            print("Delete the managed device")
            config_xpath = f"/config/mgt-config/devices/entry[@name='{serial}']"
            response = pano.xapi.delete(xpath=config_xpath)
            response_xml_str = ET.tostring(response, encoding='unicode')
            print(response_xml_str)
Code Explanation
The function begins by defining the credentials (username and password) for accessing the firewalls and Panorama, along with the IP address of the Panorama instance (panorama_ip). It is set to connect to each firewall instance using its management IP address (mgmt_ip), which is passed as an argument to the function.
After establishing a connection to a firewall instance (fw) using the Firewall class from the panos.firewall module, the function performs two main operations on the firewall.
- API Key Setting and License Deactivation - The function sets an API key for the firewall and then sends an operational command to deactivate the firewall's license.
- Panorama Management - The function then connects to Panorama using the
Panoramaclass. It retrieves a list of all devices managed by Panorama and processes this list to find the specific firewall instance being unmanaged. The processing involves parsing the XML response, which contains details of all devices.
For the firewall instance that matches the mgmt_ip, the function performs several steps to completely remove the instance from Panorama management
- It deletes the firewall from the template stack configuration.
- It removes the firewall from the device group.
- It deletes the firewall from the log collector group.
- Finally, it removes the managed device entry from Panorama.
First, the firewall runs two commands, one is to set the Customer Support Portal API key and the second is to deactivate the license. Once this is completed, we login into the Panorama, get all the serial numbers from the device group and then remove the serial number associated with the instance that is being terminated. The serial number is removed from Template, Device Group, Log Groups and finally removed as a managed device from Panorama.
import boto3
import time

def remove_eni(instanceid):
    ec2_client = boto3.client('ec2', region_name='eu-west-1')
    response = ec2_client.describe_instances(
        InstanceIds=[instanceid]
    )

    for i in response['Reservations'][0]['Instances'][0]['NetworkInterfaces']:
        if i['Attachment']['DeviceIndex'] == 1 and 'mgmt' in i['Description']:
            attachment_id = i['Attachment']['AttachmentId']
            eni_id = i['NetworkInterfaceId']
            mgmt_ip = i['PrivateIpAddress']
            print(f"ENI to remove - {eni_id}:{mgmt_ip}")

            response_detach = ec2_client.detach_network_interface(
                AttachmentId=attachment_id
            )

            print(f"Detachment - {response_detach}")
            if response_detach['ResponseMetadata']['HTTPStatusCode'] == 200:
                time.sleep(30)
                response_remove_eni = ec2_client.delete_network_interface(
                    NetworkInterfaceId=eni_id
                )
                print(f"{response_remove_eni}")
Code Explanation
The function starts by setting up a connection to the AWS EC2 service using the boto3 library.
The function then retrieves information about the specified EC2 instance using its instance ID (instanceid). It goes through the network interfaces of the instance, looking for the ENI that is used as a management interface. This is identified by checking two conditions.
- The
DeviceIndexis 1, indicating it's the secondary interface (as the primary interface typically has a device index of 0). - The description of the ENI contains 'mgmt', which is a part of the naming convention used for management interfaces.
Once the correct management ENI is identified, the function proceeds to detach it from the EC2 instance. It uses the detach_network_interface method of the boto3 EC2 client, passing the attachment ID of the ENI. The function then waits for 30 seconds to ensure that the detachment process is complete.
After the waiting period, the function deletes the detached ENI using the delete_network_interface method, effectively cleaning up the management interface.
Finally, detach the ENI from the instance, wait for 30 seconds and then remove the ENI. The reason for sleeping 30 seconds is that it takes a while for the detachment to complete.
Closing Thoughts
I hope this guide on auto-scaling Palo Alto VM-Series Firewalls in AWS has been clear and helpful. If you're feeling a bit overwhelmed or confused, don't worry – it's completely normal. I remember feeling just as confused when I first started exploring this topic. These services can be complex, and it often takes some time to fully grasp how they all work together.
If you have any questions or need further clarification on any part of the process, please don't hesitate to drop a comment below. I'm here to help and would love to hear from you. Your feedback and queries are invaluable in making these discussions more informative and engaging for everyone.
References
https://docs.aws.amazon.com/autoscaling/ec2/userguide/as-scaling-target-tracking.html


