In this blog post, we will explore how InfraHub integrates with Jinja2 and Nornir to simplify network automation workflows. To demonstrate, we'll add two Arista devices to InfraHub, treating them as basic access switches. We'll then input the necessary details for these devices to generate configurations. We'll focus on creating a VLAN and some interface configurations to keep it simple.
OpsMill has partnered with me for this post, and they also support my blog as a sponsor. The post is originally published under https://opsmill.com/blog/simplifying-network-automation-workflows-with-infrahub-nornir-and-jinja2/
For each device, we'll assign a primary IP (used for SSH), configure a few interfaces with descriptions, and specify an untagged VLAN for each interface. Additionally, we'll define these VLANs globally in InfraHub (not tied to any specific device). A Jinja2 template will then use this information to generate configurations for each device. Finally, we'll use the nornir-infrahub plugin as the inventory source and Napalm to push the generated configurations to each device.
Prerequisites
This blog post assumes you are somewhat familiar with Git and Docker. If you’re new to InfraHub, don’t worry, you should still be able to follow along. Make sure Git and Docker are installed on your local machine before getting started.
You’ll also need the following tools as we proceed.
- Infrahub - Of course, you need an Infrahub instance to follow along.
- Infrahubctl - This is the CLI tool used to interact with InfraHub.
- InfraHub Python SDK - This is required for programmatically creating and managing data in InfraHub.
Let’s install them using pip. To keep your environment clean, create a Python virtual environment to isolate the packages.
python -m venv venv
source venv/bin/activate
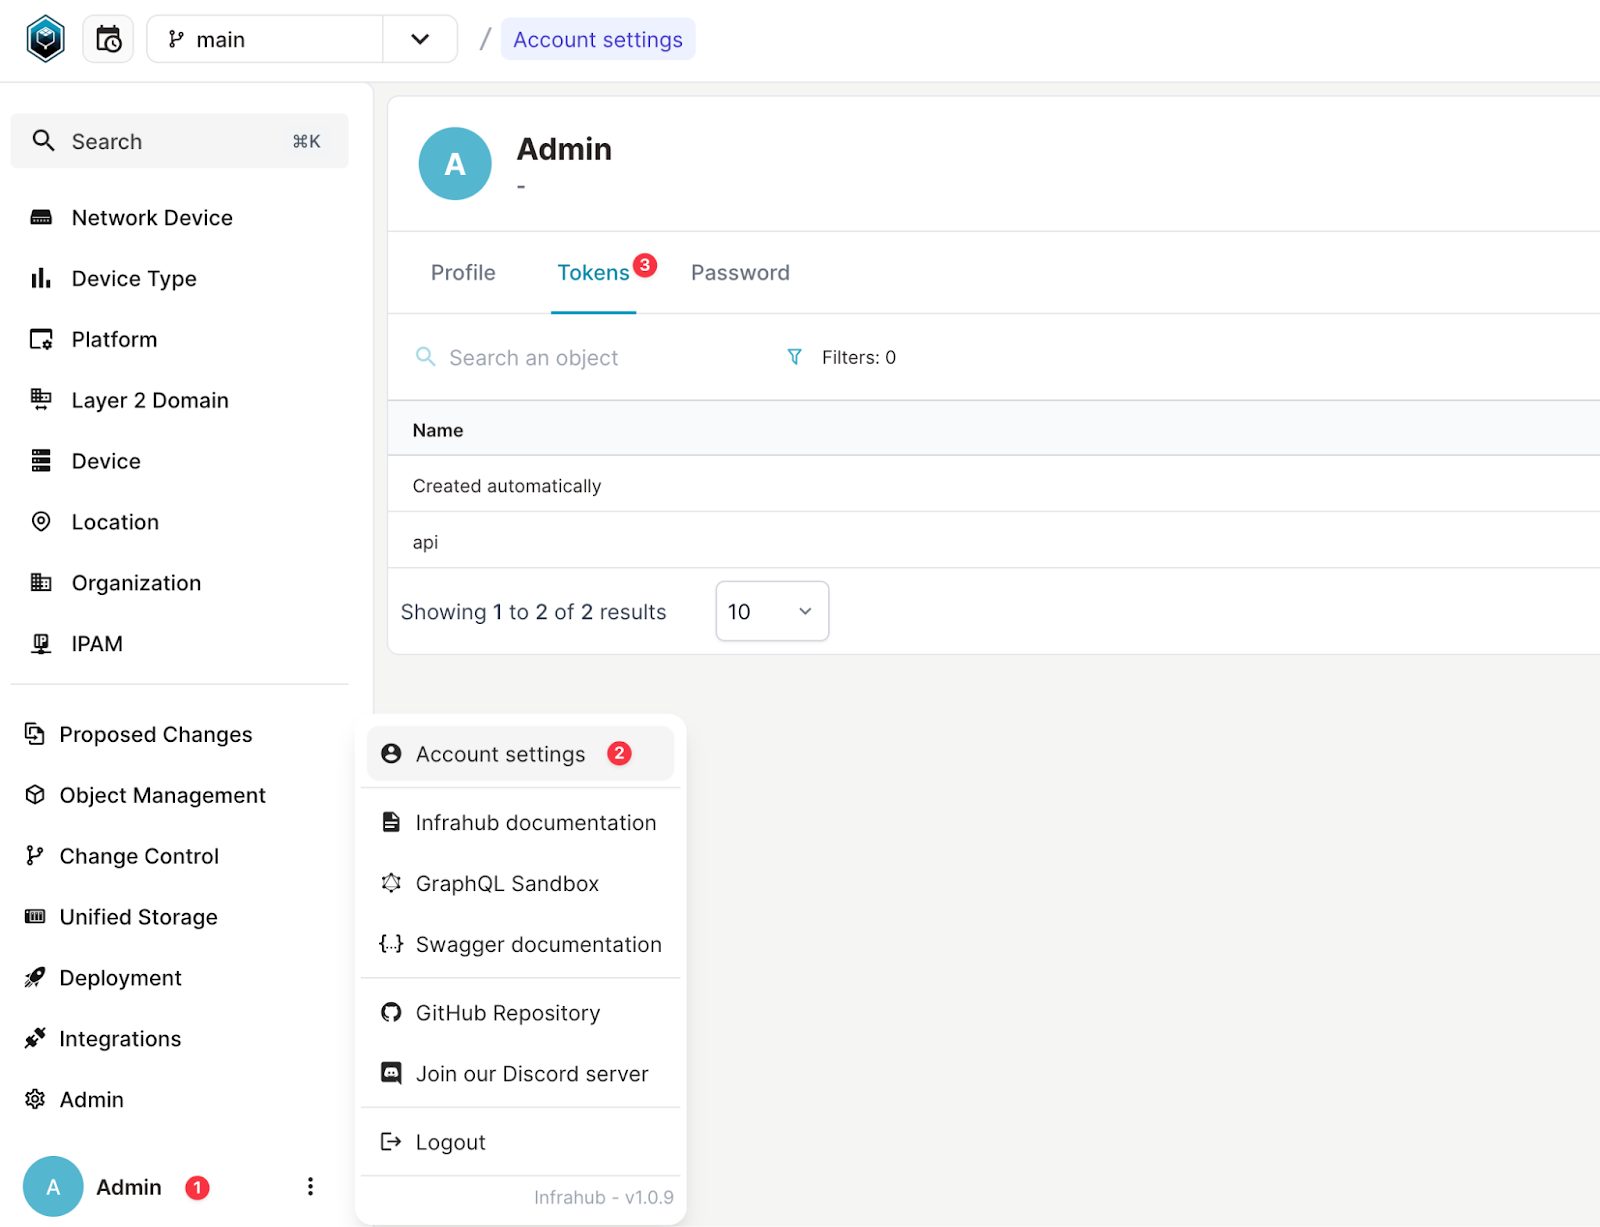
pip install 'infrahub-sdk[ctl]'Lastly, you’ll need to set an environment variable for the API key/token. Generate a token in InfraHub as shown in the screenshot and export it as an environment variable.
export INFRAHUB_API_TOKEN="1803a5a3-8cf7-ec6b-35cb-c51a83c2a410"This blog post is based on InfrahHub v1.0.9 and uses the following schemas from the Schema Library.
- schema-library/base/
- schema-library/extensions/vlan/
- schema-library/extensions/location_minimal/
To import the schemas into your Infrahub instance, first clone the schema-library GitHub repo.
git clone https://github.com/opsmill/schema-library.gitNext, import the schemas using infrahubctl CLI tool.
infrahubctl schema load /schema-library/base/
infrahubctl schema load /schema-library/extensions/vlan/
infrahubctl schema load /schema-library/extensions/location_minimal/
That’s it! With these steps completed, we should have everything set up and ready to move forward. If you want to learn more about Infrahub Schema Library, please check out my other blog post linked below.

The Components Needed
To get started with the example, let’s create some data in InfraHub. To keep it simple, we’ll focus on creating IP addresses, VLANs, devices, and interfaces. You can add this data in several ways, including the web GUI, GraphQL queries, or the Python SDK. Let’s start by creating a location and three VLANs in Infrahub, each with an ID and a name using the web GUI.
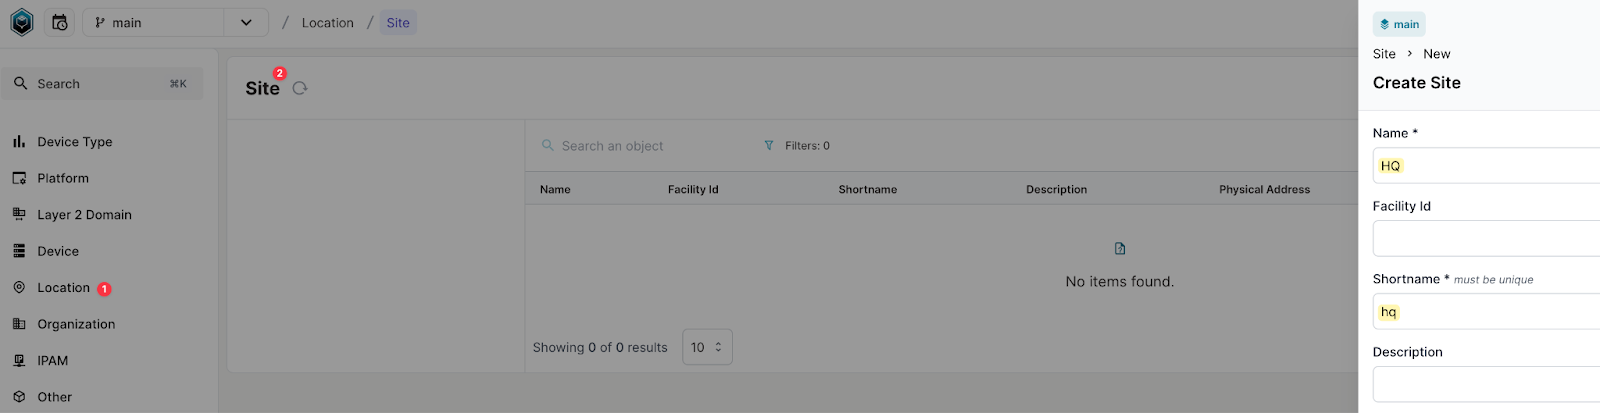
First, create a location by navigating to the Location > Site and create a Site called ‘HQ’
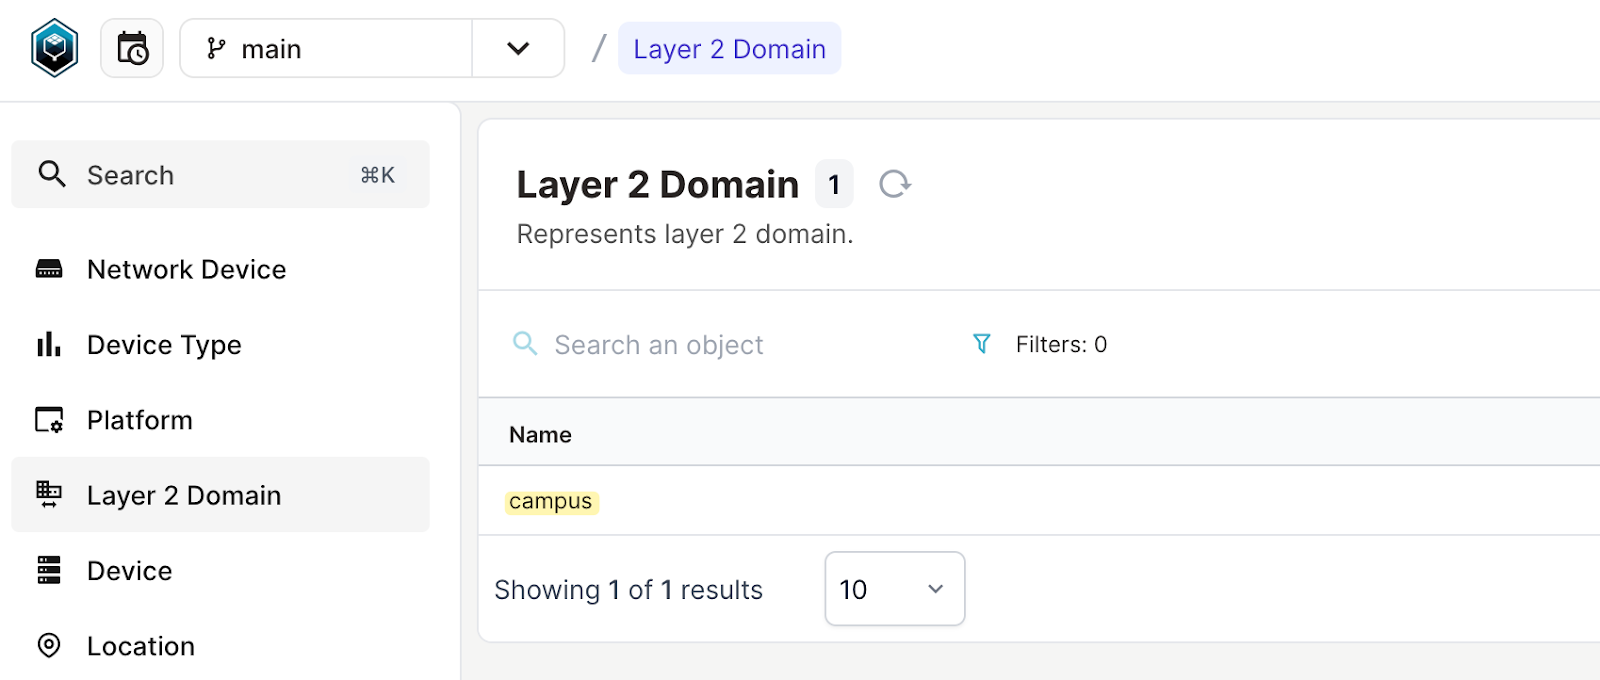
Next, navigate to Layer 2 Domain and create a domain called ‘campus’.
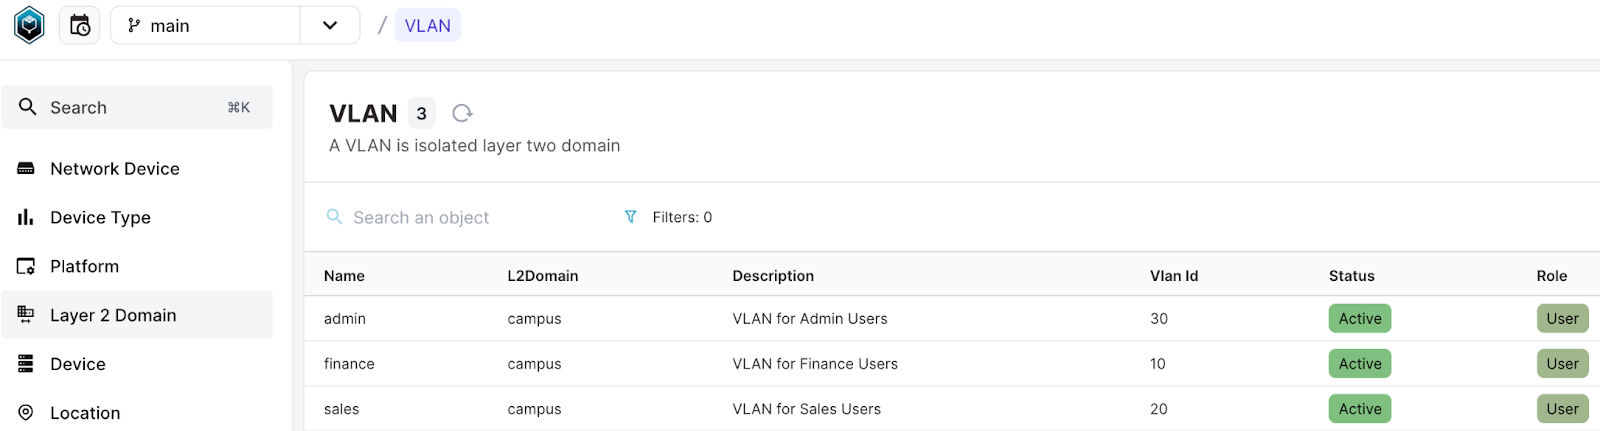
Next, create the following three VLANs by navigating to Layer 2 Domain > VLAN in Infrahub. Here, you can input the VLAN ID, name, domain (select the domain you created earlier), and status.
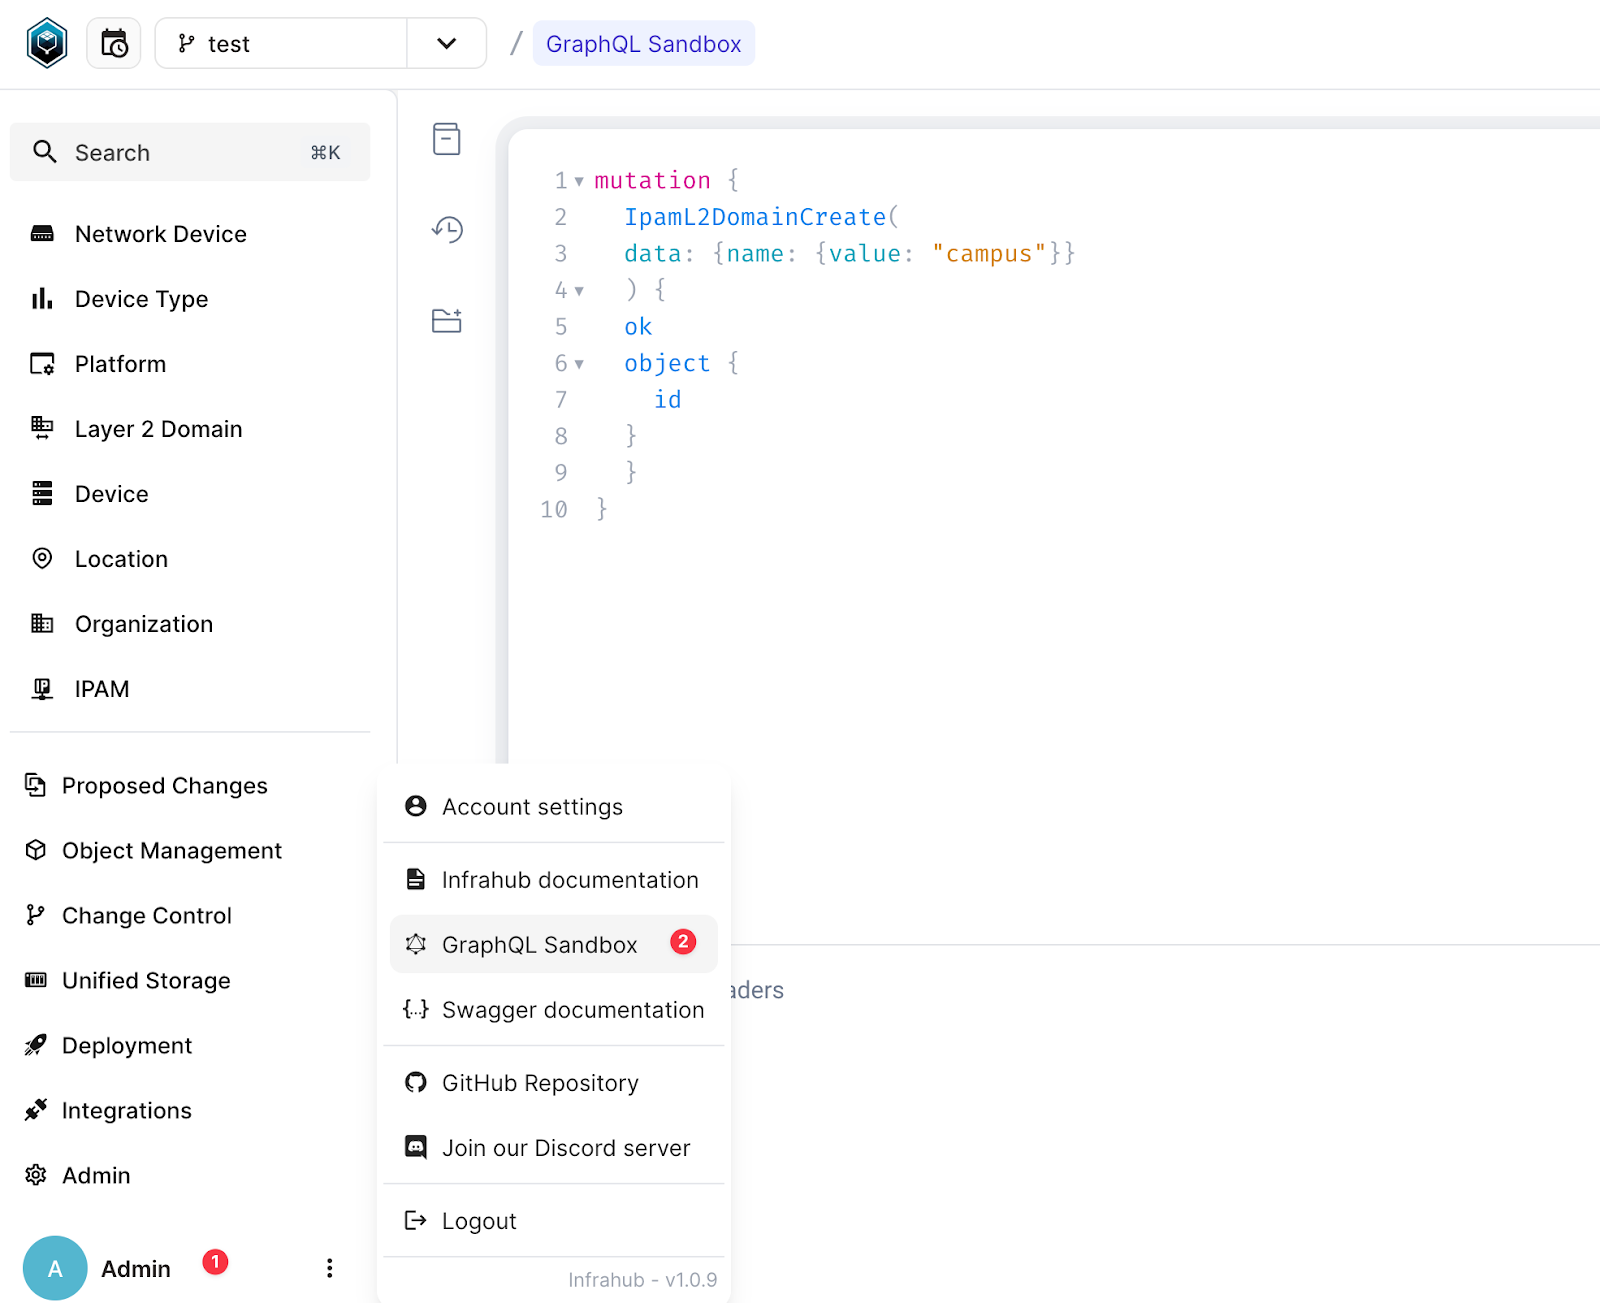
If you prefer to create them using GraphQL queries, feel free to do so. Below is an example of the query for creating Layer 2 Domain and VLANs using GraphQL. You can access the GraphQL sandbox by navigating to Admin > GraphQL Sandbox
mutation {
  LocationSiteCreate(
	data: {name: {value: "HQ"}, shortname:{value: "hq"}}
  ) {
	ok
	object {
  	id
	}
  }
}
mutation {
IpamL2DomainCreate(
data: {name: {value: "campus"}}
) {
ok
object {
id
}
}
}mutation {
vlan10: IpamVLANCreate(
data: {
vlan_id: {value: 10},
status: {value: "active"},
name: {value: "finance"},
l2domain: {hfid: "campus"},
description: {value: "VLAN for Finance Users"},
role: {value: "user"}
}
) {
ok
object {
id
}
}
vlan20: IpamVLANCreate(
data: {
vlan_id: {value: 20},
status: {value: "active"},
name: {value: "sales"},
l2domain: {hfid: "campus"},
description: {value: "VLAN for Sales Users"},
role: {value: "user"}
}
) {
ok
object {
id
}
}
vlan30: IpamVLANCreate(
data: {
vlan_id: {value: 30},
status: {value: "active"},
name: {value: "admin"},
l2domain: {hfid: "campus"},
description: {value: "VLAN for Admin Users"},
role: {value: "user"}
}
) {
ok
object {
id
}
}
}Next, we'll add two devices to Infrahub, named access-01 and access-02, and assign a primary IP to each device. Like any other device in Infrahub, these can be associated with a specific location, status, device type, platform, and more.
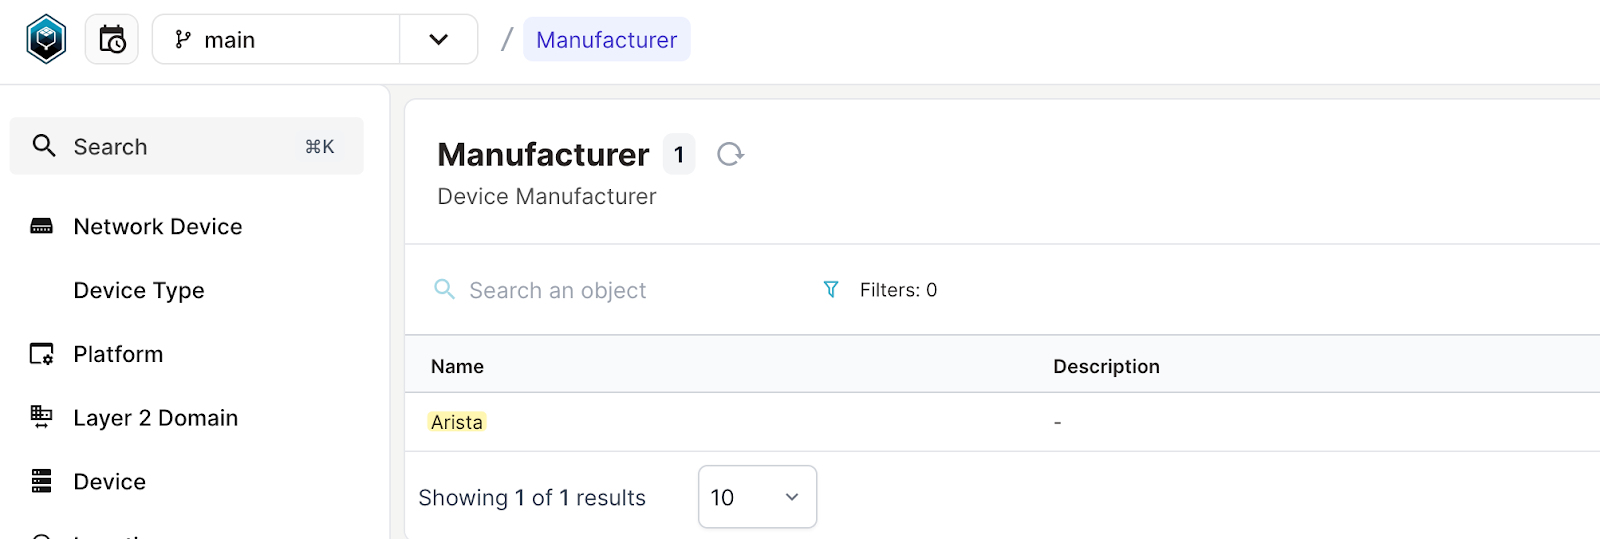
Before creating the devices, let's first create the Manufacturer, Device Type, Platform and IP address. For the platform, we'll specify eos as the Napalm driver. This will be used later in the blog post to demonstrate its significance and how it integrates with the workflow.
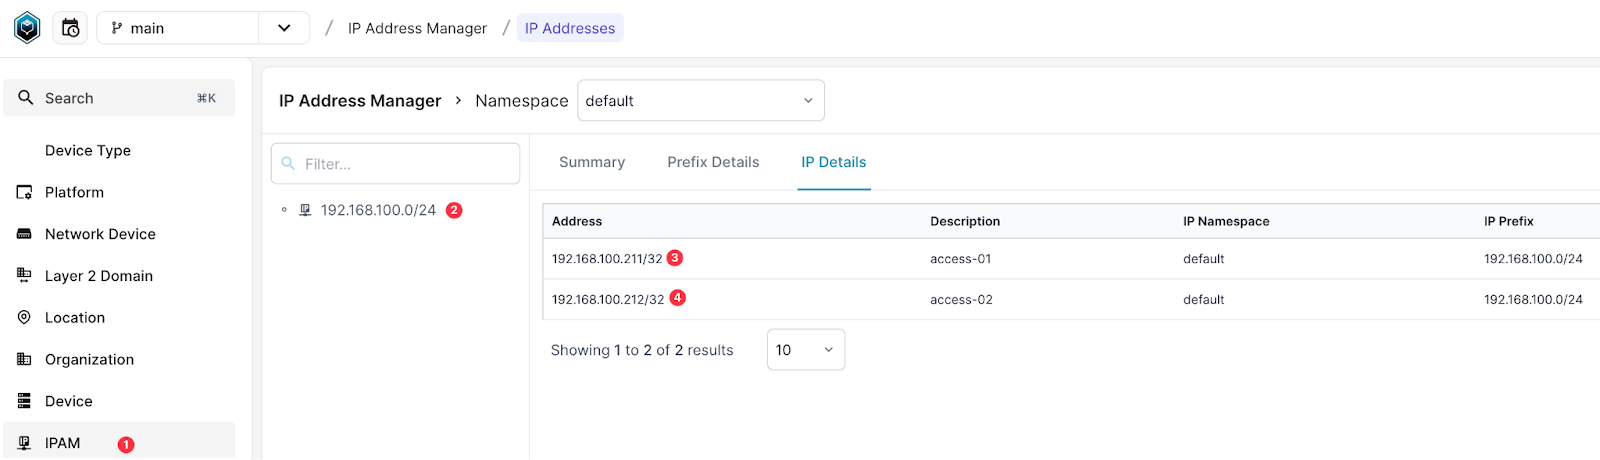
For creating IP addresses, first, navigate to IPAM > IP Prefixes and create a prefix with the 192.168.100.0/24 subnet. Once the prefix is created, go to IPAM > IP Addresses and add two IP addresses for our devices.
If you prefer to create them using GraphQL, here are the queries.
mutation {
OrganizationManufacturerCreate(
data: {name: {value: "Arista"}}
) {
ok
object {
id
}
}
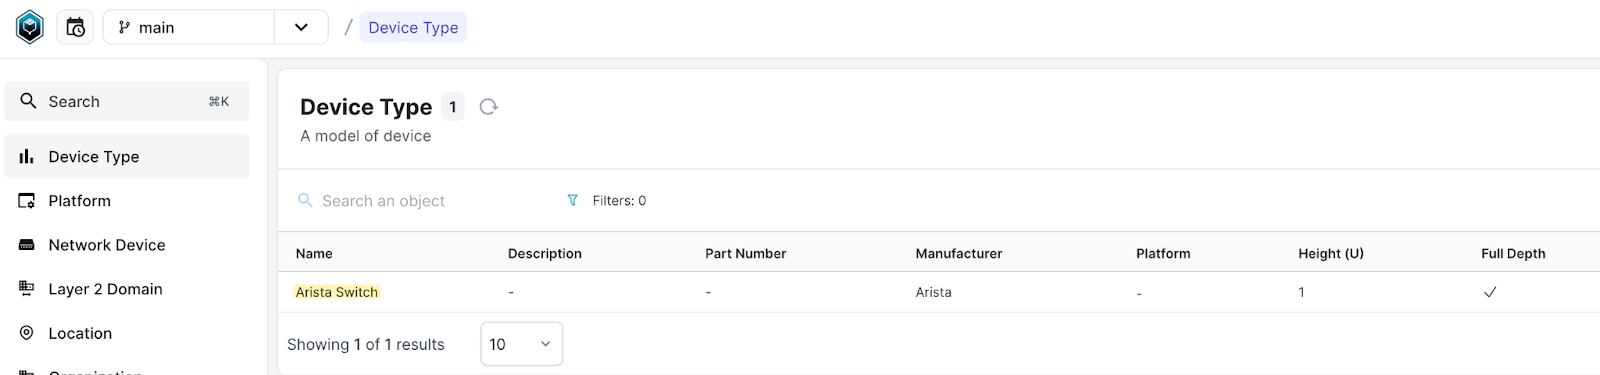
}mutation {
DcimDeviceTypeCreate(
data: {name: {value: "Arista Switch"}, manufacturer: {hfid: "Arista"}}
) {
ok
object {
id
}
}
}mutation {
DcimPlatformCreate(
data: {name: {value: "eos"}, napalm_driver: {value: "eos"}}
) {
ok
object {
id
}
}
}mutation {
IpamPrefixCreate(
data: {status: {value: "active"}, prefix: {value: "192.168.100.0/24"}, member_type: {value: "address"}}
) {
ok
object {
id
}
}
}mutation {
ip_211: IpamIPAddressCreate(
data: {
description: {value: "access-01"},
address: {value: "192.168.100.211/32"}
}
) {
ok
object {
id
}
}
ip_212: IpamIPAddressCreate(
data: {
description: {value: "access-02"},
address: {value: "192.168.100.212/32"}
}
) {
ok
object {
id
}
}
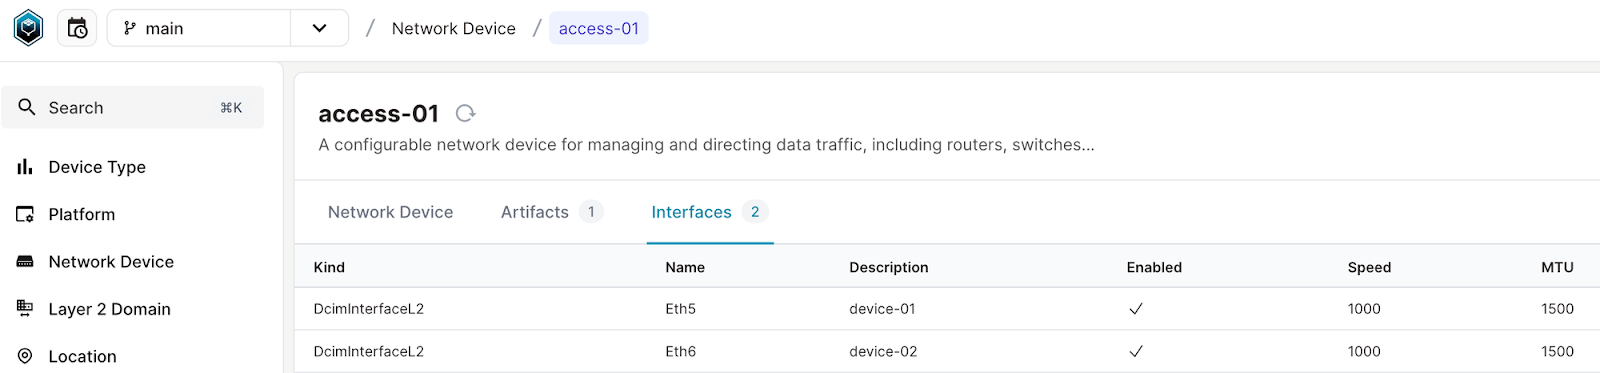
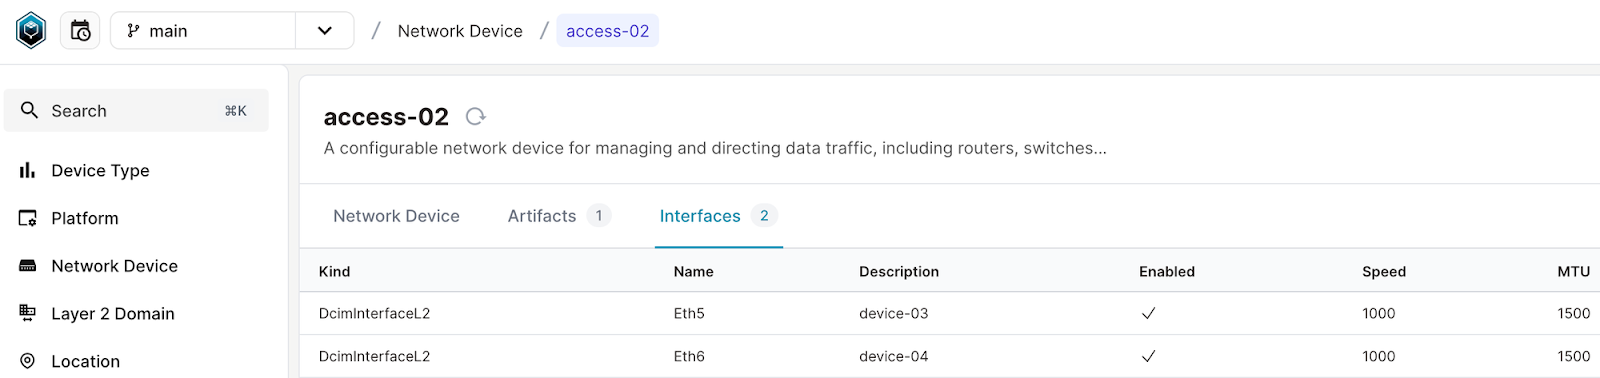
}Finally, let’s create the two devices and add two interfaces for each device. Each device will be associated with the IP address we created earlier. This IP address will serve as the primary IP for the device and will be used for SSH to manage the device. When we use Nornir, this is the IP address it will rely on to connect to the device.
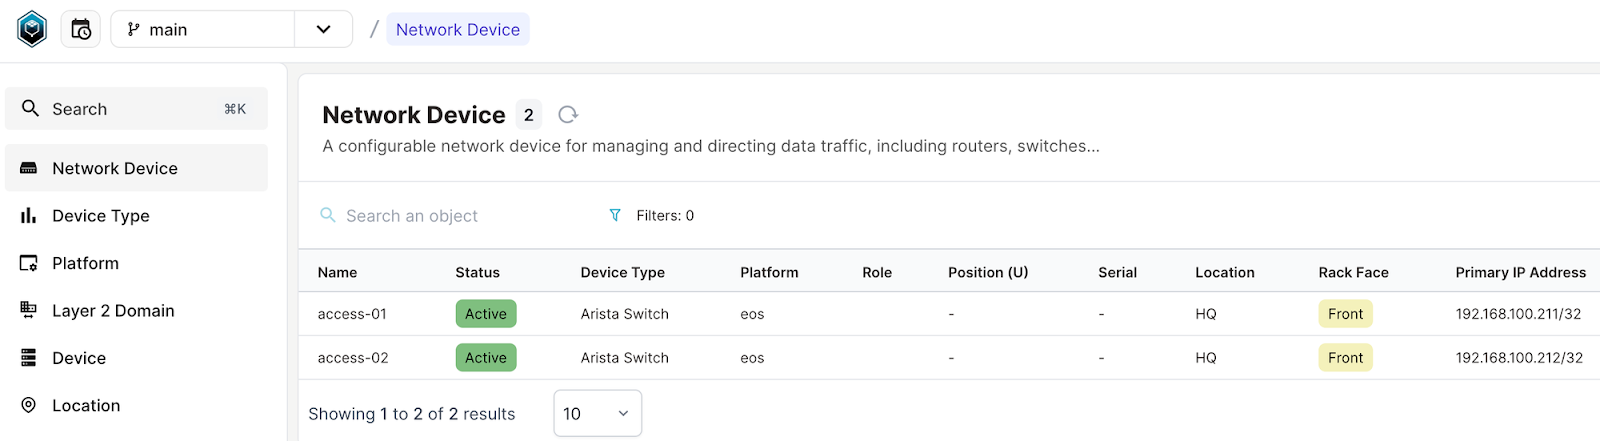
mutation {
  access_01: DcimDeviceCreate(
    data: {
      name: {value: "access-01"},
      platform: {hfid: "eos"},
      location: {id: "18178eec-8379-21fd-311d-c51b6d37a6bf"},
      device_type: {hfid: "Arista Switch"},
      status: {value: "active"},
      primary_address: {id: "181832cf-12e5-55de-311e-c516b3a8b16c"}
    }
  ) {
    ok
    object {
      id
    }
  }
  access_02: DcimDeviceCreate(
    data: {
      name: {value: "access-02"},
      platform: {hfid: "eos"},
      location: {id: "18178eec-8379-21fd-311d-c51b6d37a6bf"},
      device_type: {hfid: "Arista Switch"},
      status: {value: "active"},
      primary_address: {id: "181832cf-411c-4dae-3111-c515154e7409"}
    }
  ) {
    ok
    object {
      id
    }
  }
}We will then add a couple of interfaces to each device, including details like descriptions, status, and associated VLANs.
mutation {
  access_01_eth5: DcimInterfaceL2Create(
    data: {
      name: {value: "eth5"},
      description: {value: "device-01"},
      enabled: {value: true},
      device: {hfid: "access-01"},
      untagged_vlan: {hfid: "finance"},
      speed: {value: 1000},
      l2_mode: {value: "Access"},
      status: {value: "active"}
    }
  ) {
    ok
    object {
      id
    }
  }
  access_01_eth6: DcimInterfaceL2Create(
    data: {
      name: {value: "eth6"},
      description: {value: "device-02"},
      enabled: {value: true},
      device: {hfid: "access-01"},
      untagged_vlan: {hfid: "admin"},
      speed: {value: 1000},
      l2_mode: {value: "Access"},
      status: {value: "active"}
    }
  ) {
    ok
    object {
      id
    }
  }
  access_02_eth5: DcimInterfaceL2Create(
    data: {
      name: {value: "eth5"},
      description: {value: "device-03"},
      enabled: {value: true},
      device: {hfid: "access-02"},
      untagged_vlan: {hfid: "sales"},
      speed: {value: 1000},
      l2_mode: {value: "Access"},
      status: {value: "active"}
    }
  ) {
    ok
    object {
      id
    }
  }
  access_02_eth6: DcimInterfaceL2Create(
    data: {
      name: {value: "eth6"},
      description: {value: "device-04"},
      enabled: {value: true},
      device: {hfid: "access-02"},
      untagged_vlan: {hfid: "admin"},
      speed: {value: 1000},
      l2_mode: {value: "Access"},
      status: {value: "active"}
    }
  ) {
    ok
    object {
      id
    }
  }
}
Once we have all the data in place, the next step is to use it to generate device configurations. If you're familiar with any form of network automation, you likely know that Jinja2 is one of the best tools for generating device configurations.
We now have all the data required to generate the configuration, such as VLANs, interfaces, descriptions, and more. The next step is to create a Jinja2 template that takes these values as inputs and generates the configuration. Additionally, we need to ensure the generated configurations are correctly associated with each device.
Infrahub provides a way to achieve this by using a Jinja2 template along with a GraphQL query to generate the configuration. The generated configuration is saved in Infrahub as an artifact, which can then be associated with the devices using an artifact definition. In the next sections, we’ll look at how to configure all of this.
Jinja2 Transformation and Artifact
So, how do we use Jinja2 with Infrahub? We use an Infrahub feature called 'Transformation'. As the name suggests, this involves taking the data stored in Infrahub and converting it into a different format. In our case, we use a Jinja2 template to transform the data into a text file (rendered configuration).
As discussed previously, we also need a GraphQL query that fetches all the inputs required for the Jinja2 template. If you're familiar with Jinja2, you might typically use a YAML or JSON file to store the data and then pass it to the template. In our case, this data is stored in Infrahub.
The final step involves defining an Artifact definition, which groups together a transformation with a target group, forming the artifact's definition.
We can package all these components, Jinja2 template, GraphQL query, and artifact definition into a .infrahub.yml file within a Git repository. This repository can then be added to Infrahub. The .infrahub.yml file enables Infrahub to identify the necessary imports and tie together the various components.
Please note that the Artifact definition, for example, can also be created via the web GUI or GraphQL query, but in this example, we use a Git repository. Here are the contents of each file.
#config.gql

query MyQuery($device: String!) {
  IpamVLAN {
    edges {
      node {
        vlan_id {
          value
        }
        name {
          value
        }
      }
    }
  }
  DcimDevice(name__value: $device) {
    edges {
      node {
        interfaces {
          edges {
            node {
              name {
                value
              }
              description {
                value
              }
              ... on DcimInterfaceL2 {
                l2_mode {
                  value
                }
                untagged_vlan {
                  node {
                    name {
                      value
                    }
                    vlan_id {
                      value
                    }
                  }
                }
              }
            }
          }
        }
      }
    }
  }
}
Here is the sample output from the query for the device access-01.
{
  "data": {
	"IpamVLAN": {
  	"edges": [
    	{
      	"node": {
        	"vlan_id": {
          	"value": 30
        	},
        	"name": {
          	"value": "admin"
        	}
      	}
    	},
    	{
      	"node": {
        	"vlan_id": {
          	"value": 10
        	},
        	"name": {
          	"value": "finance"
        	}
      	}
    	},
    	{
      	"node": {
        	"vlan_id": {
          	"value": 20
        	},
        	"name": {
          	"value": "sales"
        	}
      	}
    	}
  	]
	},
	"DcimDevice": {
  	"edges": [
    	{
      	"node": {
        	"interfaces": {
          	"edges": [
            	{
              	"node": {
                	"name": {
                  	"value": "Eth5"
                	},
                	"description": {
                  	"value": "new-description"
                	},
                	"l2_mode": {
                  	"value": "Access"
                	},
                	"untagged_vlan": {
                  	"node": {
                    	"name": {
                      	"value": "finance"
                    	},
                    	"vlan_id": {
                      	"value": 10
                    	}
                  	}
                	}
              	}
            	},
            	{
              	"node": {
                	"name": {
                  	"value": "Eth6"
                	},
                	"description": {
                  	"value": "device-02"
                	},
                	"l2_mode": {
                  	"value": "Access"
                	},
                	"untagged_vlan": {
                  	"node": {
                    	"name": {
                      	"value": "admin"
                    	},
                    	"vlan_id": {
                      	"value": 30
                    	}
                  	}
                	}
              	}
            	}
          	]
        	}
      	}
    	}
  	]
	}
  }
}
#config.j2
!
{% for vlan in data['IpamVLAN']['edges'] %}
vlan {{ vlan['node']['vlan_id']['value'] }}
name {{ vlan['node']['name']['value'] }}
!
{% endfor %}
{% for edge in data['DcimDevice']['edges'][0]['node']['interfaces']['edges'] %}
interface {{ edge['node']['name']['value'] }}
description {{ edge['node']['description']['value'] }}
{% if edge['node']['l2_mode']['value'] == 'Access' %}
switchport mode access
switchport access vlan {{ edge['node']['untagged_vlan']['node']['vlan_id']['value'] }}
{% endif %}
!
{% endfor %}#.infrahub.yml
---
jinja2_transforms:
- name: device_config
description: "VLAN and Interface configuration"
query: "config_query"
template_path: "config.j2"
queries:
- name: config_query
file_path: "config.gql"
artifact_definitions:
- name: "config_file"
artifact_name: "configuration file"
parameters:
device: "name__value"
content_type: "text/plain"
targets: "Transformation"
transformation: "device_config"Both jinja2_transforms and queries defined in this file are straightforward, so let’s focus on artifact_definitions. Each Artifact Definition in .infrahub.yml must include the following.
- name - the name of the Artifact Definition
- artifact_name - the name of the Artifact created by this Artifact Definition
- parameters - mapping of the input parameters required to render this Artifact
- content_type - the content-type of the created Artifact
- targets - the Infrahub Group to target when generating the Artifact
- transformation - the name of the Transformation to use when generating the Artifact
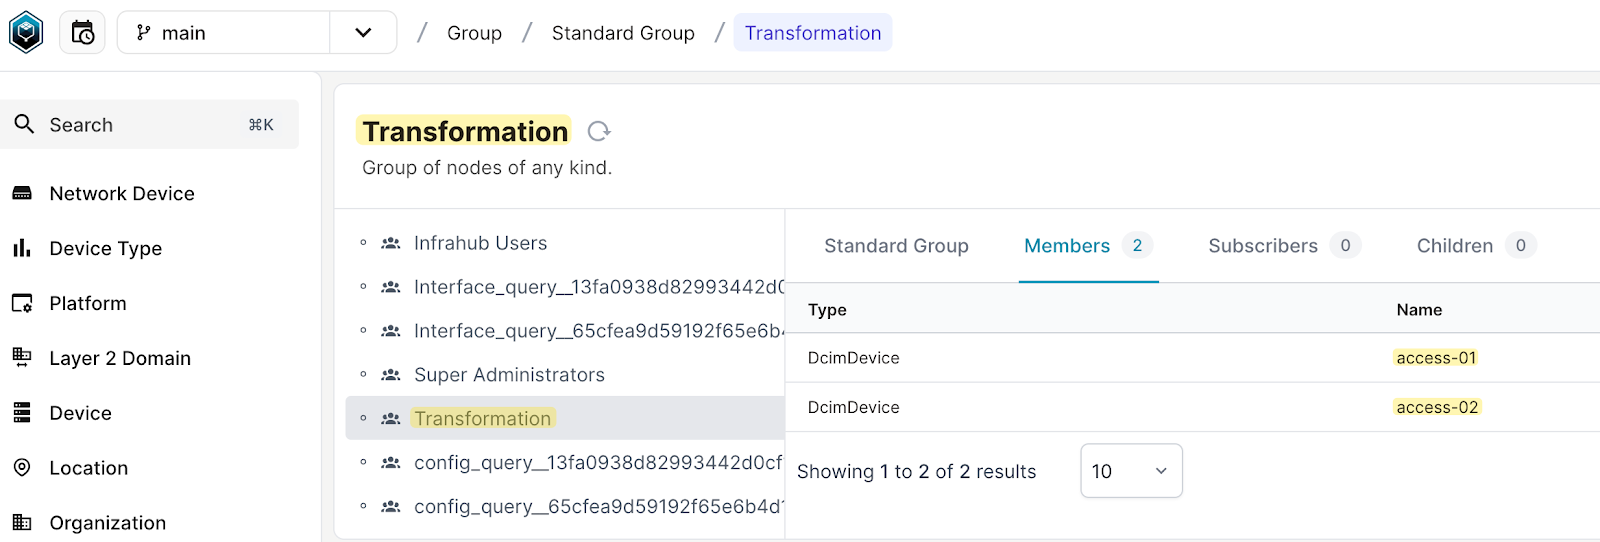
Here, we defined a group called 'Transformation' and added the two devices to this group. You can create the Group by navigating to Object Management > Groups. Once the group is created, you can add the two devices as members.
So, in the end, you'll end up with three files in your repository - a Jinja2 template, a GraphQL query, and a .infrahub.yml file that ties everything together. Commit and push these changes to your remote repository, then add the repository to InfraHub.
├── config.gql
├── config.j2
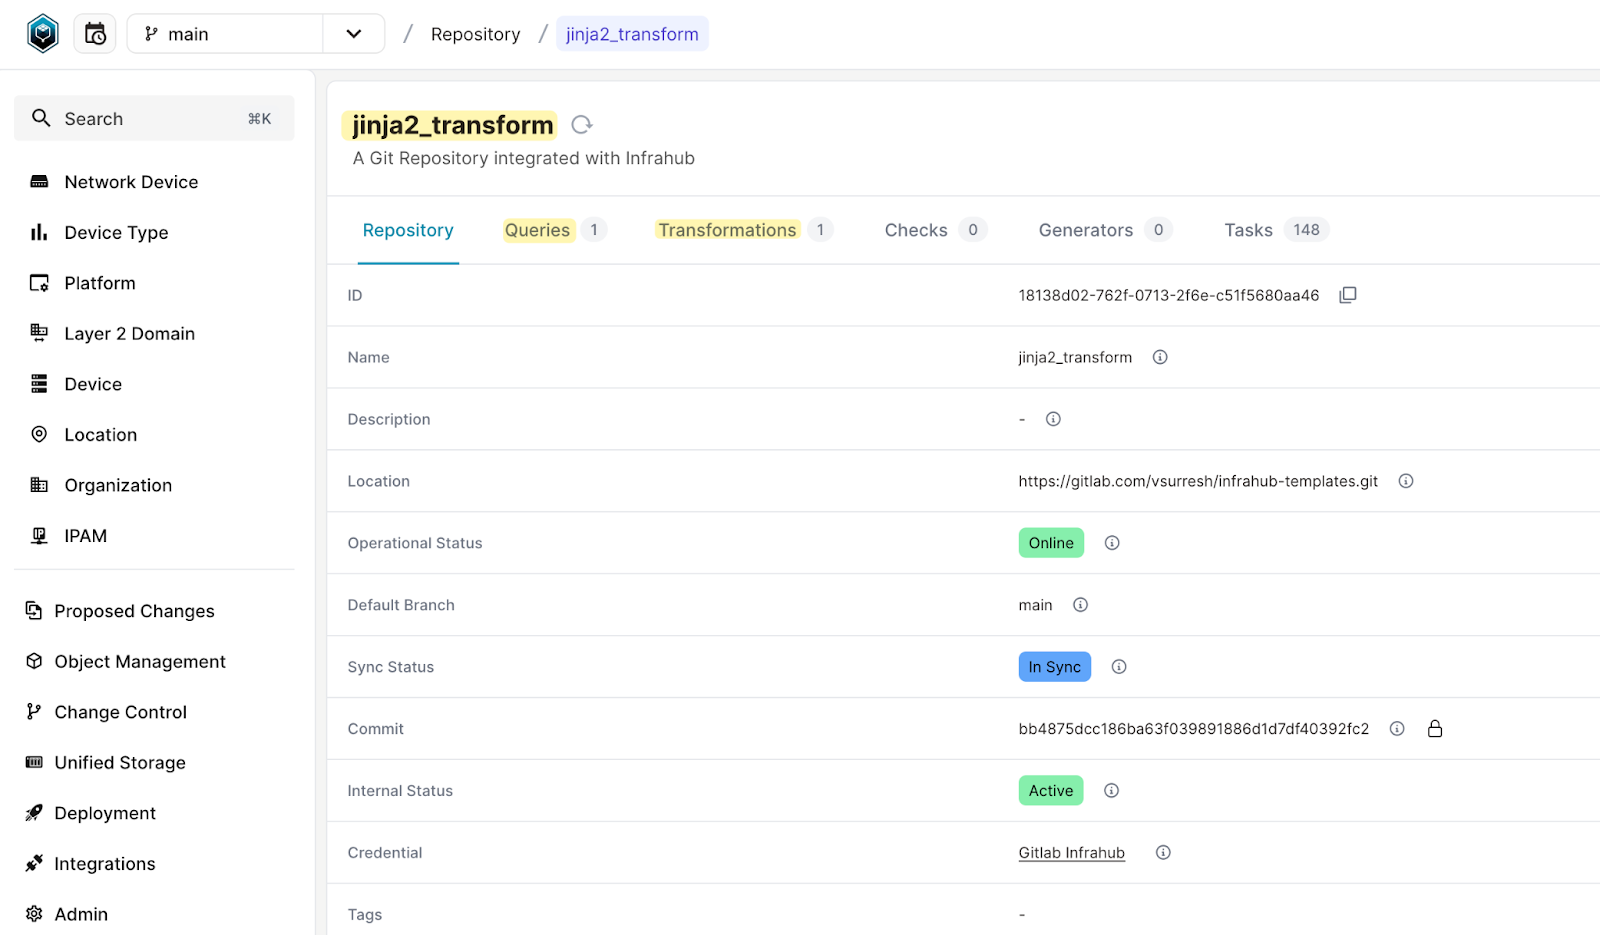
└── .infrahub.ymlTo add this repository to Infrahub, navigate to Unified Storage > Repository and provide the Git remote repository link, login credentials (for example, if you use GitLab, create an access token and use it as the password for Infrahub), and a unique name for the repository. Infrahub will then connect to your remote repository and import the components defined within it—in our case, the Jinja2 template, GraphQL query, and artifact definition.
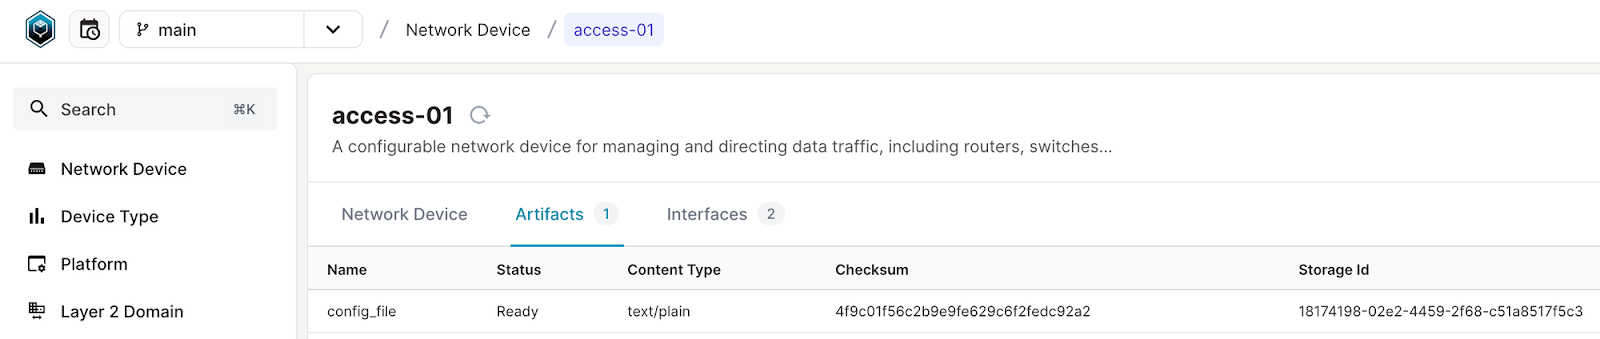
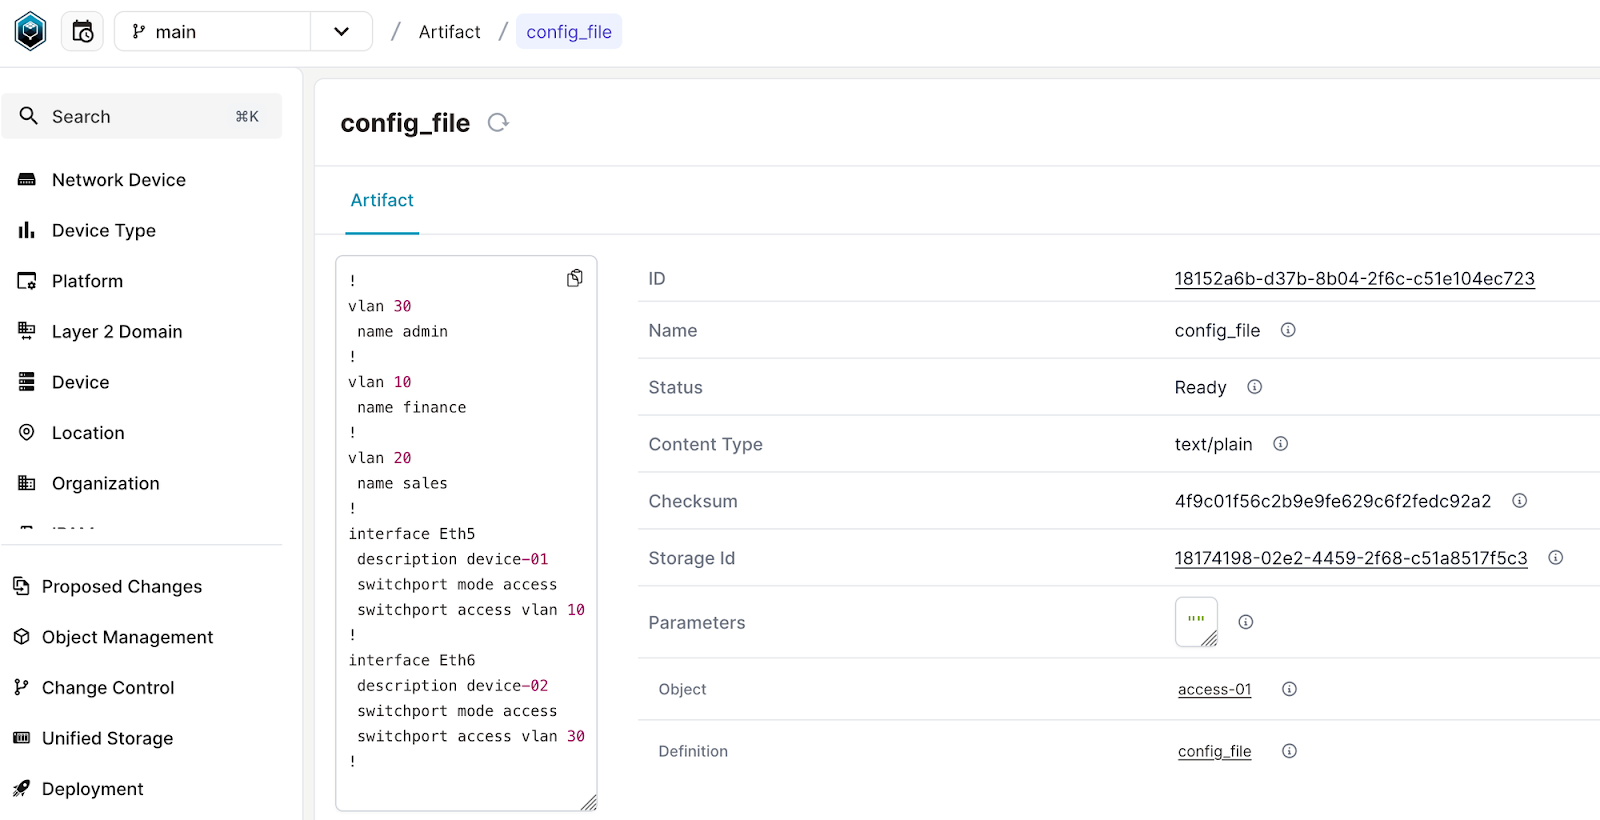
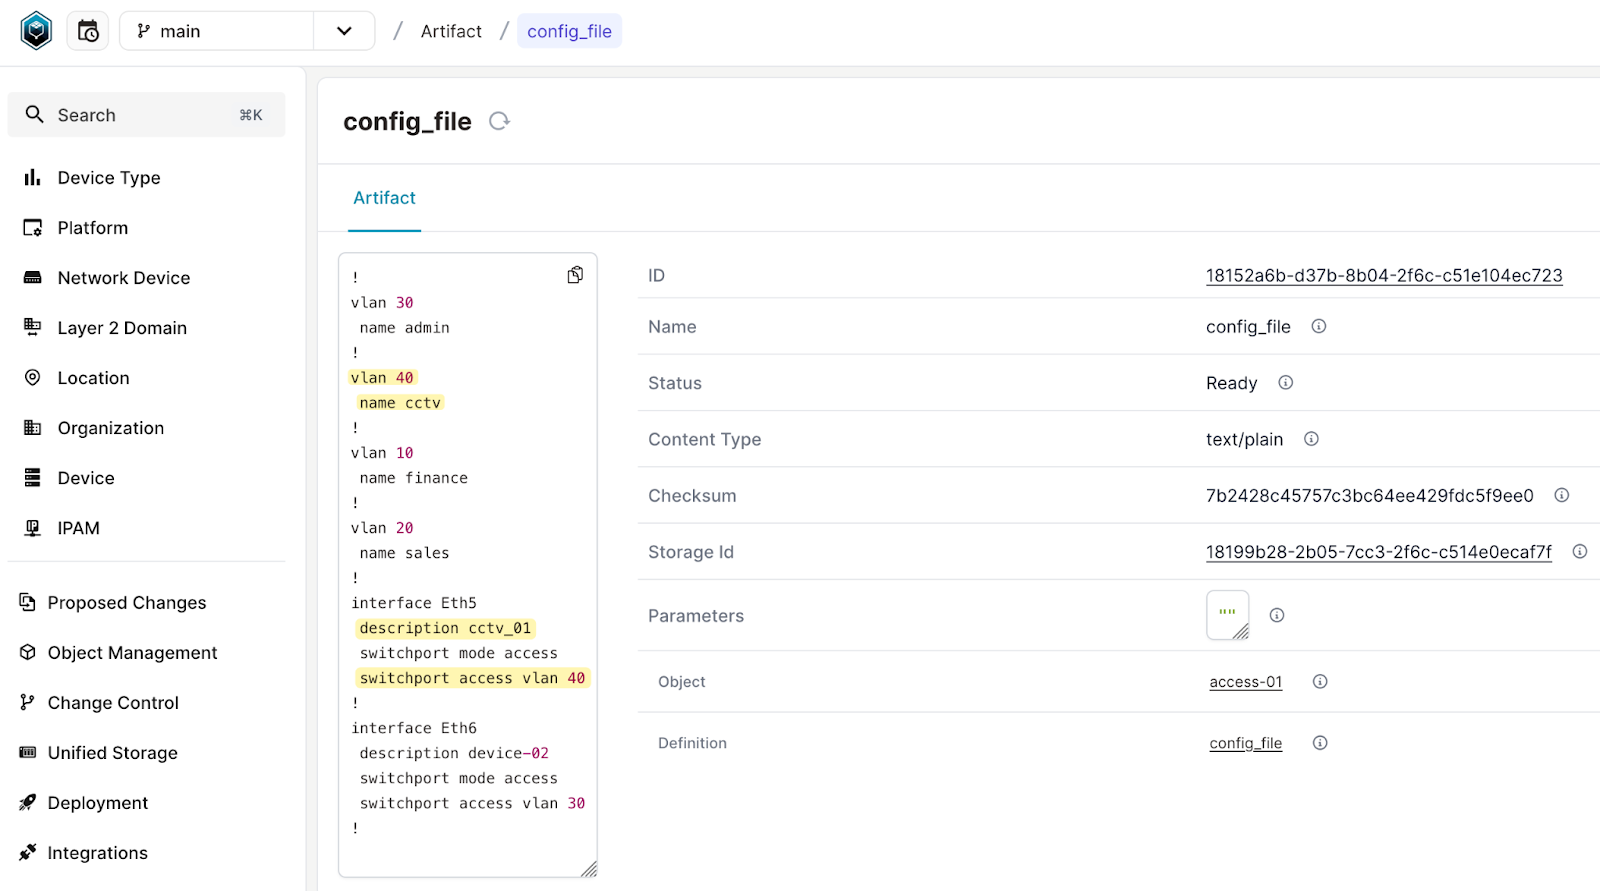
Once you add the repository to Infrahub and everything is set up correctly, you should see the artifact under the Artifact tab. If you open the artifact, you'll find the generated configuration, as shown below.
you can also test your transformation by using infrahubctl render. When you use infrahubctl you need to pass the name of the transformation and any required variables. Here is an example, of using access-01 as the device.
infrahubctl render device_config device=access-01

!
vlan 30
 name admin
!
vlan 40
 name cctv
!
vlan 10
 name finance
!
vlan 20
 name sales
!
interface Eth5
 description cctv_01
 switchport mode access
 switchport access vlan 40
!
interface Eth6
 description device-02
 switchport mode access
 switchport access vlan 30
!
Nornir-Infrahub Plugin
We've now completed about 75% of the process, with the remaining steps focusing on Nornir and how to use Nornir/Napalm to retrieve and apply these artifacts (configs). If you remember, our ultimate goal is to store all necessary information in Infrahub, generate the configurations, and push them to the devices. Infrahub will act as the inventory source for Nornir and also provide the artifacts.
First, you need to install the nornir-infrahub and nornir_napalm plugins. Use the following command to install it. As always, use a virtual environment for installing pip modules.
python3 -m venv venv
source venv/bin/activate

pip install nornir-infrahub
Pip install nornir_napalm
Once installed, the following Nornir configuration file (config.yml) initializes Nornir with the Infrahub inventory plugin, fetching the required inventory and configuration details from Infrahub.
---
inventory:
  plugin: InfrahubInventory
  options:
    address: http://10.10.10.40:8000
    token: 1811f38d-feb8-24da-2f6c-c51a2af588c8
    host_node:
      kind: DcimDevice
    schema_mappings:
      - name: hostname
        mapping: primary_address.address
      - name: platform
        mapping: platform.napalm_driver
    group_mappings:
      - platform.name
group_file: groups.yml- We configure Nornir to use DcimDevice nodes from Infrahub as the host, which acts as the source of the device inventory. If you're using a different schema in Infrahub, you need to specify the appropriate node type that represents a device in your setup. This ensures Nornir retrieves the correct inventory data based on your schema structure.
- We define schema mappings to enable Nornir to correctly interpret the data from Infrahub. For example, we map
platform.napalm_driverto the platform field, ensuring that Nornir identifies the correct driver for each device. - When using Napalm, the platform names must match the expected values (e.g., eos for Arista). However, if you're using Netmiko, platform names might differ (e.g., arista_eos for Arista). These differences need to be accounted for when setting up Nornir.
- A groups.yml file is used to define group-specific attributes, such as the username and password for the eos platform. The plugin automatically creates groups based on the
group_mappingsspecified in the configuration. Here, we useplatform.name, so Nornir creates a group for each host based on the value ofplatform.name. In this case, it creates a group namedplatform__eos, withplatform__prefixed to the platform name. - You can then define attributes for this group in the groups.yml file, such as credentials or other platform-specific settings. If you're using a different schema, ensure your group mappings align with your schema structure to reflect the appropriate group names.
#groups.yml

platform__eos:
  username: admin
  password: admin
With the prerequisites out of the way, we can now move on to pushing the generated configurations to the devices.
In the following Python script (main.py), get_artifact function retrieves the artifact (in this case, the rendered configuration) associated with each device from Infrahub. It uses the Infrahub API to fetch the artifact's content, which is then stored in the Nornir’s result object.
#main.py

from nornir import InitNornir
from nornir_utils.plugins.functions import print_result
from nornir_napalm.plugins.tasks import napalm_configure
from nornir_infrahub.plugins.tasks.artifact import get_artifact


def main(task):
	# Fetch artifacts from Infrahub
	artifacts = task.run(task=get_artifact, artifact="config_file")

	# Configure devices using Napalm with the fetched artifacts
	task.run(task=napalm_configure, configuration=artifacts[0].result, dry_run=False)


if __name__ == "__main__":
	nr = InitNornir(config_file="config.yml")
	results = nr.run(task=main)
	print_result(results)
Once the artifacts are successfully fetched, the next step is to apply these configurations to the devices using the napalm_configure task. This task takes the fetched configuration (artifacts[0].result) and pushes it to the target devices.
So, just to recap, our directory structure will look like this - main.py is our Python script, config.yml specifies that Nornir should use the InfraHub inventory and defines how it interacts with it, and groups.yml is used to provide the login credentials.
.
├── groups.yml
├── main.py
├── config.yml
Let’s Make Some Changes
To demonstrate how changes are made and pushed to devices using Nornir, let’s create a new VLAN, assign it to one of the interfaces, and update the interface description.
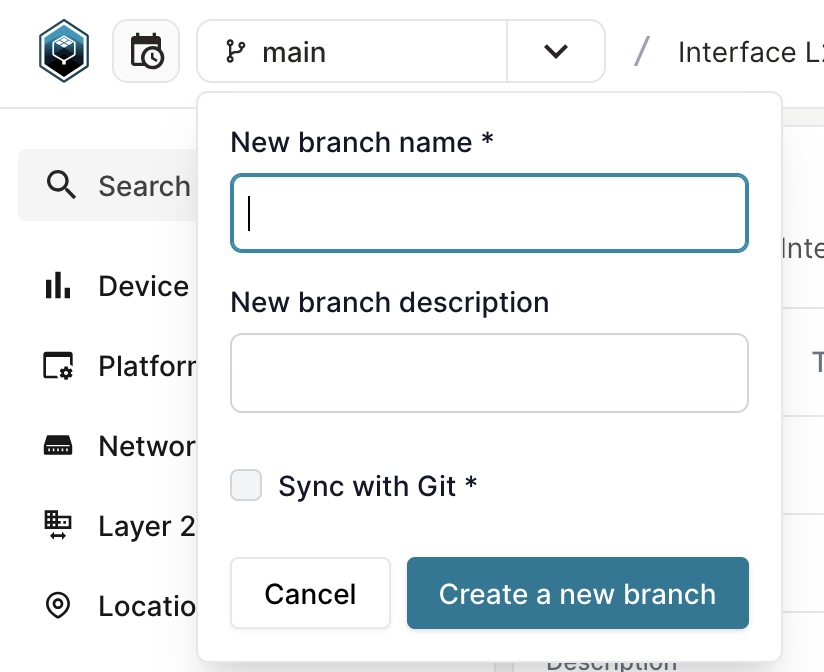
The process begins by creating a branch in Infrahub. This branch allows us to isolate and manage the changes without affecting the main configuration. You can create a new branch (called vlan_40) in Infrahub GUI by clicking the ‘+’ button as shown below.
Once the branch is created, select the branch to work on and create a new VLAN.
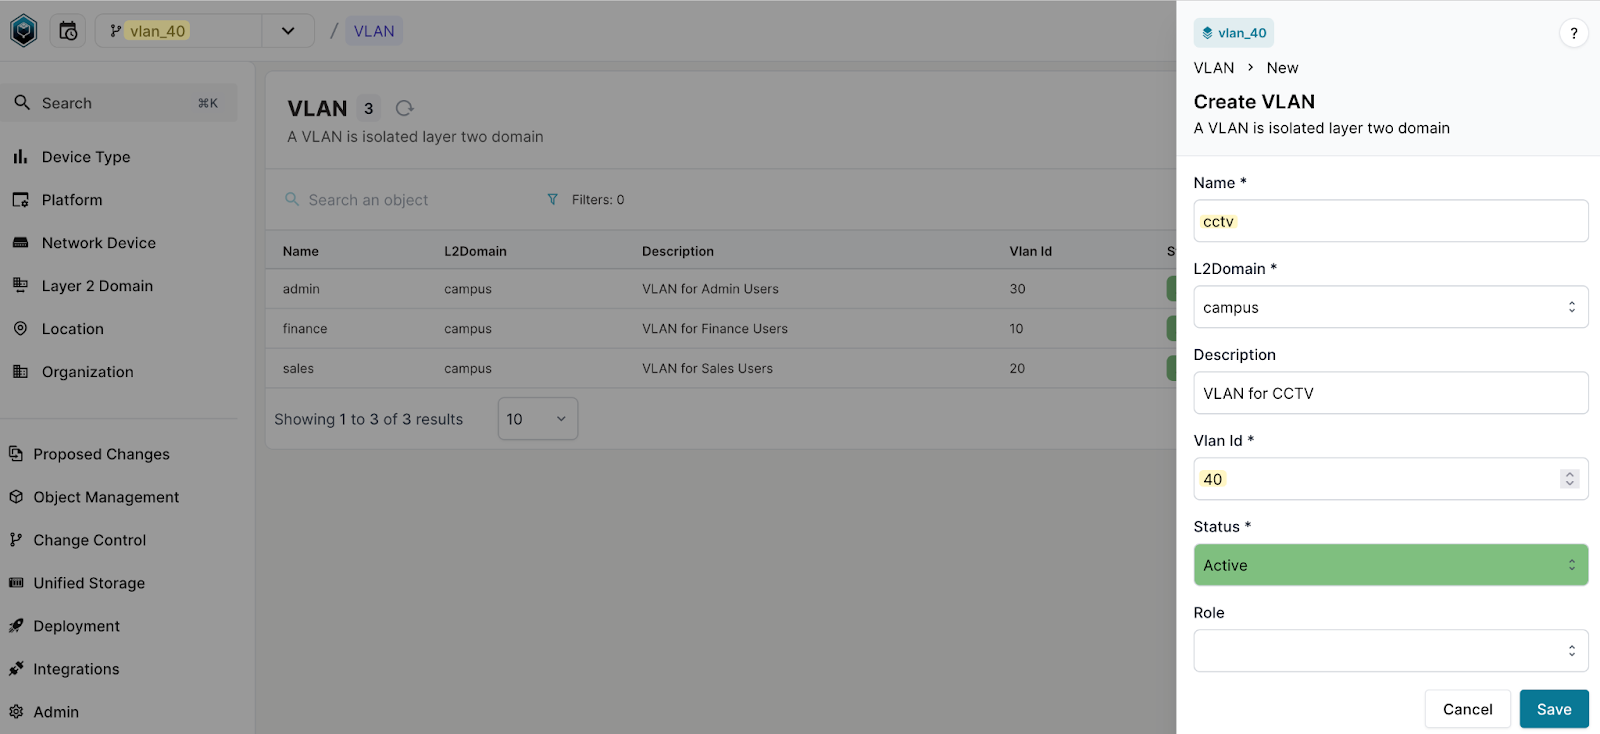
After the VLAN is created, choose an interface (e.g., access-01, Eth5 in this example) and update its configuration to use the newly created VLAN 40. Additionally, update the interface description to reflect the changes. This ensures that both the VLAN assignment and description are consistent with the new configuration requirements.
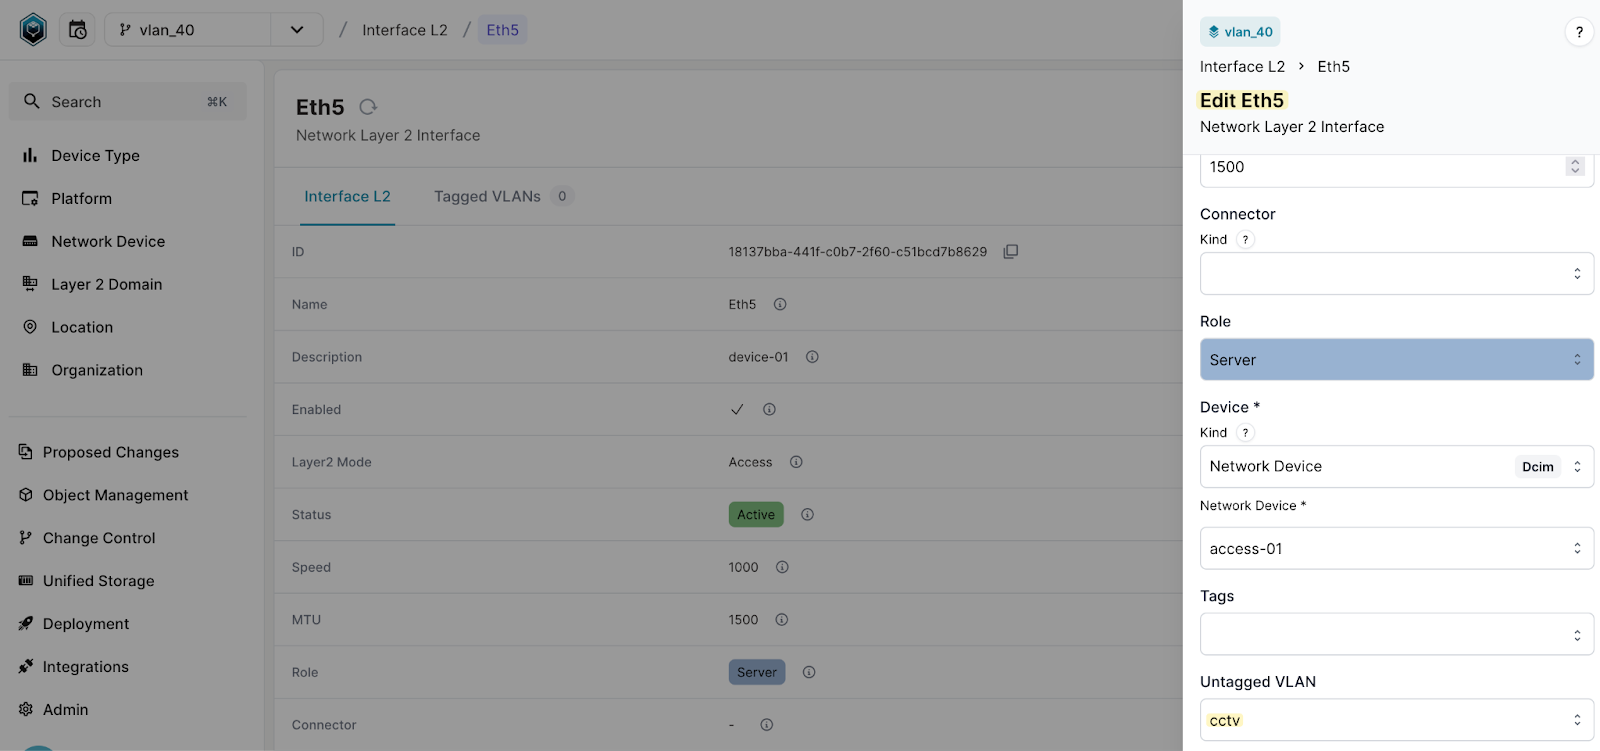
Once you've made the changes, navigate to Change Control > Branches and select the branch you just created. Under the Data tab, you can view exactly what has been modified.
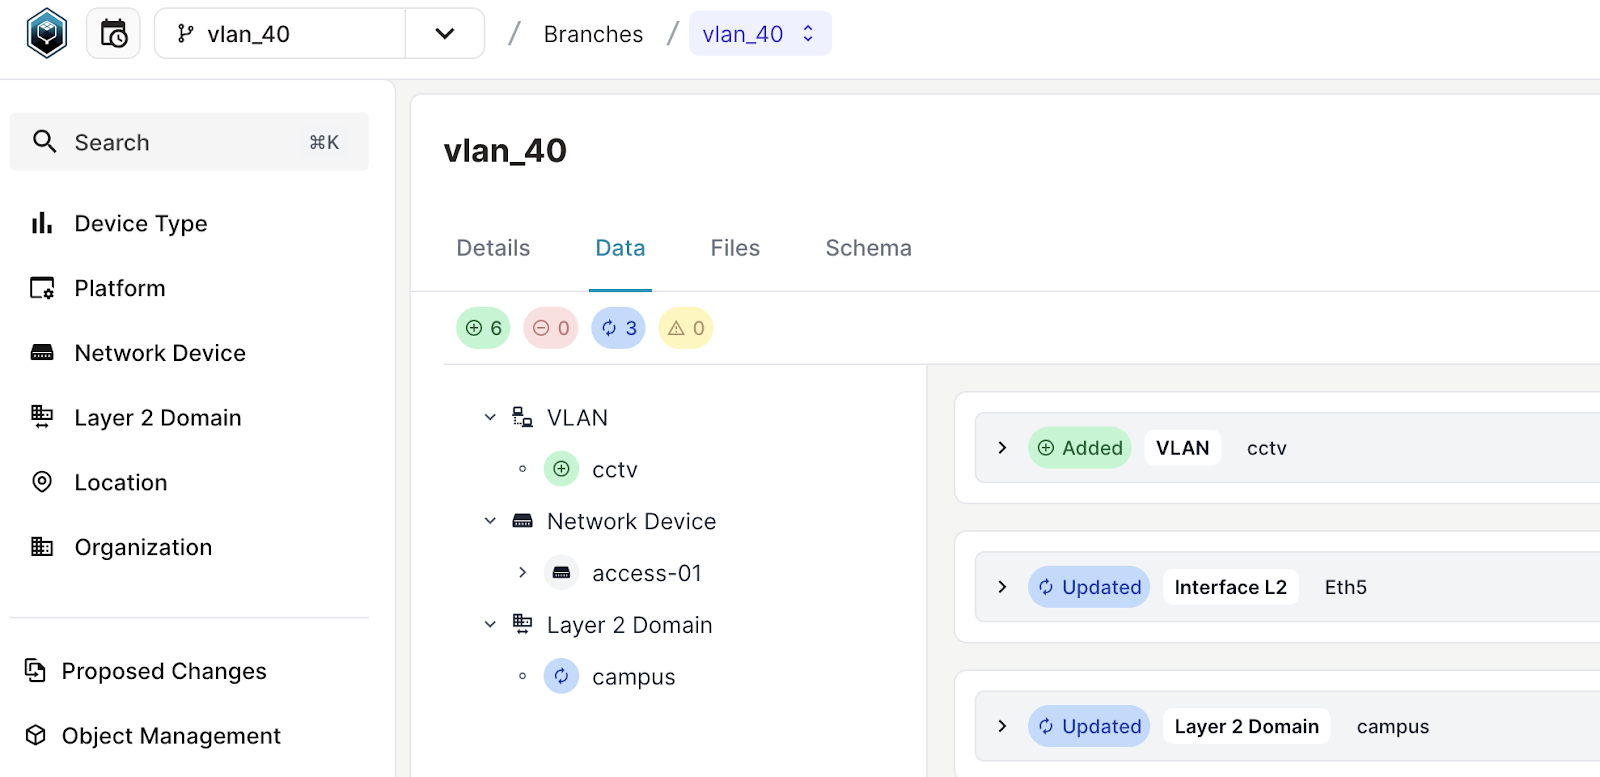
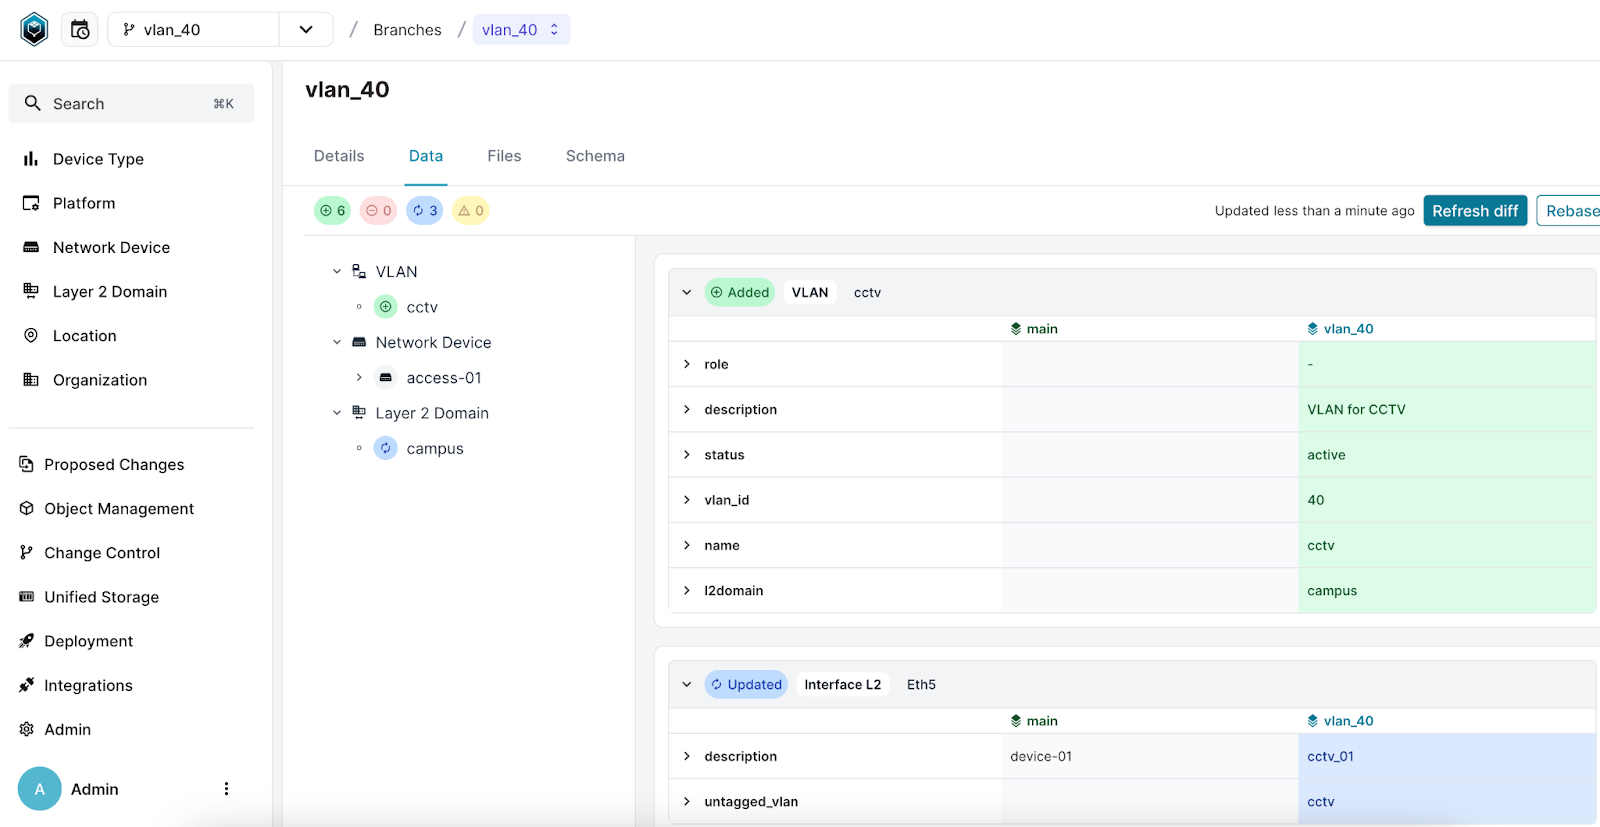
You can expand each field to see the specific changes in detail. For example, you’ll notice that a new VLAN was added (highlighted in green), and the description and untagged VLAN for the interface was updated (highlighted in blue)
At this point, you have the option to merge your changes directly. However, Infrahub offers a more robust way to manage changes using a feature called Proposed Changes. Let’s explore how to use this feature.
Infrahub Proposed Changes
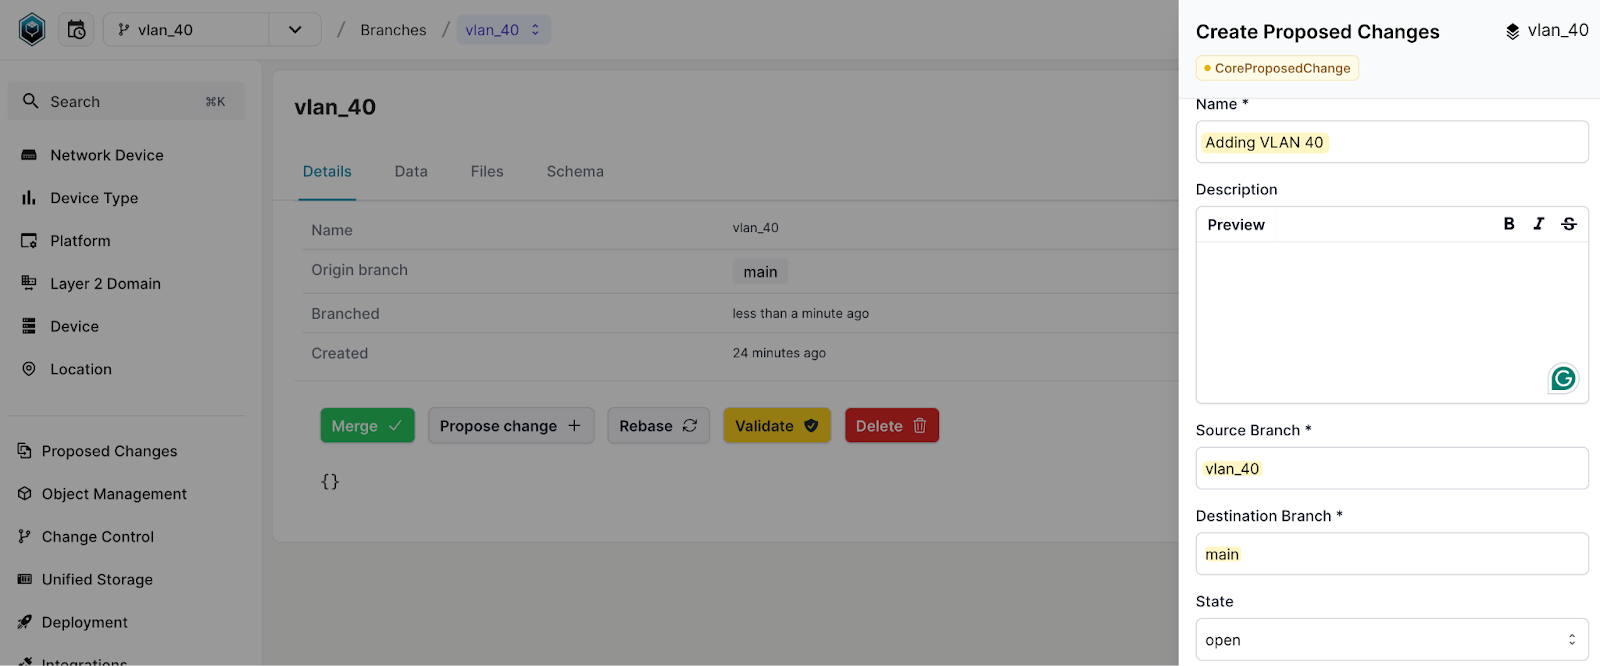
Infrahub's Proposed Changes feature takes automation a step further. Instead of merging directly from Change Control > Branches, you can create a Proposed Change. In this process, you provide a name, description, the person raising the change, and the source and destination branches.
Once the proposed change is created, navigate to Proposed Change and select the change you just raised. Here, you’ll find multiple tabs:
- Overview - Provides a general overview of the change, as the name suggests. You can also add comments here.
- Data - Similar to what you’ve seen before, this tab shows exactly what was modified.
- Artifact - This is the most important tab for this post. Infrahub detects the changes, renders a new configuration, and highlights exactly what has been updated.
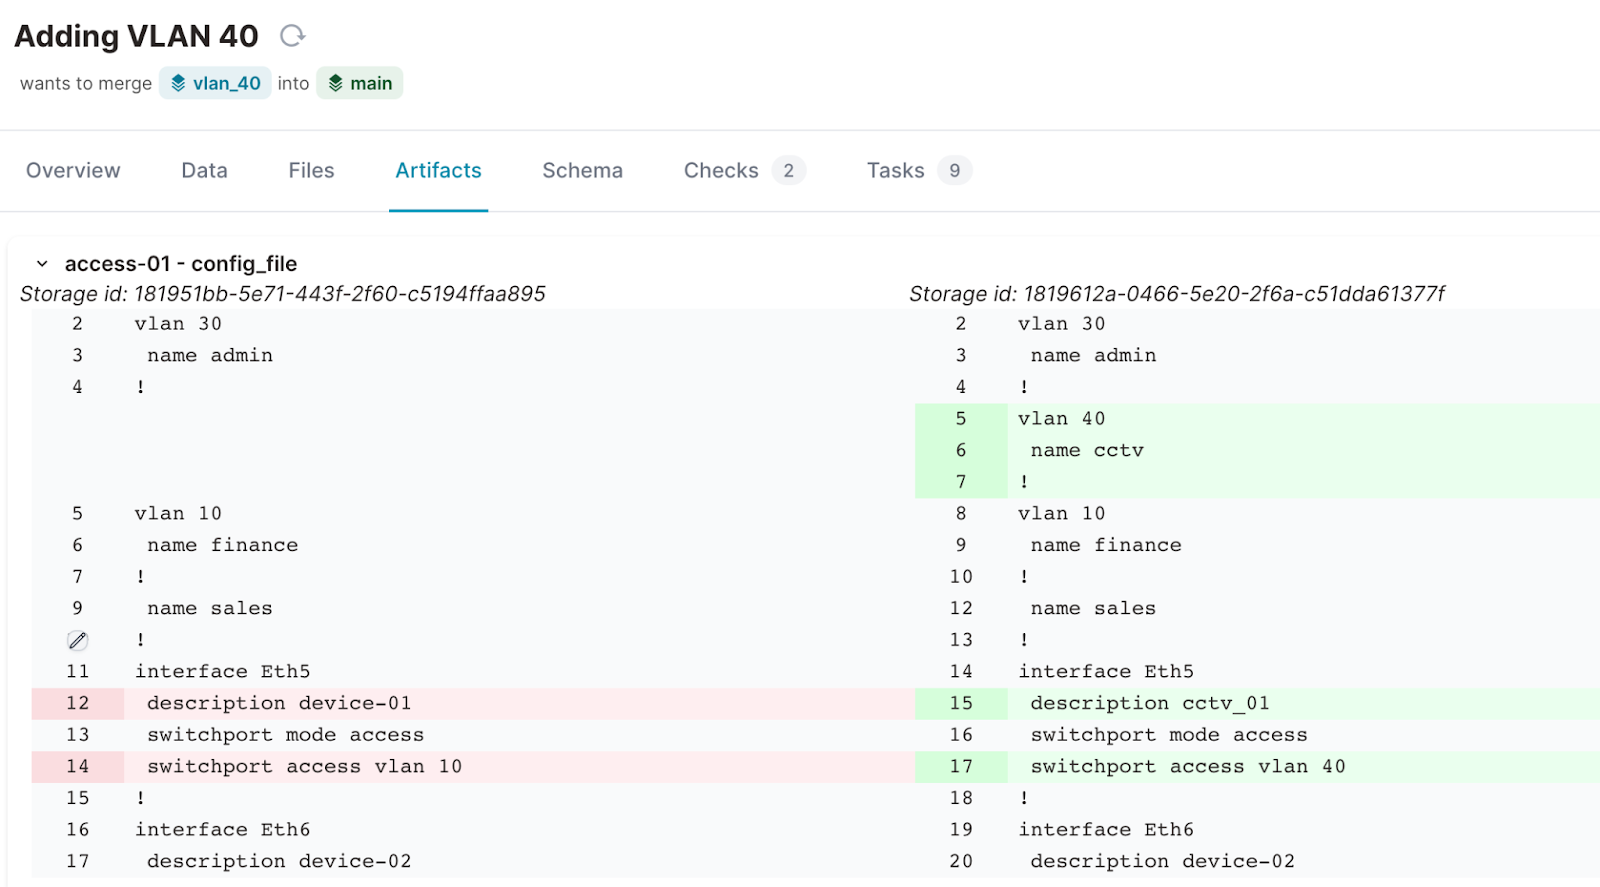

In our changes, we added a new VLAN, so the artifact reflects the VLAN being created on both devices. For access-01, in addition to creating the VLAN, the artifact also shows the VLAN being assigned to interface Eth5 and the description being updated. These changes are clearly visible in the web GUI, making it easy to verify and review.
If the changes look good, the reviewer can approve the proposal. As soon as the change is approved and merged, the artifact gets re-generated automatically.
Now you can use Nornir to run the job again, and the updated configuration will be pushed to the devices seamlessly. This workflow ensures changes are tracked, reviewed, and implemented efficiently.
Here are the outputs from Nornir showing what is being changed on the devices.
#access-01

---- napalm_configure ** changed : True ---------------------------------------- INFO
+vlan 40
+   name cctv
 !
 interface Ethernet5
-   description device-01
+   description cctv_01
-   switchport access vlan 10
+   switchport access vlan 40
#access-02
---- napalm_configure ** changed : True ---------------------------------------- INFO
+vlan 40
+ name cctvIf we SSH into access-01, we can confirm that the changes have taken effect. The new VLAN 40 is present, and interface Eth5 is now using this VLAN with the updated description, as expected.
access-01#show run interfaces eth5
interface Ethernet5
   description cctv_01
   switchport access vlan 40
access-01#

access-01#show vlan
VLAN  Name                         	Status	Ports
----- -------------------------------- --------- -------------------------------
1 	default                      	active	Et1, Et2
10	finance                      	active
20	sales                        	active
30	admin                        	active	Et6
40	cctv                         	active	Et5
Closing Up
Just to keep this post simple, we only covered the basics, but you can absolutely manage every aspect of the configuration, such as SNMP servers, NTP, trunk ports, uplinks, port channels, and more. All you need to do is input the relevant data into InfraHub, update your Jinja2 template and GraphQL query, and let Infrahub and Nornir handle the rest.