I currently run multiple Docker containers across two hosts, each hosting various applications on different ports. UniFi Controller exposes the web GUI on 8443, Pi-hole on 8080, and Memos on 5230. Remembering each port number for every application started to become a hassle.
Additionally, most of these applications, like Pi-hole and Memos, do not support HTTPS out of the box. After searching for a solution to simplify this setup, I found that Caddy Reverse Proxy offers one of the simplest and most effective ways to manage these services. In this blog post, we’ll look at how to use Caddy Reverse Proxy with my Docker containers running across two hosts.
What is a Reverse Proxy?
A reverse proxy is a server that sits in front of one or more web servers and forwards client requests to them. It acts as an intermediary, handling incoming traffic and distributing it to the appropriate server. This setup can help improve security, manage SSL/TLS encryption, and simplify network traffic management by consolidating multiple services under a single domain.
What is Caddy?
Caddy is an open-source web server and reverse proxy software that is known for its simplicity and ease of use. It automatically handles HTTPS configuration and renewals by default, providing secure connections without extra setup. Caddy supports a variety of web applications and services and its straightforward configuration allows users to quickly set up sites and services with minimal fuss.
My Current Setup
In my home lab, I have two Pi-hole instances, a UniFi Controller, and a Memos app. One Pi-hole instance runs separately on a Raspberry Pi, while everything else runs on an old MacBook running Mint Linux. Pi-hole also serves as my internal DNS server, allowing DNS record creation and resolution across all my clients.
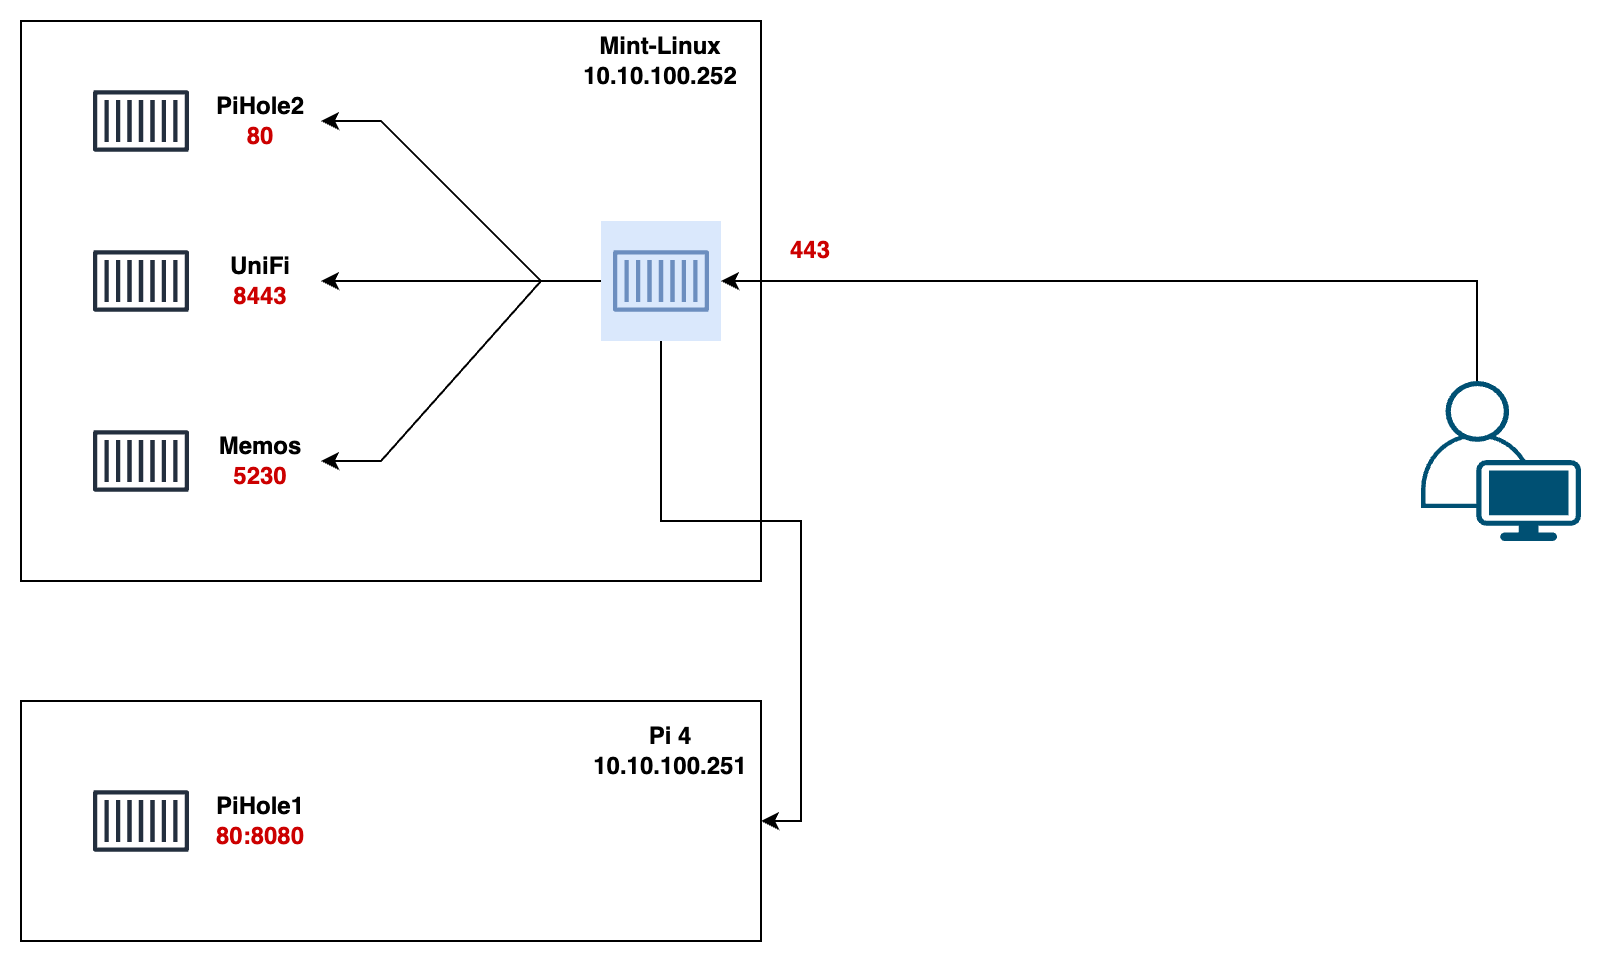
My goal is to use Docker Compose to manage all containers on the Linux Mint host and maintain a separate compose file on the Raspberry Pi for the standalone Pi-hole instance.
services:
  pihole:
    container_name: pihole1
    image: pihole/pihole:latest
    ports:
      - "53:53/tcp"
      - "53:53/udp"
      - "8080:80/tcp"
    environment:
      TZ: 'Europe/London'
      WEBPASSWORD: 'pwd123'
    volumes:
      - './etc-pihole:/etc/pihole'
      - './etc-dnsmasq.d:/etc/dnsmasq.d'
    restart: unless-stopped
The first compose file is used to launch the Pi-hole instance on the Raspberry Pi. However, our primary focus is on the second compose file and the Caddy configuration for the containers running on the Linux Mint system shown below.
.
├── Caddyfile
└── compose.yaml

0 directories, 2 file
services:
pihole2:
container_name: pihole
image: pihole/pihole:latest
expose: [80/tcp]
ports:
- "53:53/tcp"
- "53:53/udp"
environment:
TZ: 'Europe/London'
WEBPASSWORD: 'pwd123'
volumes:
- '/home/suresh/Documents/pihole/etc-pihole:/etc/pihole'
- '/home/suresh/Documents/pihole/etc-dnsmasq.d:/etc/dnsmasq.d'
restart: unless-stopped
memos:
image: neosmemo/memos:stable
container_name: memos
restart: unless-stopped
expose: [5230/tcp]
volumes:
- ~/.memos:/var/opt/memos
unifi-controller:
image: lscr.io/linuxserver/unifi-controller:latest
container_name: unifi-controller
environment:
- PUID=1000
- PGID=1000
- TZ=Europe/London
- MEM_LIMIT=2048 #optional
- MEM_STARTUP=2048 #optional
volumes:
- /home/suresh/Documents/unifi/unifi_data:/config
expose: [8443/tcp]
ports:
- 3478:3478/udp
- 10001:10001/udp
- 8080:8080
- 1900:1900/udp #optional
- 8843:8843 #optional
- 8880:8880 #optional
- 6789:6789 #optional
- 5514:5514/udp #optional
restart: unless-stopped
caddy:
image: caddy:2.8
container_name: caddy
restart: unless-stopped
ports:
- 0.0.0.0:80:80/tcp
- 0.0.0.0:443:443
volumes:
- ~/.caddy/data:/data
- ~/.caddy/config:/config
- ~/.caddy/logs:/logs
- ./Caddyfile:/etc/caddy/Caddyfile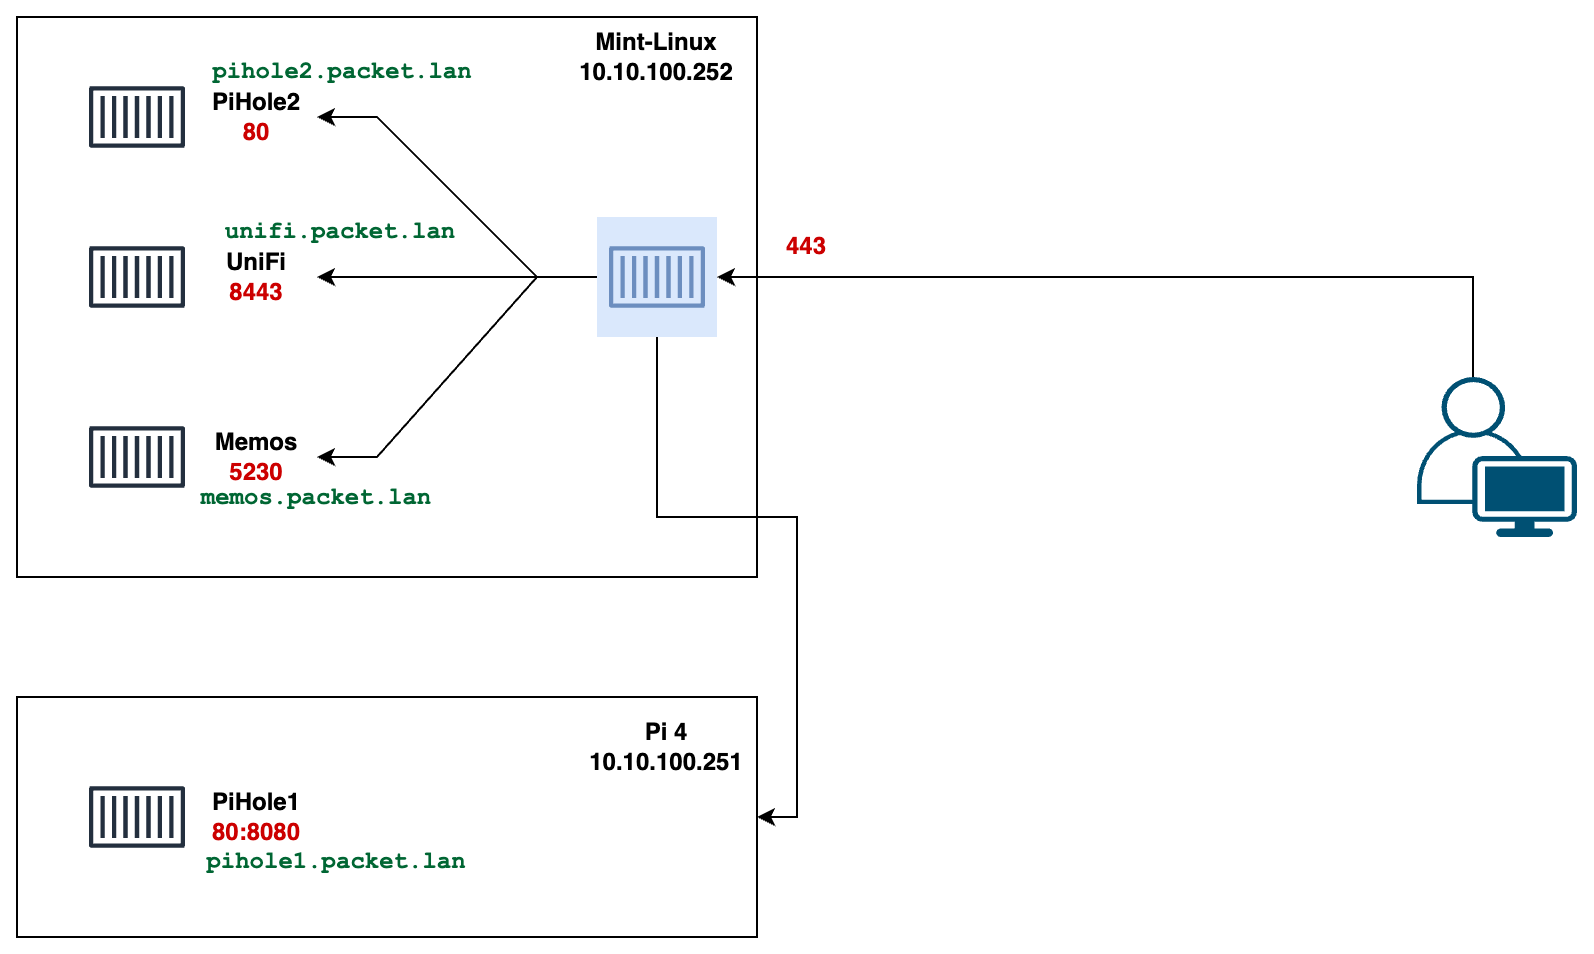
Docker expose vs ports
In Docker, expose and ports serve different purposes. Using the first container as an example.
expose: [80/tcp]tells Docker that the container listens on port 80/tcp internally. This is more about documenting which ports are used internally and does not make the port accessible to the host.ports:specifies mappings from the host's ports to the container's ports, making a service accessible from outside the Docker host. For instance,"53:53/tcp"and"53:53/udp"map port 53 on the host to port 53 in the container for both TCP and UDP traffic, allowing DNS services running in the container to communicate with the outside world.
Understanding Caddy and Its Configuration
Caddy acts as a reverse proxy and web server. Since I’m using one compose file for Caddy and other containers and they are part of the same docker network, I can reference the container names directly in the Caddyfile.
By specifying tls internal in the Caddyfile, we tell Caddy to handle HTTPS internally without needing external certificate authorities. This is useful in a home lab environment where trusted certificates are not necessary.
pihole1.packet.lan {
    tls internal
    reverse_proxy 10.10.100.251:8080
    log {
        format console
        output file /logs/pihole1.log {
            roll_size 10mb
            roll_keep 20
            roll_keep_for 7d
        }
    }
    encode {
        zstd
        gzip
        minimum_length 1024
    }
}

pihole2.packet.lan {
    tls internal
    reverse_proxy pihole2:80
    log {
        format console
        output file /logs/pihole2.log {
            roll_size 10mb
            roll_keep 20
            roll_keep_for 7d
        }
    }
    encode {
        zstd
        gzip
        minimum_length 1024
    }
}

memos.packet.lan {
    tls internal
    reverse_proxy memos:5230
    log {
        format console
        output file /logs/memos.log {
            roll_size 10mb
            roll_keep 20
            roll_keep_for 7d
        }
    }
    encode {
        zstd
        gzip
        minimum_length 1024
    }
}

unifi.packet.lan {
    tls internal
    reverse_proxy https://unifi-controller:8443 {
        transport http {
            tls_insecure_skip_verify
        }
    }
    log {
        format console
        output file /logs/unifi-controller.log {
            roll_size 10mb
            roll_keep 20
            roll_keep_for 7d
        }
    }
    encode {
        zstd
        gzip
        minimum_length 1024
    }
}
For services like the UniFi Controller, we use the directive transport http { tls_insecure_skip_verify } within the reverse proxy configuration. This is important as it tells Caddy to bypass TLS verification for the upstream service, necessary when connecting to services with self-signed certificates.
Because PiHole-1 runs on a separate host, I can’t use the container name in the Caddyfile. Instead, I specify the IP address of the host (10.10.100.251) to direct traffic correctly.
For each container, the configuration begins with a domain name, like memos.packet.lan for the Memos app or unifi.packet.lan for the UniFi Controller. It's important that client devices can resolve these domain names to access the services.
Now, to access Memos, I can simply go to https://memos.packet.lan, and for UniFi, I use https://unifi.packet.lan. Each service is also secured with an HTTPS certificate that Caddy automatically generates as a self-signed certificate.
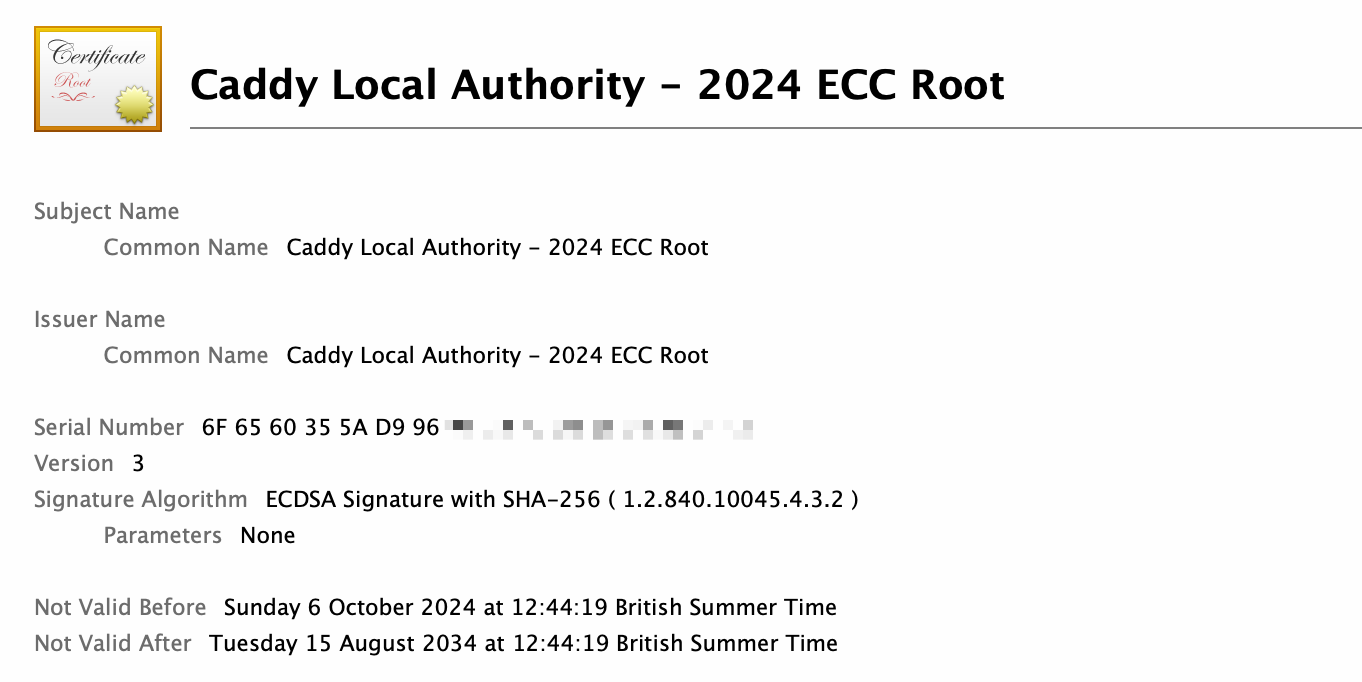
Trusting the Caddy Certificate
Even though my sites are now using HTTPS, my client devices don't trust this certificate automatically. Caddy tries to install the root CA certificate to the system trust store automatically, but this can fail when Caddy is running as an unprivileged user or inside a Docker container. In such cases, the root CA certificate needs to be manually installed.
Since we are running Caddy inside a container, we need to copy the Root CA certificate out of the container and install it on all my client devices. I used a single command to copy the certificate to my Docker host and then imported it into my MacBook and iPhone.
docker cp caddy:/data/caddy/pki/authorities/local/root.crt .