In this blog post, let's look at how to configure NAT on Cisco ASA firewalls. We will mainly be focusing on the following four scenarios.
- Source NAT
- Static 1-1 NAT
- Static PAT
- NAT Exception.
Before we dive into the configurations, let's have a quick look at the options available for us.
- Auto-Nat - Only allows you to translate the Source IP address. Auto-NAT is also called Object-NAT as the NAT configuration is directly added under the objects.
- Manual NAT - This allows you to translate both the Source and Destination IPs. Manual-NAT is also called Twice-NAT. Manual-NAT is very flexible compared to Auto-NAT. Manual NAT configurations are added under global configuration mode.
Scenario 1 - Source NAT
Source NAT is the most commonly used NAT type where multiple internal hosts share the same public IP. Source NAT is also known as one-to-many NAT translation.
Almost all devices on internal networks don't get public IPs assigned to them (globally routable addresses). One of the main reasons is that there are only a very limited number of public IPs available for us to consume so, devices on internal networks usually have private IP addresses assigned to them (RFC-1918).
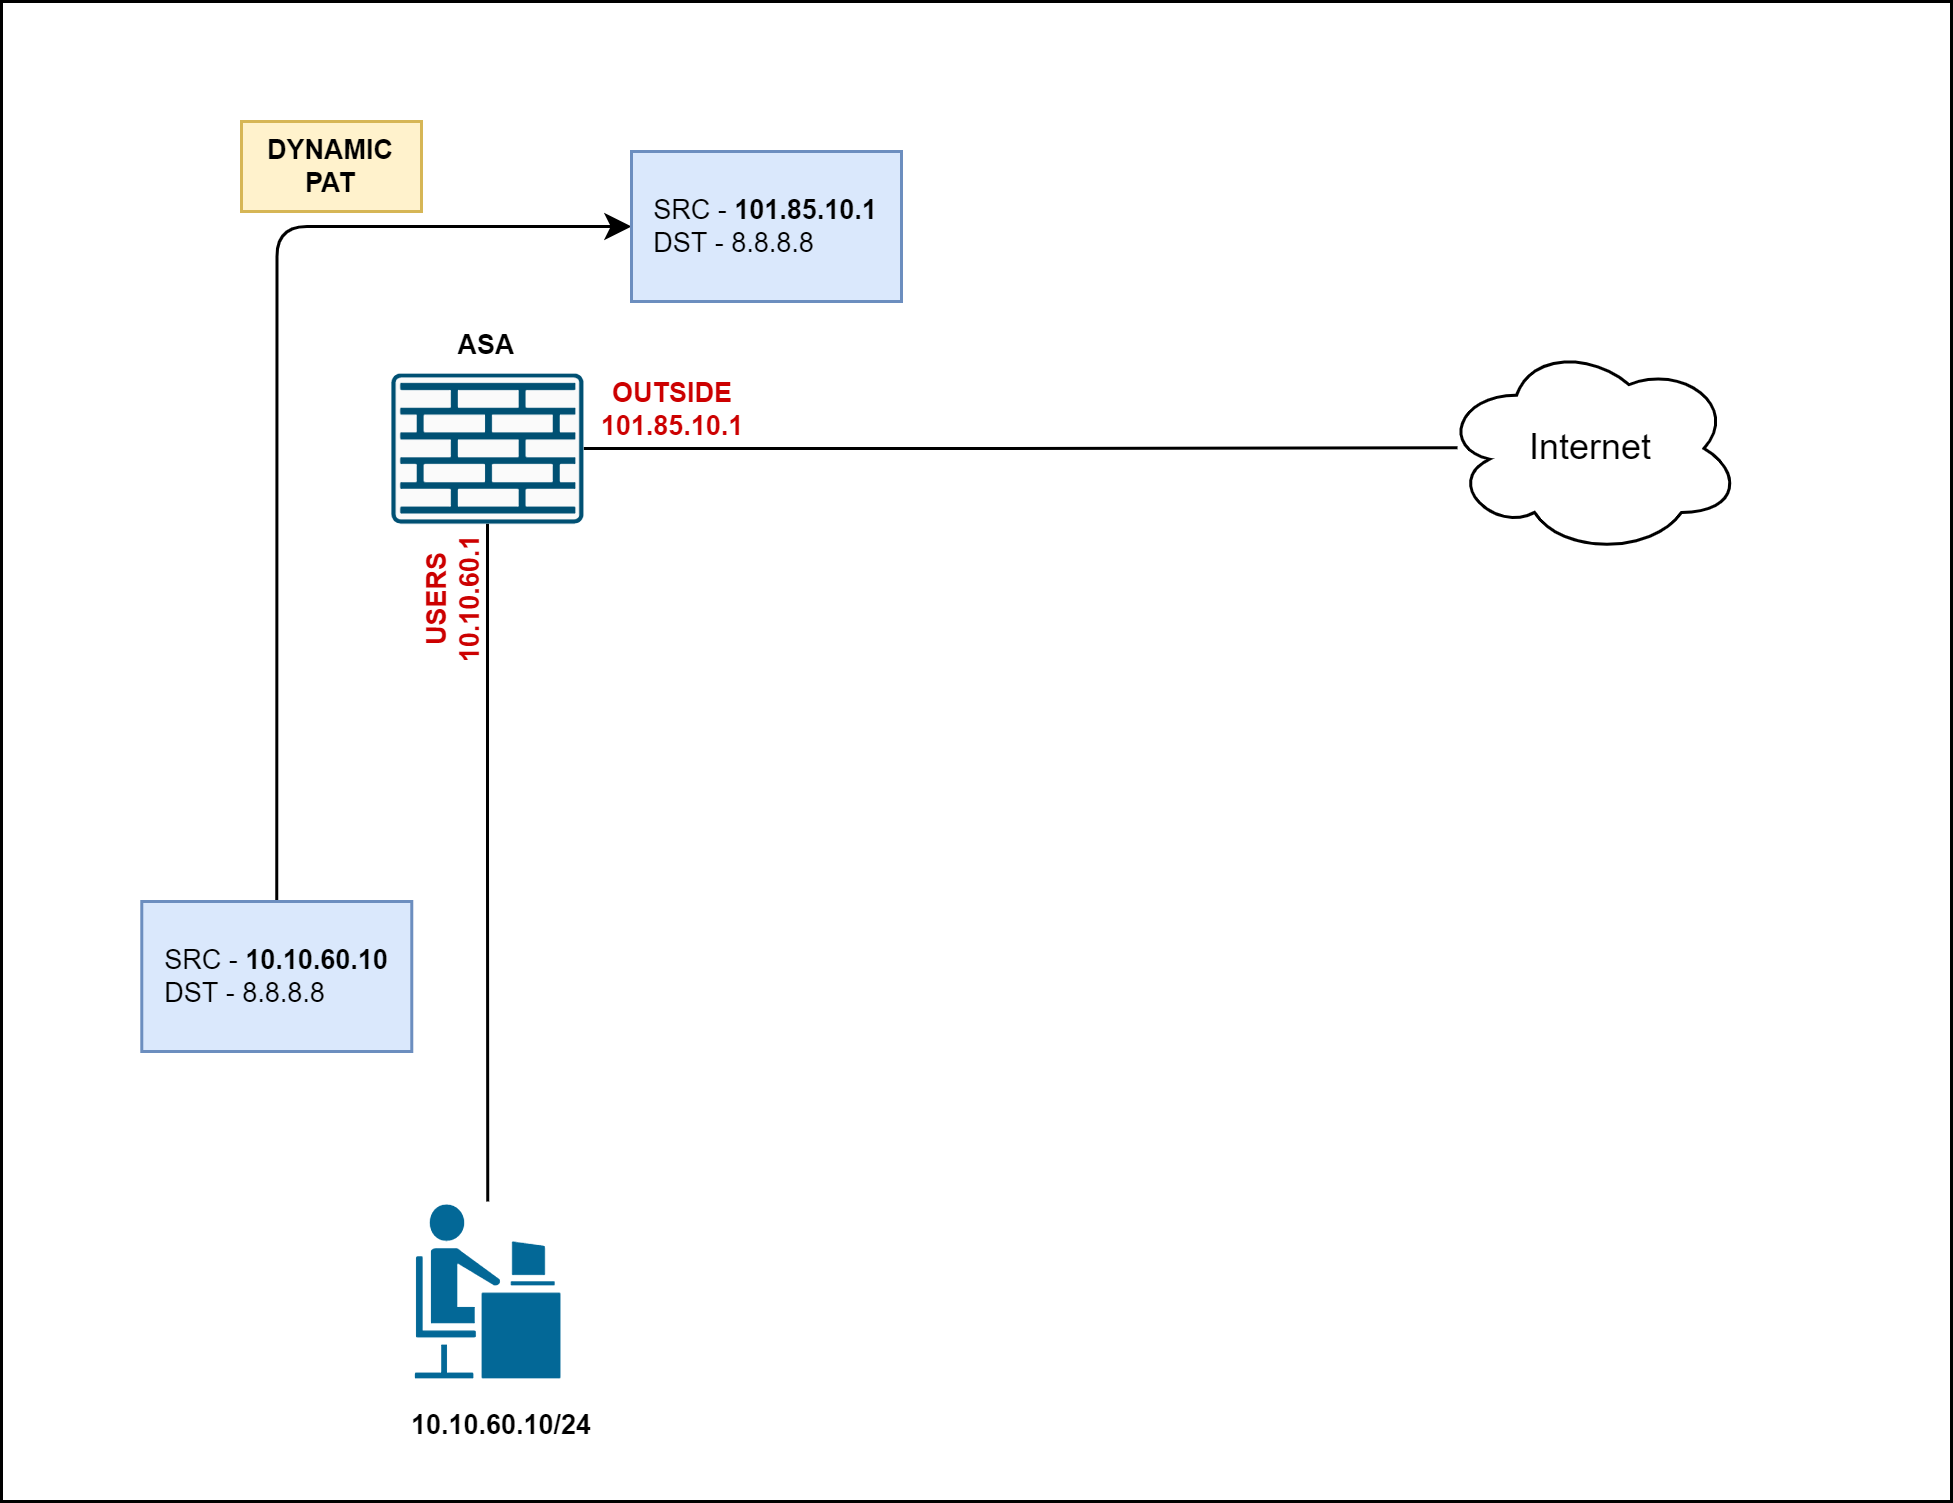
In our diagram, we want to translate the source IP address of the USER subnet to the OUTSIDE interface IP address of the ASA. So, when 10.10.60.10 goes out to the Internet, its IP address gets translated to ASA's Outside Interface IP (or the one you specify)
Auto-NAT configurations
Auto NAT configurations are configured directly under the objects. We can read the configuration as, 'when the subnet 10.10.60.0/24 behind the USERS Interface goes out to the Internet via the OUTSIDE interface, change its source IP to ASA's OUTSIDE interface IP'
object network user-subnet
 subnet 10.10.60.0 255.255.255.0
 nat (USERS,OUTSIDE) dynamic interface
If you don't want to use the Interface IP for the translation, you can also specify the IP that you want to use as shown below. With this configuration, the source IP is translated to 101.85.10.3
object network user-subnet
 subnet 10.10.60.0 255.255.255.0
 nat (USERS,OUTSIDE) dynamic 101.85.10.3
Manual-NAT configurations
Please note that the Manual NAT configurations are added under global configuration mode. The end result is the same as the Auto NAT.
object network NAT-IP
 host 101.85.10.3

object network user-subnet
 subnet 10.10.60.0 255.255.255.0

nat (USERS,OUTSIDE) source dynamic user-subnet NAT-IP
Scenario 2 - Static NAT
Static NAT, AKA one-to-one NAT is generally used where the traffic destined for a public address is sent to a private address. For example, let's say we have a public-facing web server in our company and we want to translate the public IP address to the real private IP of the server as shown below.
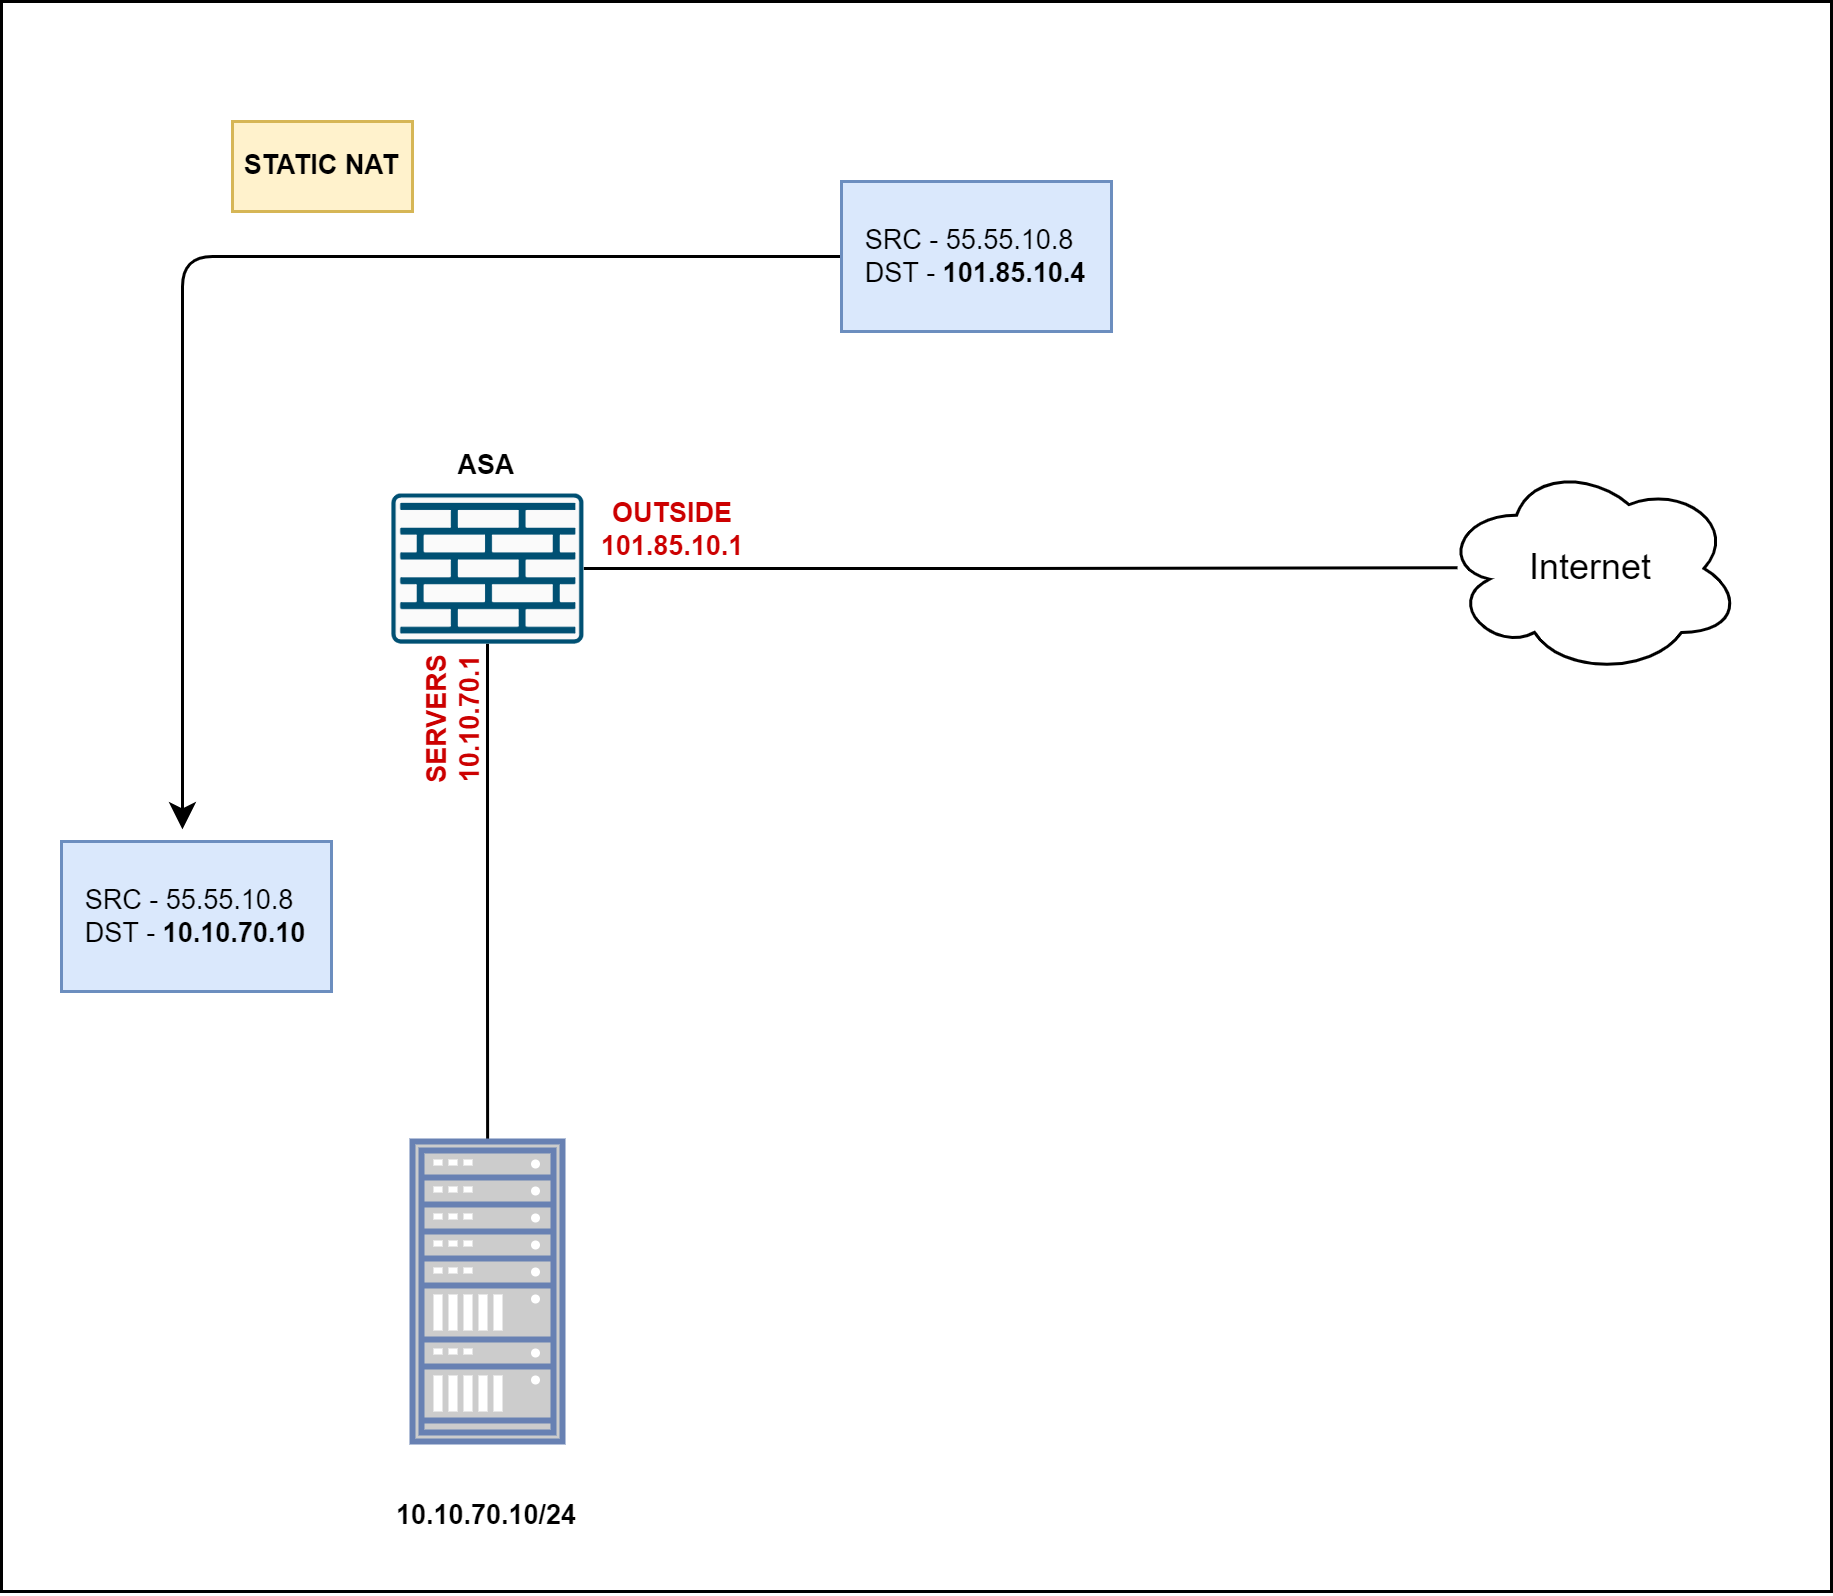
Let's say a user from the Internet with a source IP of 55.55.10.8 initiates a connection to 101.85.10.4. When the connection arrives at the ASA's OUTSIDE interface, the IP address is translated from 101.85.10.4 to 10.10.70.10 and forwarded to the webserver.
Auto NAT
We can read the configuration as, 'when traffic destined to 101.85.10.4 arrives at the ASA's OUTSIDE interface, change its IP to the webserver's private IP of 10.10.70.10'
object network public-web-server
 host 10.10.70.10
 nat (SERVERS,OUTSIDE) static 101.85.10.4
Manual NAT
object network public-web-server
 host 10.10.70.10

object network web-server-NAT
 host 101.85.10.4

nat (SERVERS,OUTSIDE) source static public-web-server web-server-NAT
Scenario 3 - Static PAT
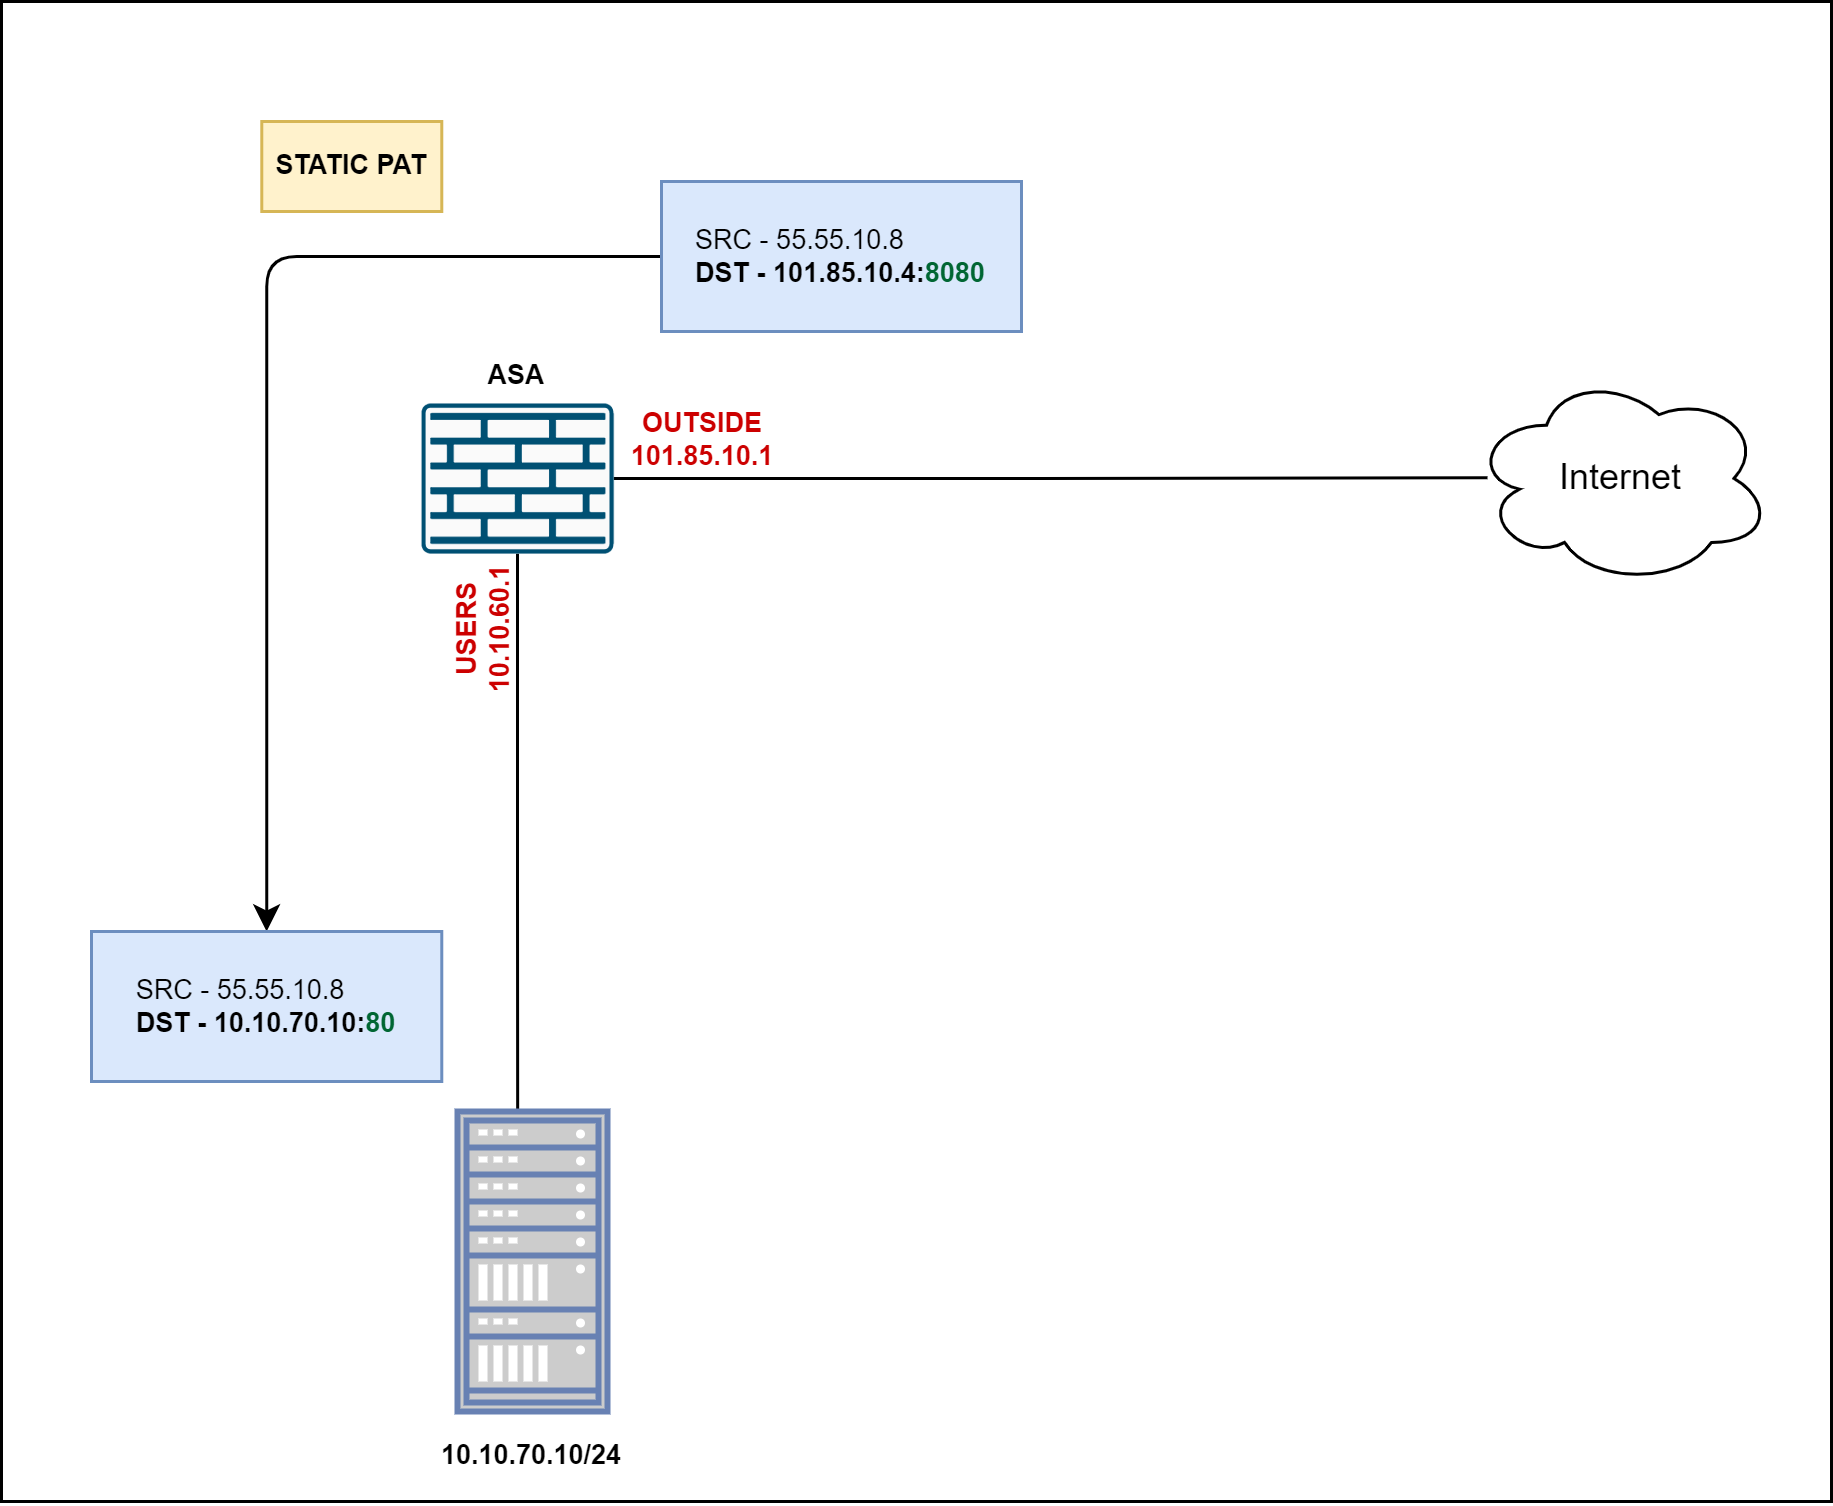
With Static Port Address Translation, we are able to not only modify the IP addresses but also the port numbers. Let's say our web server is listening on port 80 but we want to hide this port from the public Internet and let them connect via a non-standard port 8080.
Auto NAT
We can read the configuration as 'when traffic destined to 101.85.10.4 on port 8080 arrives at the ASA's OUTSIDE interface, change its IP to the webserver's private IP of 10.10.70.10 and the port to 80'
object network public-web-server
 host 10.10.70.10
 nat (SERVERS,OUTSIDE) static 101.85.10.4 service tcp 80 8080
Manual NAT
object network public-web-server
 host 10.10.70.10
object network web-server-NAT
 host 101.85.10.4

object service port-80
 service tcp source eq www
object service port-8080
 service tcp source eq 8080

nat (SERVERS,OUTSIDE) source static public-web-server web-server-NAT service port-80 port-8080
Scenario 4 - NAT Exception
Let's imagine a scenario where we have a site-to-site VPN to a third party as shown below. What will happen when we initiate a connection from 10.10.60.10 to 192.168.10.10? Well, the connection will not work because when the traffic leaves the ASA, the source IP address of the traffic is translated from 10.10.60.10 to 101.85.10.1 (as explained in scenario - 1) which may not match with your Crypto ACL (VPN Interesting traffic)
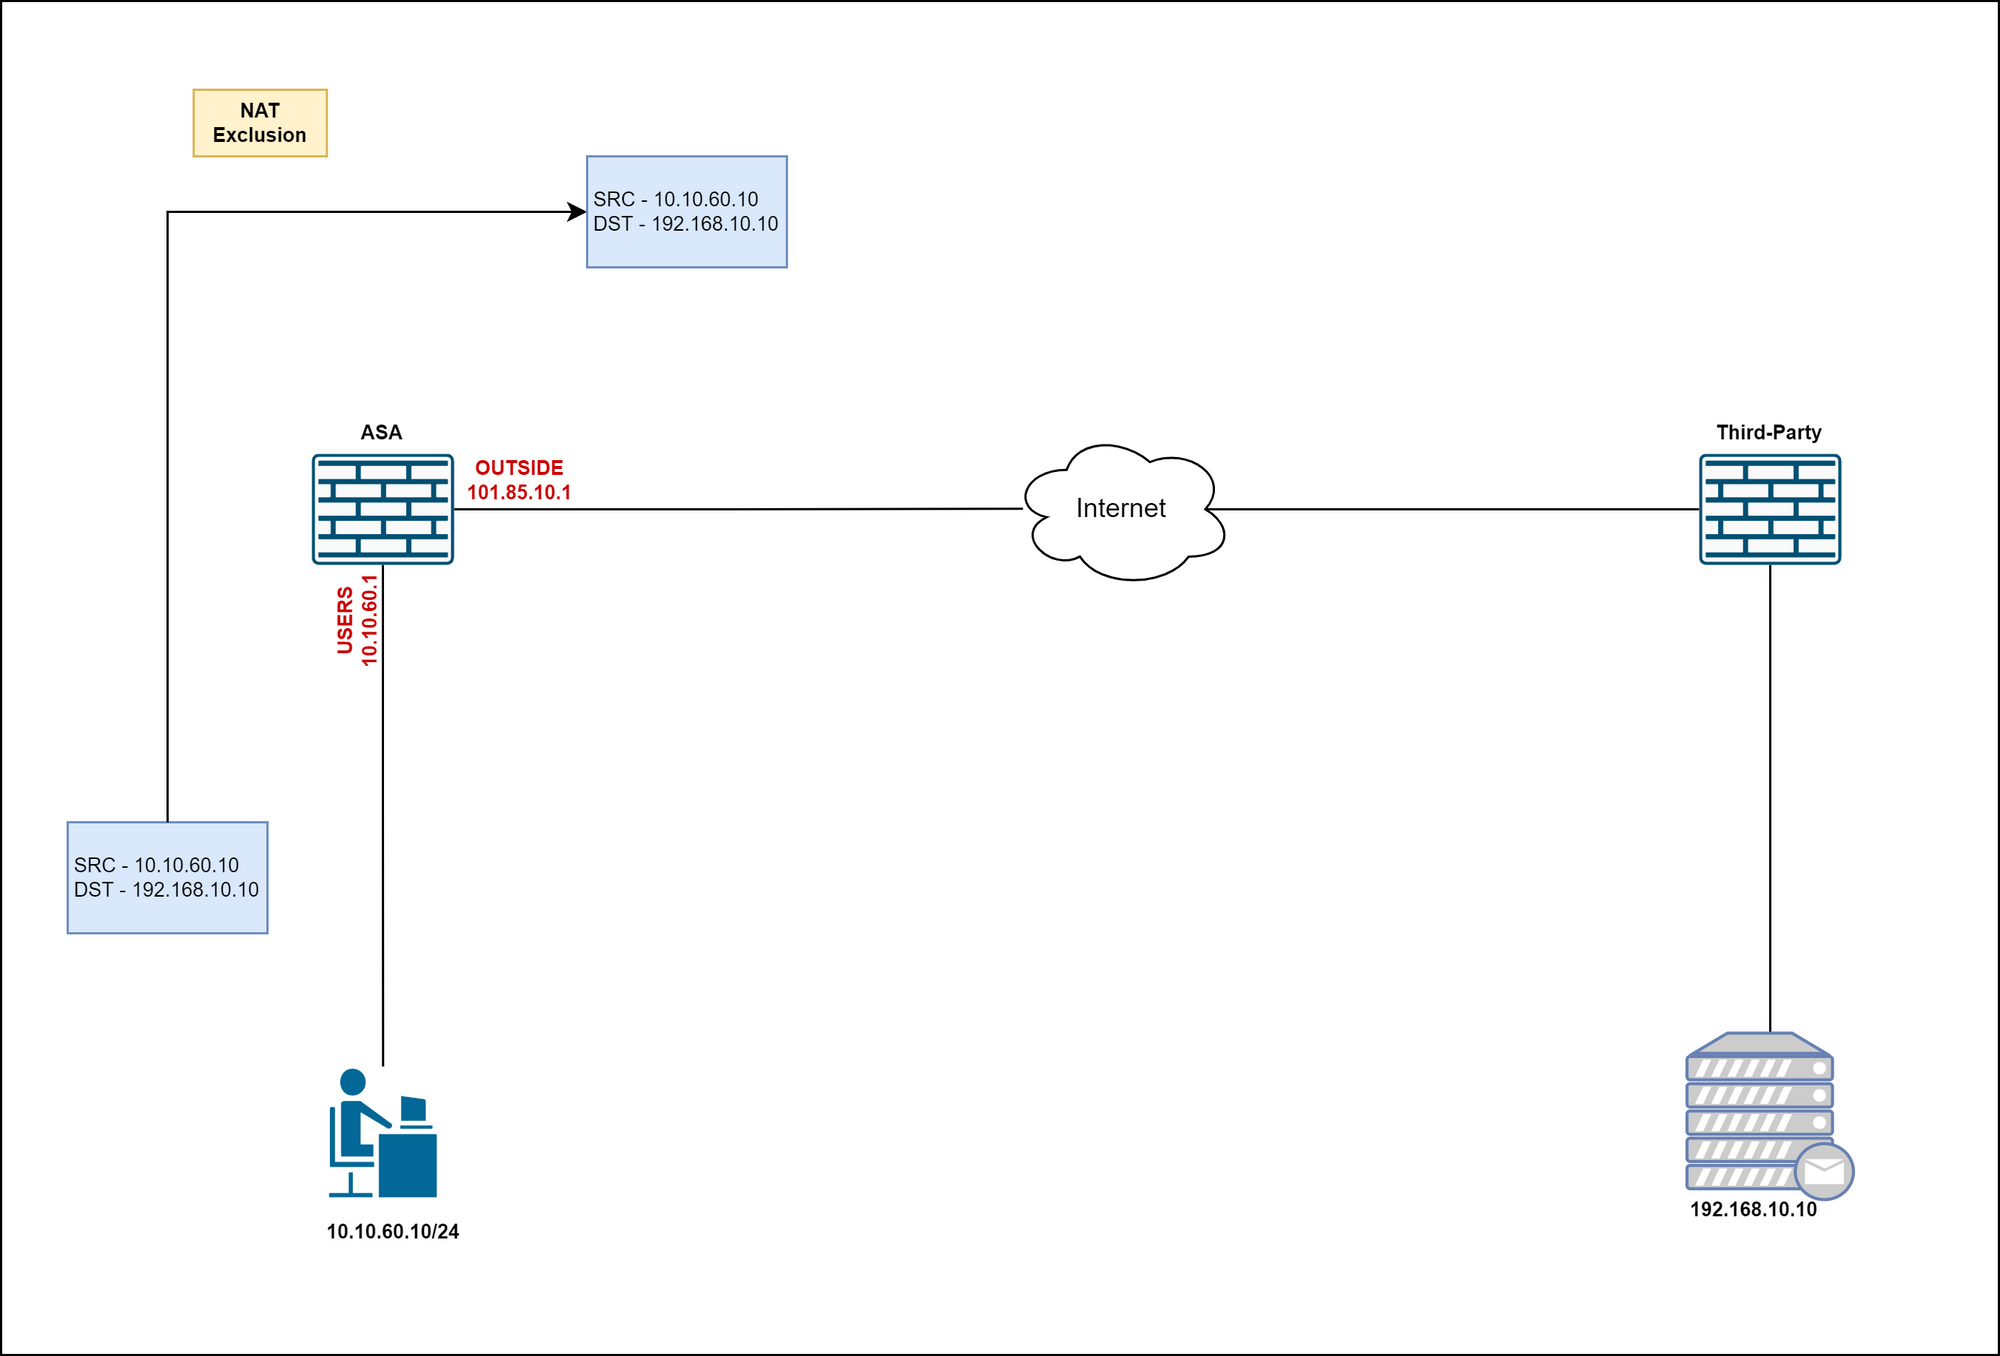
So, what we want to do is instruct ASA not to do translation for the traffic between 10.10.60.0/24 and 192.168.10.0/24. You can only do the exception via Manual NAT.
object network user-subnet
 subnet 10.10.60.0 255.255.255.0
object network 3p-subnet
 subnet 192.168.10.0 255.255.255.0

nat (USERS,OUTSIDE) source static user-subnet user-subnet destination static 3p-subnet 3p-subnet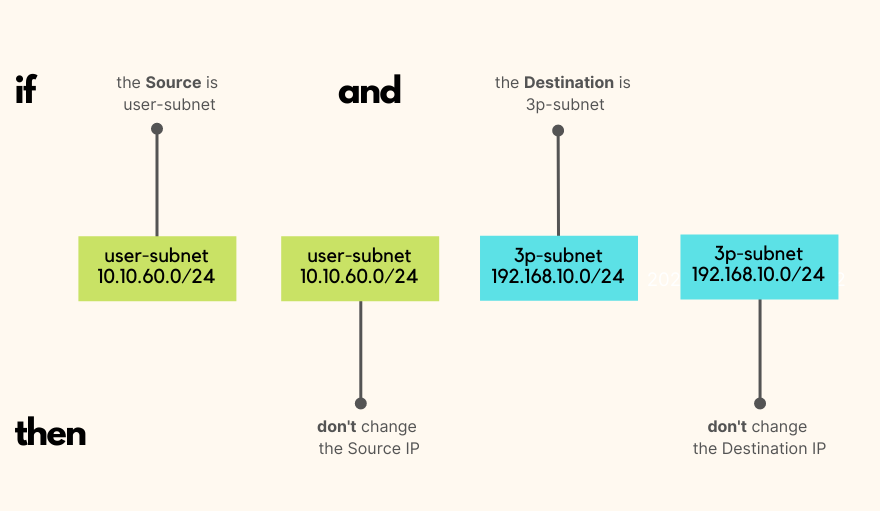
NAT Precedence
You may think that now we ended up with both Auto NAT and Manual NAT so, which one takes precedence? Well, Manual NAT takes precedence over the Auto NAT. So, if you were to add a NAT exemption just like the one we mentioned in the previous step, that takes precedence over the Auto NAT.
Closing up
You can use show xlate command to view the NAT translations. You can also use the packet-tracer command to see how the NAT translation would work as shown below.
branch-01# show xlate
3 in use, 3 most used
Flags: D - DNS, e - extended, I - identity, i - dynamic, r - portmap,
       s - static, T - twice, N - net-to-net
NAT from USERS:10.10.60.0/24 to OUTSIDE:10.10.60.0/24
    flags sIT idle 0:06:09 timeout 0:00:00
NAT from OUTSIDE:192.168.10.0/24 to USERS:192.168.10.0/24
    flags sIT idle 0:06:09 timeout 0:00:00

ICMP PAT from USERS:10.10.60.10/1047 to OUTSIDE:101.85.10.1/1047 flags ri idle 0:00:00 timeout 0:00:30
shows 10.10.60.10 is translated to 101.85.10.1
branch-01# packet-tracer input USERS tcp 10.10.60.10 25000 1.1.1.1 80

Phase: 1
Type: ACCESS-LIST
Subtype:
Result: ALLOW
Config:
Implicit Rule
Additional Information:
MAC Access list

Phase: 2
Type: ROUTE-LOOKUP
Subtype: Resolve Egress Interface
Result: ALLOW
Config:
Additional Information:
found next-hop 101.85.10.6 using egress ifc  OUTSIDE

Phase: 3
Type: NAT
Subtype:
Result: ALLOW
Config:
nat (USERS,OUTSIDE) source dynamic user-subnet NAT-IP
Additional Information:
Dynamic translate 10.10.60.10/25000 to 101.85.10.1/25000
Phase: 3 shows the NAT translations
There is so much to talk about ASA NAT configurations but I tried to cover the most used scenarios. Please let me know in the comments if you would like to see any more examples.


