In this blog post, we'll be exploring a practical example of how to configure Wireless 802.1X with Cisco Identity Services Engine (ISE) and Meraki using EAP-TLS. We're breaking down a typical network scenario and explaining it in a way that's easy to understand.
The process we'll detail involves a domain-joined PC connecting to an 802.1X-protected SSID. We'll walk you through configuring the ISE, the PC, and the AP to enable this sequence of events. By the end of this post, you'll understand this specific network access control scenario and be better equipped to manage it in your own network environment.
If you are looking for the Wired 802.1x EAP-TLS, please check out my other blog post below.
 Suresh Vina
Assumptions and Prerequisites
Before we proceed, let's establish the assumptions and prerequisites for this guide. This blog post assumes that you have a foundational understanding of Cisco ISE and the 802.1X protocol.
Additionally, it is assumed that the PC we're focusing on is already joined to the domain and operating correctly. Active Directory' (AD) has also been integrated with the ISE. For EAP-TLS to work, the users (or machines if you are using machine authentication) should have a user certificate issued by a trusted CA. In this example, I'm using Active Directory Certificates Services to issue user certificates.
If you want to learn more about 802.1X or NAC in general, please check out my other blog post below.
Suresh Vina
What is 802.1X?
802.1X is an IEEE standard for port-based network access control that provides secure network access to corporate networks. You cannot secure if you don't know what's on your network. The 802.1X framework functions as a gatekeeper for entry to enterprise networks (wired and wireless).
When a user or device wants to gain access to a wired/wireless network, 802.1X acts as a framework that verifies the person/device connecting is who they say they are.
The Components of 802.1X
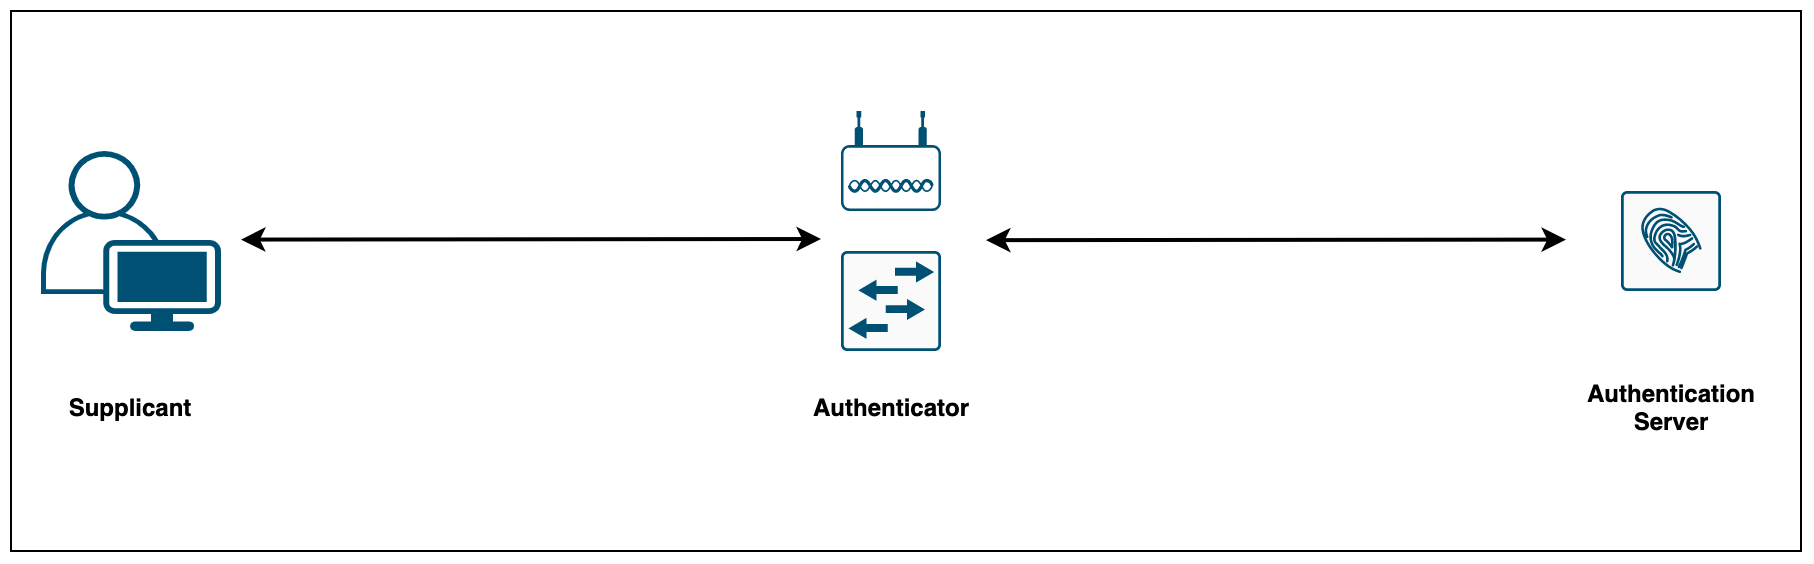
802.1X consists of three components:
- The Supplicant (laptop) is the device attempting to gain access to the network. The supplicant communicates with the authenticator via 802.1X-encapsulated EAP packets
- The Authenticator (AP) is the gatekeeper to the network and permits or denies access to the supplicants. The authenticator acts as an intermediary (proxy) between the supplicant and the authentication server. The authenticator requests identity information (credentials/certificates) from the supplicant via EAP packets, verifies that information with the authentication server and then relays a response to the supplicant (access permit or deny)
- The Authentication Server (Cisco ISE) performs the actual authentication of the supplicant. By examining the information in the encapsulated EAP messages relayed from the authenticator, the authentication server validates the identity of the supplicant and responds back to the authenticator whether or not the supplicant is authorized to access the network.
Choosing an EAP Method
When deploying 802.1X, it is important to choose an EAP method that meets your organization’s security standards. Choosing which EAP method to use is one of the most important decisions because different EAP methods offer differing levels of security and complexity. This example solely focuses on EAP-TLS.
Which EAP type to implement solely depends on the level of security that the organization requires and the administrative overhead. If you are looking for a higher level of security, EAP-TLS is the best choice, providing the strongest authentication method using client and server-side certificates.
Even though there are many EAP types available, I've listed the most popular ones.
- EAP-TLS relies on client-side and server-side certificates to perform mutual authentication. This is considered one of the strongest EAP types however, it requires each and every client to have a certificate pre-installed.
- EAP-PEAP requires only server-side certificates for the client to authenticate the authentication server. PEAP is known as a tunnelled EAP type because it first establishes an outer tunnel using TLS and then sends the credentials via an inner tunnel. The inner tunnel can be virtually any EAP type but the widely used inner method is MSCHAPV2.
- EAP-FAST is very similar to PEAP, it first establishes an outer TLS tunnel. Inside this encrypted tunnel, a secondary inner EAP method (such as MSCHAPv2) is used to authenticate the user.
Certificates
For EAP-TLS to work, we need certificates so, let's get to it. The first step is to configure a Certificate Template that AD Certification Services (AD CS) uses as the starting point for device certificates that are automatically enrolled and deployed to machines or users in the domain.
The below procedure shows how to create a copy of a template, and then configure the newly created template to enable auto-enrollment.
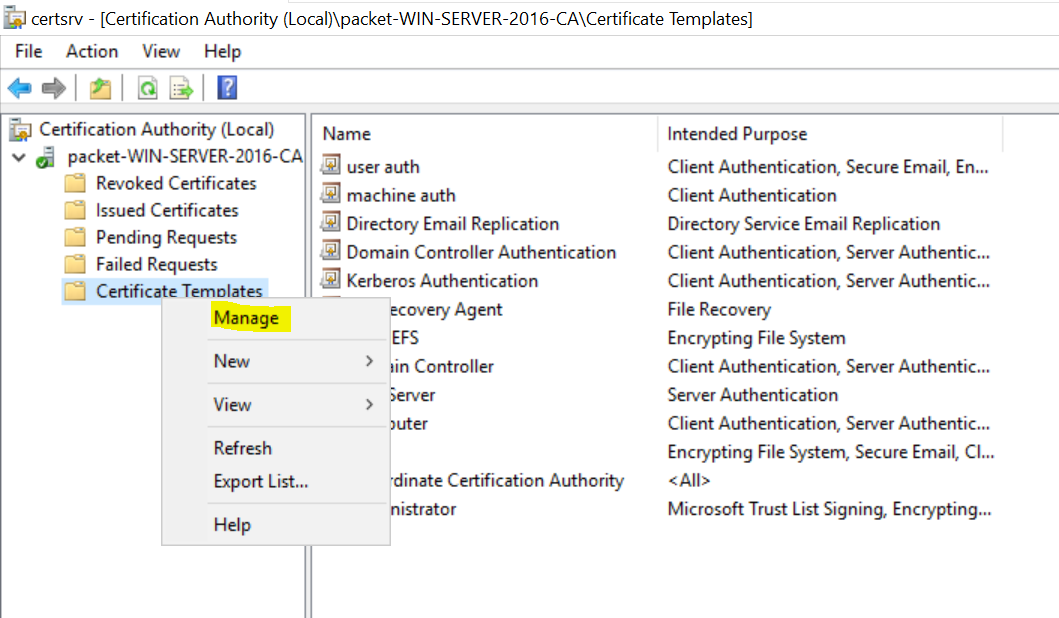
- Navigate to Certificate Authority > Certificate Templates > Manage
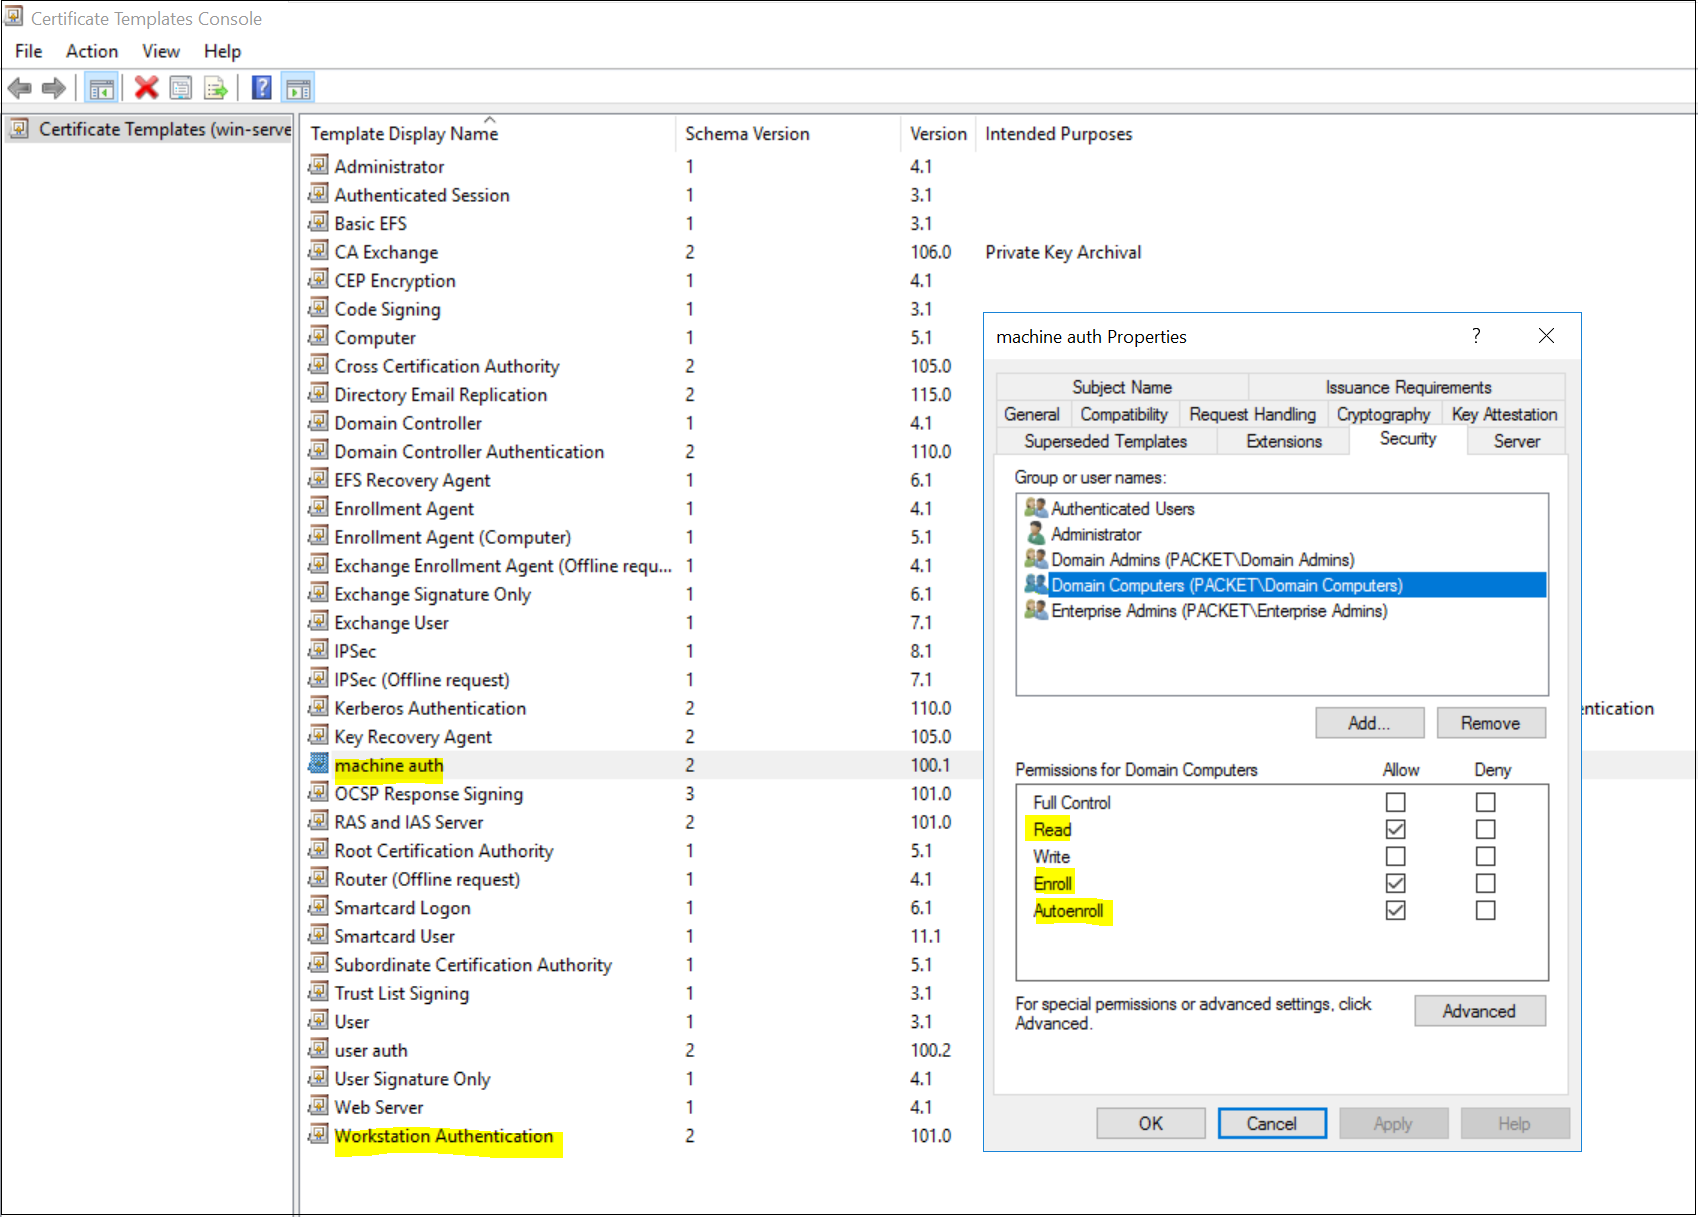
- For machine certificates, duplicate the 'Workstation Authentication' template and give a suitable name ('machine auth' in this example)
- Under the Security tab, Allow Read, Enroll and Autoenroll for 'Domain Computers'
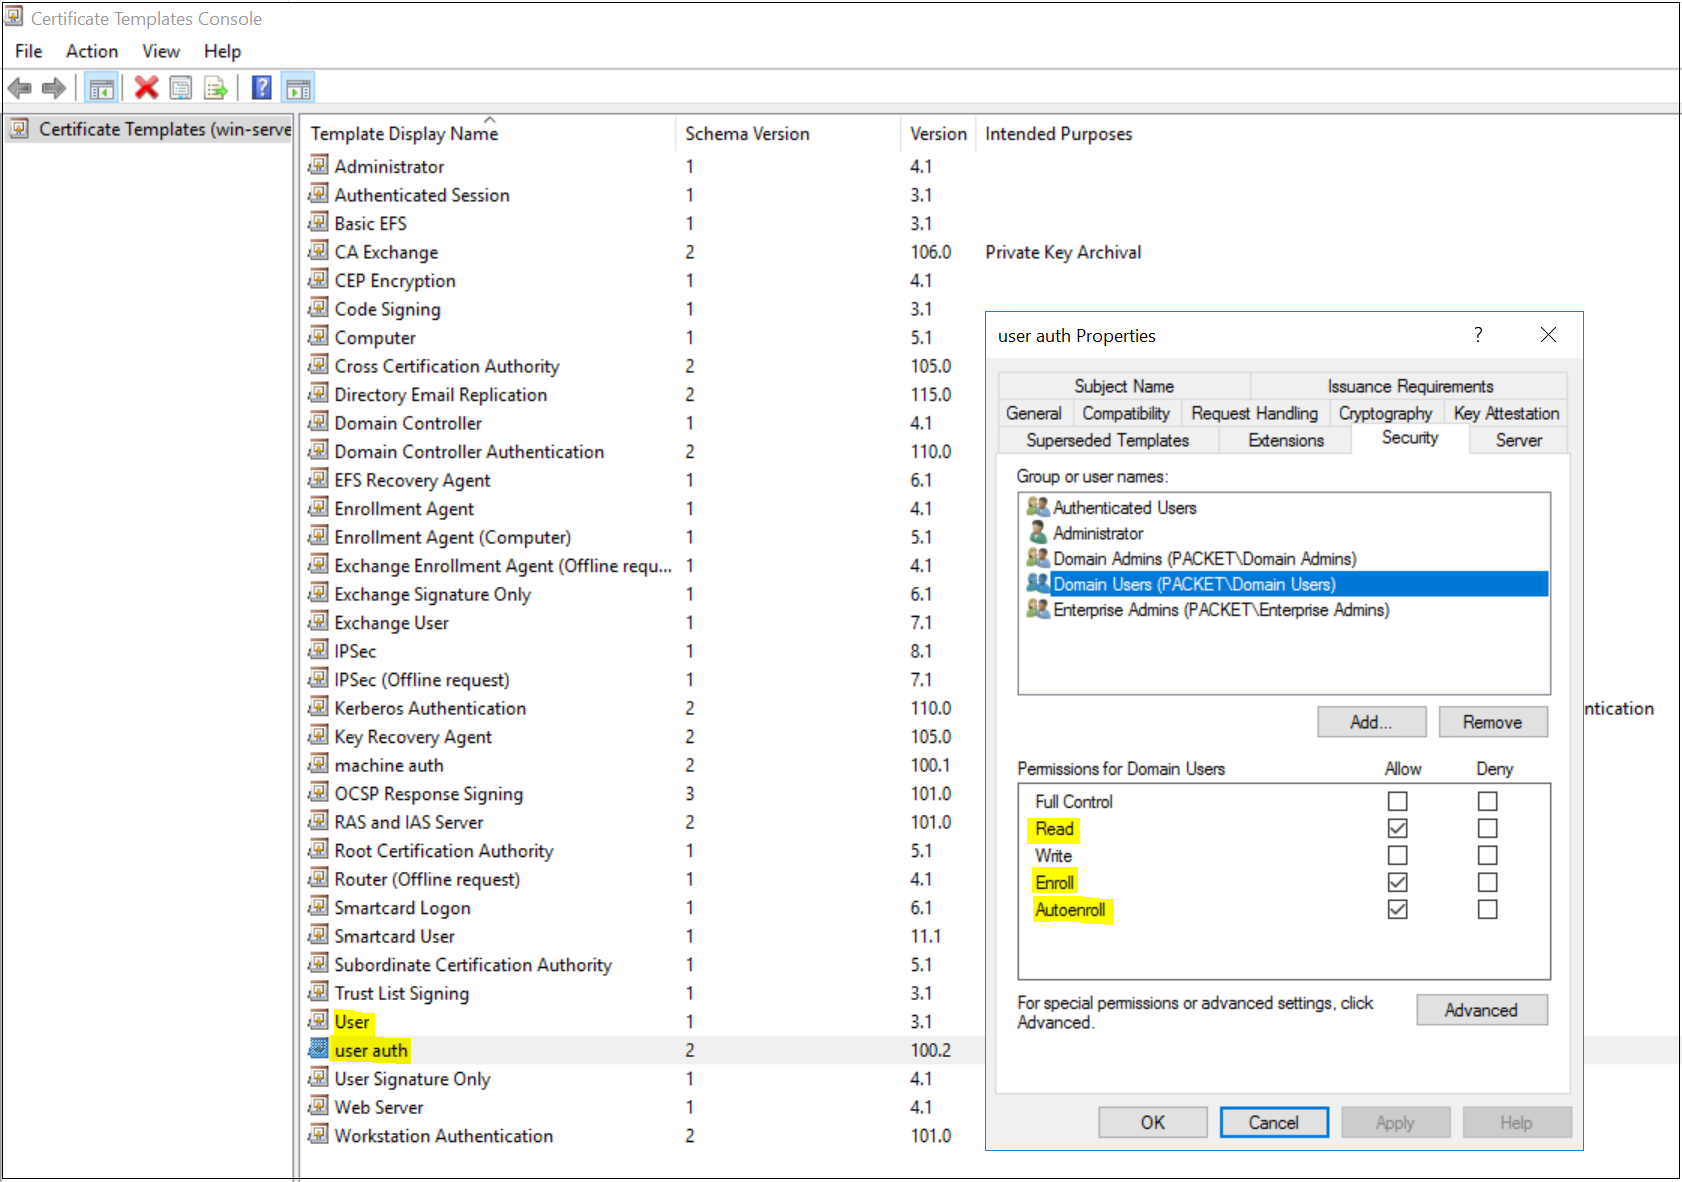
- For user certificates, duplicate the 'User' template and give a suitable name ('user auth' in this example)
- Under Security tab, Allow Read, Enroll and Autoenroll for 'Domain Users'
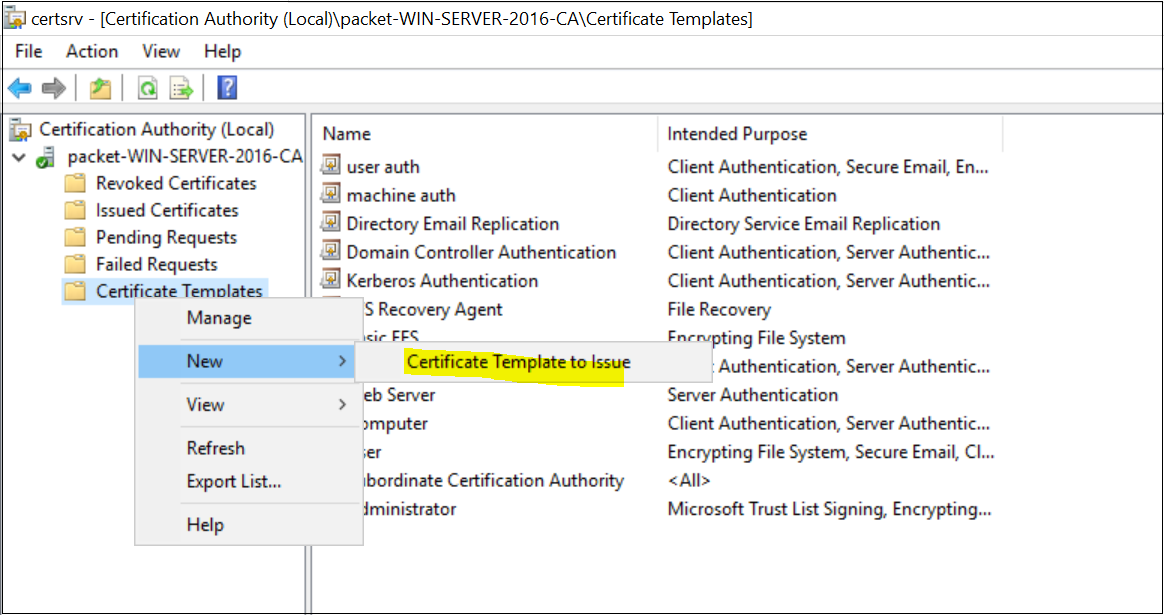
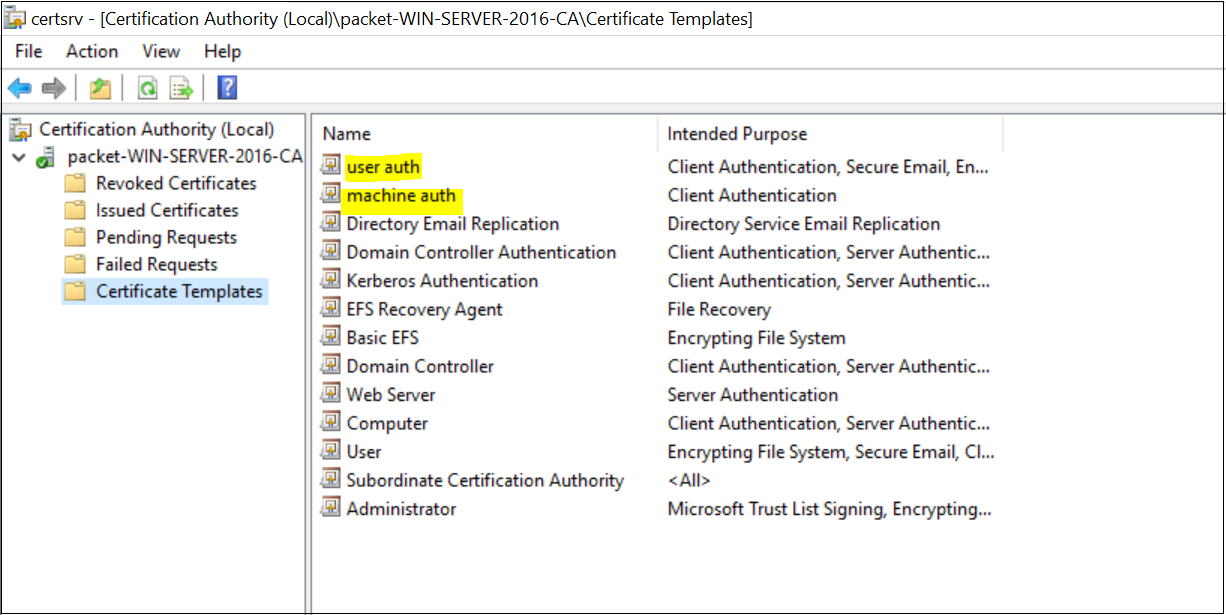
The next step is to Publish the newly created certificate templates as shown below. Once you added the certificates, they are available for enrollment.
You can use Group Policy to automatically enrol both computer and user certificates and deploy them to the workstations.
- Open the Group Policy Management console.
- Edit the GPO that you want to modify (using the Default Domain Policy in this example)
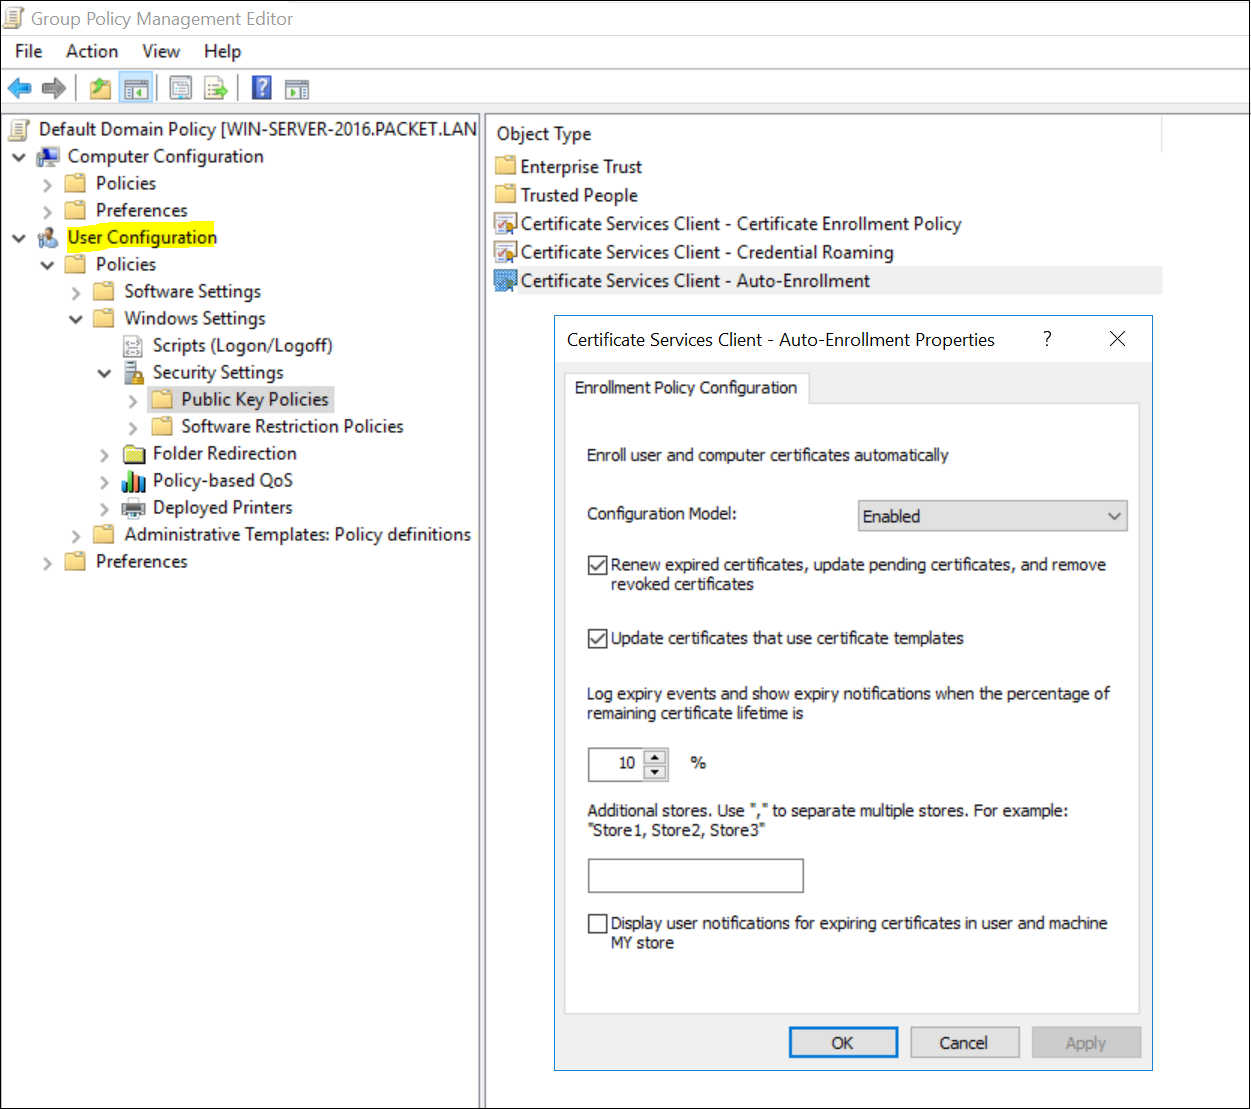
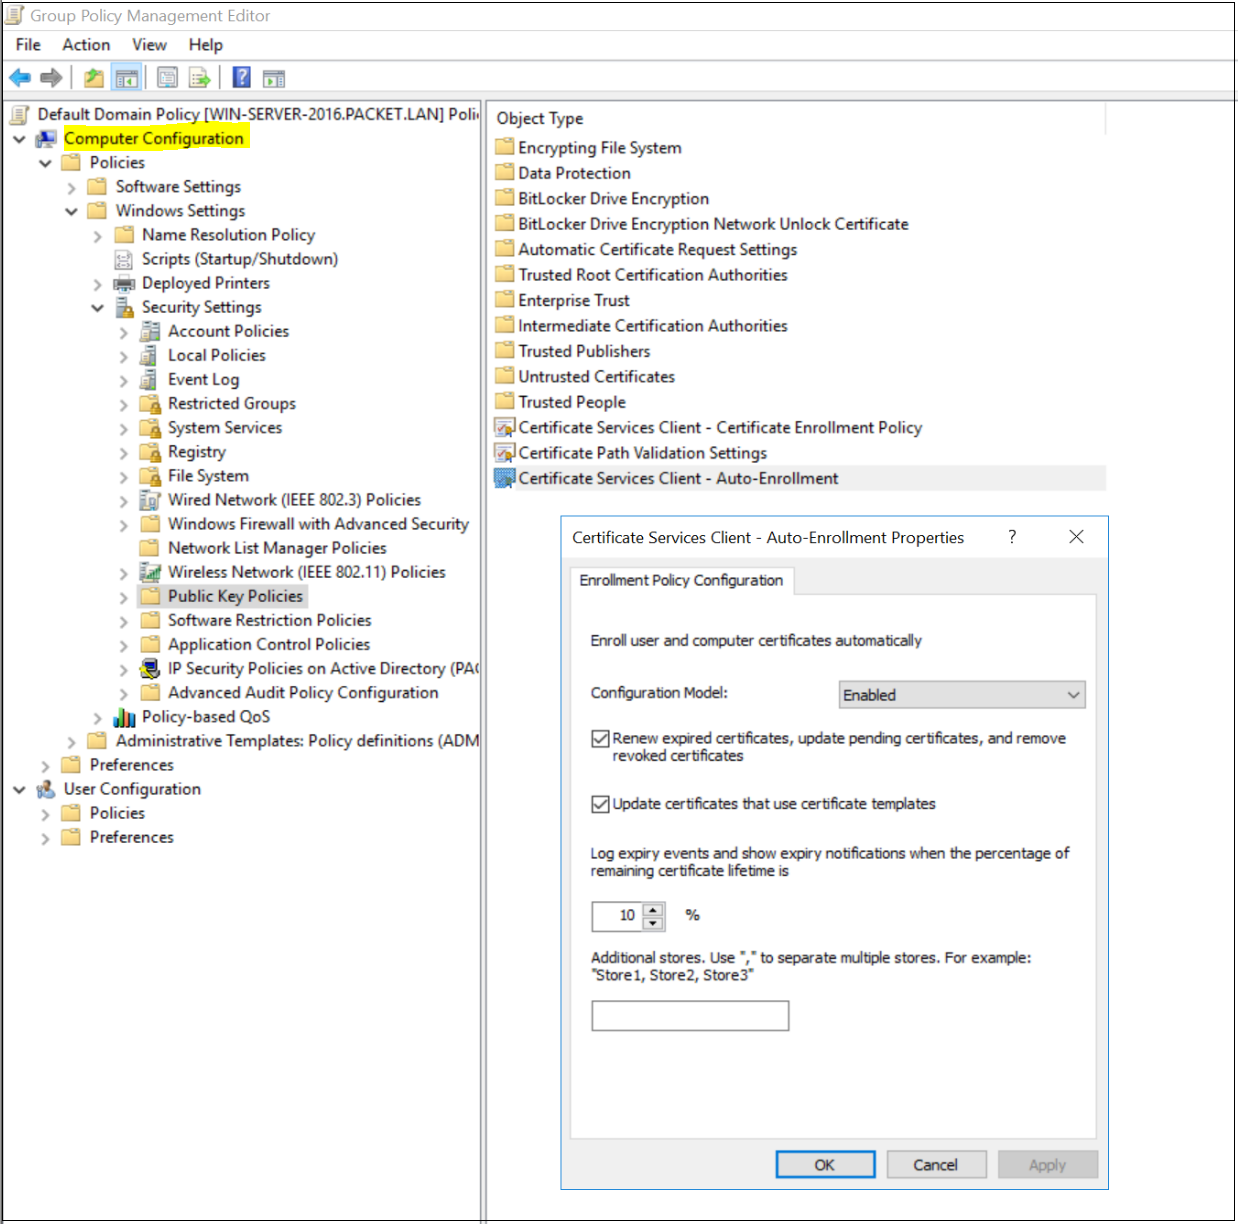
- Navigate to User | Computer Configuration, Policies, Windows Settings, Security Settings, and Public Key Policies.
- Double-click Certificate Services Client - Auto-Enrollment.
- Change Configuration Model to Enabled.
- Select both Renew expired certificates and Update certificates that use certificate templates.
- Click OK to save your changes. Workstations apply the GPO and download the certificate the next time Group Policy is refreshed.
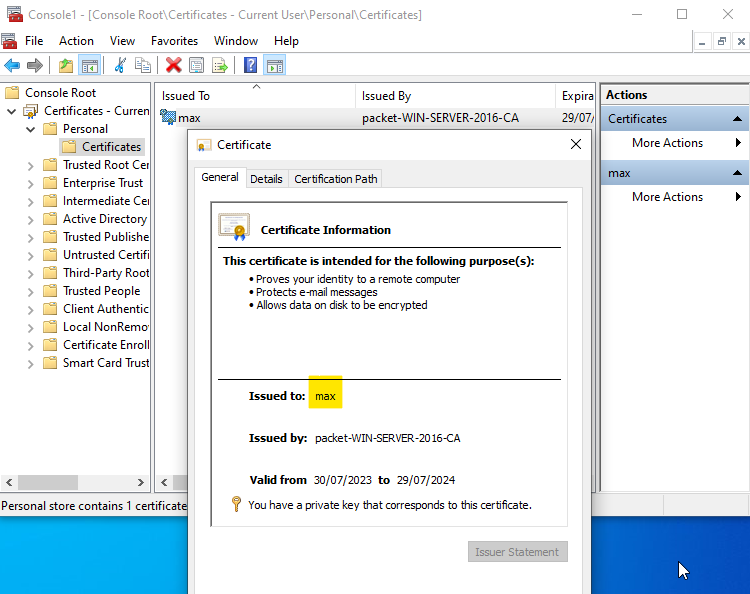
Once all the configurations are completed, you can either reboot your computer or force the GPO update by running gpupdate /force on the command line to receive the certificates. You can view the certificates on the MMC console.
Windows 10 / Supplicant Configurations
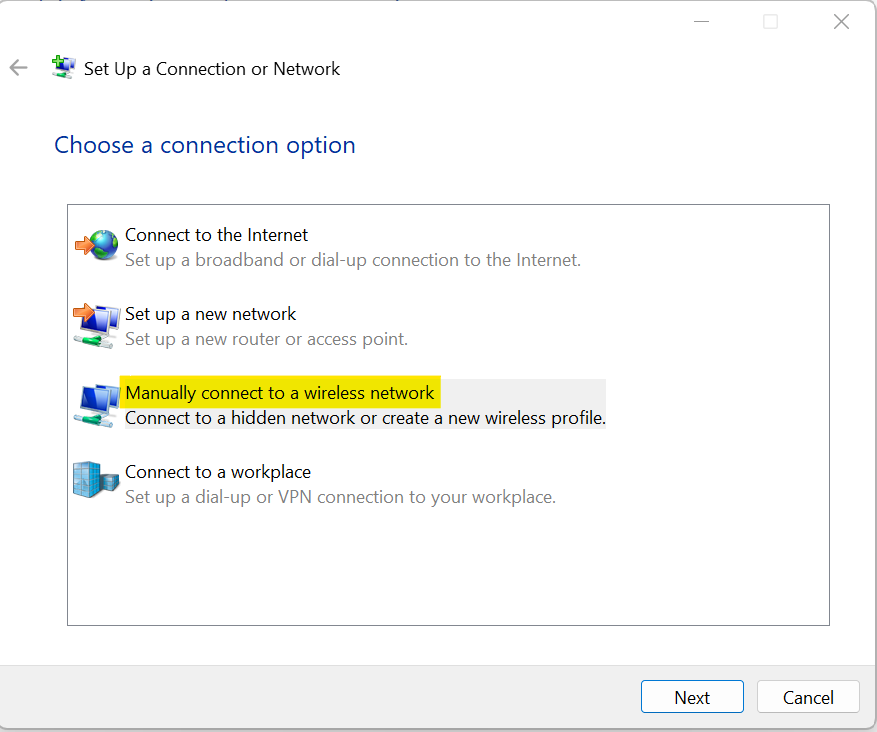
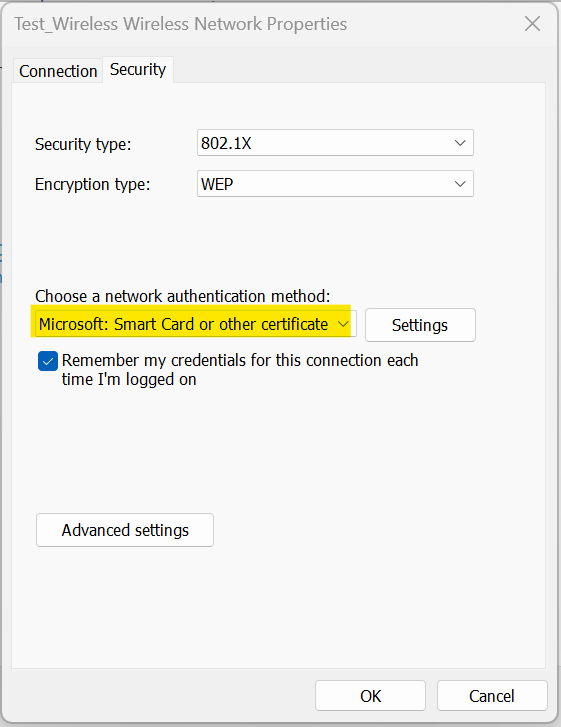
Configuring 802.1X on a wireless connection isn't the same as its wired counterpart. While wired setups have you navigate directly to the Ethernet adapter properties, wireless doesn't offer a direct 802.1X tab.
Instead, for wireless.
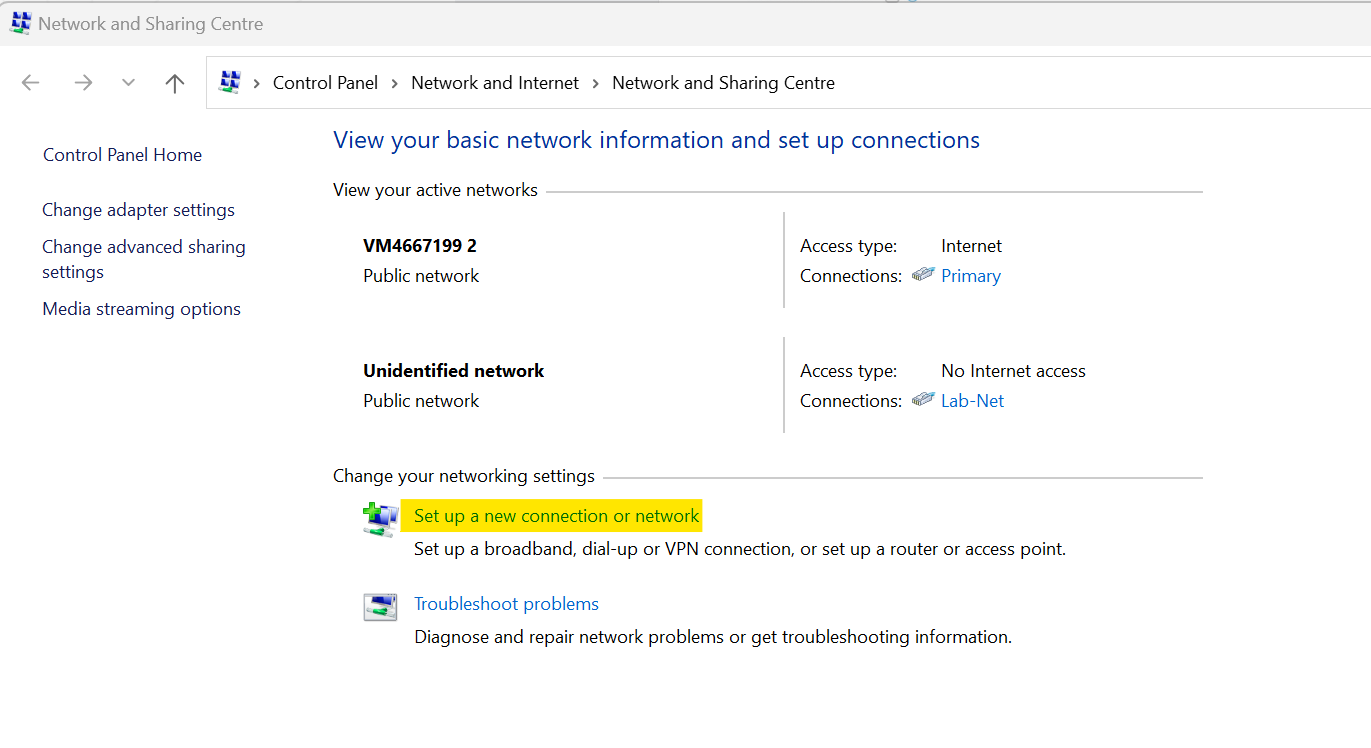
- Go to the Control Panel.
- Click on Network and Sharing Center.
- Choose Set up a new connection or network.
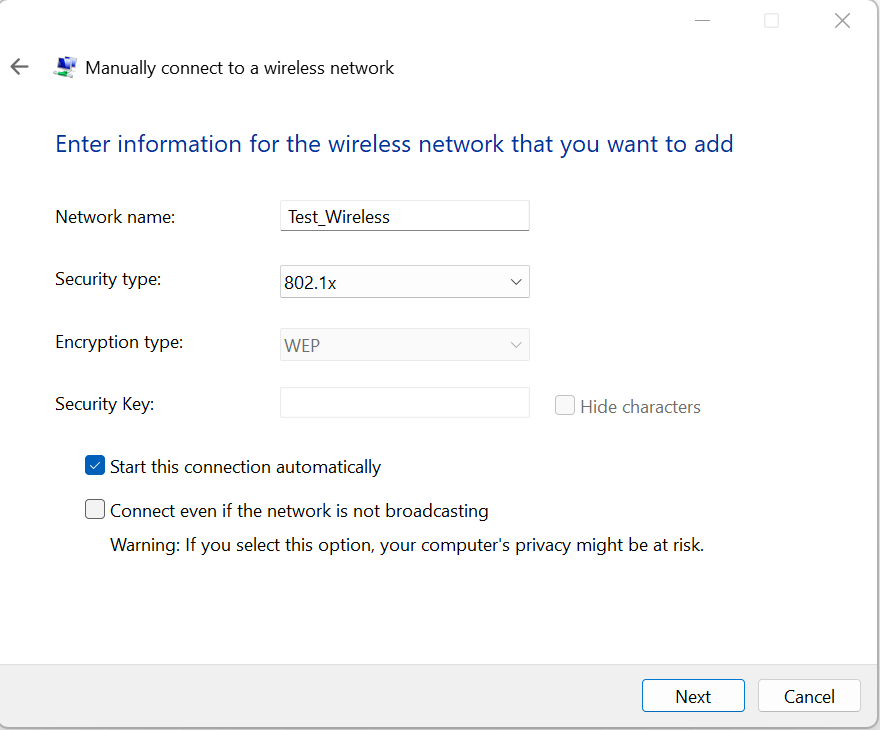
- Here, you can define the 802.1X properties.
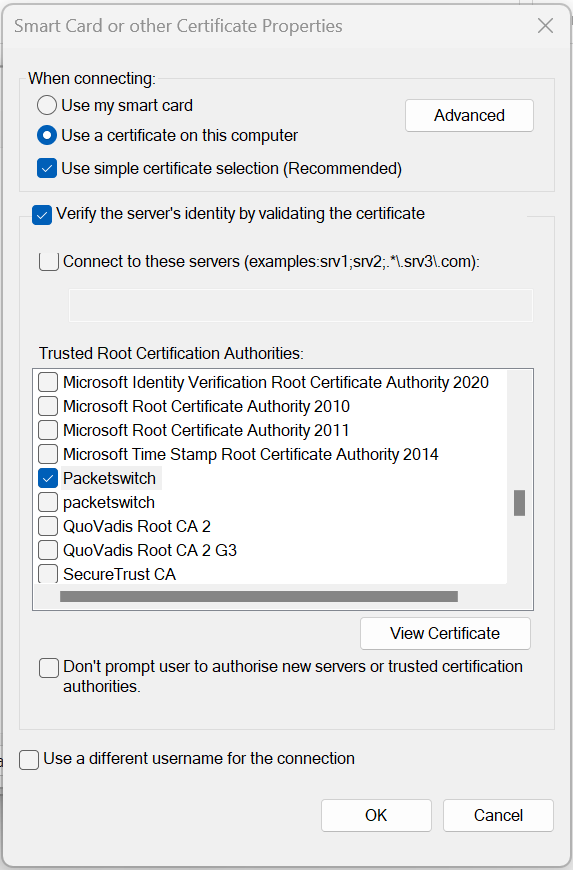
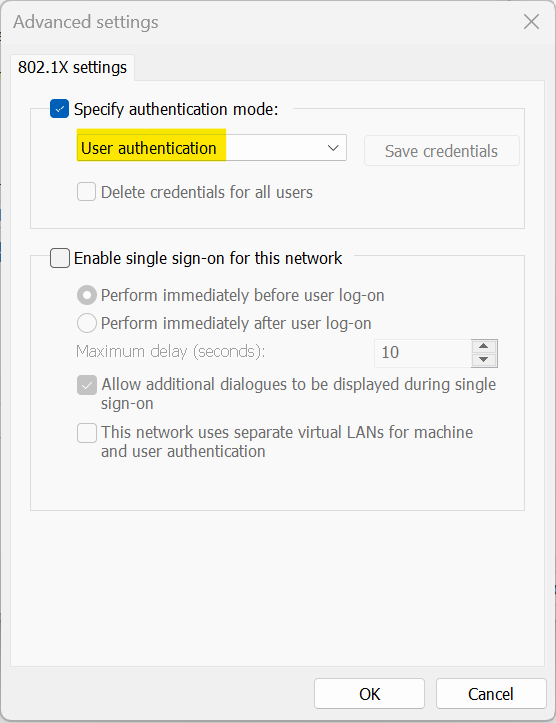
In this configuration, I've selected EAP-TLS as the preferred method. I'm also using user-only authentication and have chosen the root certificate corresponding to the one that issued ISE's identity certificate.

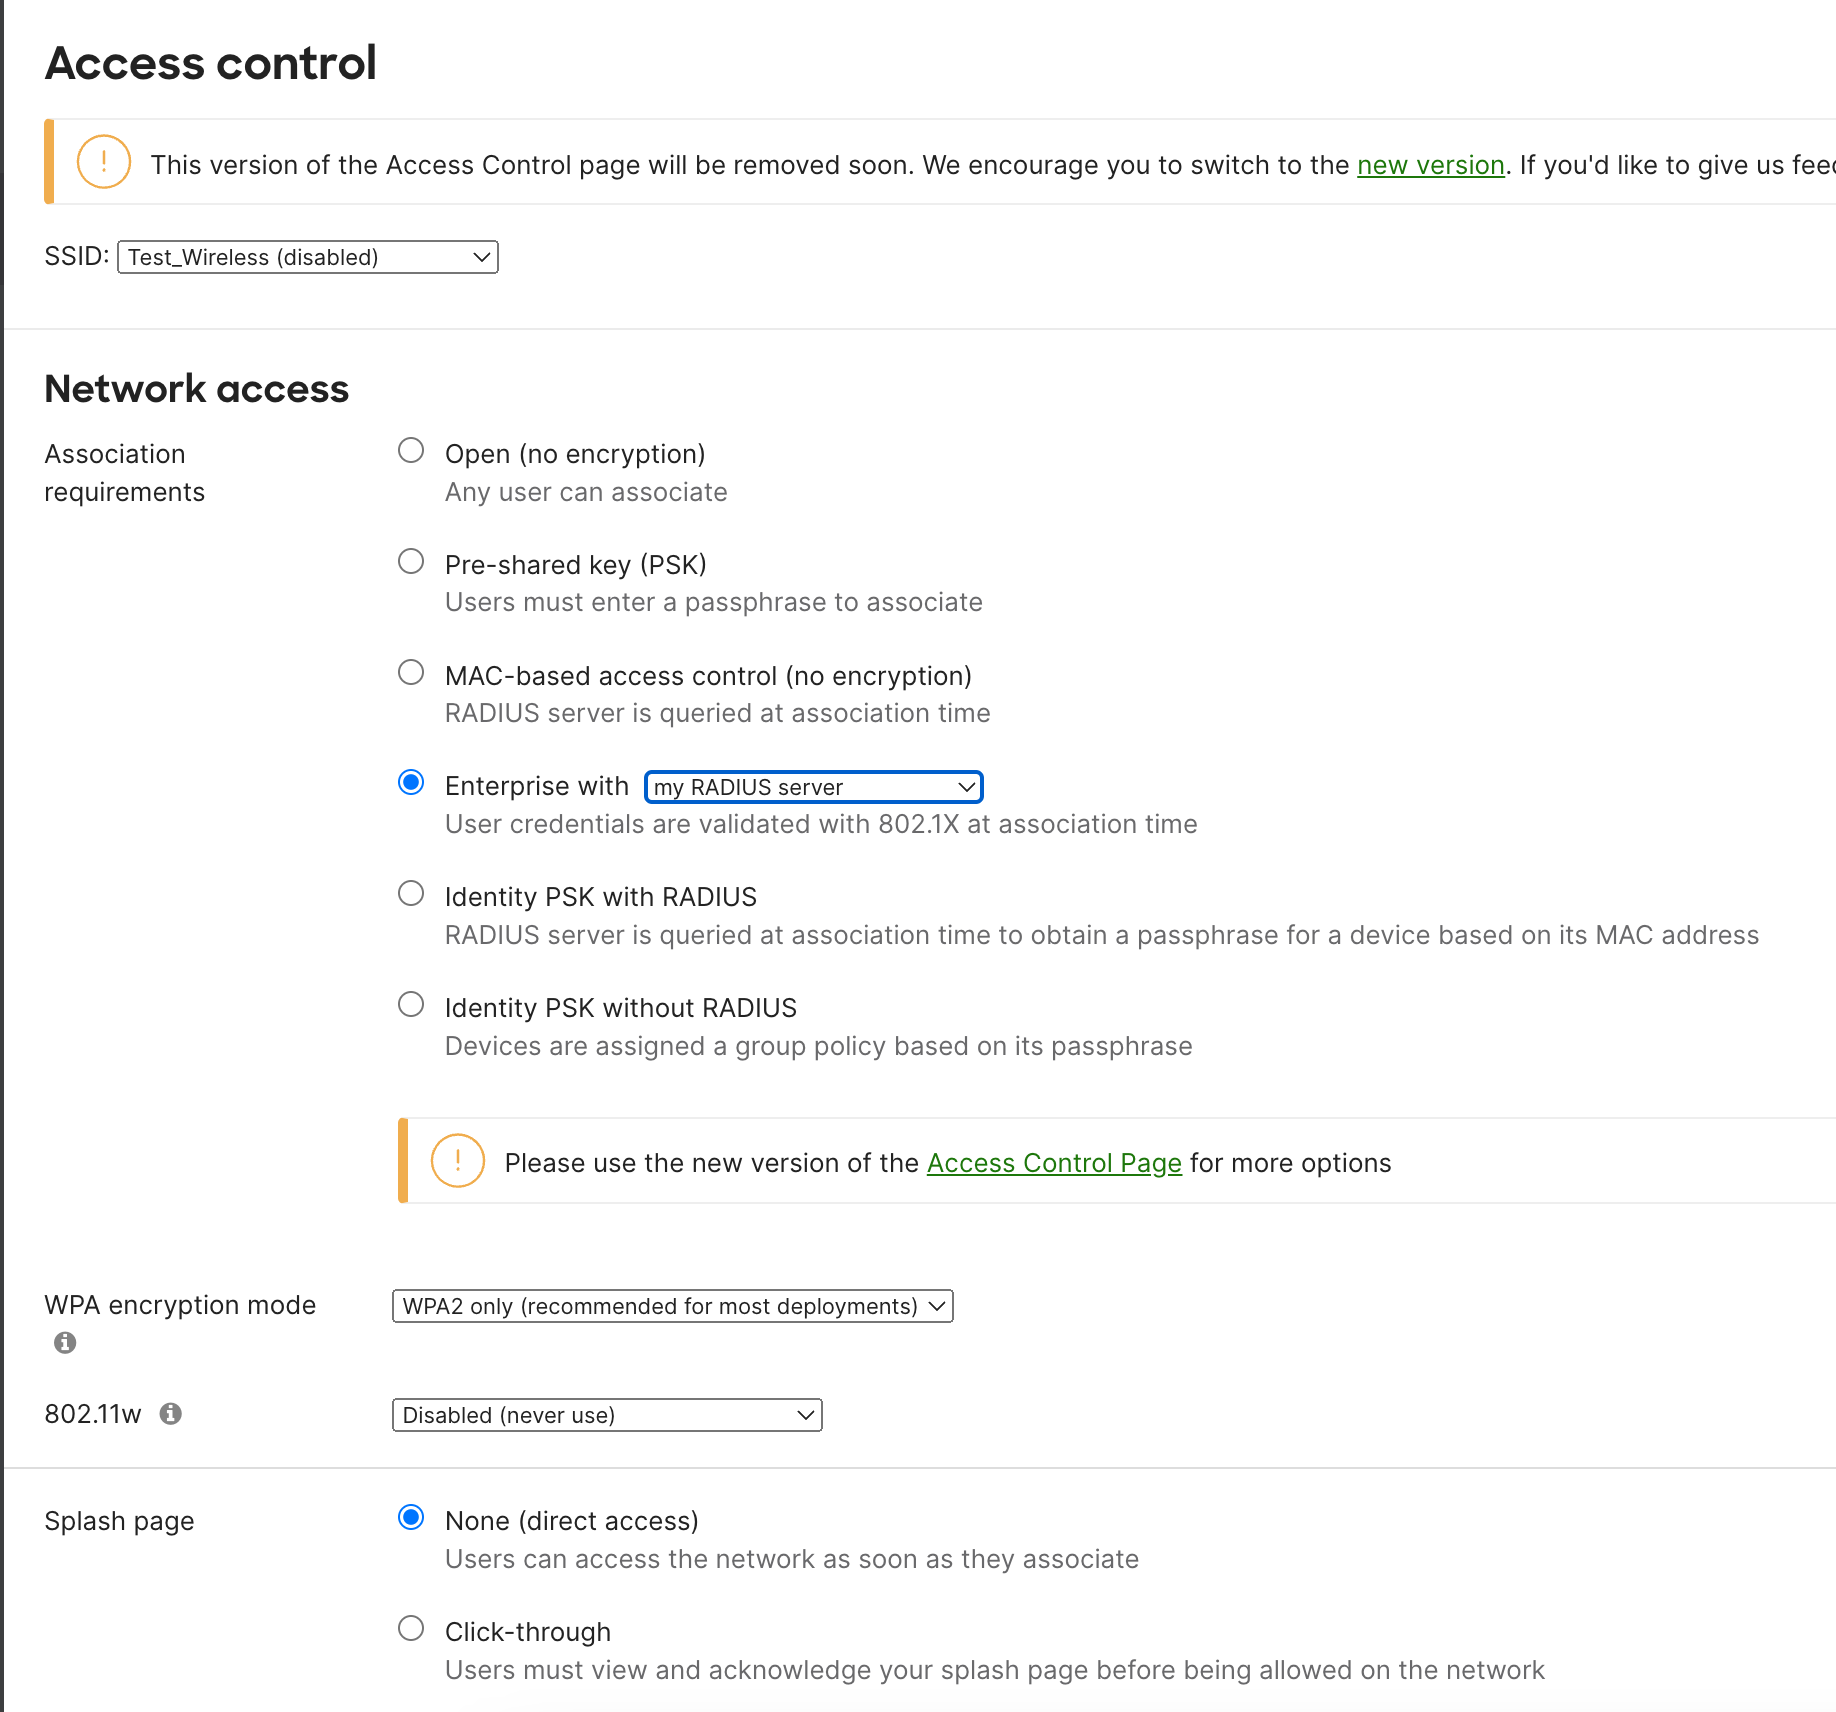
Access Point / Authenticator Configuration
Configuring the AP for our use case, it's important to note that there are a lot of settings that could be adjusted to tweak and tune the behaviour of 802.1X. For the sake of simplicity, our example will only focus on the most essential configurations.
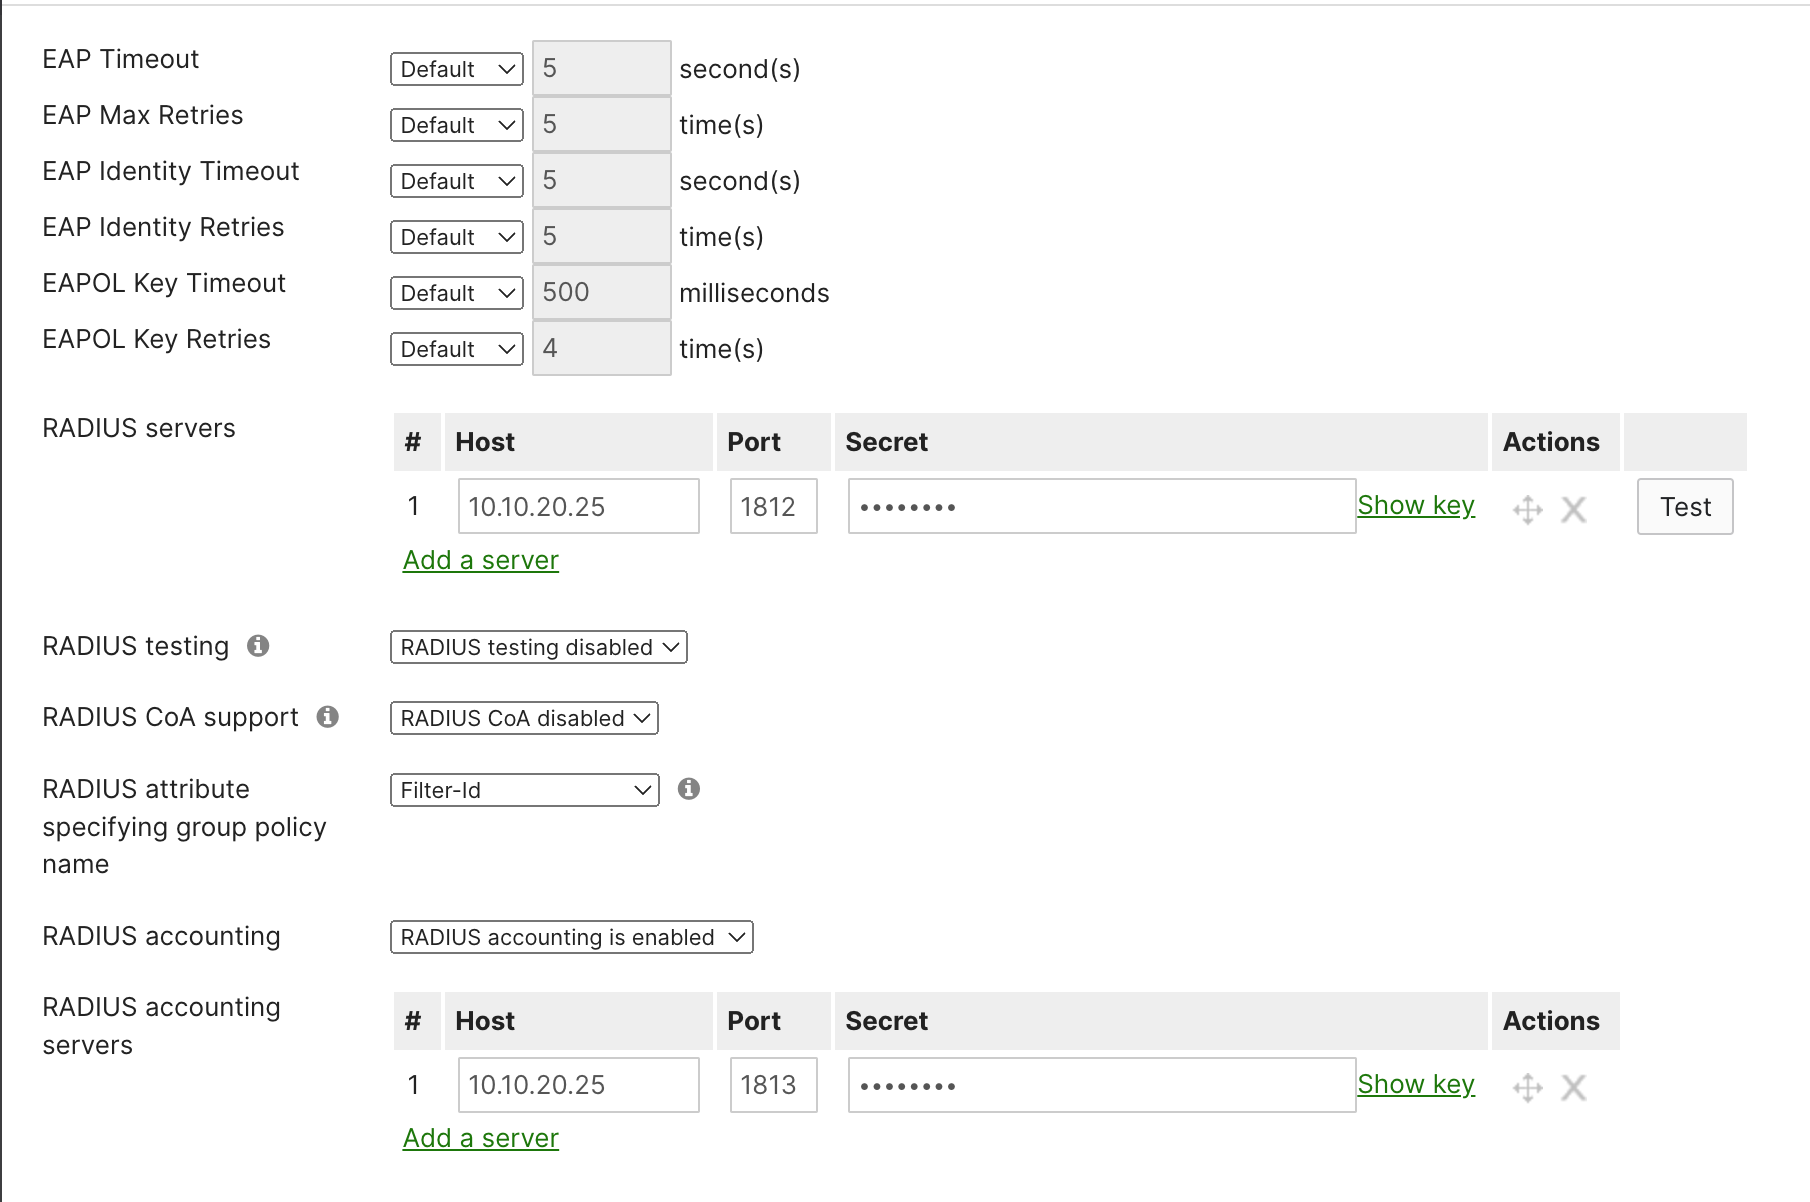
Cisco ISE / Authentication Server Configuration
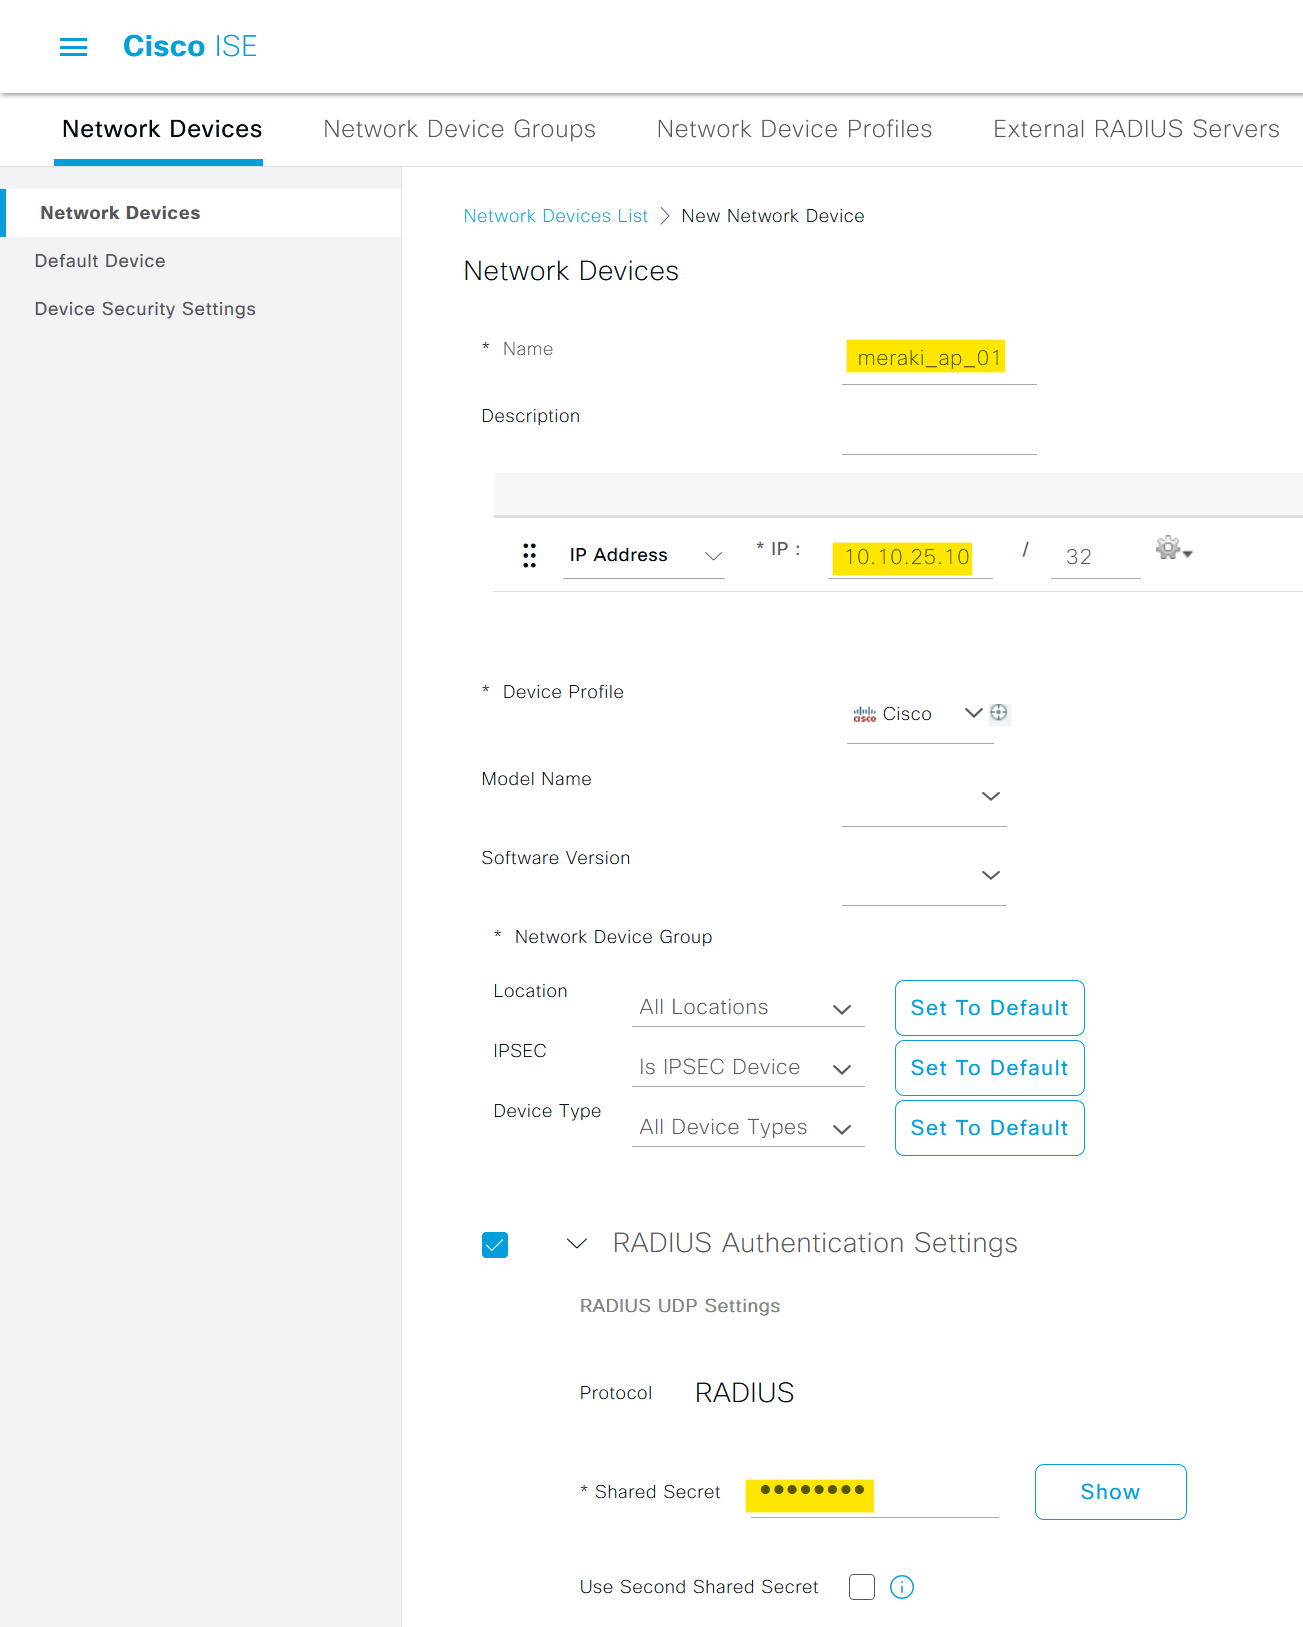
Step 1: Add the AP as a Network Device in ISE
The very first step is to add the AP as a Network Device in ISE. To do this, navigate to the ISE management interface and select 'Network Resources' followed by 'Network Devices'.
Here you can add a new device (our AP) by specifying the IP address and shared secret, which should match the configurations set in the AP.
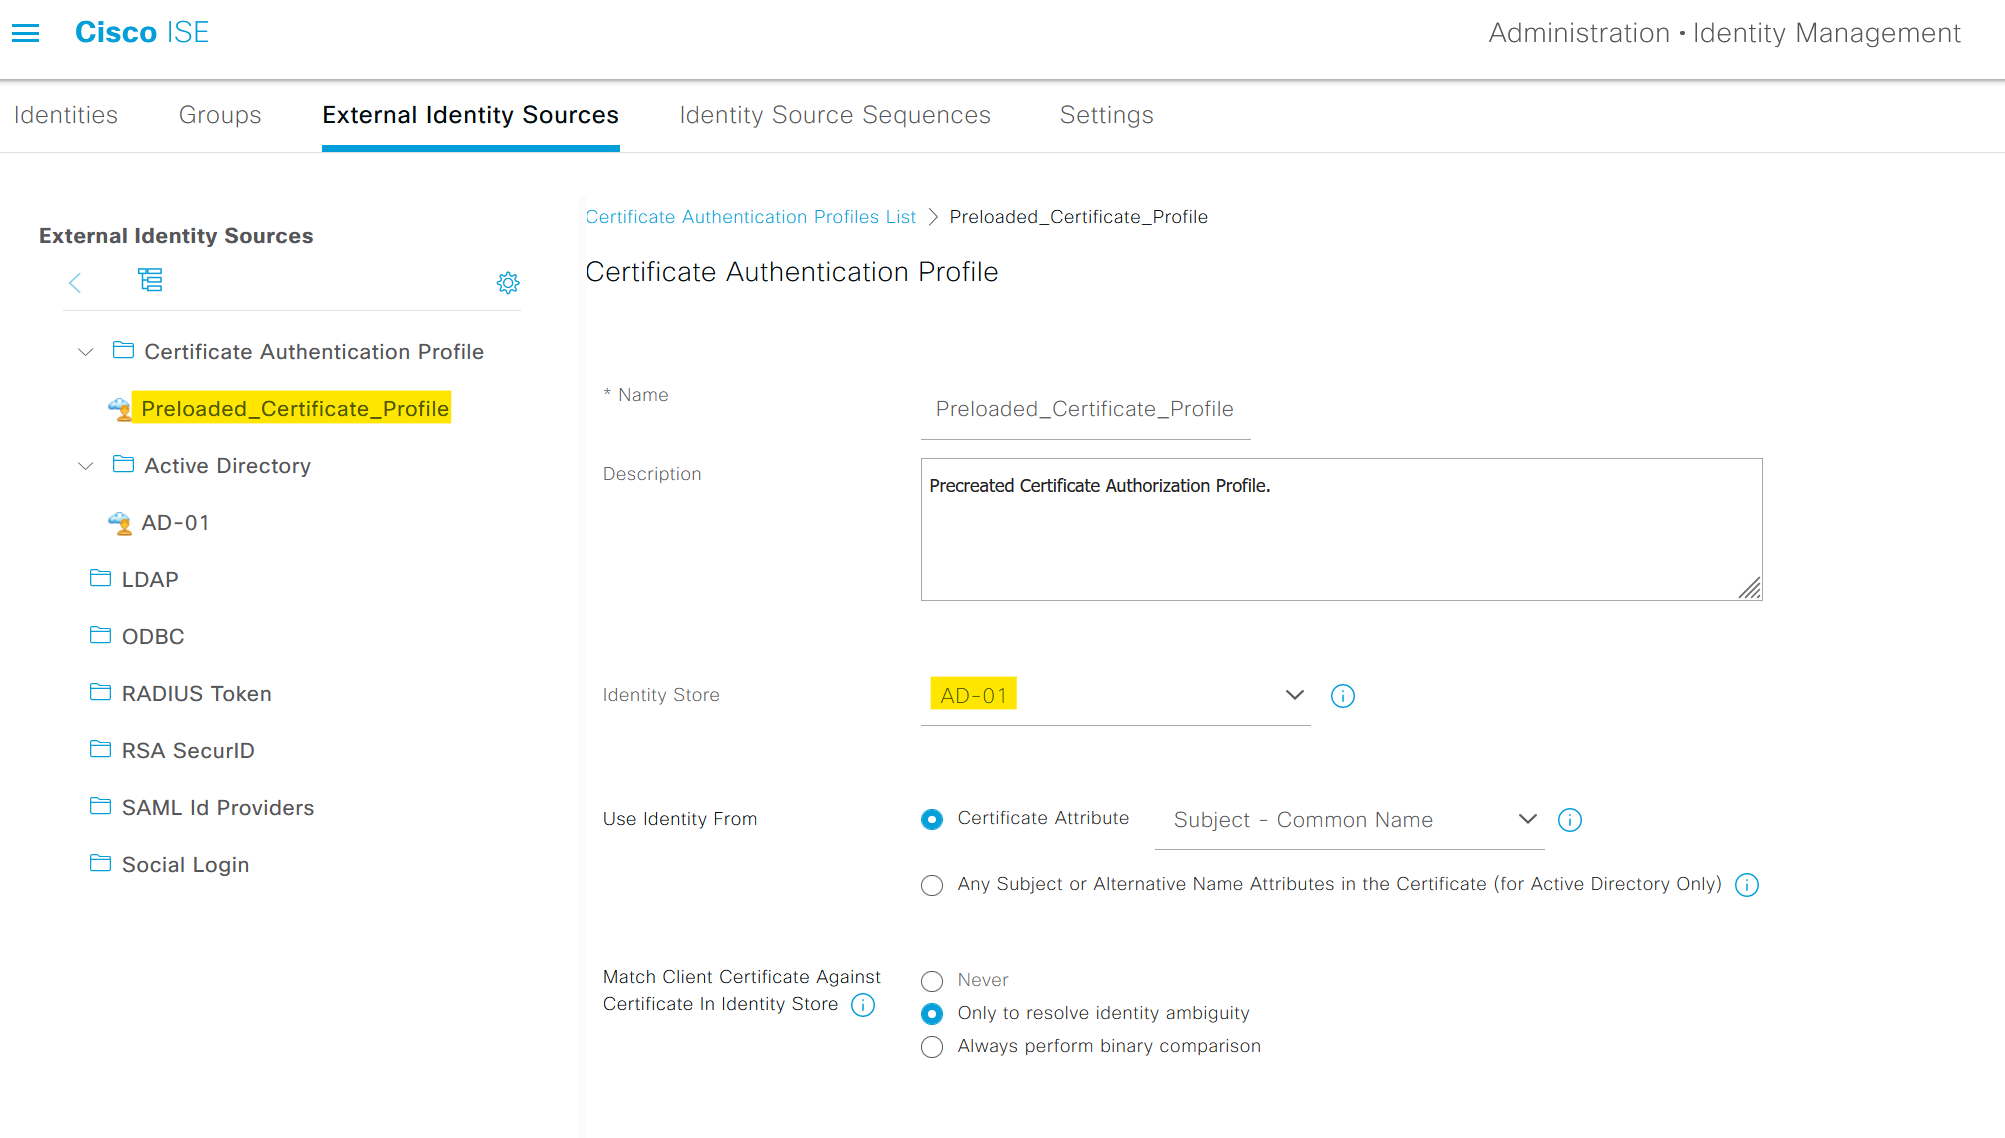
Step 2 - Certificate Authentication Profile
The purpose of the Certificate Authentication Profile is to inform ISE which certificate field the identity (machine or user) can be found on the client certificate presented to ISE during EAP-TLS. These settings are bound to the Authentication Policy to authenticate the identity.
From ISE GUI, navigate to Administration > Identity Management > External Identity Sources > Certificate Authentication Profile and select or add a profile. I'm using the default profile for this example and points the Identity Store to Active Directory.
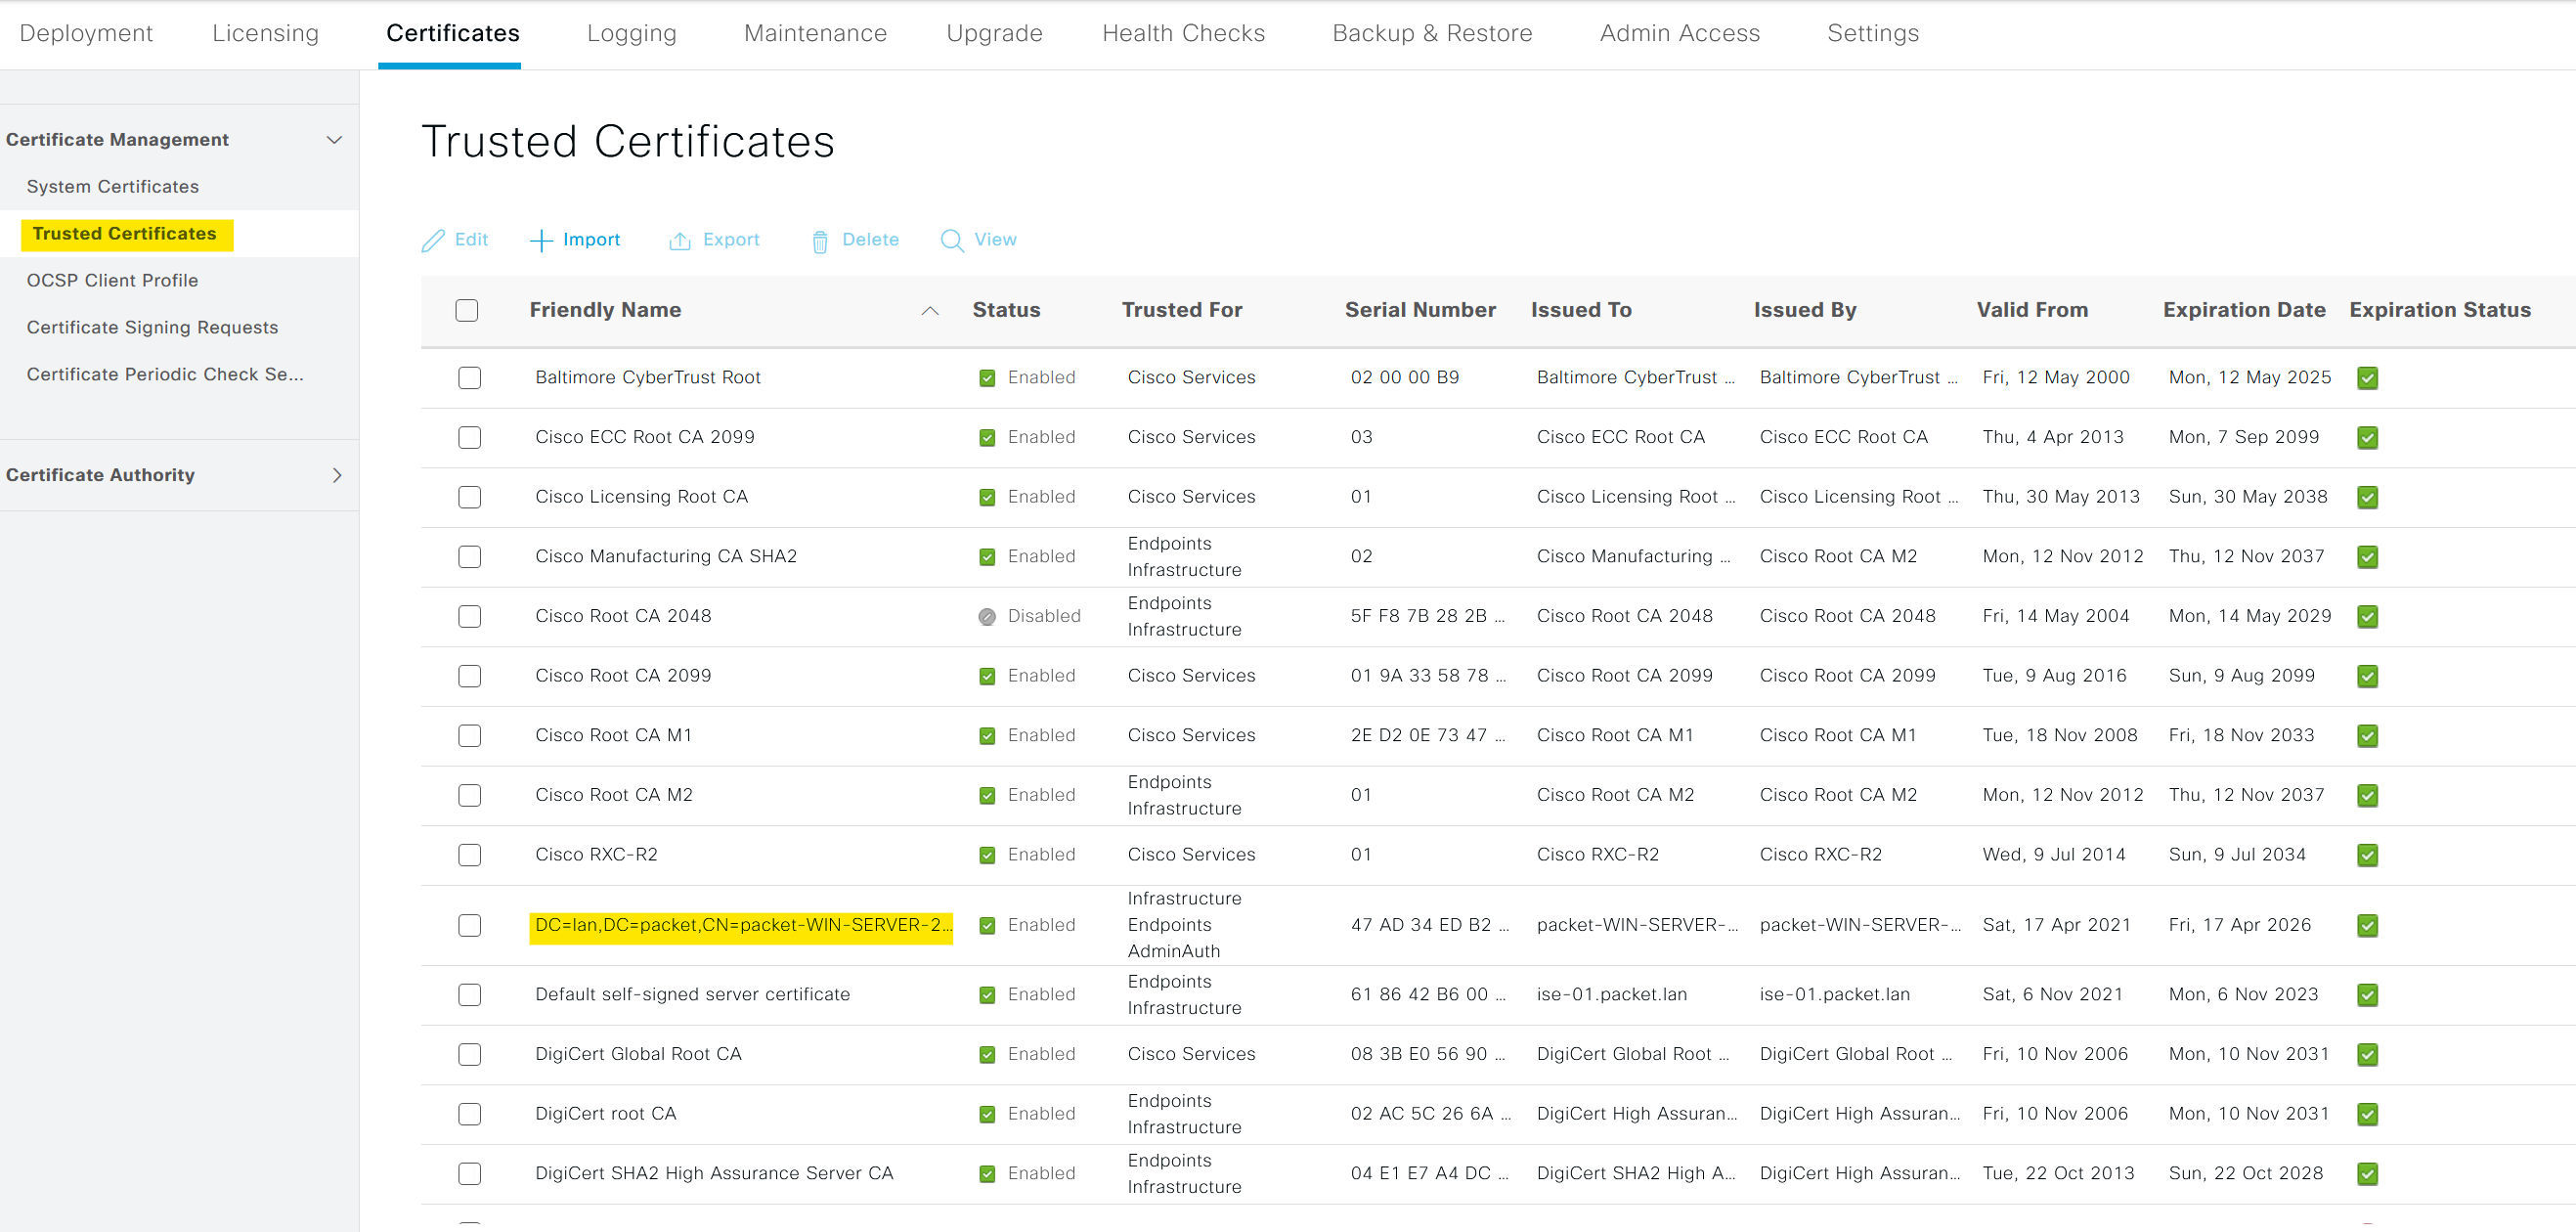
Step 3 - Trusted Certificates
Next, we need to import the Root CA certificate that signs the user certificates into ISE.
Step 4 - Create a Policy Set
At a high level, a Policy Set in ISE is a bundle of rules, each of which contains conditions and results. When a device tries to access the network, ISE applies these policy sets to determine whether the device meets certain conditions (like being in a specific IP range or having a specific identity group) and assigns results (like allowing or denying access) based on that.
Imagine you have a list of policy sets created for different types of network users, such as VPN users, guest users, and wired/wireless clients. Each of these policy sets has specific conditions tailored to the type of network access they manage.
Now, when a request comes from a device through the AP to access the network, ISE starts to evaluate these policy sets, going from top to bottom. It checks each policy set to see if the conditions of that policy match the incoming request.
In our case, we're dealing with a wireless 802.1X request from a domain-joined PC. So, ISE will scan through the policy sets until it finds the one that's specifically designed for wireless 802.1X requests. Once it finds a match, it applies the corresponding authentication and authorization policies to this request. Here I'm creating a new policy set called EAP-TLS-Wireless with the pre-built smart condition Wireless_802.1x

The Radius:NAS-Port-Type = Wireless - IEEE 802.11 and Radius:Service-Type = Framed are specific attributes included in the Wireless_802.1X smart condition.
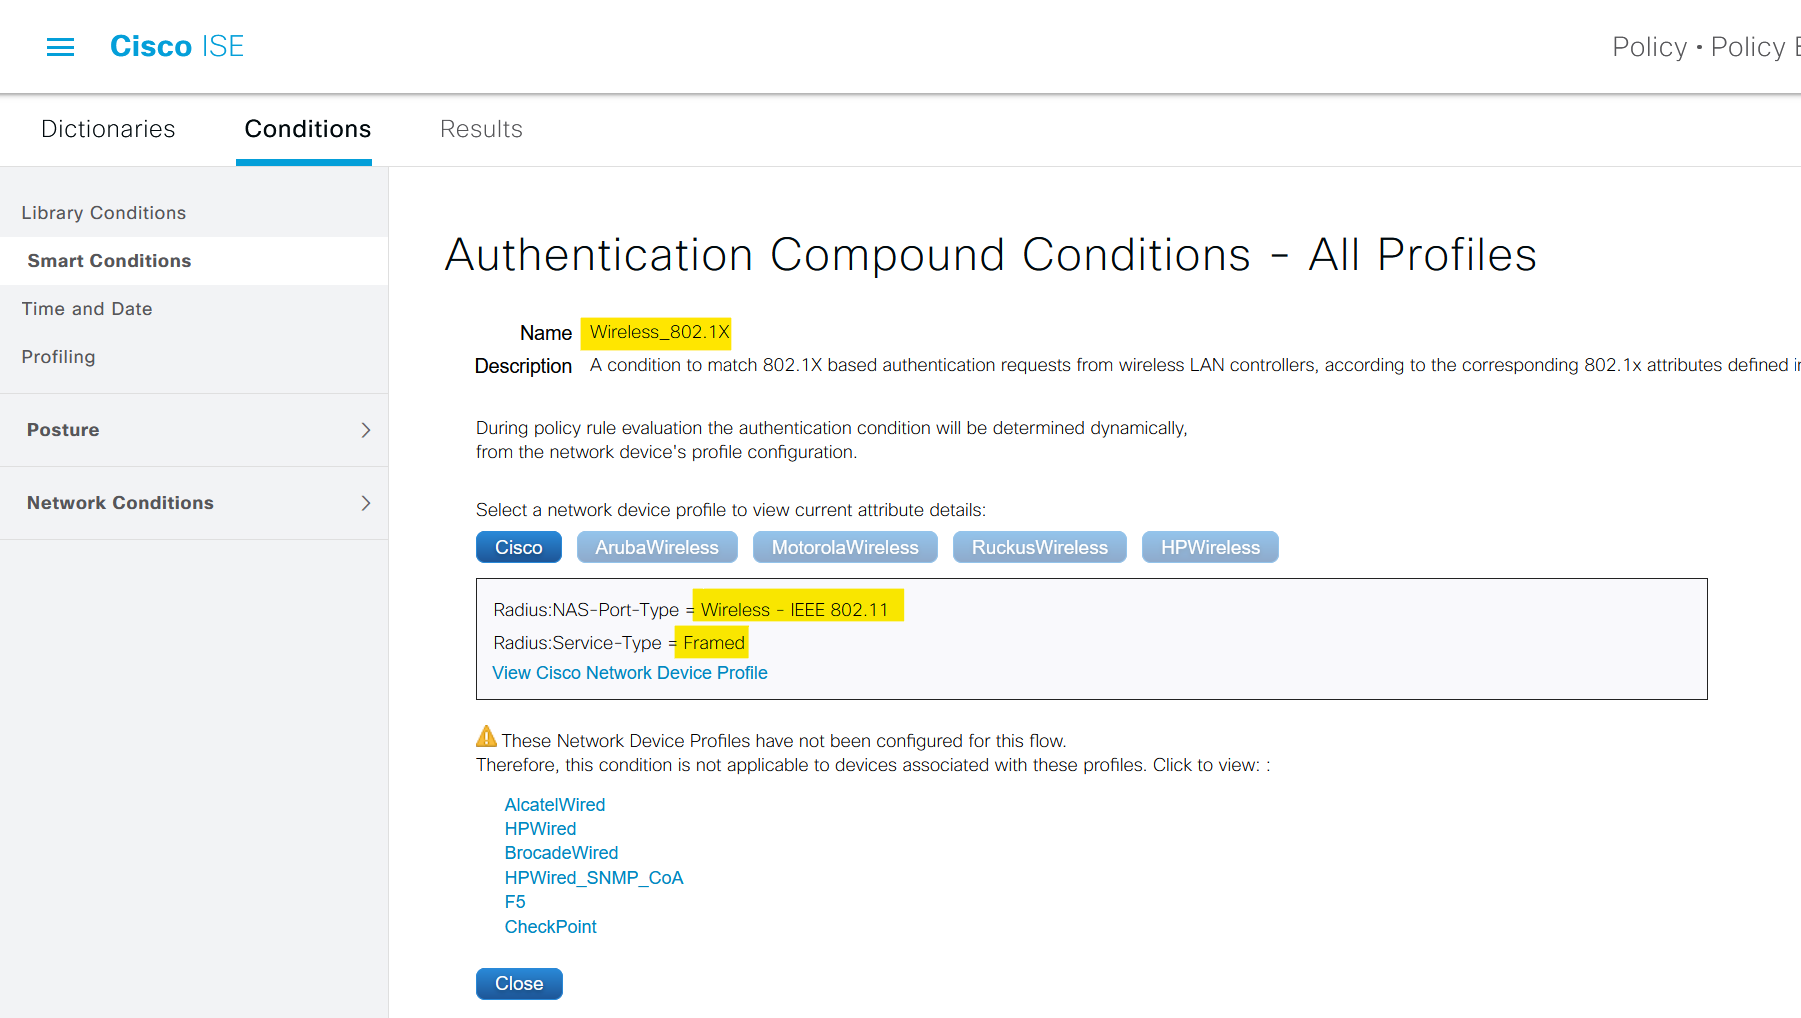
Radius:NAS-Port-Type = Wireless - IEEE 802.11This attribute tells the RADIUS server (in this case, Cisco ISE) that the access request is coming from a wireless device. This helps ISE understand the type of network access being attempted.Radius:Service-Type = Framed: This attribute indicates that the user data is framed, meaning that it's encapsulated in a protocol.
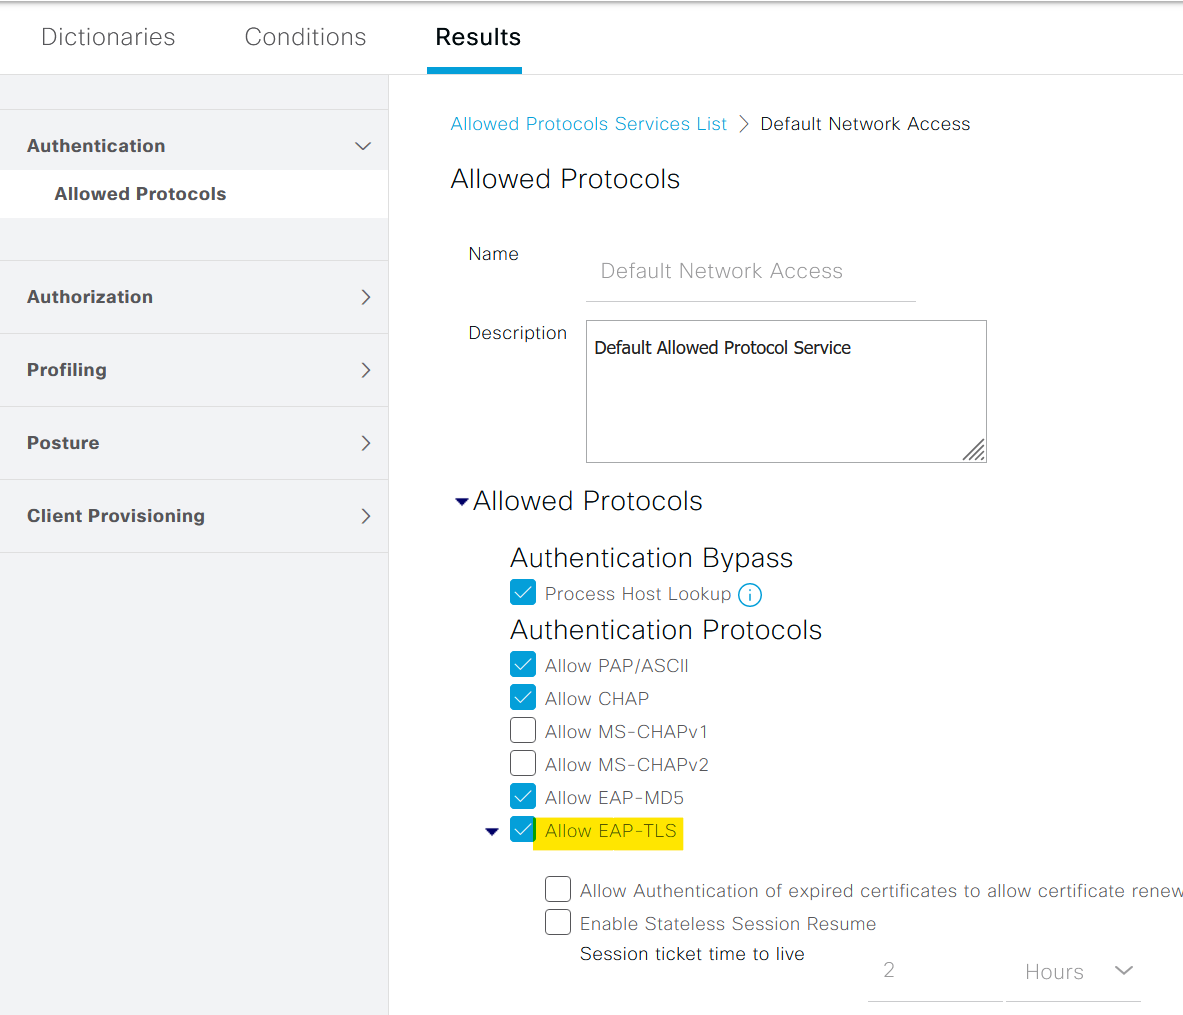
Here you must have noticed that the 'Allowed Protocols' is set to 'Default Network Access'. This is the default list that comes with ISE. Here you can specify which EAP protocols the clients can use. In our case, we are using EAP-TLS which is already allowed (by the check box)
within a policy set, we need to define two key types of police that are Authentication and Authorization.
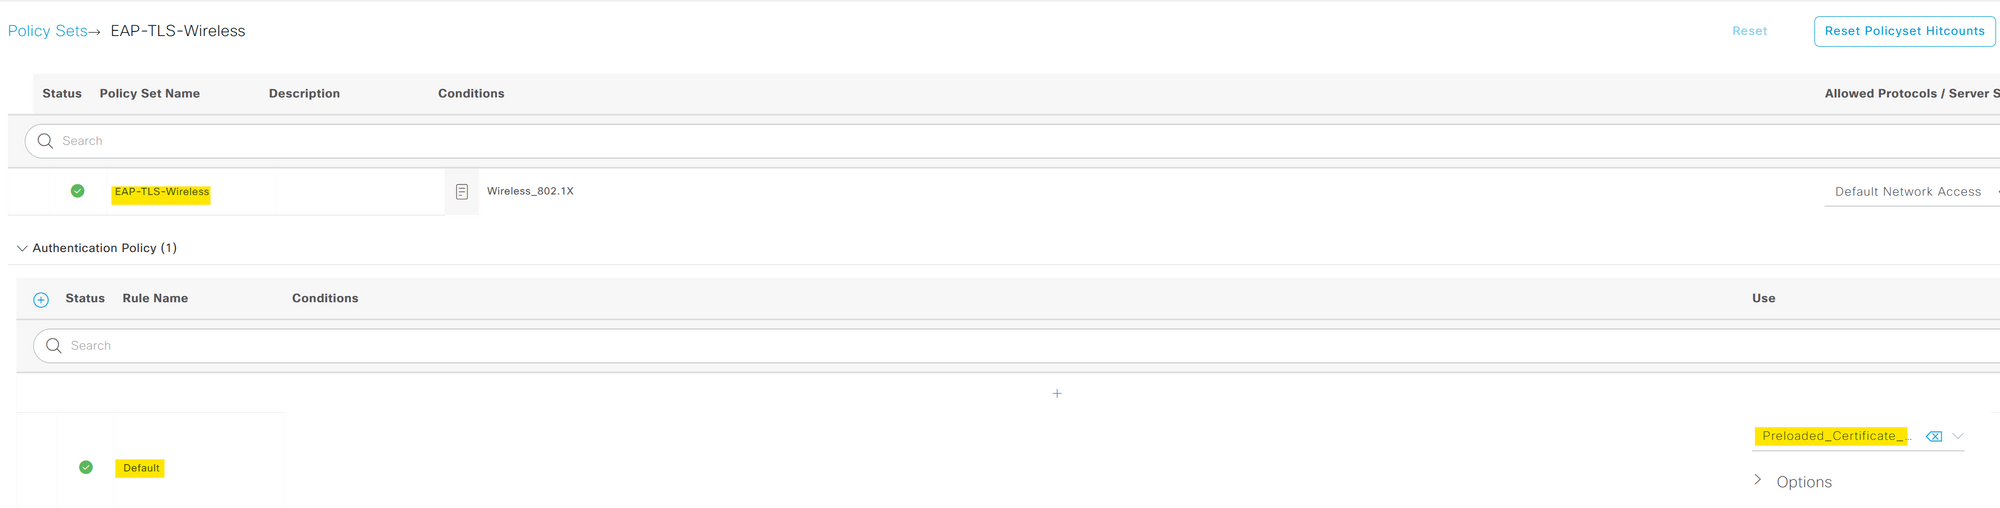
Step 5 - Authentication Policy
An Authentication Policy is essentially a set of rules that the ISE uses to verify the identity of a device or user trying to access the network. This is the "who are you" part of the process, checking the credentials provided by the device or user against AD or Internal User Group.
For our configuration, we are using the default authentication policy. This policy checks the certificate against the certificate profile we created in step-2. When a user attempts to authenticate, ISE takes the provided certificate and cross-checks them with the AD. If the authentication is successful the process proceeds to the next step, which is authorization.
Step 6 - Authorization Policy
On the other hand, an Authorization Policy determines what a successfully authenticated user or device can do within the network. It dictates the level of access, the resources that can be used, and any restrictions that need to be applied. This is the "what you can do" part of the process, defining the permissions for each authenticated device or user.
Our Authorization Policy in this setup is quite straightforward. It has a single condition, if a user is part of the 'desktop-users' group in Active Directory (AD), the policy 'permitAccess' is applied.

By defining these policies within a policy set, we create a rulebook for how the ISE should handle devices trying to access the network, from verifying their identity to deciding what they can do once they're in.
Closing Thoughts
I hope this blog post has provided you with a clearer understanding of the 802.1X process using Cisco ISE and EAP-TLS. Remember, network configurations are rarely a one-size-fits-all scenario. The settings and processes we've explored here offer a solid starting point, but you'll likely need to adjust and refine them to perfectly suit your specific environment and needs.


