In this blog post, let's look at how to configure TACACS+ AAA authentication on Arista EOS devices using Cisco ISE. When someone tries to log in to the device, we want the Arista device to authenticate and authorize the user against Cisco ISE. We'll go through the necessary configurations and steps to set up this integration between Arista EOS and Cisco ISE.
Local Authorization vs ISE Authorization
You could configure this in two ways with a slight difference. With the first method, ISE authenticates the user and tells Arista which role to apply. Arista devices come with two predefined roles, network-admin and network-operator. For example, if we have two different groups of users, network engineers who need full access and NOC engineers who only need read-only access. When the users log in, depending on the policy, ISE will send TACACS+ attributes that tell the switch which role to apply. With this method, the authorization happens locally at the switch.
For the second method, we will not use these two predefined roles. Each command the user enters on the CLI will be authorized by Cisco ISE. For example, we can allow all commands for network engineers and prevent NOC engineers from entering the configure terminal command. I prefer this method as it provides more flexibility and scalability.
 Suresh Vina
Method 1 - Local Authorization
As we discussed before, ISE will handle the authentication and leave the authorization with the Arista device. Here are the two predefined roles that come with the devices. The first role permits everything whereas the second role denies a few commands and allows everything else.
eos-01#show users roles
The default role is network-operator

role: network-admin
        10 permit command .*
role: network-operator
        10 deny mode exec command configure|bash|python-shell|\|
        20 permit mode exec command .*
Moving on to the configuration part, we only need a few commands on the Arista device to enable TACACS+ authentication. We will configure this in a way that when a user logs in, they will be placed directly in the privilege EXEC mode (indicated by the # sign). To demonstrate this, we will have two users.
- Bob, who is a network engineer needs full access.
- Max on the other hand needs access to the show commands and cannot enter global configuration mode.
Arista configurations
You start the configuration by defining the IP address of ISE and the shared-secret. Then, create a TACACS+ server group and add the server you created in the previous step. You can add multiple servers to the same group. Next, specify the source interface where the TACACS+ packets are sourced from. This is the interface IP that ISE will see when the request comes in. Once you are done with that, you start with the actual AAA configurations.
tacacs-server host 10.10.0.100 key 7 08205E471A0D04464058
!
aaa group server tacacs+ ISE-GROUP
   server 10.10.0.100
!
ip tacacs source-interface Management0
!
aaa authentication login default group ISE-GROUP local
aaa authorization exec default group ISE-GROUP local
aaa authorization commands all default local
The first line defines the authentication. Here, we specify that the primary authentication should consult the group called ISE-GROUP and if all the servers within the group are unreachable, use the local user database. The second line places the user directly in the privilege EXEC mode, and the final command tells the switch to perform authorization locally.
Cisco ISE Configurations
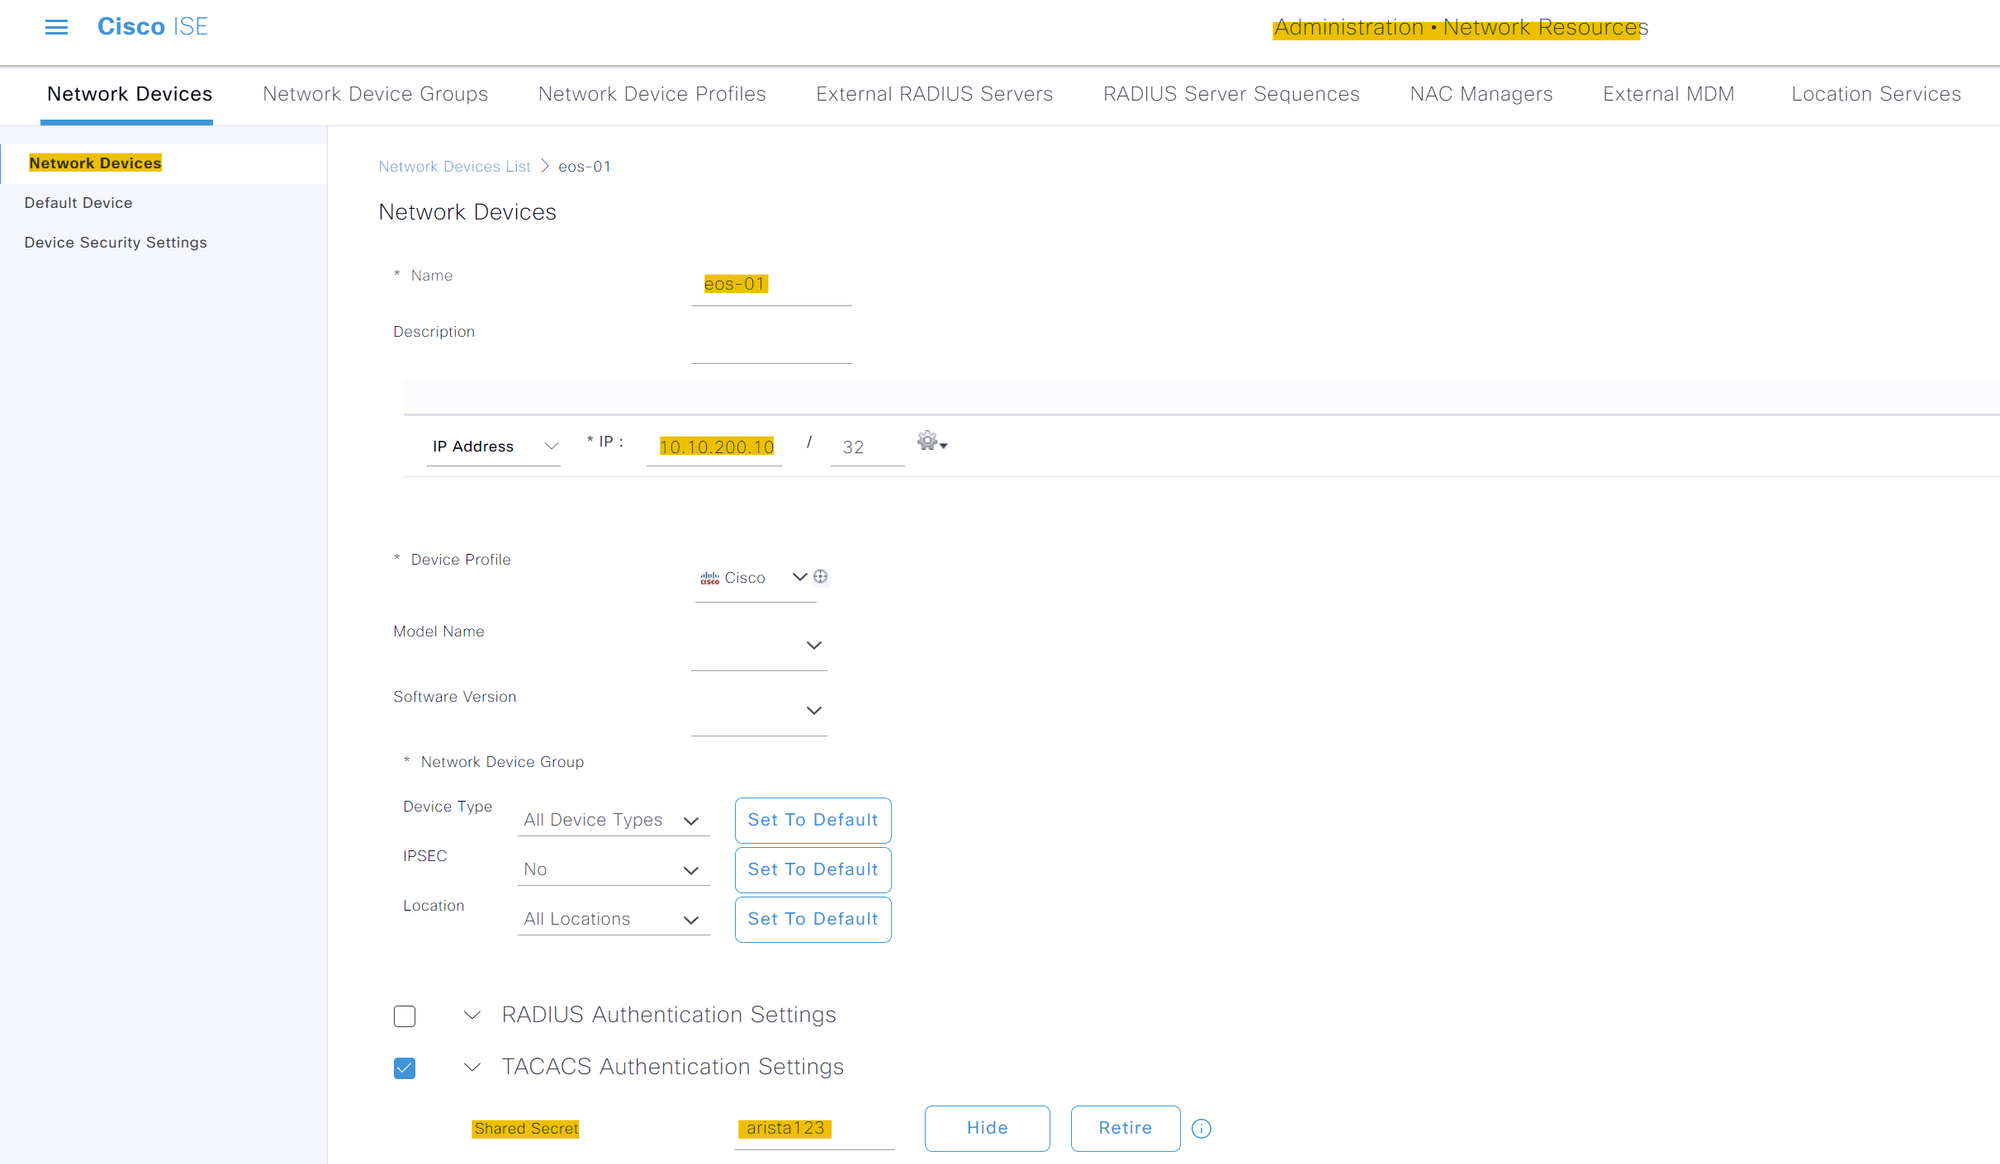
On the Cisco ISE side, first, you will need to add the Arista device as a 'Network Device' with the IP address and shared secret. Navigate to Administration > Network Devices and click on Add.
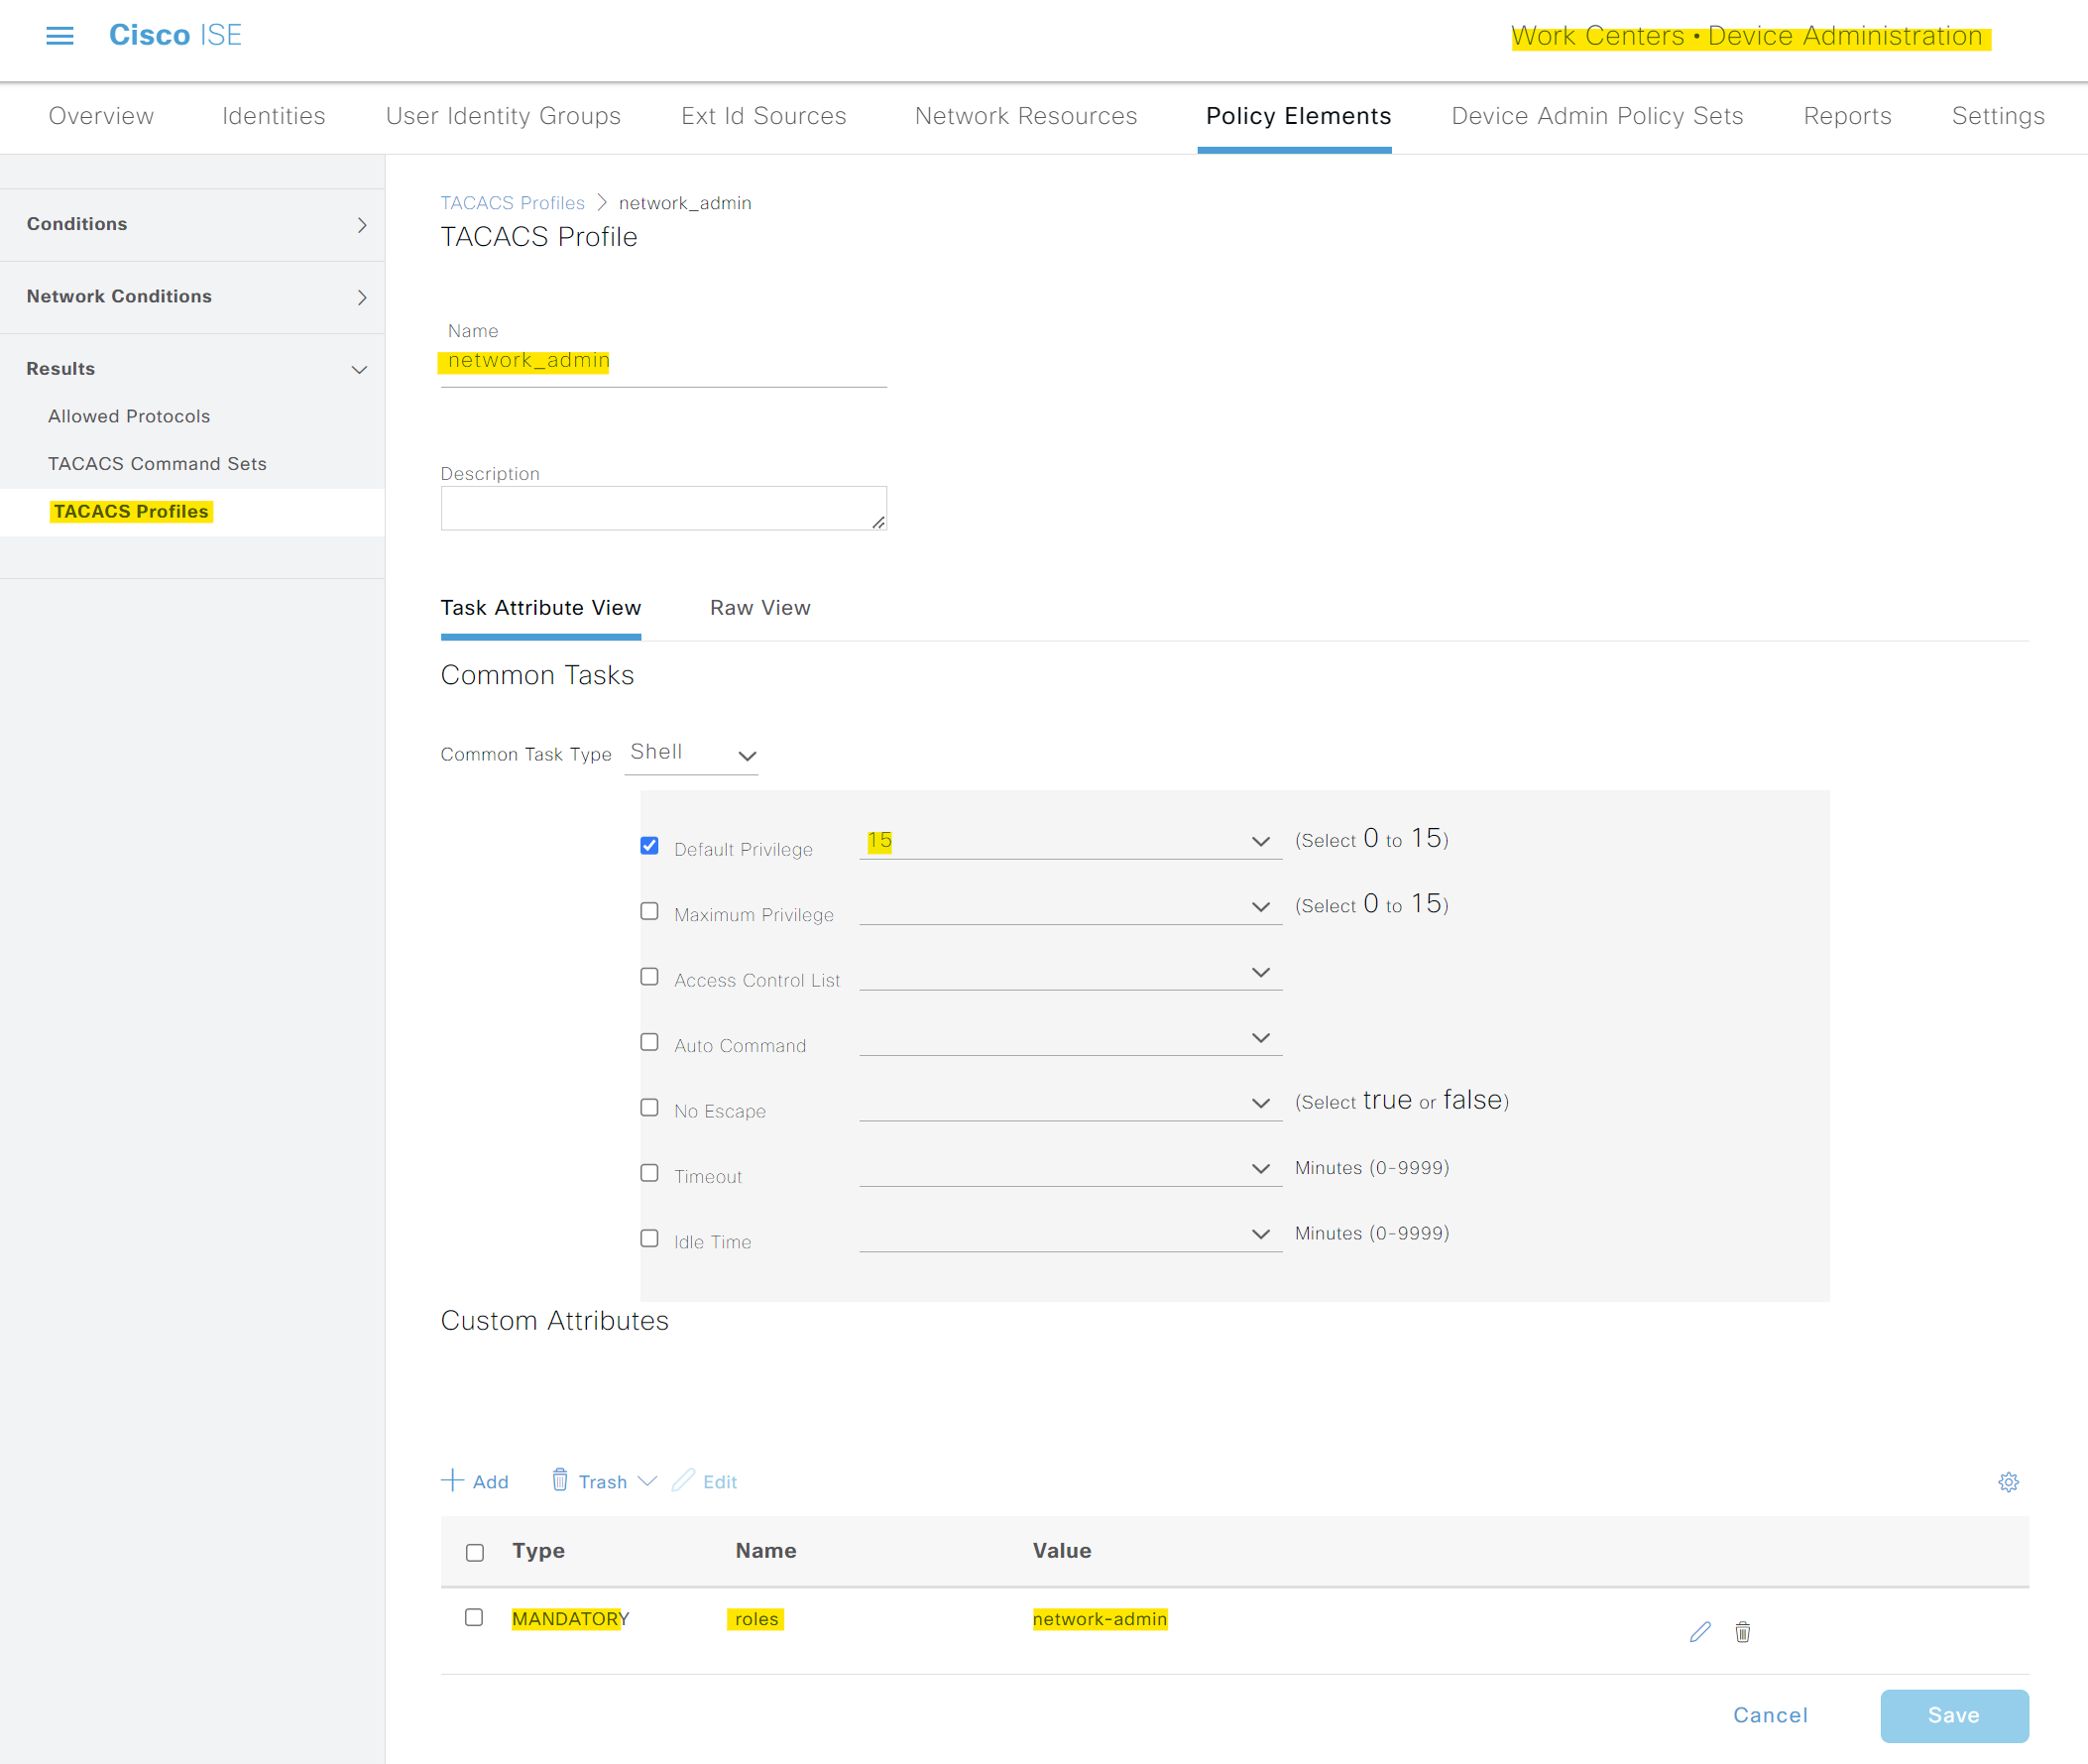
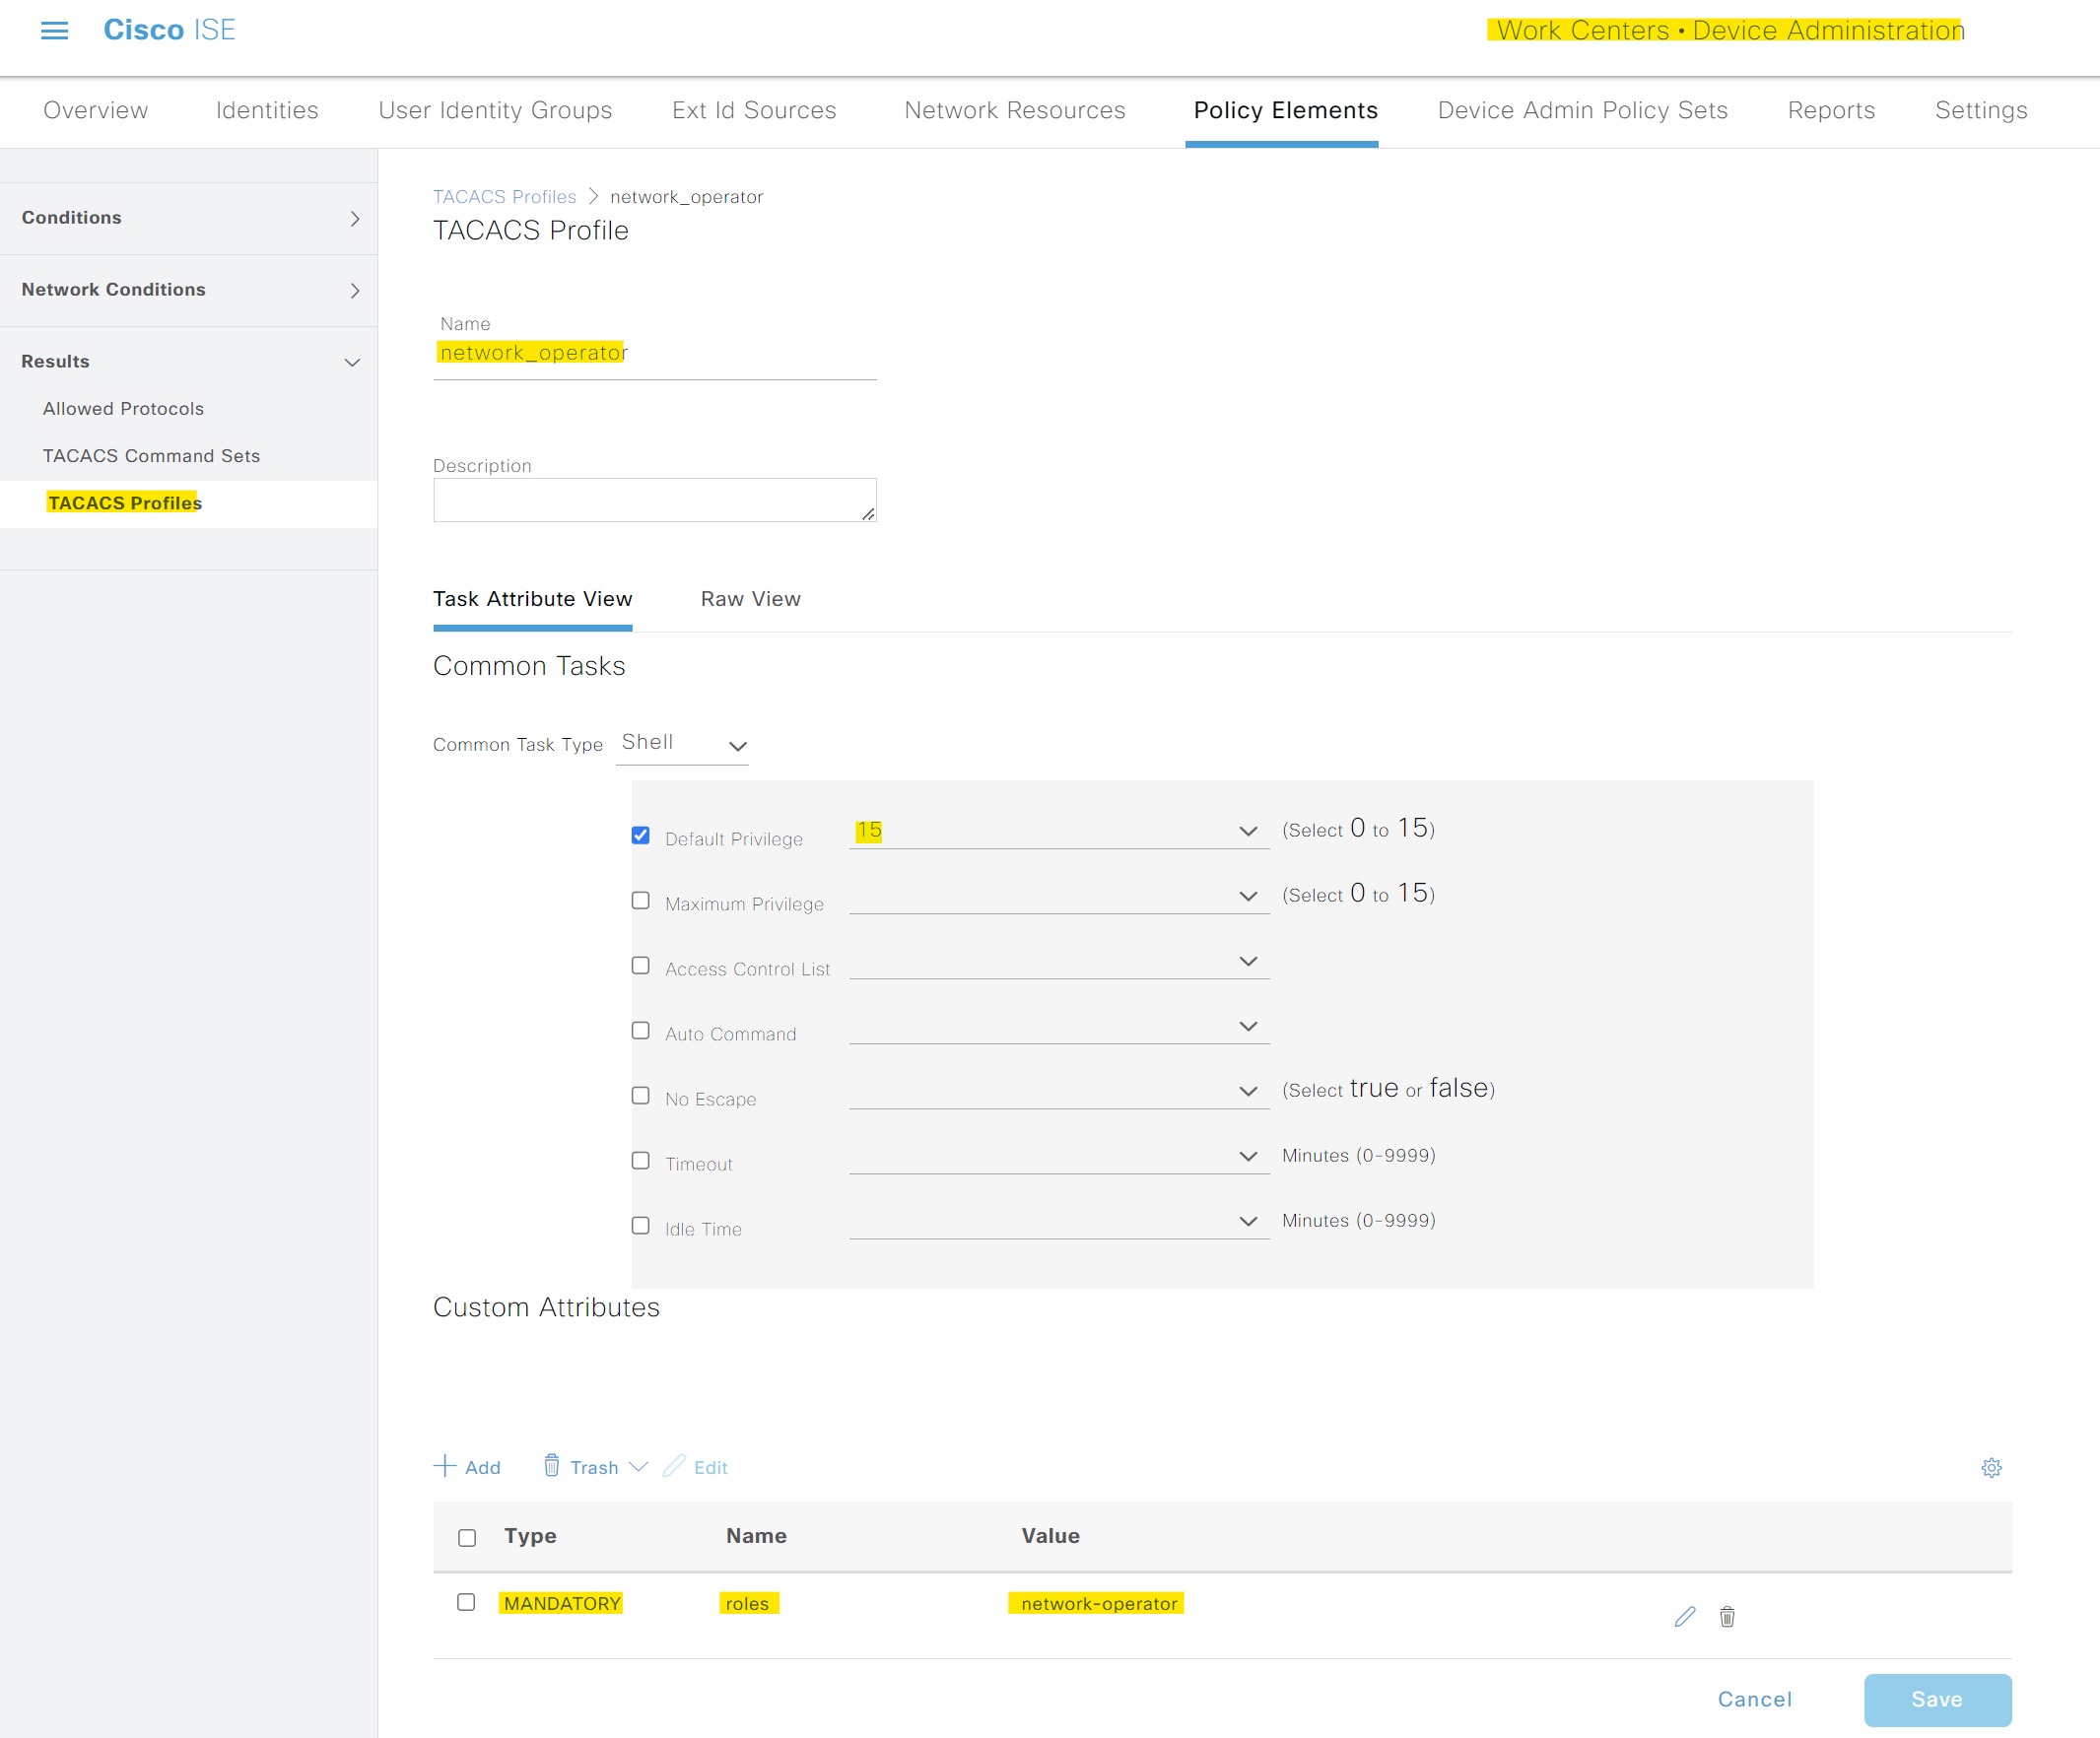
You then need to create two TACACS profiles, one for network-admin and another for network-operator. Navigate to Work Centres > Device Administration > Policy Elements > Results > TACACS Profiles and select Add. For both profiles, you can select the 'Default Privilege' as 15. For the network-admin profile, create a Custom Attribute as follows.
- Type - MANDATORY
- Name - roles
- Value - network-admin
The name of the profile can be anything, but I'm using network_admin.
For the second profile, the Type and Name are the same, but the Value should be network-operator.
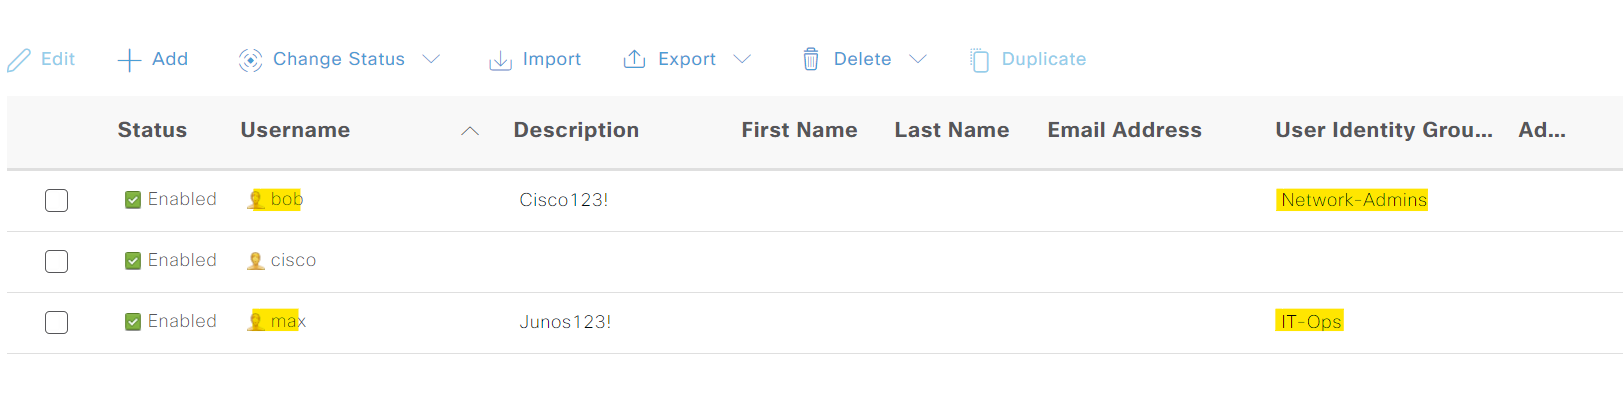
In terms of the users, you would typically use Active Directory, but again for the sake of simplicity, I created two local Identity Groups and placed each user into each group. I placed Bob in the group called 'Network-Admins' and Max in the group called 'IT-Ops'.
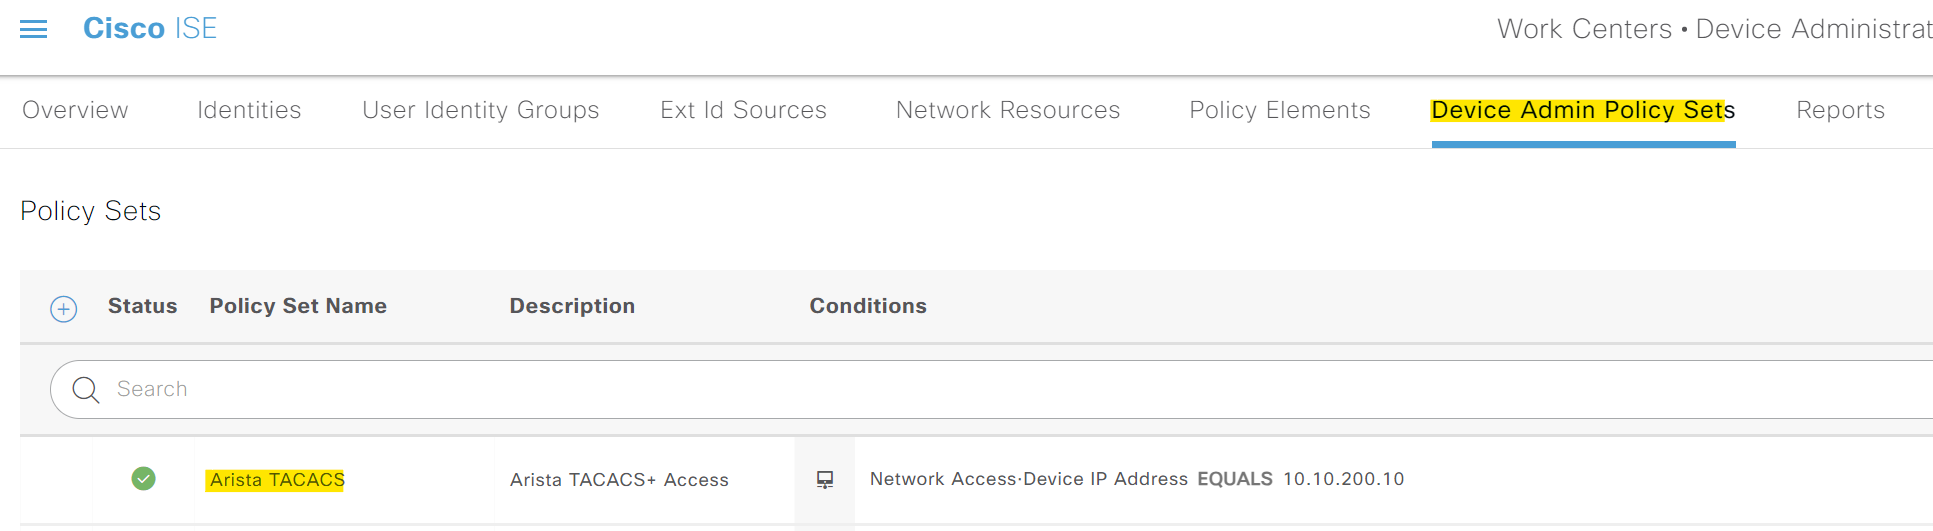
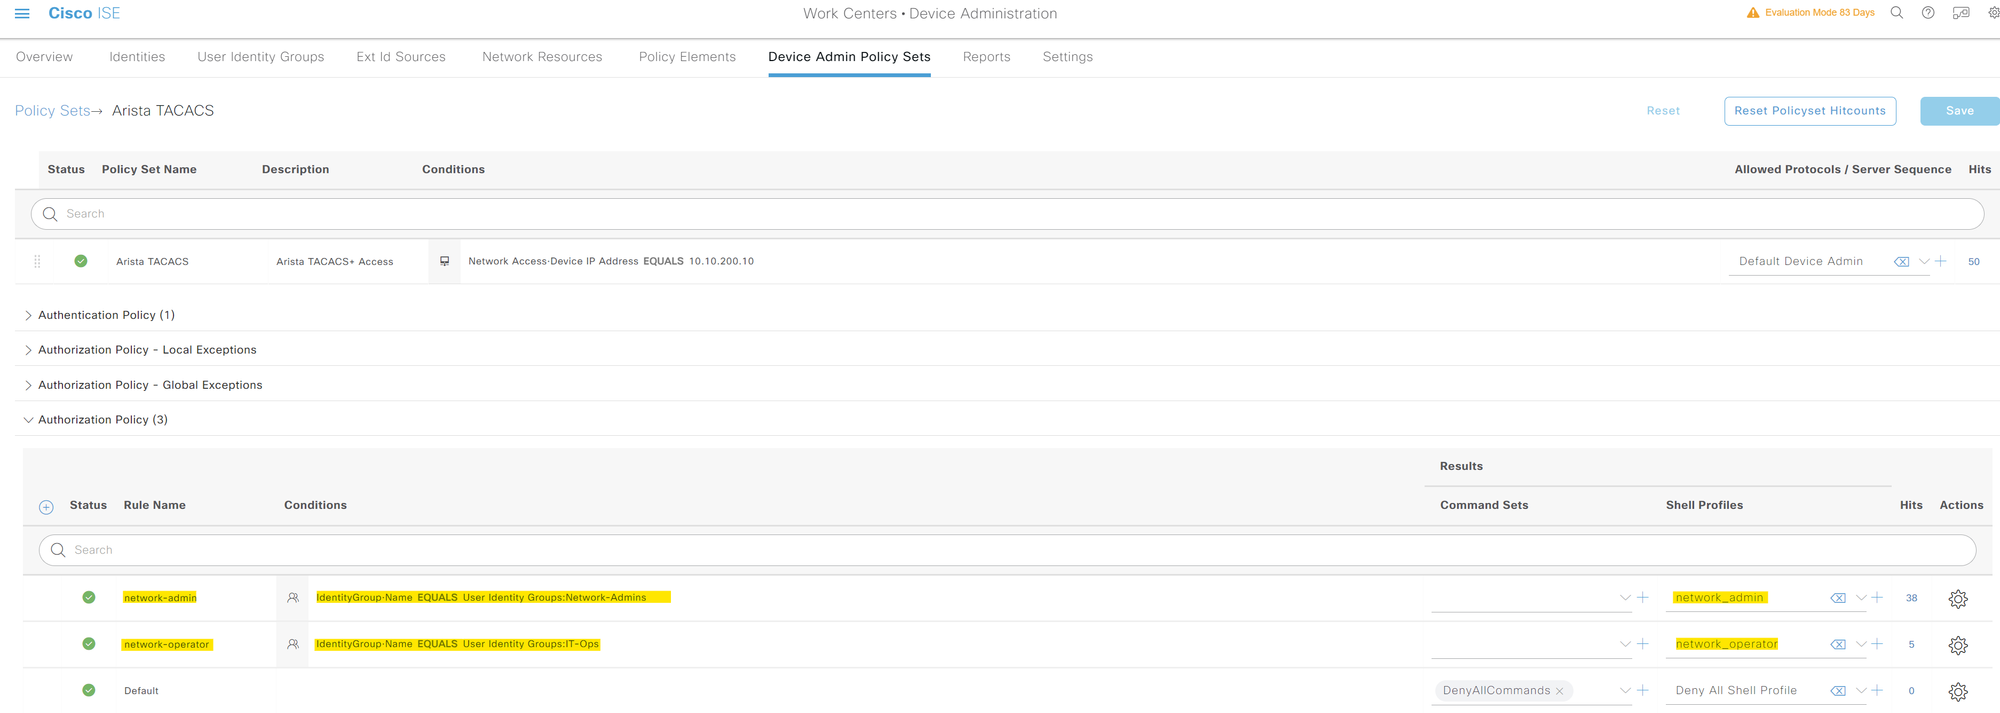
Finally, we need to tie all of this together by creating a new policy set and two Authorization policies inside it. You can create a policy by navigating to Work Centres > Device Administration > Device Admin Policy Sets. In the authorization policies, I'm simply saying
- If the user is in the 'Network-Admins' group, apply the TACACS/Shell profile called 'network_admin'.
- For users in the 'IT-Ops' group, apply the 'network_operator' profile.
Verification
Let's put this to the test now. First, I'm going to log in with the user 'bob'. I should have full access to the CLI.
eos-01#show users detail
Session       Username       Roles               TTY         State       Duration       Auth                  Remote Host
------------- -------------- ------------------- ----------- ----------- -------------- --------------------- -----------
3             admin          network-admin       vty10       E           3:36:26        local                 10.10.0.11
38            bob            network-admin       vty12       E           0:53:50        group ISE-GROUP       10.10.0.11
eos-01#conf ter
eos-01(config)#exit
eos-01#
But when I log in with the user 'max', I should only get limited access.
eos-01#show users detail
Session       Username       Roles                  TTY         State       Duration       Auth                  Remote Host
------------- -------------- ---------------------- ----------- ----------- -------------- --------------------- -----------
3             admin          network-admin          vty10       E           3:38:29        local                 10.10.0.11
39            max            network-operator       vty12       E           0:00:04        group ISE-GROUP       10.10.0.11
eos-01#
eos-01#conf ter
% Authorization denied for command 'configure terminal'
As you can see, this setup works well. However, imagine you need to deny a specific command, like the 'reload' command, to all users. You would need to configure each switch individually to achieve this. The second method we'll discuss can simplify this process and make more sense.
Method 2 - ISE Authorization (Recommended)
We will make slight changes to both the Arista configuration and the ISE configuration to demonstrate the second method.
Arista Configuration
We'll start with the Arista configuration, where we will specify ISE as the authorization server instead of local.
aaa authorization commands all default group ISE-GROUP localISE Configuration
For the ISE part, we will use something called 'TACACS Command Sets' instead of using the custom attributes. With command sets, you can specify which commands you want to permit and which commands you want to deny, simple as that.
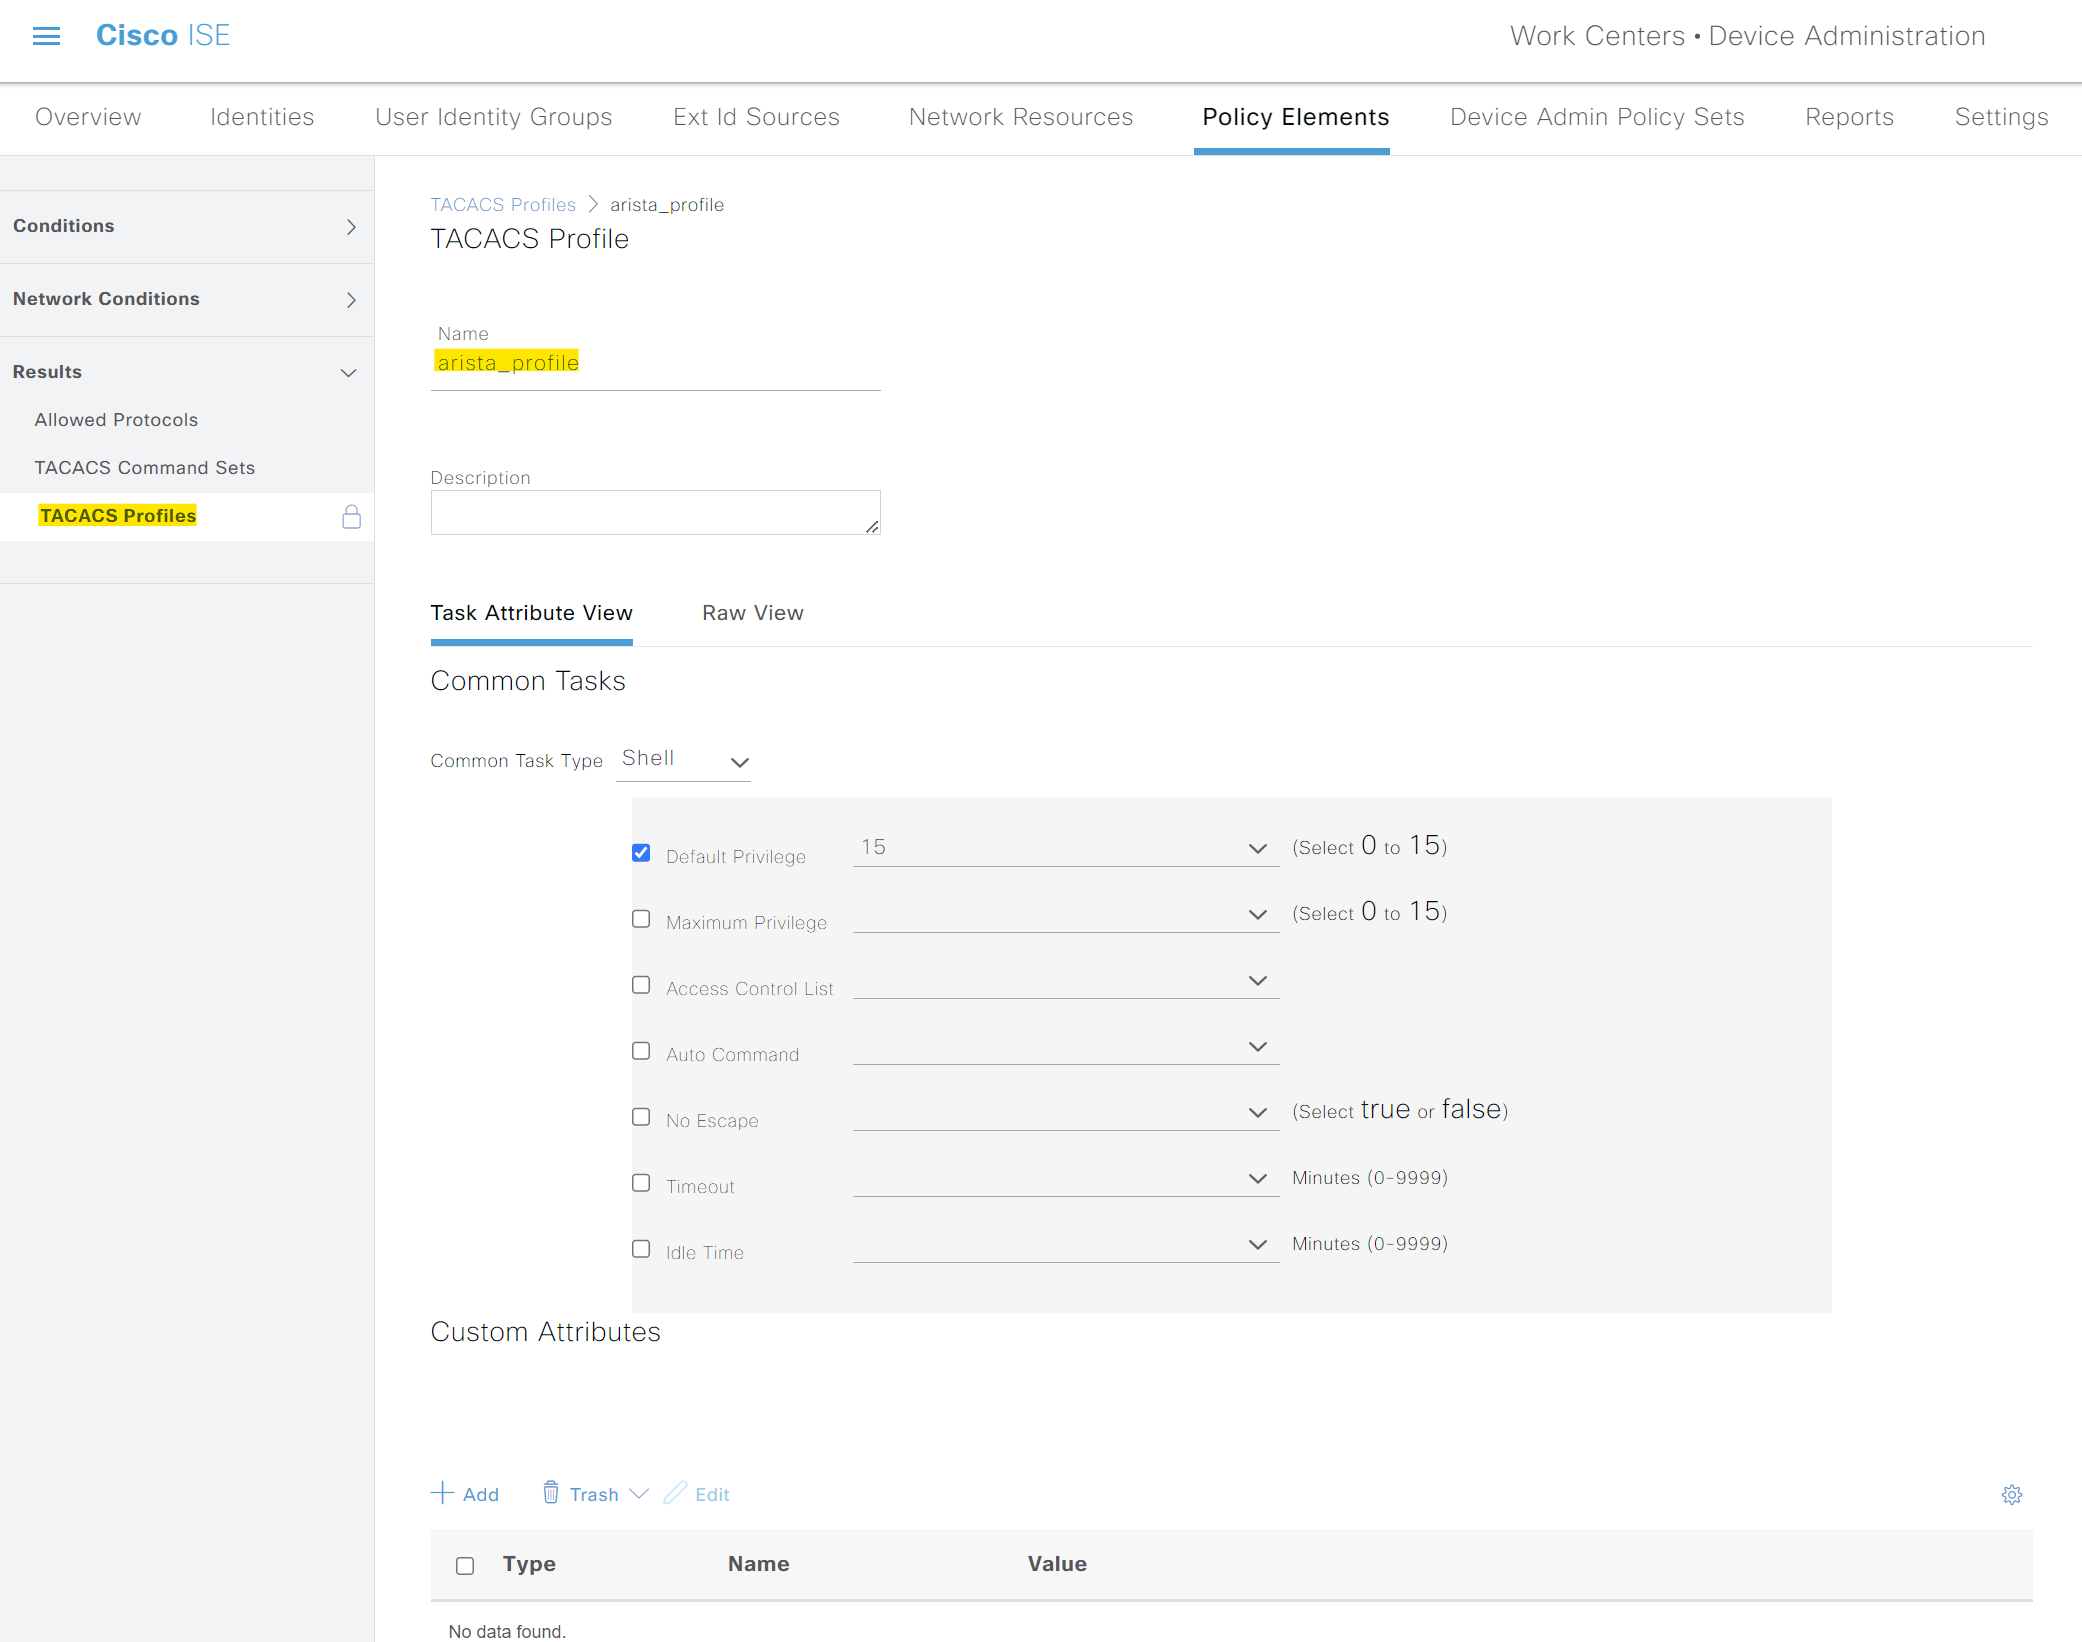
To demonstrate, I'm creating a new TACACS Profile called arista_profile without any Custom Attributes.
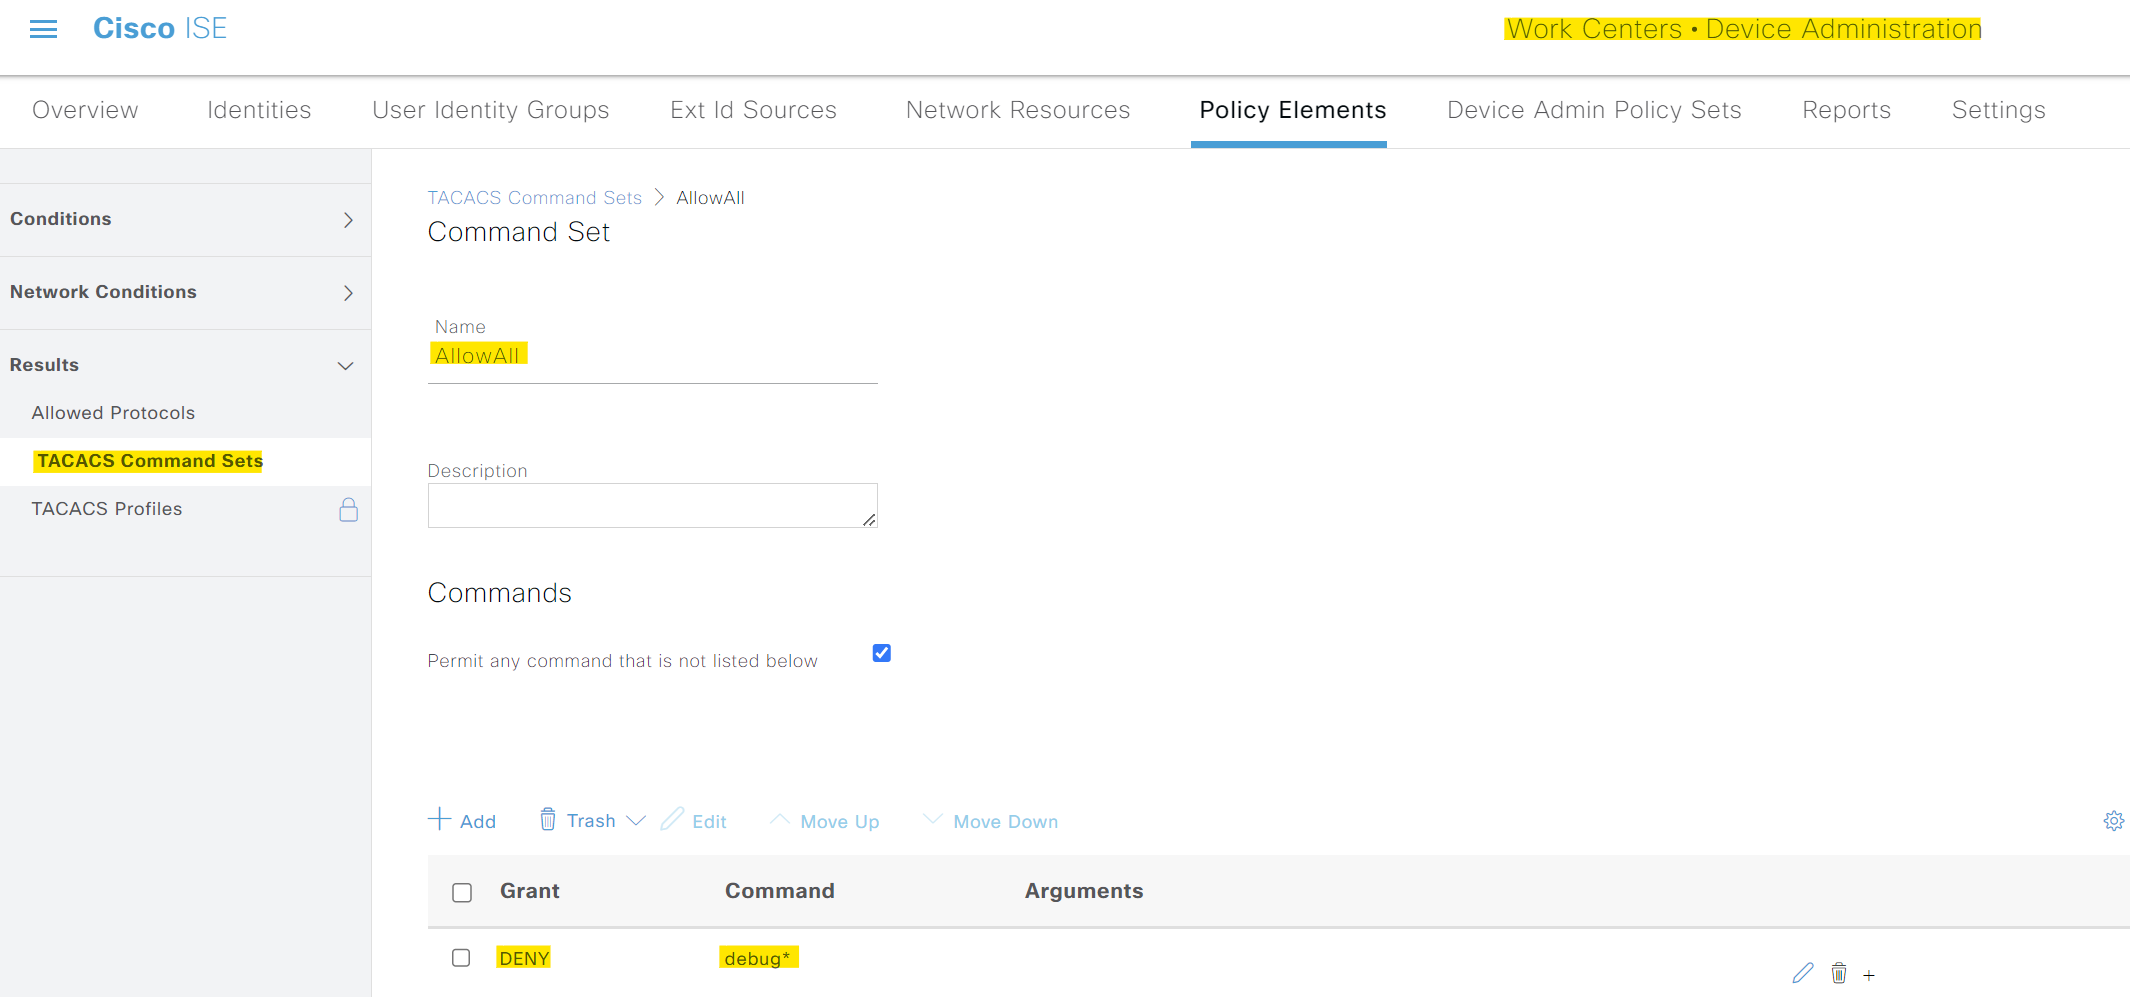
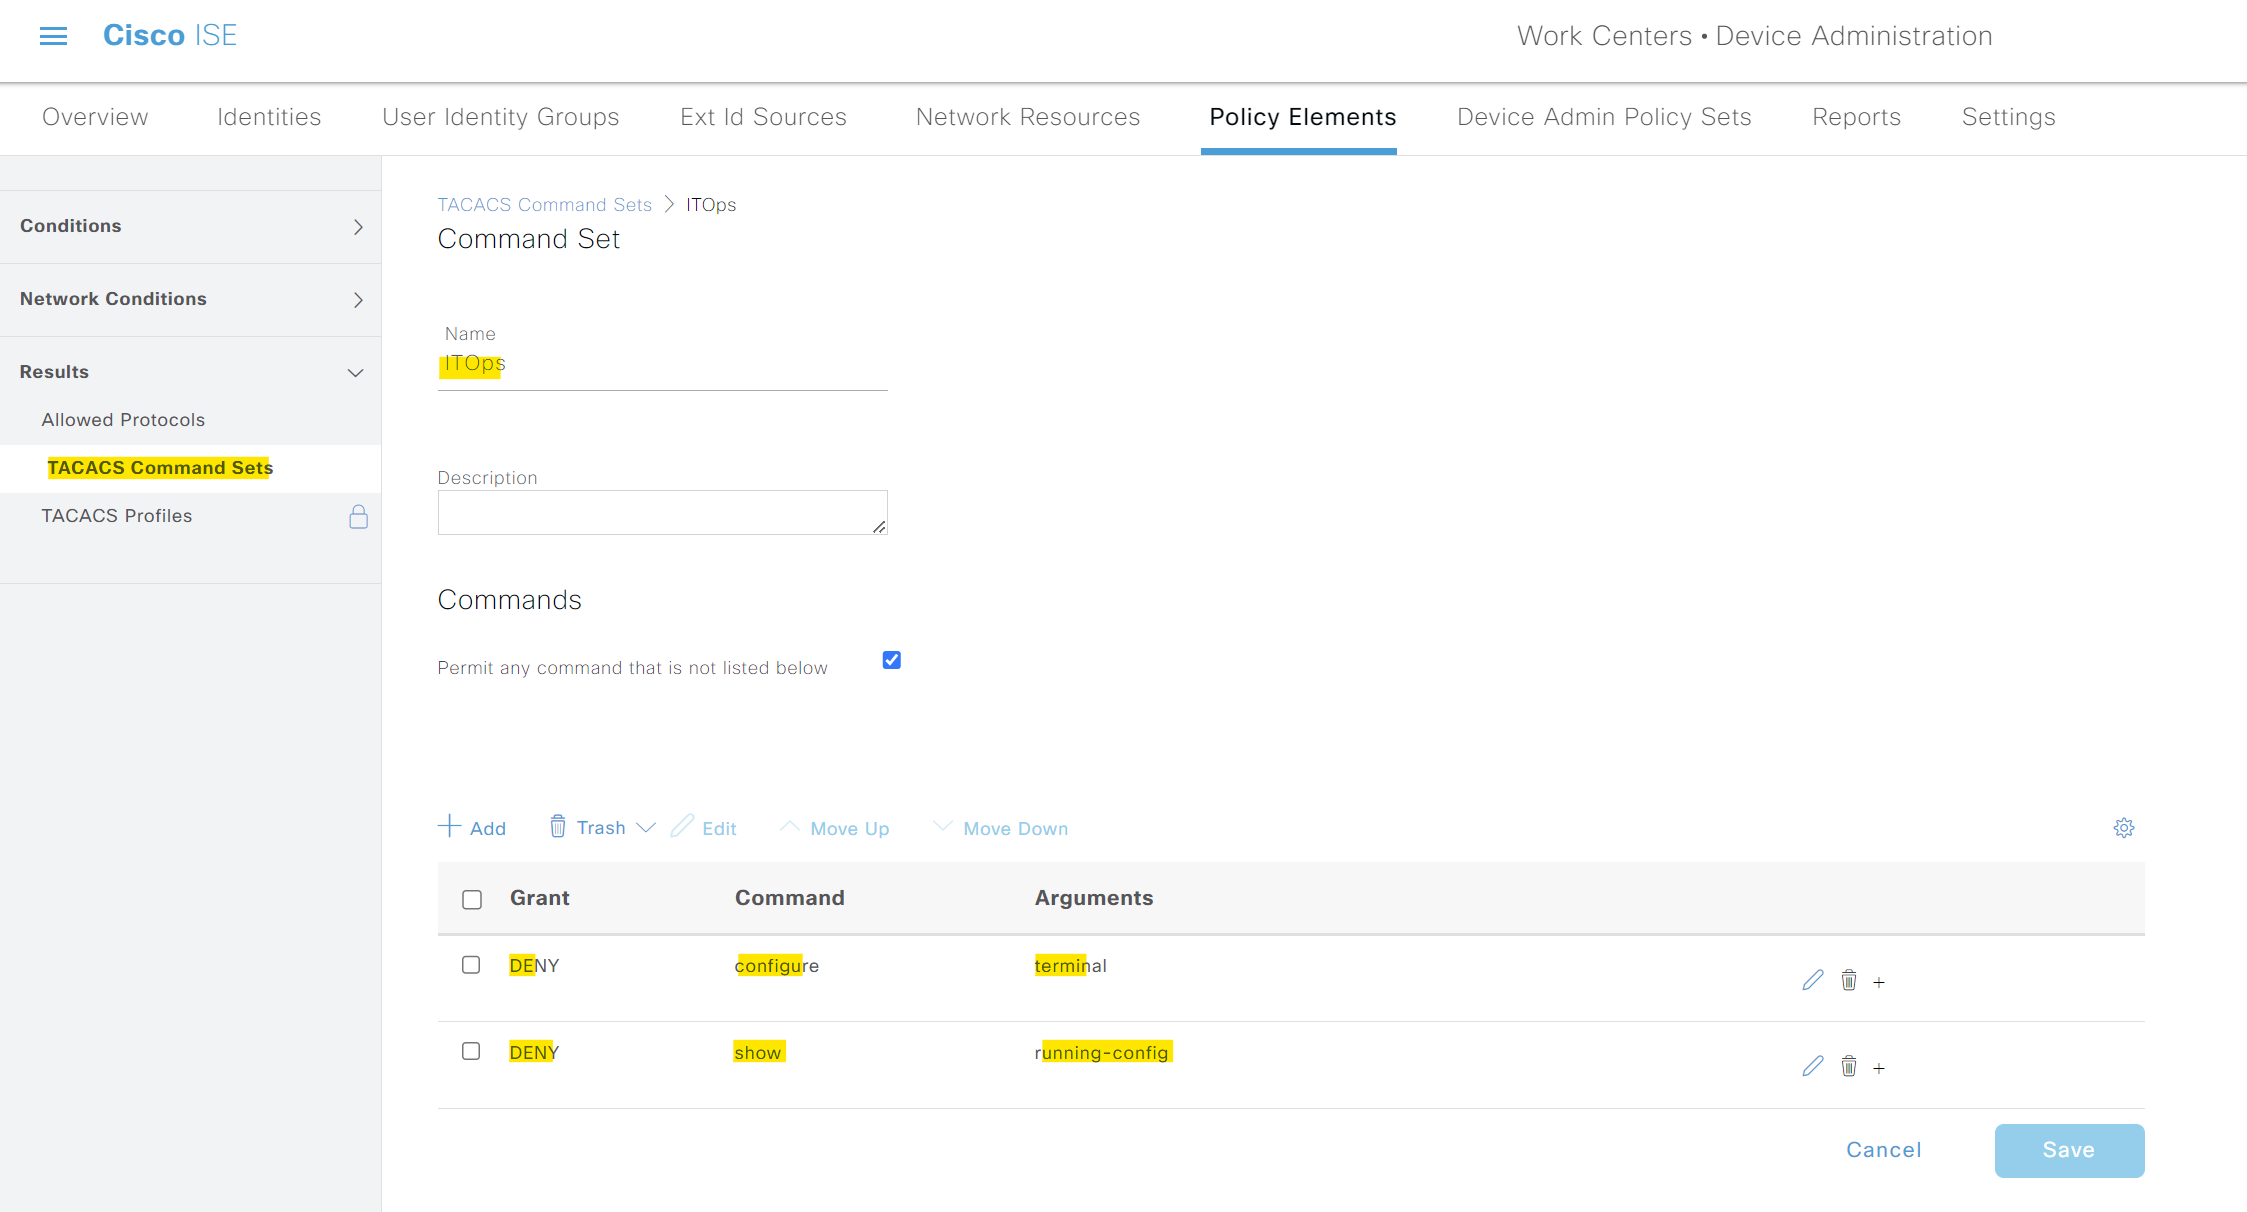
Next, I'm creating two command sets, 'AllowAll' and 'ITOps'. The first set allows every CLI command except the 'debug' commands. The second set allows everything except 'configure terminal' and 'show running-config'.
For the policy sets, all you need to change is to use the new profile we created and apply the command sets appropriately.
- For the network admins, apply the
arista_profileTACACS Profile and the 'AllowAll' command set. - For the NOC engineers, apply the same
arista_profileTACACS Profile but with the 'ITOps' command set.
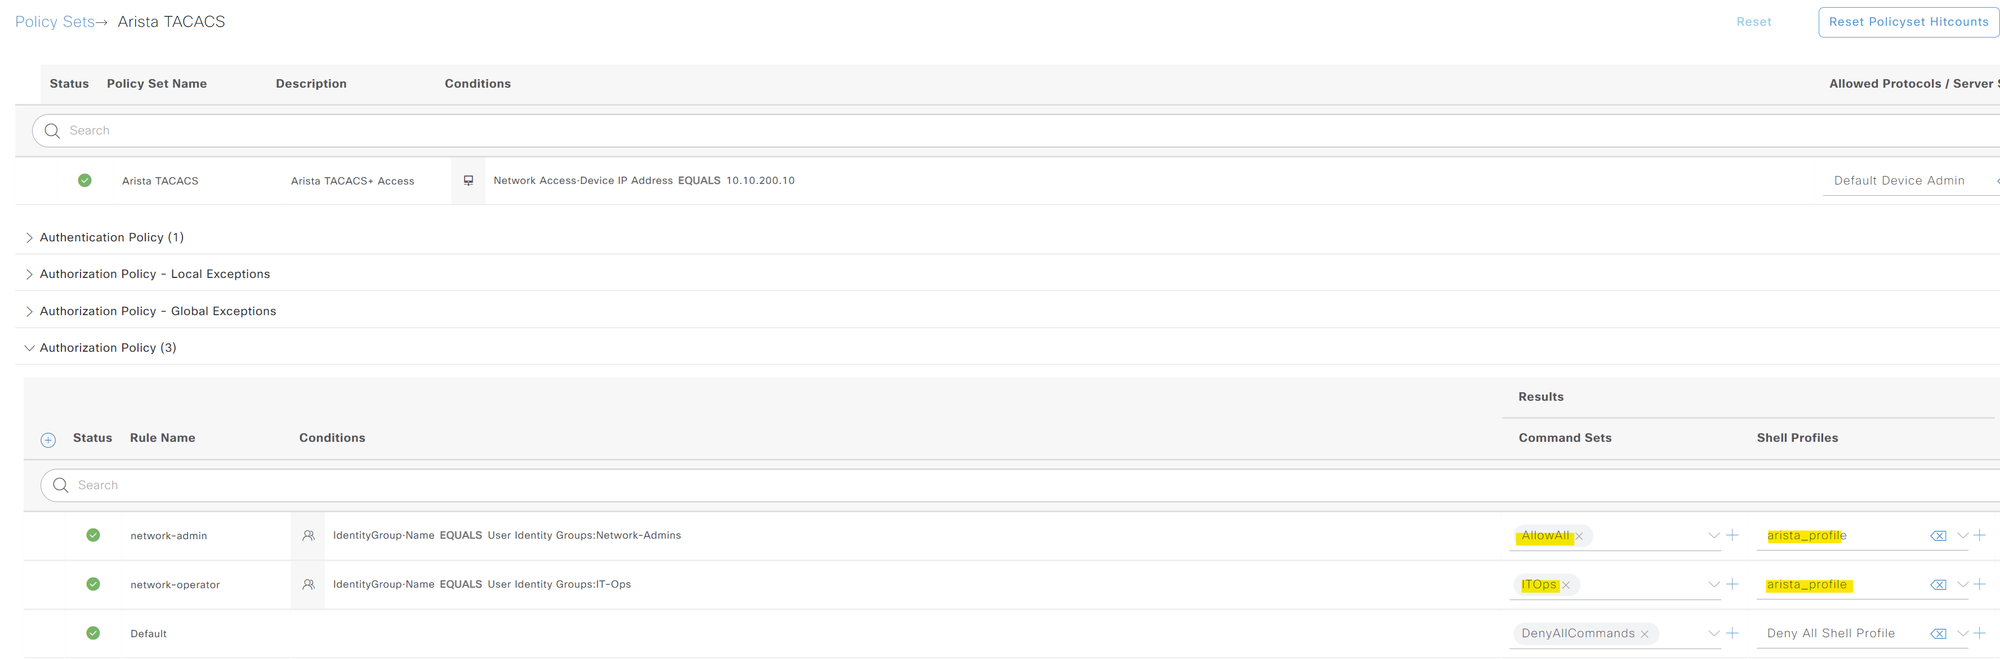
This way, you can control which commands are permitted or denied based on the user group, providing more granular control over user permissions.
Verification
As always, first I'm going to log in as 'bob'. I should be able to run any command except 'debug'. For the user 'max', I should be able to run any commands except 'configure terminal' and 'show running-config'.
Here is the output and logs for bob
eos-01#show ip interface brief
Address
Interface IP Address Status Protocol MTU Owner
----------------- --------------------- ------------ -------------- ---------- -------
Management0 10.10.200.10/16 up up 1500
eos-01#
eos-01#show ip arp
Address Age (sec) Hardware Addr Interface
10.10.0.11 0:00:00 b42e.99fc.8376 Management0
10.10.0.25 0:01:57 3e2e.acb7.9e95 Management0
10.10.0.100 0:00:00 000c.297d.6c06 Management0
eos-01#
eos-01#
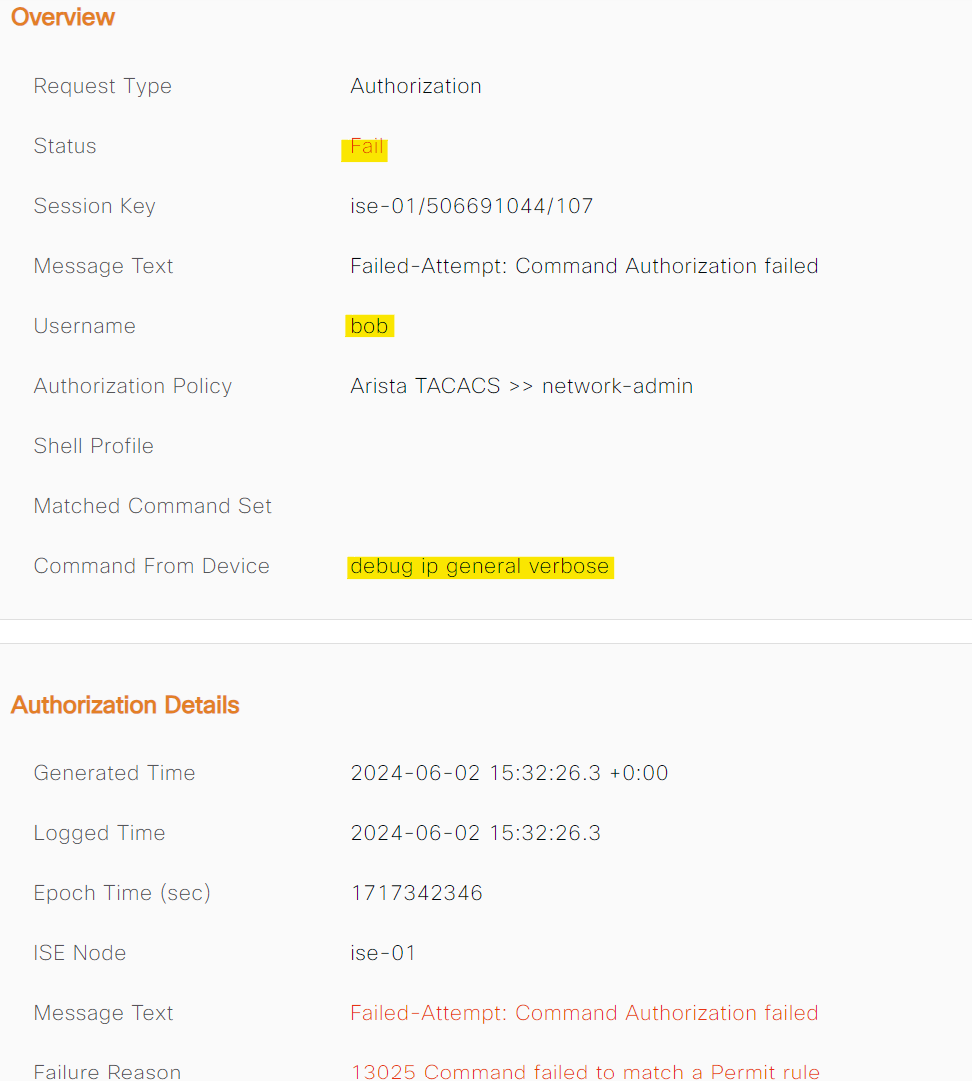
eos-01#debug ip general verbose
% Authorization denied for command 'debug ip general verbose'
eos-01#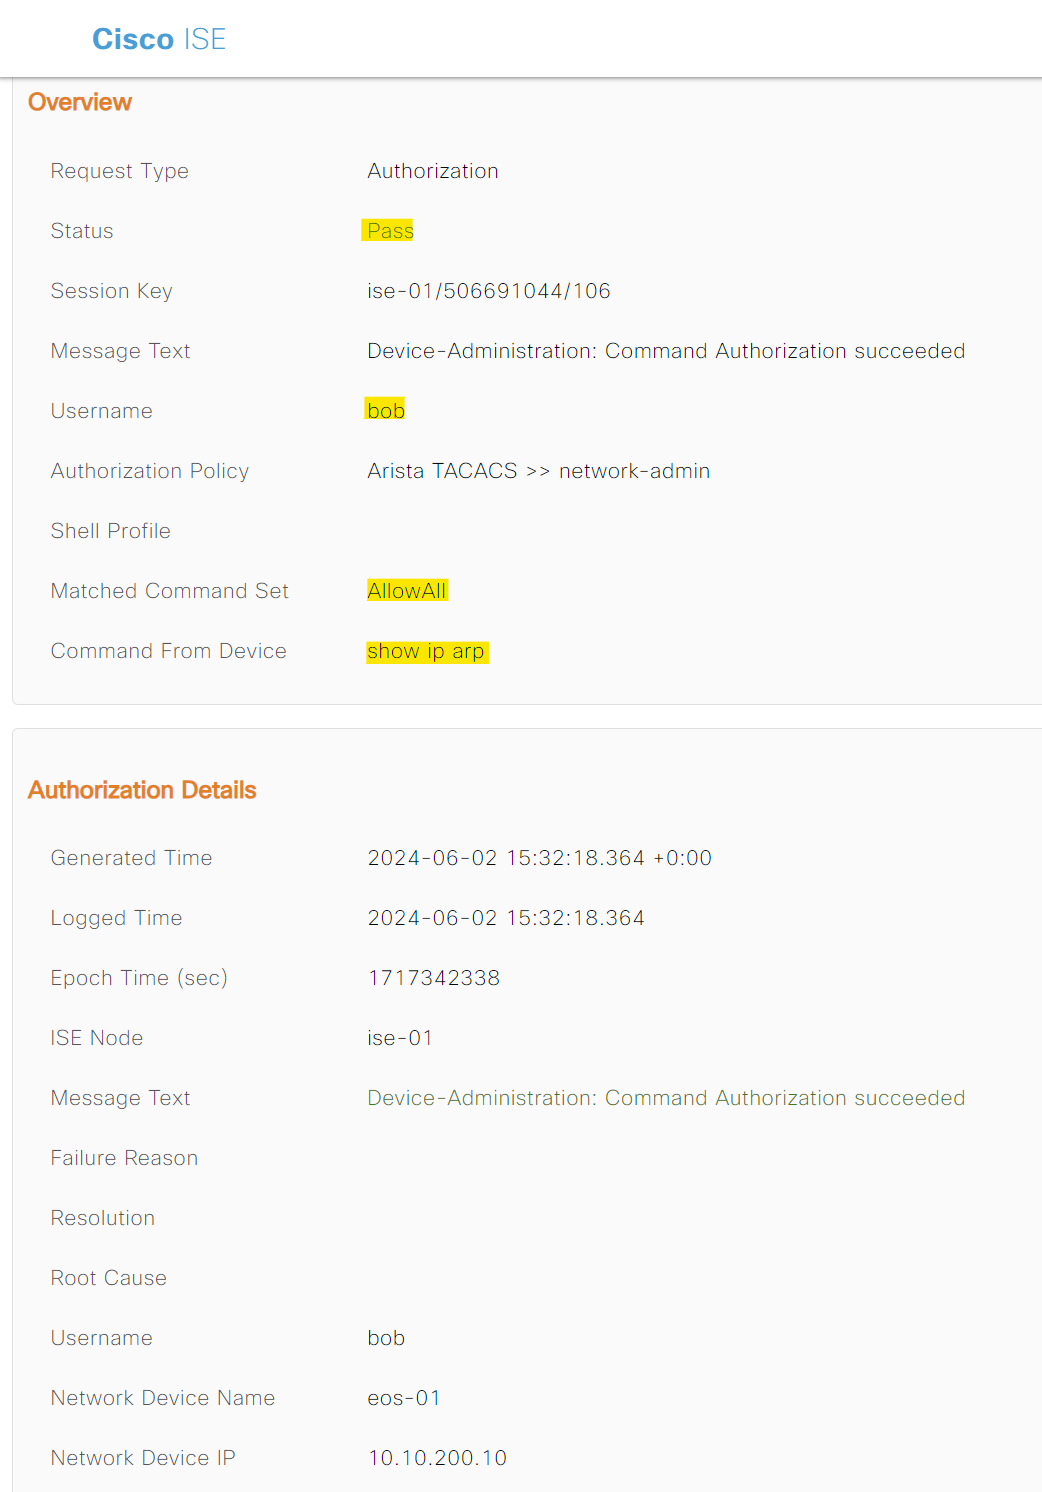
Here are the output and logs for max
eos-01#show ip arp
Address Age (sec) Hardware Addr Interface
10.10.0.11 0:00:00 b42e.99fc.8376 Management0
10.10.0.25 0:04:45 3e2e.acb7.9e95 Management0
10.10.0.100 0:00:00 000c.297d.6c06 Management0
eos-01#
eos-01#
eos-01#conf ter
% Authorization denied for command 'configure terminal'
eos-01#show running-config
% Authorization denied for command 'show running-config'
Accounting
You can configure accounting using the following commands. Each and every command a user types is recorded and can be viewed later in the ISE GUI. This is very useful for the audit trail.
aaa accounting exec default start-stop group ISE-GROUP
aaa accounting commands all default start-stop group ISE-GROUP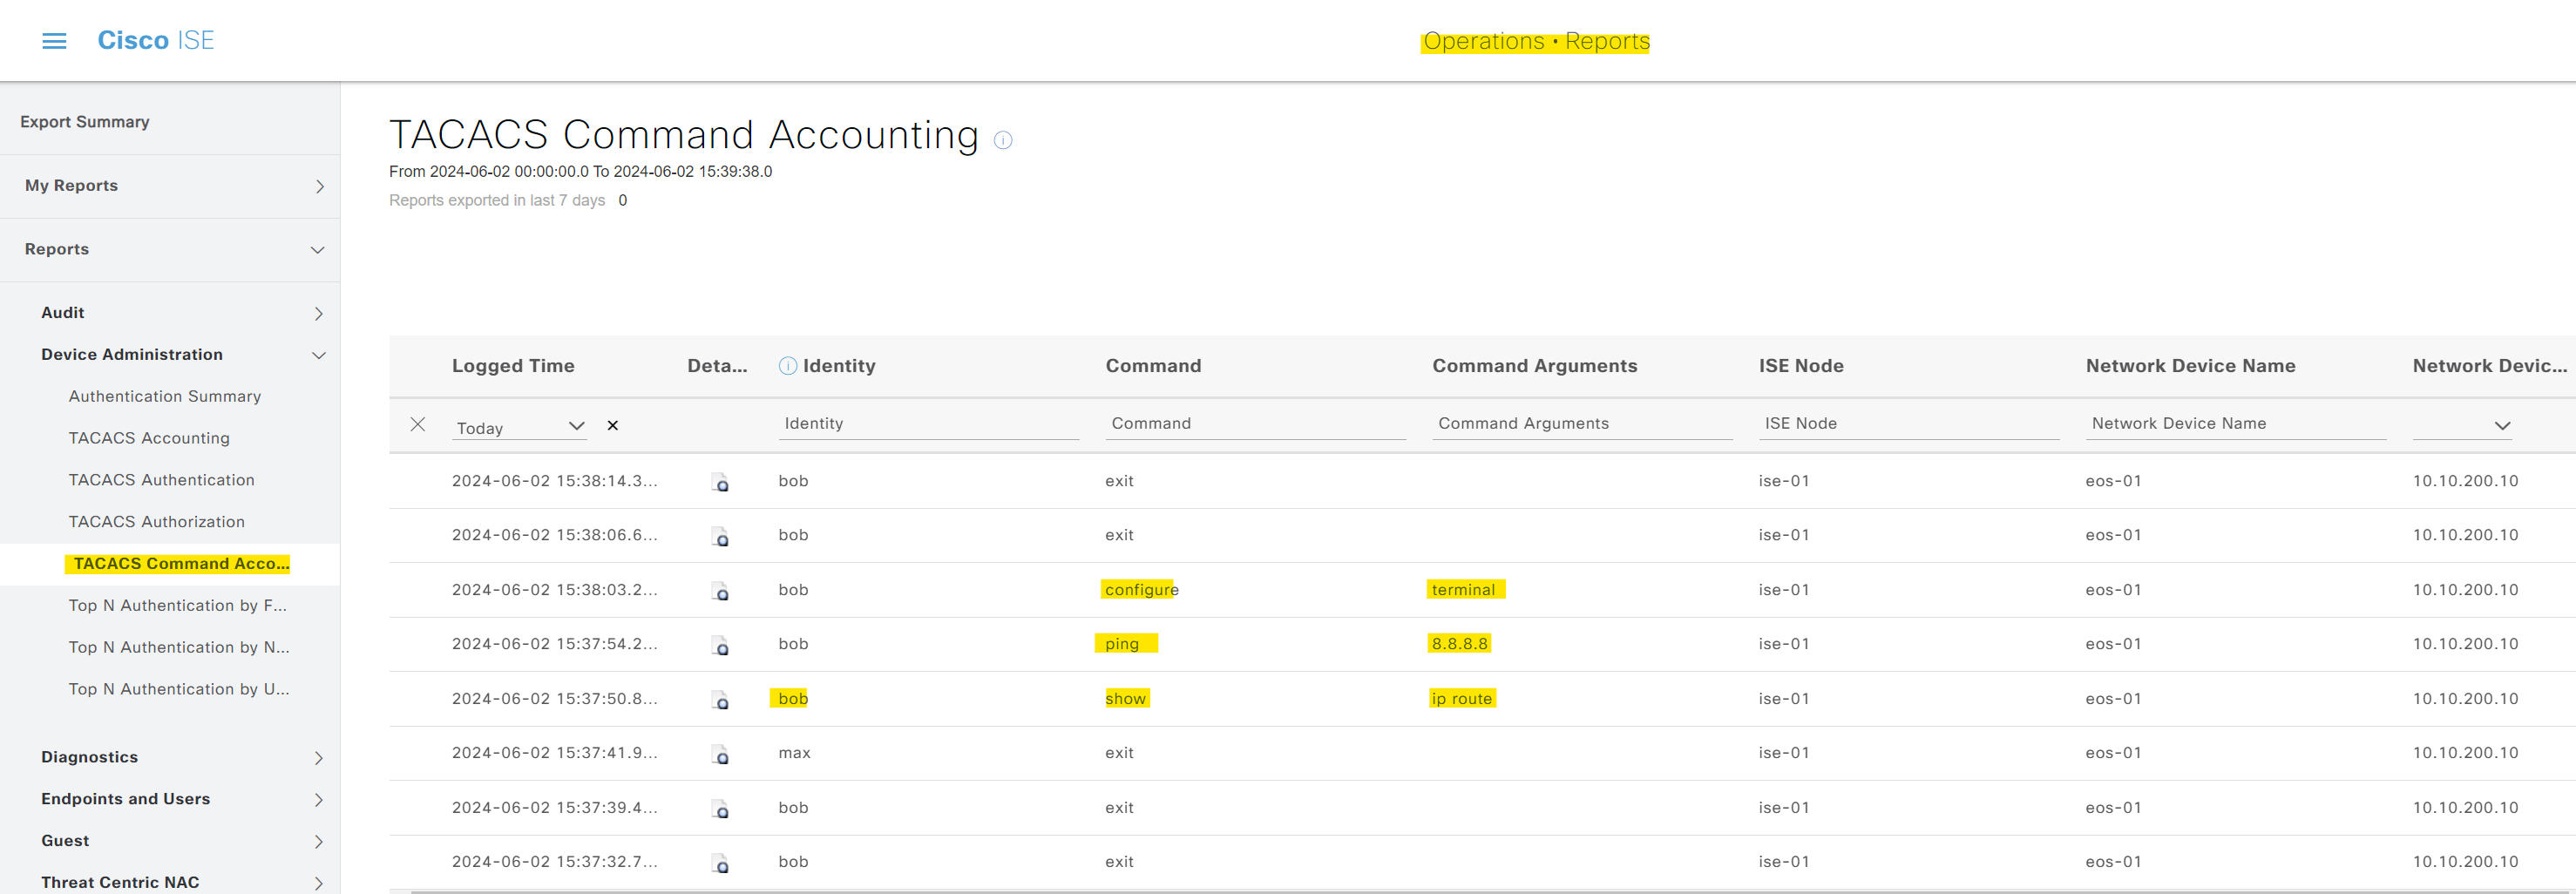
Closing Up
I hope this all makes sense to you. I didn't cover the ISE part in detail because it would have made the blog post very long. In the end, here is the full AAA configuration if you decide to use Method 2.
tacacs-server host 10.10.0.100 key 7 08205E471A0D04464058
!
aaa group server tacacs+ ISE-GROUP
   server 10.10.0.100
!
aaa authentication login default group ISE-GROUP local
aaa authorization exec default group ISE-GROUP local
aaa authorization commands all default group ISE-GROUP local
aaa accounting exec default start-stop group ISE-GROUP
aaa accounting commands all default start-stop group ISE-GROUP
!
ip tacacs source-interface Management0
This configuration sets up the Arista device to use Cisco ISE for both authentication and command authorization, providing flexible and scalable access control for your network users.
References
https://sharifulhoque.blogspot.com/2021/01/arista-eos-aaa-configuration-for.html
https://arista.my.site.com/AristaCommunity/s/article/cvp-aaa-tacacs-authorization-with-cisco-ise