Welcome back to the Docker series. In this post, we’re going to look at Docker Compose - a tool that makes managing multi-container applications much easier.
In the previous posts, we ran individual containers using plain Docker commands. This works fine for simple cases, but as soon as you have multiple services, volumes, networks, and restart policies, managing everything through individual commands becomes painful.
This is exactly where Docker Compose helps. Docker Compose lets you define your entire application stack in a single YAML file, describing services, networks, volumes, and how everything connects. Once defined, you can bring up the whole stack with a single command.
Revisiting Memos
Previously, we installed the memos app using plain Docker commands, as shown below. This works well and does the job, but you can also add this to a compose file. The beauty is that you can also define other services/containers within the same file.
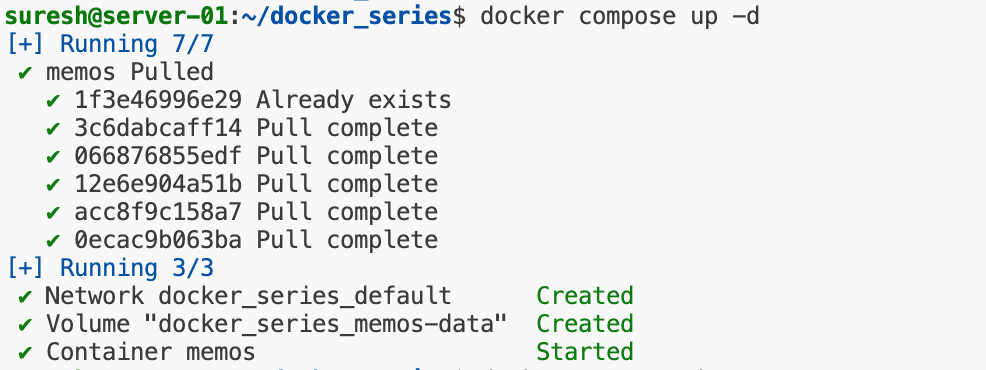
With Docker Compose, we can define the same thing in a file called compose.yml
Please note that here, I made a small change. Instead of using a bind mount (a directory directly from the host, denoted via ~/.memos/), we are using a Docker-managed volume called memos-data. This keeps the data isolated from the host filesystem and managed entirely by Docker. We could have used a bind mount, but I thought it would be easier for you to follow along this way. With bind mounts, you need to make sure your directory structure matches mine exactly. We’ll cover volumes in more detail in future posts.
To bring up the memos app using Docker Compose, you simply run.
This tells Docker Compose to start all services defined in the file. The -d option means detached mode, which runs the containers in the background so your terminal is free for other commands.
Similarly, you can stop the containers by running docker compose down as shown below.

compose.yaml (preferred) or compose.yml that is placed in the working directory. Compose also supports docker-compose.yaml and docker-compose.yml for backwards compatibility of earlier versions. If both files exist, Compose prefers the canonical compose.yamlRunning Multiple Services
With Docker Compose, you can define multiple services in the same file. For example, if you want to run both memos and UniFi Network Application, your docker-compose.yml could look like this. I've explained how to run UniFi Network Application Docker in one of my previous posts, so feel free to check it out here.

init-mongo.sh in the same directory as the docker-compose.yml. This script is executed when the MongoDB container starts and is responsible for creating the initial database user and setting up permissions.The UniFi application requires a database instance, so using Docker Compose, we can define both the UniFi application and its required MongoDB database in the same file. This makes deployment much easier because everything needed is described in one place.

In the compose file, you might have noticed the environment section. This is where we pass environment variables into the containers. These variables configure things like database credentials, time zones, memory limits, and more. This is a common way to pass configuration to containers without hardcoding them into the image.
For UniFi, you’ll also see PUID and PGID. These define the user and group IDs that the container should run as. On most Linux systems, the default user ID for a regular user is 1000, and the group ID is also 1000. This ensures the container can read and write to the mounted volumes without permission issues.
With this single file, you can bring up both services and their dependencies by running up and stopping everything by running down
As you can see, both applications are now available and reachable as we expected.

If you want to restart all services, you can use restart
Or, if you only want to start or stop one service (like memos)
This makes managing multi-container applications so much easier than running individual commands for each container.
Closing Up
Most of the self-hosted apps I run are defined in a single YAML file. So, if I ever need to deploy all my apps to a different host or if I want to share my setup with friends, I can simply give them the file. With a single command, they can bring everything up just like I have it.
There’s much more to Docker Compose than what we’ve seen so far, and there are many useful tweaks you can apply to fine-tune your setup. We’ll explore those in future posts.