It’s a bit embarrassing as a Network Engineer that we’ve made it this far into the Docker series without looking into Docker Networking and IP Addresses. So, in this part of the series, let’s take a quick look at the basics of Docker Networking. There’s a lot more to Docker networking than what we’ll cover here, but this should be enough to get most people started. We can always explore advanced topics in future posts.
If you haven’t been following the Docker series and just landed on this post, don’t worry; you can still follow along without any issues. If you’re curious about the previous posts, feel free to check them out below.
As always, if you find this post helpful, press the ‘clap’ button. It means a lot to me and helps me know you enjoy this type of content.
Docker Networking Basics
Container networking refers to the ability for containers to connect to and communicate with each other or to non-Docker workloads (applications that are not Docker containers)
Containers have networking enabled by default, and they can make outgoing connections. A container has no information about what kind of network it's attached to or whether its peers are also Docker workloads or not. A container only sees a network interface with an IP address, a gateway, a routing table, DNS services, and other basic networking details.
The following network drivers are available by default, providing core networking functionality.
- bridge - The default network driver.
- host - Removes network isolation between the container and the Docker host.
- none - Completely isolates a container from the host and other containers.
- overlay - Connects multiple Docker daemons together.
- ipvlan - Provides full control over both IPv4 and IPv6 addressing.
- macvlan - Assigns a MAC address to a container, making it appear like a physical device.
In this post, we will focus on the Bridge, Host and None Docker Network Drivers. I'm going to use a Linux VM (Ubuntu 22.04) as a docker host throughout this post.
Let's Look at a Simple Example
Let's start a new container and look into its networking specifics. For this example, I'm going to use the httpd container. This is the Apache web server, and it's very lightweight. Let's start the container by running the following.
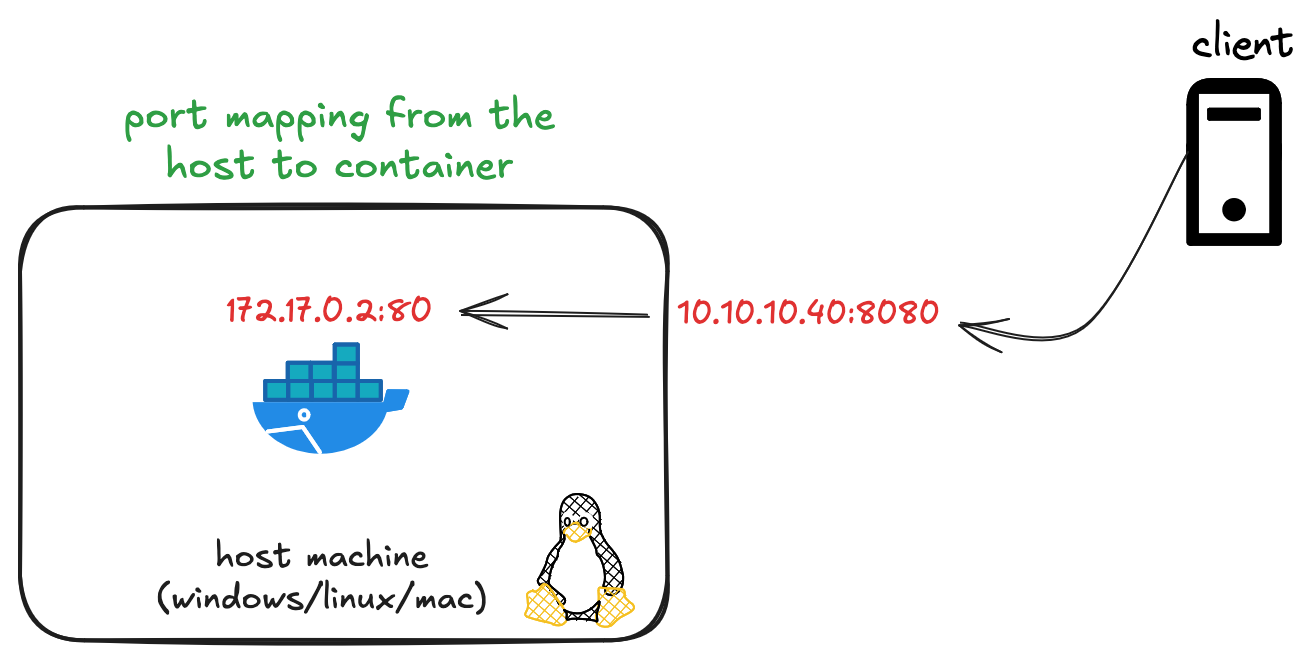
docker run -d -p 8080:80 --name web-server httpd
Once the container is up, as usual, I can access the web page by visiting http://10.10.10.40:8080 (10.10.10.40 is the host IP where the container runs). So, as a end-client, I connect to the host's IP on port 8080 and the host auto-magically forwards this traffic to the container on port 80.
We can inspect the container using the inspect command that gives us detailed information about a container, including its configuration, networking details, mounted volumes, environment variables, and more.
docker inspect web-server
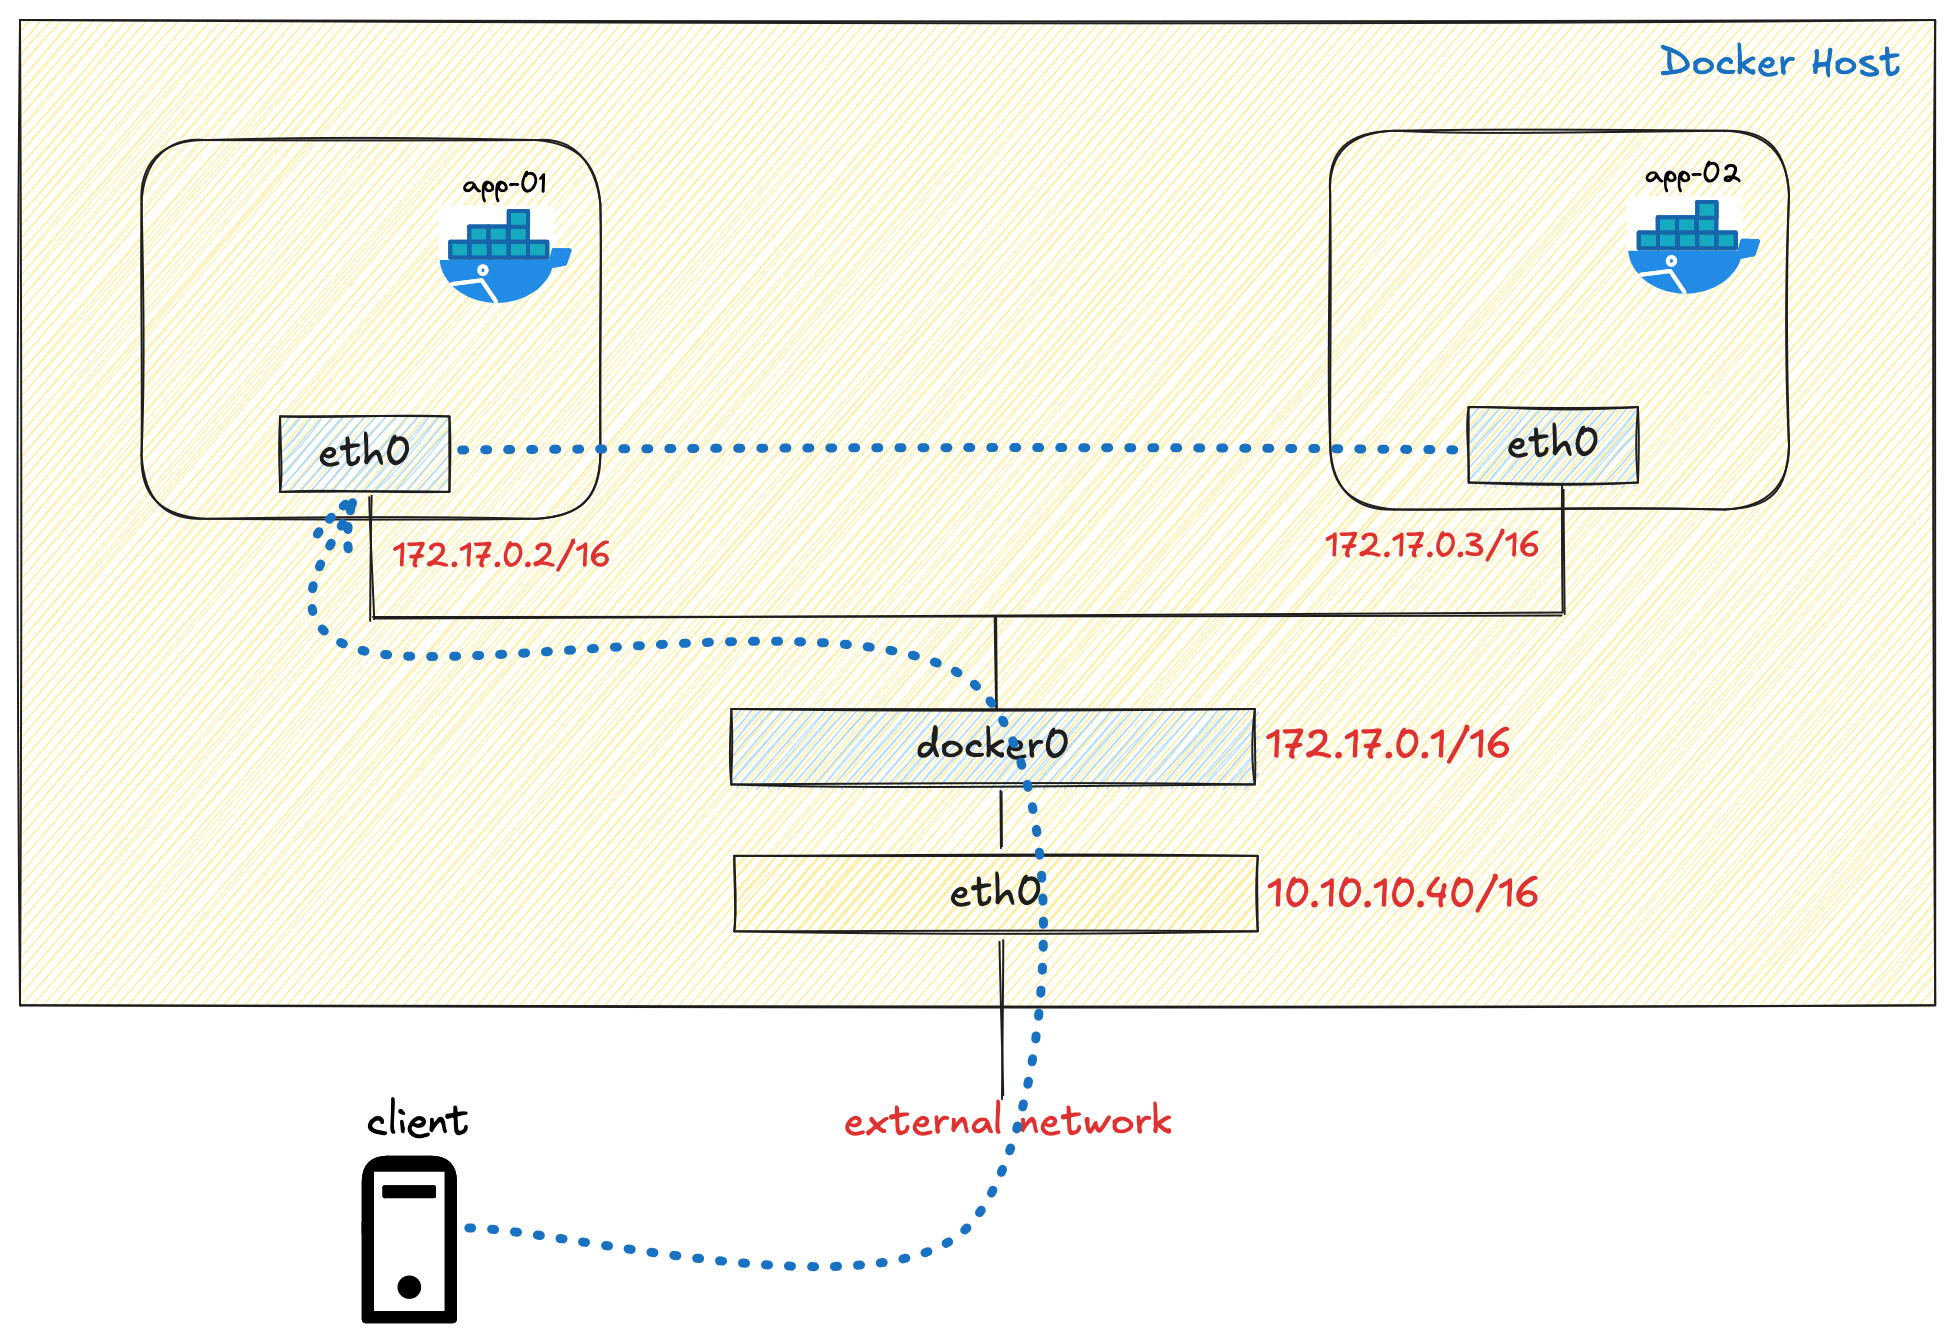
In the output, we can see the container has an IP address 172.17.0.2 with a gateway 172.17.0.1. Where did this come from? Let's take a step back and go through this.
"Networks": {
    "bridge": {
        "IPAMConfig": null,
        "Links": null,
        "Aliases": null,
        "MacAddress": "de:86:16:d7:28:07",
        "DriverOpts": null,
        "GwPriority": 0,
        "NetworkID": "ae341f9ef0",
        "EndpointID": "eb4357ee4e",
        "Gateway": "172.17.0.1",
        "IPAddress": "172.17.0.2",
        "IPPrefixLen": 16,
        "IPv6Gateway": "",
        "GlobalIPv6Address": "",
        "GlobalIPv6PrefixLen": 0,
        "DNSNames": null
    }
}
Docker Default Bridge Driver
When we install Docker, it automatically creates a network interface called docker0 on the host machine. This is a bridge interface with the IP 172.17.0.1/16.
suresh@server-01:~$ ip addr show docker0

4: docker0: <BROADCAST,MULTICAST,UP,LOWER_UP>
    link/ether b2:ef:8f:11:8f:cd brd ff:ff:ff:ff:ff:ff
    inet 172.17.0.1/16 brd 172.17.255.255 scope global docker0
       valid_lft forever preferred_lft forever
    inet6 fe80::b0ef:8fff:fe11:8fcd/64 scope link
       valid_lft forever preferred_lft forever
A bridge interface in Linux functions like a virtual network switch. In traditional networking, a physical switch connects multiple devices on a LAN and forwards traffic between them. Similarly, a Linux bridge is a software implementation that connects multiple network segments at the data link layer (Layer 2).
In Docker's default networking model, the docker0 bridge connects all containers to each other and to the host network. Each container gets its own virtual ethernet interface pair (veth), with one end in the container network namespace and the other connected to the docker0 bridge. This allows containers to communicate with each other and the external network through the host's network stack.
A Virtual Ethernet (veth) Pair
When we start a container, Docker also creates a veth (virtual ethernet) interface on the host. This interface looks something like this.
5: veth4ebe6e6@if2: <BROADCAST,MULTICAST,UP,LOWER_UP>
    link/ether 6e:13:d8:bc:30:c1 brd ff:ff:ff:ff:ff:ff link-netnsid 0
    inet6 fe80::6c13:d8ff:febc:30c1/64 scope link
       valid_lft forever preferred_lft forever
A virtual Ethernet (veth) pair is essentially a virtual network cable with two ends.
- One end (
veth4ebe6e6) is connected to the host'sdocker0bridge - The other end (usually named
eth0) is placed inside the container's network namespace
Starting a New Container
Let's say I want to spin up another container for some testing, and we’ll call this container web-server-test. But if we run the same command we ran before, we will get an error saying that port 8080 is already in use on the host machine.
docker run -d -p 8080:80 --name web-server-test httpd

docker: Error response from daemon: failed to set up container networking:
driver failed programming external connectivity on endpoint web-server-test
(a1762d262423): Bind for 0.0.0.0:8080 failed: port is already allocated
So, for the second container, we need to use a different port on the host - for example, 8081
docker run -d -p 8081:80 --name web-server-test httpd
Once this second container is up and running, both containers should be able to ping each other because they are both connected to the same docker0 bridge.
root@07e52a63e8b9:/usr/local/apache2# ping 172.17.0.3
PING 172.17.0.3 (172.17.0.3) 56(84) bytes of data.
64 bytes from 172.17.0.3: icmp_seq=1 ttl=64 time=0.045 ms
64 bytes from 172.17.0.3: icmp_seq=2 ttl=64 time=0.038 ms
64 bytes from 172.17.0.3: icmp_seq=3 ttl=64 time=0.039 ms
^C
--- 172.17.0.3 ping statistics ---
3 packets transmitted, 3 received, 0% packet loss, time 2047ms
rtt min/avg/max/mdev = 0.038/0.040/0.045/0.003 mshttpd container doesn’t include the ping command by default. To use it, I had to install it inside the container using apt-get update && apt-get install -y iputils-ping. If you want to run the ip address command inside the container, you need to install apt-get update && apt-get install -y iproute2This second container will have it's own veth pair similar to the first container where one ends connect to the host's docker0 bridge, and the other end connects to the new container's own network namespace.
Creating a Custom Bridge
So far, we’ve been using the default docker0 bridge, but sometimes you might want to create your own custom bridge. This can be useful if you want to isolate containers from each other or group certain containers into their own dedicated network. Creating a new bridge is simple with the docker network create command.
docker network create -d bridge test-bridge
docker network ls
NETWORK ID     NAME          DRIVER    SCOPE
ae341f9ef0f8   bridge        bridge    local
e0fd13b30c58   host          host      local
7dd77aabc476   none          null      local
126e268651fe   test-bridge   bridge    local
You can also run ip address on your Linux host to see this newly created bridge and its IP address.
8: br-126e268651fe: <BROADCAST,MULTICAST,UP,LOWER_UP> mtu 1500
    link/ether be:49:6c:dc:94:1e brd ff:ff:ff:ff:ff:ff
    inet 172.18.0.1/16 brd 172.18.255.255 scope global br-126e268651fe
       valid_lft forever preferred_lft forever
    inet6 fe80::bc49:6cff:fedc:941e/64 scope link
       valid_lft forever preferred_lft forever
Now, let’s launch a container inside this new bridge using the --network flag. This container will now get an IP like 172.18.0.x/16 from the test-bridge bridge.
docker run -d --name web-server-bridge-test --network test-bridge httpd
"Networks": {
    "test-bridge": {
        "IPAMConfig": null,
        "Links": null,
        "Aliases": null,
        "MacAddress": "4a:53:a6:25:84:e3",
        "DriverOpts": null,
        "GwPriority": 0,
        "NetworkID": "126e268651f",
        "EndpointID": "aa3fb0787f5a",
        "Gateway": "172.18.0.1",
        "IPAddress": "172.18.0.2",
        "IPPrefixLen": 16,
        "IPv6Gateway": "",
        "GlobalIPv6Address": "",
        "GlobalIPv6PrefixLen": 0,
        "DNSNames": [
            "web-server-bridge-test",
            "64a540d32e21"
        ]
    }
}
Can containers in different bridges talk to each other?
No, they cannot talk to each other directly. Containers connected to docker0 cannot directly communicate with containers in test-bridge, and vice versa. This is because each bridge network is isolated from the others by design using iptables.
suresh@server-01:~$ docker exec -it web-server /bin/bash
root@07e52a63e8b9:/usr/local/apache2# ping 172.18.0.2
PING 172.18.0.2 (172.18.0.2) 56(84) bytes of data.
^C
--- 172.18.0.2 ping statistics ---
5 packets transmitted, 0 received, 100% packet loss, time 4100ms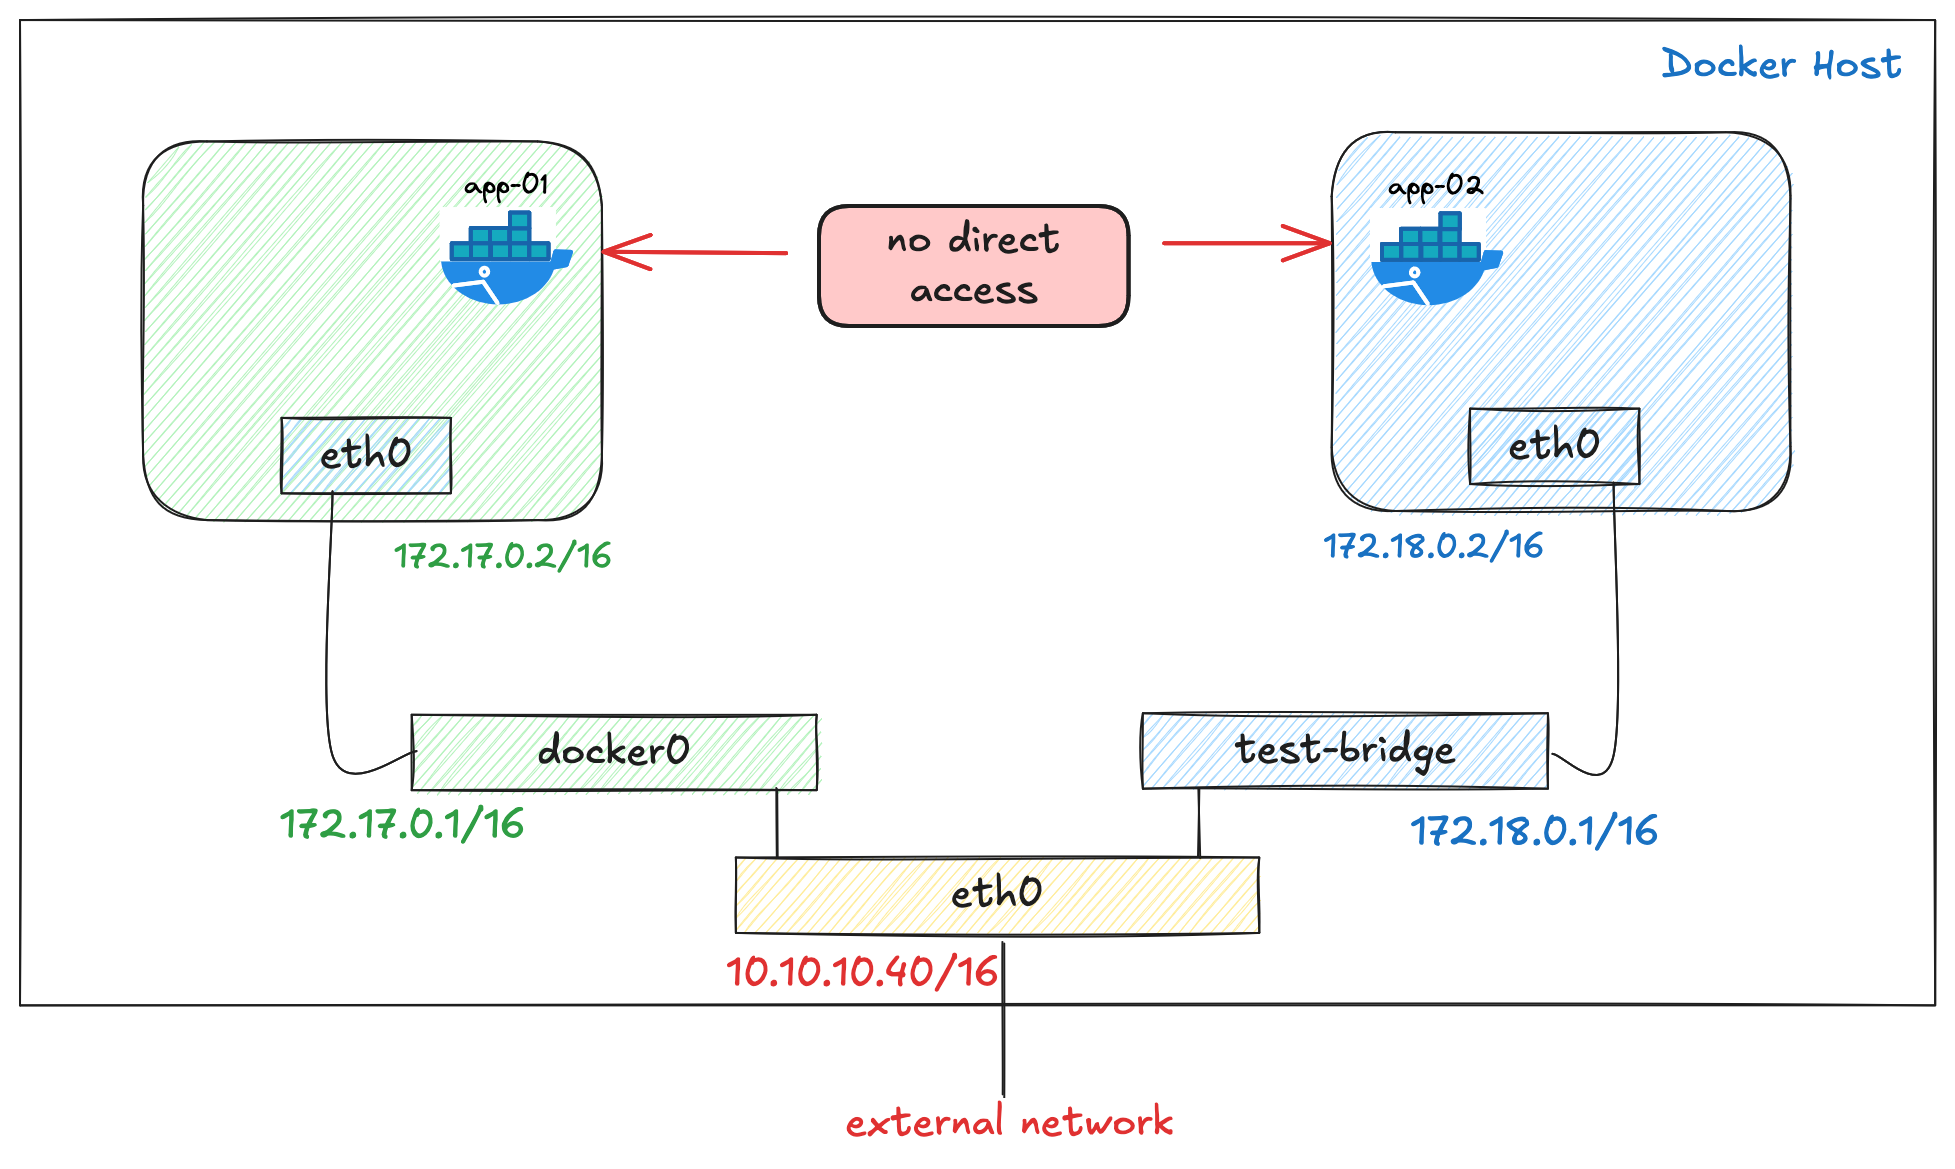
This isolation is one of the main benefits of creating custom bridges; it allows you to segment different applications or services into their own private networks.
How Docker Manages Isolation with iptables
The isolation between different bridges is managed by iptables rules. When you create a new bridge network, Docker automatically adds rules in iptables to control traffic flow between containers and between the containers and the outside world. By default, all external source IPs are allowed to connect to ports that have been published to the Docker host's addresses.
iptables rules for bridge networks. No iptables rules are created for ipvlan, macvlan or host networking.Here is how our iptable rules look at the moment.
suresh@server-01:~$ sudo iptables -vnL
Chain INPUT (policy ACCEPT 0 packets, 0 bytes)
 pkts bytes target     prot opt in     out     source               destination

Chain FORWARD (policy DROP 0 packets, 0 bytes)
 pkts bytes target            prot opt in     out     source               destination
 5254 9867K DOCKER-USER       all  --  *      *       0.0.0.0/0            0.0.0.0/0
 5254 9867K DOCKER-FORWARD    all  --  *      *       0.0.0.0/0            0.0.0.0/0

Chain OUTPUT (policy ACCEPT 0 packets, 0 bytes)
 pkts bytes target     prot opt in     out     source               destination

Chain DOCKER (2 references)
 pkts bytes target     prot opt in     out                        source               destination
    0     0 ACCEPT     tcp  --  !docker0 docker0                  0.0.0.0/0            172.17.0.3           tcp dpt:80
    1    64 ACCEPT     tcp  --  !docker0 docker0                  0.0.0.0/0            172.17.0.2           tcp dpt:80
    0     0 DROP       all  --  !docker0 docker0                  0.0.0.0/0            0.0.0.0/0
    0     0 DROP       all  --  !br-126e268651fe br-126e268651fe  0.0.0.0/0            0.0.0.0/0

Chain DOCKER-BRIDGE (1 references)
 pkts bytes target     prot opt in     out               source               destination
    1    64 DOCKER     all  --  *      docker0           0.0.0.0/0            0.0.0.0/0
    0     0 DOCKER     all  --  *      br-126e268651fe   0.0.0.0/0            0.0.0.0/0

Chain DOCKER-CT (1 references)
 pkts bytes target     prot opt in     out              source               destination
 3014 9774K ACCEPT     all  --  *      docker0          0.0.0.0/0            0.0.0.0/0            ctstate RELATED,ESTABLISHED
    0     0 ACCEPT     all  --  *      br-126e268651fe  0.0.0.0/0            0.0.0.0/0            ctstate RELATED,ESTABLISHED

Chain DOCKER-FORWARD (1 references)
 pkts bytes target                    prot opt in                out   source               destination
 5254 9867K DOCKER-CT                 all  --  *                 *     0.0.0.0/0            0.0.0.0/0
 2240 92518 DOCKER-ISOLATION-STAGE-1  all  --  *                 *     0.0.0.0/0            0.0.0.0/0
 2235 92098 DOCKER-BRIDGE             all  --  *                 *     0.0.0.0/0            0.0.0.0/0
 2234 92034 ACCEPT                    all  --  docker0           *     0.0.0.0/0            0.0.0.0/0
    0     0 ACCEPT                    all  --  br-126e268651fe   *     0.0.0.0/0            0.0.0.0/0

Chain DOCKER-ISOLATION-STAGE-1 (1 references)
 pkts bytes target     prot opt in     out                                            source               destination
 2239 92454 DOCKER-ISOLATION-STAGE-2  all  --  docker0 !docker0                       0.0.0.0/0            0.0.0.0/0
    0     0 DOCKER-ISOLATION-STAGE-2  all  --  br-126e268651fe !br-126e268651fe       0.0.0.0/0            0.0.0.0/0

Chain DOCKER-ISOLATION-STAGE-2 (2 references)
 pkts bytes target     prot opt in     out               source               destination
    5   420 DROP       all  --  *      br-126e268651fe   0.0.0.0/0            0.0.0.0/0
    0     0 DROP       all  --  *      docker0           0.0.0.0/0            0.0.0.0/0

Chain DOCKER-USER (1 references)
 pkts bytes target     prot opt in     out     source               destination
 5254 9867K RETURN     all  --  *      *       0.0.0.0/0            0.0.0.0/0
You don't need to worry about this as Docker manages the iptable rules, but I leave it here if anyone wants to dive-deep and see how it works.
Creating a Bridge with Custom Subnet
In our previous examples, Docker automatically assigned a subnet to the new bridge, such as 172.18.0.0/16. However, you can easily specify a custom subnet by using the --subnet flag. For example, we can create a new bridge called custom-subnet with a subnet of 192.168.25.0/24
docker network create -d bridge --subnet=192.168.25.0/24 custom-subnet
Now, let’s launch a container into this bridge. For this example, I’m going to use the alpine image because it already comes with some network utilities installed, so we don’t have to manually install them like we did with the httpd image.
docker run -dit --name alpine1 --network custom-subnet alpine
The -dit flags mean
- d: Run detached (in the background)
- i: Start interactive mode (so you can type commands into the container)
- t: Allocate a TTY (so you can see the input and output)
Since the container is running detached, you won’t be connected to it right away. Instead, Docker will print the container ID. To attach to the container and start interacting with it, you can use:
docker attach alpine1
Inside the container, you will see it has an IP address like 192.168.25.2/24, and it can also reach external addresses.
/ # ip ad
1: lo: <LOOPBACK,UP,LOWER_UP> mtu 65536
    link/loopback 00:00:00:00:00:00 brd 00:00:00:00:00:00
    inet 127.0.0.1/8 scope host lo
       valid_lft forever preferred_lft forever
    inet6 ::1/128 scope host
       valid_lft forever preferred_lft forever
2: eth0@if25: <BROADCAST,MULTICAST,UP,LOWER_UP,M-DOWN> mtu
    link/ether 92:1f:1c:30:81:3a brd ff:ff:ff:ff:ff:ff
    inet 192.168.25.2/24 brd 192.168.25.255 scope global eth0
       valid_lft forever preferred_lft forever
/ # ping 1.1.1.1
PING 1.1.1.1 (1.1.1.1): 56 data bytes
64 bytes from 1.1.1.1: seq=0 ttl=55 time=22.263 ms
64 bytes from 1.1.1.1: seq=1 ttl=55 time=18.941 ms
^C
--- 1.1.1.1 ping statistics ---
2 packets transmitted, 2 packets received, 0% packet loss
round-trip min/avg/max = 18.941/20.602/22.263 ms
You can detach from alpine1 without stopping it by using the detach sequence, CTRL + p CTRL + q (hold down CTRL and type p followed by q). On macOS, the keys are shift + ctrl + p followed by q
/ # read escape sequence  << inside alpine
suresh@server-01:~$       << back to host's shell
Connecting a Container to Multiple Networks
So far, we’ve only looked at connecting a container to a single network, whether that’s the default bridge network or a custom bridge we created. However, Docker also allows you to connect a container to multiple networks.
For example, we launched the alpine1 container into our custom bridge called custom-subnet. Now, we can also connect the same container to the default bridge network.
docker network connect bridge alpine1
When you initially run a container using docker run, you can only specify one network. If you want to add more networks later, you have to use docker network connect command.
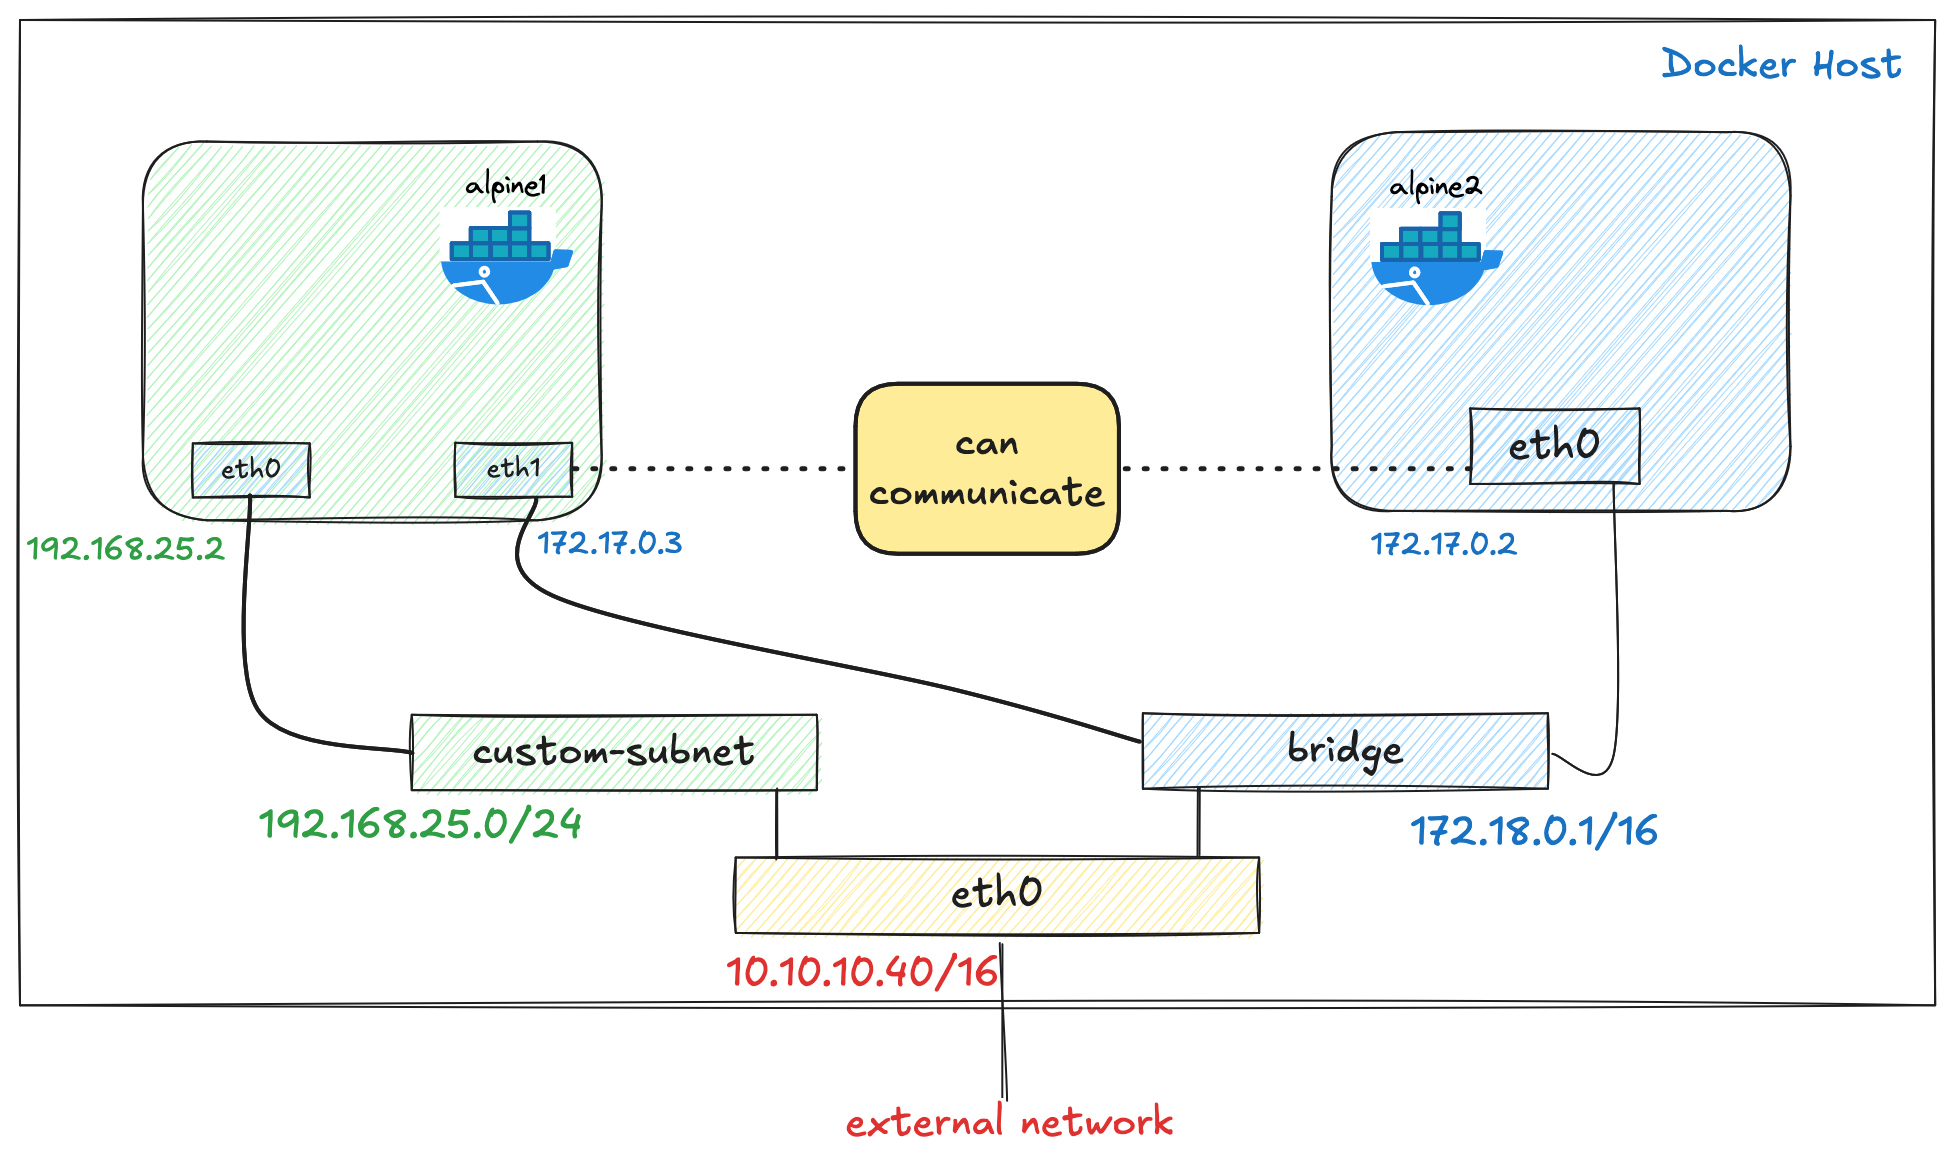
Now, if we attach to alpine1 and check the IP addresses, the container will have two IPs - one from the custom-subnet network and one from the bridge network.
docker attach alpine1
/ # ip ad
1: lo: <LOOPBACK,UP,LOWER_UP> mtu 65536
    link/loopback 00:00:00:00:00:00 brd 00:00:00:00:00:00
    inet 127.0.0.1/8 scope host lo
       valid_lft forever preferred_lft forever
    inet6 ::1/128 scope host
       valid_lft forever preferred_lft forever
2: eth0@if28: <BROADCAST,MULTICAST,UP,LOWER_UP,M-DOWN> mtu 1500
    link/ether be:6b:54:bd:b0:7e brd ff:ff:ff:ff:ff:ff
    inet 192.168.25.2/24 brd 192.168.25.255 scope global eth0
       valid_lft forever preferred_lft forever
3: eth1@if29: <BROADCAST,MULTICAST,UP,LOWER_UP,M-DOWN> mtu 1500
    link/ether 42:14:79:00:6c:f2 brd ff:ff:ff:ff:ff:ff
    inet 172.17.0.2/16 brd 172.17.255.255 scope global eth1
       valid_lft forever preferred_lft forever
If we then launch another container directly into the default bridge network, both containers should be able to communicate with each other through the bridge network.
docker run -dit --name alpine2 alpine
Attach to alpine2 and try to ping alpine1's bridge network IP.
docker attach alpine2
/ # ping 172.17.0.2
PING 172.17.0.2 (172.17.0.2): 56 data bytes
64 bytes from 172.17.0.2: seq=0 ttl=64 time=0.057 ms
64 bytes from 172.17.0.2: seq=1 ttl=64 time=0.066 ms
Clean Up
Before moving to the next section, let's clean up and remove all the containers we have created so far.
suresh@server-01:~$ docker ps
CONTAINER ID   IMAGE     COMMAND              CREATED             STATUS             PORTS                                     NAMES
64a540d32e21   httpd     "httpd-foreground"   28 minutes ago      Up 28 minutes      80/tcp                                    web-server-bridge-test
9ce956ad76cc   httpd     "httpd-foreground"   33 minutes ago      Up 33 minutes      0.0.0.0:8081->80/tcp, [::]:8081->80/tcp   web-server-test
07e52a63e8b9   httpd     "httpd-foreground"   About an hour ago   Up About an hour   0.0.0.0:8080->80/tcp, [::]:8080->80/tcp   web-server
50a4c850aae0   alpine    "/bin/sh"   5 minutes ago   Up 5 minutes             alpine2
0e0be36d0d5e   alpine    "/bin/sh"   7 minutes ago   Up 7 minutes             alpine1
docker stop 64
docker stop 9c
docker stop 07
docker stop 50
docker stop 0edocker rm 64a540d32e21
docker rm 9ce956ad76cc
docker rm 07e52a63e8b9
docker rm 50a4c850aae0
docker rm 0e0be36d0d5edocker network rm test-bridge
docker network rm custom-subnet
docker rm -f $(docker ps -a -q) to stop and remove all the containers. Please use it with caution, as it may remove other containers you may want to keep. This command is useful when you experiment in your lab.Docker Host Network Driver
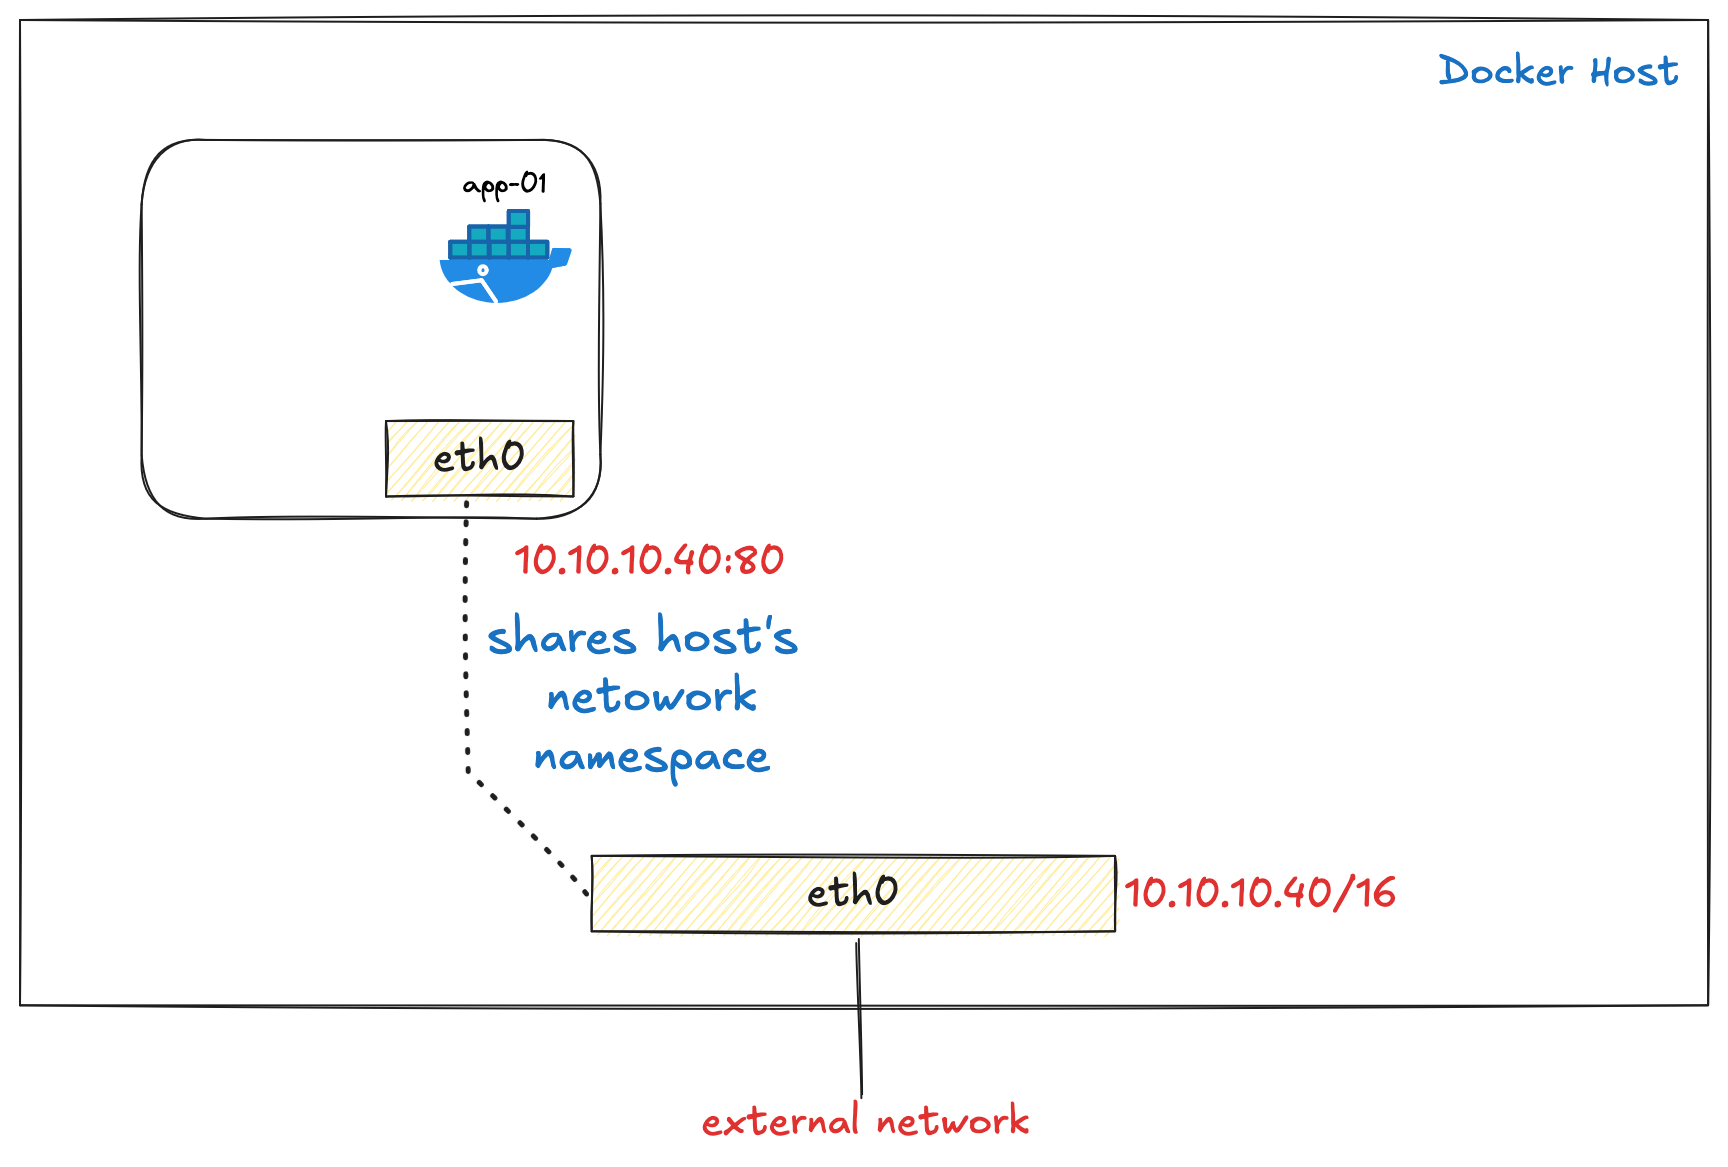
If you use the host network mode for a container, that container’s network stack is not isolated from the Docker host. Instead, the container shares the host’s networking namespace, meaning the container does not get its own IP address. It simply uses the host’s IP directly.
In our example, if we run the httpd container, which binds to port 80, and we use the host network, the container’s web server will be available directly on port 80 of the host’s IP address.
docker run -d --name web-server --network host httpd
Now, we can access the web page using http://10.10.10.40:80
If we go inside the container and check the IP configuration, we will see the host’s IP and interfaces, exactly as expected. This is because the container doesn’t have its own isolated network stack in host mode; it fully relies on the host’s networking setup.
root@server-01:/usr/local/apache2# ip ad
1: lo: <LOOPBACK,UP,LOWER_UP> mtu 65536
    link/loopback 00:00:00:00:00:00 brd 00:00:00:00:00:00
    inet 127.0.0.1/8 scope host lo
       valid_lft forever preferred_lft forever
    inet6 ::1/128 scope host
       valid_lft forever preferred_lft forever
2: enp6s18: <BROADCAST,MULTICAST,UP,LOWER_UP> mtu 1500
    link/ether bc:24:11:1b:da:5c brd ff:ff:ff:ff:ff:ff
    inet 10.10.10.40/16 brd 10.10.255.255 scope global enp6s18
       valid_lft forever preferred_lft forever
    inet6 fe80::be24:11ff:fe1b:da5c/64 scope link
       valid_lft forever preferred_lft forever
3: tailscale0: <POINTOPOINT,MULTICAST,NOARP,UP,LOWER_UP> mtu 1280
    link/none
    inet6 fe80::3f9b:9c68:1e1:15fe/64 scope link stable-privacy
       valid_lft forever preferred_lft forever
4: docker0: <NO-CARRIER,BROADCAST,MULTICAST,UP> mtu 1500
    link/ether b2:ef:8f:11:8f:cd brd ff:ff:ff:ff:ff:ff
    inet 172.17.0.1/16 brd 172.17.255.255 scope global docker0
       valid_lft forever preferred_lft forever
    inet6 fe80::b0ef:8fff:fe11:8fcd/64 scope link
       valid_lft forever preferred_lft forever
When people say that "Docker containers using the host network driver share the host's network namespace", they mean the container skips having its own isolated network stack and directly uses the host machine's networking. This means the container sees the same network interfaces, IP addresses, and ports as the host system itself. There's no network isolation, address translation, or port mapping needed; processes in the container can bind directly to host ports as if they were running natively on the host.
Host Network on Docker Desktop
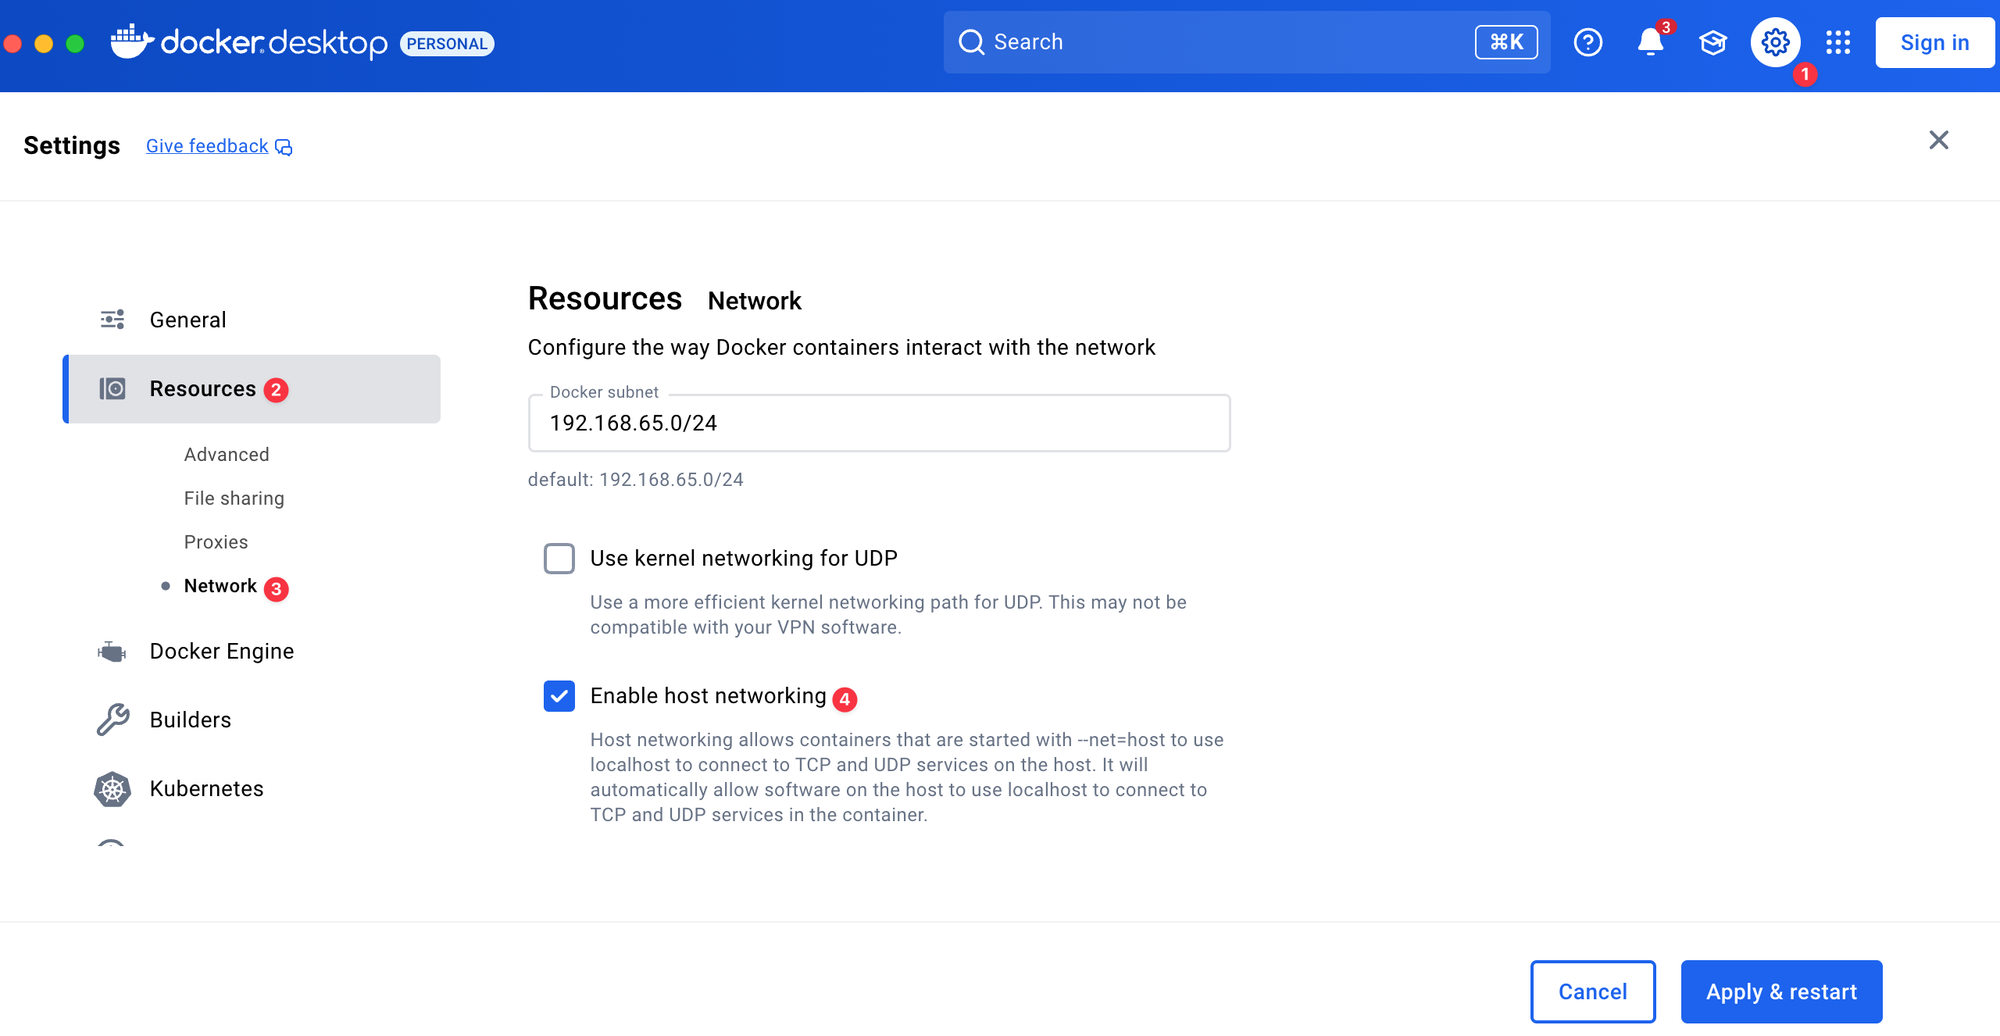
The host networking driver is supported on Docker Engine (Linux only) and Docker Desktop version 4.34 and later. You can enable this feature by making the following change.
- Sign in to your Docker account in Docker Desktop.
- Navigate to Settings.
- Under the Resources tab, select Network.
- Check the Enable host networking option.
- Select Apply and restart.
Without enabling this option, I was still able to launch a container with the host network driver on my macOS, but I couldn’t access its services. For example, when I started an httpd container and tried to access it via http://localhost:80, it didn’t work. It only started working after I enabled host networking in the Docker Desktop settings.
Docker None Network Driver
So far, we’ve covered the bridge and host network drivers. In this section, let’s look at the none driver. As the name suggests, this completely isolates the container’s networking stack. You can use the --network none flag when starting a container. With this mode, the container only has a loopback interface, no external connectivity at all.
To test this, if we launch our usual httpd container using --network none, we won’t be able to run ping or ip a commands. On top of that, we can’t install any missing tools because the container has no Internet access.
Of course, you could use a different image that comes with these tools pre-installed, but for this example, I’m going to build my own image with a Dockerfile that includes some basic network utilities.
For this, create a new file called Dockerfile with the following contents.
FROM httpd:latest

# Install network utilities
RUN apt-get update && \
    apt-get install -y iproute2 iputils-ping && \
    apt-get clean && \
    rm -rf /var/lib/apt/lists/*
We can then build and run this new image (httpd-nettool is the name we assign to this image)
docker build -t httpd-nettools .

docker run -d -p 8080:80 --name web-server --network none httpd-nettools
With this, the container will start completely isolated (-network none), with only the loopback interface present.
docker exec -it web-server /bin/baship add
1: lo: <LOOPBACK,UP,LOWER_UP> mtu 65536
link/loopback 00:00:00:00:00:00 brd 00:00:00:00:00:00
inet 127.0.0.1/8 scope host lo
valid_lft forever preferred_lft forever
inet6 ::1/128 scope host
valid_lft forever preferred_lft foreverping 1.1.1.1
ping: connect: Network is unreachableClosing Up
In most cases, you will end up using either the bridge or host network drivers. We’ll try to cover the other drivers later in the series. I highly recommend trying these out in your own lab and getting familiar with how they work. Nothing comes close to actually doing it yourself.
References
https://docs.docker.com/engine/network/tutorials/standalone/