

If you're a Network Engineer looking to learn what 802.1X is and how you can implement it in your network, you've come to the right place. 802.1X might seem confusing at first glance due to its various components, and the fact that it can be implemented in numerous ways. But don't worry, I'm here to break down each component and simplify the whole process for you. By the end of this post, you'll have a clear understanding of 802.1X and how to set it up, whether for wired or wireless networks.
Here is what we will cover in this blog post.
- What is our end goal?
- Network Access Control (NAC)
- What exactly is 802.1X?
- What do I need to start using 802.1X?
- Which protocol to use? (EAP-TLS, PEAP, TEAP)
- Cisco ISE Introduction
- Supplicant (end-device) configuration
- MAB
What is Our End Goal?
Let's talk about our end goal - Imagine our current setup where the WiFi network is secured with just a Pre-Shared Key (PSK) and wired networks are open, allowing anyone to plug in a laptop and gain access. This isn't ideal for security.
Our main aim is to shift towards a more secure authentication method using certificates or credentials. This means that each endpoint, whether connecting to wired or wireless networks, needs to have a certificate/credentials to access the network. This setup significantly improves security by ensuring that only authorized devices can connect.
But what about when someone tries to connect their personal laptop to the WiFi or wired network? We can either block their access outright or redirect them to a dedicated guest VLAN. This approach gives us flexibility in handling unauthorized devices and providing secure access for authorized users while offering limited access to visitors or unregistered devices.
Network Access Control (NAC)
In a simpler form, Network Access Control ensures that only users and devices that are authenticated and authorized can enter the corporate network and restrict unauthorized users and devices from gaining access to it.
NAC is extremely important for ensuring that users have the appropriate authorizations before they access internal resources. In many cases, this is primarily a security concern, ensuring that sensitive and confidential information does not end up in the hands of someone who might use them maliciously or unintentionally.
NAC ensures that every endpoint connected to a network complies with a security state baseline and gives the network admins the option to permit or deny access as necessary.
What is 802.1X?
802.1X is an IEEE standard for port-based network access control that provides secure network access to corporate networks. You cannot secure if you don't know what's on your network. The 802.1X framework functions as a gatekeeper for entry to enterprise networks (wired and wireless).
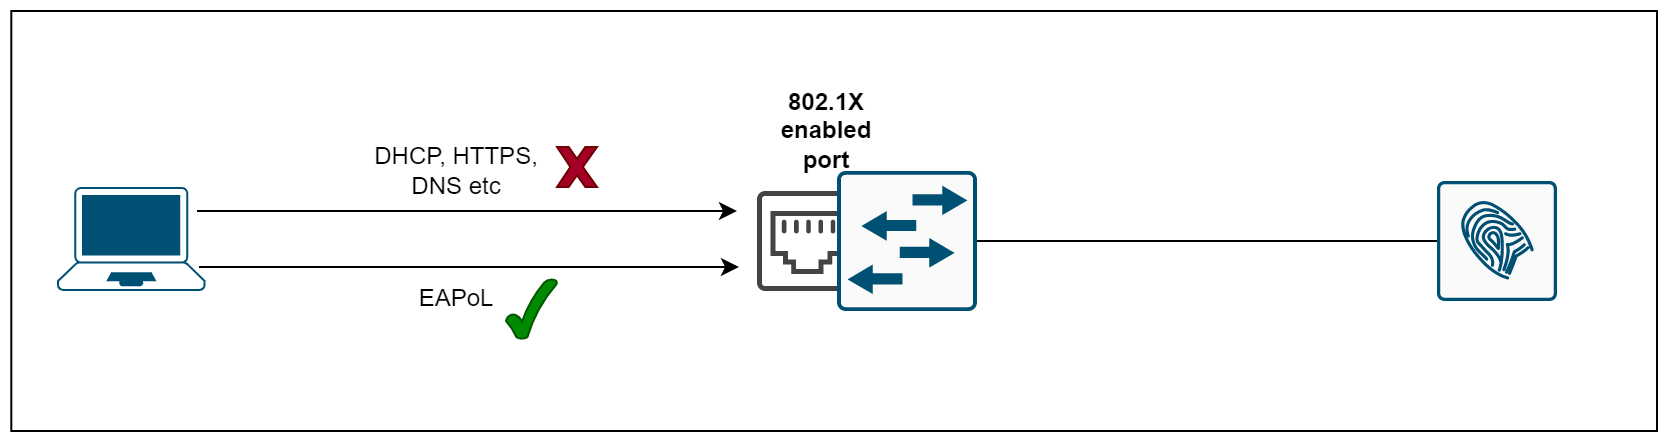
When a user or device wants to gain access to a network, 802.1X acts as a framework that verifies the person/device connecting is who they say they are. When we enable 802.1X on a port, the switch drops all traffic received on that port except EAPoL packets (more on this later). Only after the 802.1X authentication has successfully completed will the switch allow any other traffic on that port.
 Suresh Vina
What do I need to start using 802.1X?
Here is a very simple diagram that shows the basic pieces needed to have a working 802.1X setup.
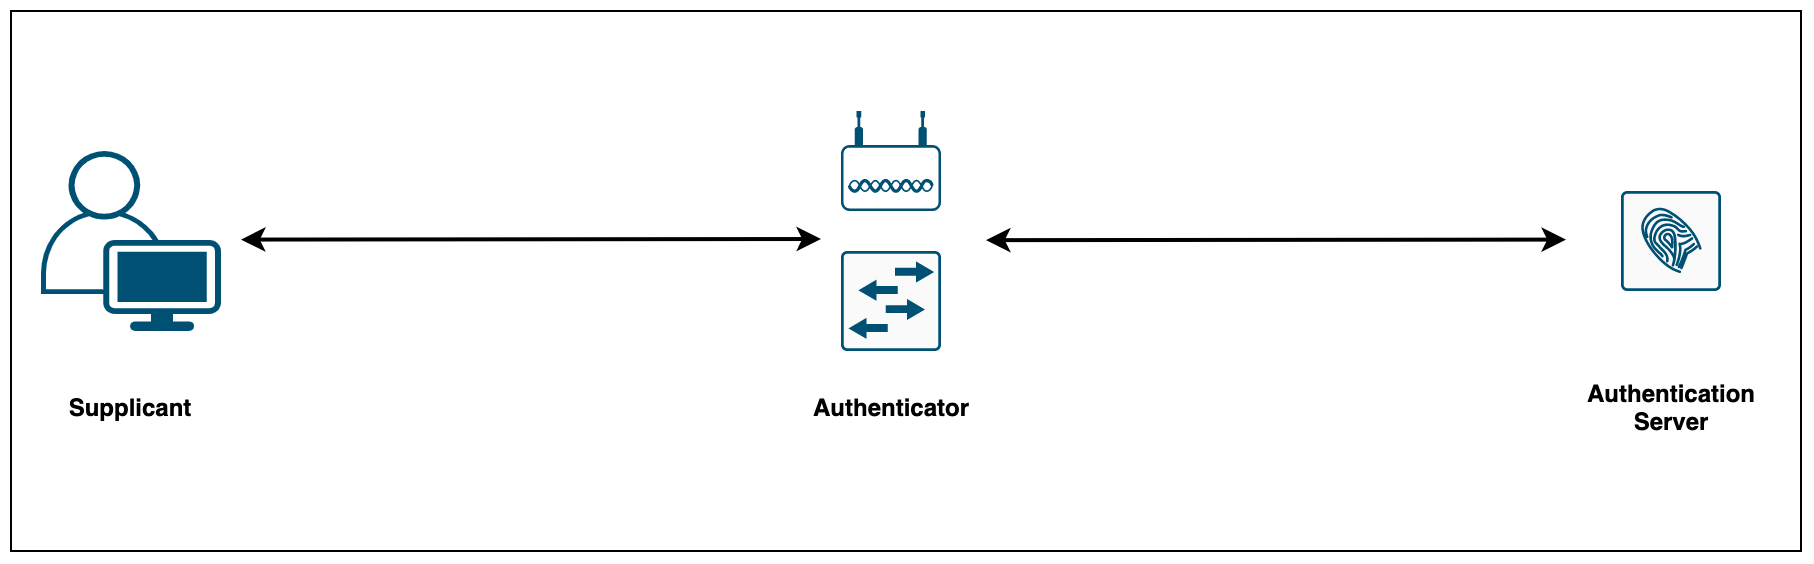
802.1X consists of three components:
- The Supplicant (laptop, printer, phone etc) is the device attempting to gain access to the network. The supplicant communicates with the authenticator via 802.1X-encapsulated EAP packets
- The Authenticator (Switch or AP) is the gatekeeper to the network and permits or denies access to the supplicants. The authenticator acts as an intermediary (proxy) between the supplicant and the authentication server. The authenticator requests identity information (credentials/certificates) from the supplicant via EAP packets, verifies that information with the authentication server and then relays a response to the supplicant (access permit or deny)
- The Authentication Server (Cisco ISE, ClearPass or any radius server) performs the actual authentication of the supplicant. By examining the information in the encapsulated EAP messages relayed from the authenticator, the authentication server validates the identity of the supplicant and responds back to the authenticator whether or not the supplicant is authorized to access the network.
Supplicant
A supplicant is something you likely already have, which could be a laptop or a desktop in most cases. You might also have devices that don’t support 802.1x, such as printers or CCTV cameras. For the laptops, they could be running Windows, macOS, or Linux, most commonly Windows or macOS. You need to 'tell' these devices to recognize that the network is 802.1x protected. So, every time they connect to the network and get prompted for some sort of credentials, the device should provide the predefined credentials to the network devices.
By ‘tell,’ I mean we need to configure the devices. Windows, macOS, and Linux each have dedicated sections for 802.1X configurations. We just need to enable them and make some config changes. Of course, we can’t configure them manually on each device, especially if you have 1,000 users.
For Windows, this process is pretty straightforward; you can push the configs via Group Policy Objects (GPO). These are usually managed by a different team, not necessarily by network engineers. For macOS, it can be slightly more complicated. Ideally, you would use an MDM (Mobile Device Management) solution such as Jamf, which can push changes to all managed macOS devices. I’ve used Jamf in the past, and it worked really well.
Authenticator
Next, we need an authenticator which, in most cases, is a switch for wired clients and an access point for wireless clients. Again, we need to ‘tell’ the authenticator that if a device tries to connect to the network, it should stop all traffic and ask for some credentials. The authenticator doesn’t check or verify these credentials; it simply acts as a middleman, forwarding these credentials to an ‘Authentication Server.’
When you configure a switch, you need to enable 802.1x globally and also on each port. So, if you connect a device to an 802.1x-protected port, all access is prohibited until the authentication is successful.
For the access point, you need to configure or enable 802.1x per SSID. Again, if a device tries to connect to an 802.1x-protected SSID, all access is prohibited until the authentication is successful.
Authentication Server
Finally, let's talk about the 'authentication server'. So far, we've discussed that the supplicant is the end device needing access to your network, and the authenticator acts as the middleman, blocking all connections until the authentication is successful. The Authentication Server actually performs the authentication. It checks the credentials or certificates provided by the supplicants, evaluates any policies, and ultimately grants or denies access. It sends an 'access-accept' or 'access-reject' message to the authenticator.
There are many free and paid products out there that can function as an authentication server. I only have experience with Cisco ISE, but the alternatives include Aruba ClearPass, FreeRADIUS, and Radiator.
Introduction to EAP
The Extensible Authentication Protocol (EAP) is an authentication framework that allows for the use of different authentication methods for secure network access. Examples of these technologies include wireless and wired access using 802.1X, and Point-to-Point Protocol connections like VPN.
EAP isn't a specific authentication method like MS-CHAP v2 to TLS, but rather a framework that enables networking vendors to develop and install new authentication methods, known as EAP methods, on the access client and authentication server.
Which EAP Methods to Use? (EAP-TLS, PEAP, TEAP)
Just to recap, we've covered a very high-level overview so far. Suppose you've decided to implement this in your environment; you'll be faced with the challenge of there being multiple ways to implement this. Something you have to choose wisely is which EAP method to use. Personally, I would say this is the most difficult part of your 802.1X deployment 🙂
EAP-PEAP
Most environments use EAP-PEAP because it's very easy to set up, and you don't need to have any PKI environment. EAP-PEAP often uses MSCHAPv2 as the inner method, which relies on credentials. If you use Active Directory, these are typically the username and password that users use to log in to their devices. Personally, I don't recommend using EAP-PEAP because there are much better options available relatively. Also, with Windows 11, Credential Guard is enabled by default, which may prevent the use of MSCHAPv2 with 802.1x.
Suresh Vina
EAP-TLS
With EAP-TLS, we use certificates instead of credentials (username/password). Unlike EAP-PEAP, EAP-TLS performs mutual authentication, meaning the authentication server verifies the client's certificate, and the client verifies the authentication server's certificate. You might think this is complicated because you need to manage the certificates on all the clients, but if you already have an Active Directory environment, it's not as complicated as you may think.
So, in a nutshell, for this to work, you need to provision certificates to all the clients, which are mostly laptops or PCs.
Suresh Vina
EAP-TEAP
EAP-TEAP is a relatively newer protocol and supports EAP-Chaining. Like EAP-TLS, EAP-TEAP supports mutual authentication, ensuring both the client and server authenticate each other. It can use both certificates and credentials within its secure tunnel.
Without going into much detail, EAP-TEAP is the only protocol (apart from EAP-FAST, which is Cisco proprietary and requires a supplicant software to run) that supports EAP-Chaining. With EAP-Chaining, you can perform 'User' and 'Machine' authentication simultaneously. In contrast, EAP-PEAP or EAP-TLS only supports 'User' or 'Machine' authentication.
My recommendation is that if you want to perform EAP-Chaining, go with EAP-TEAP. If you're happy with either User or Machine authentication alone, then EAP-TLS is a good choice. However, as I mentioned before, with EAP-TLS, you need to have a PKI (Public Key Infrastructure) running in your environment.
What Exactly is EAP-Chaining?
This is one of the topic I was so confused at the start, it took me a while to wrap my head around on how it works. So, here is a simplified version.
EAP-Chaining, a feature that facilitates machine and user authentication within a 'single EAP/RADIUS session'. To explain this, let's picture a scenario, A user comes in, connects their laptop to the network, powers it up, and then leaves to grab a cup of coffee. In their absence, the laptop boots up, awaiting user login.
In environments that only use user authentication, the laptop would remain unauthenticated from the network until the user logs in. However, with EAP-Chaining, the situation changes drastically. It enables machine authentication, which kicks in before the user login. In other words, even when a user hasn't logged into the computer yet, machine authentication can provide a basic level of network connectivity such as DHCP, GPO updates etc. In this stage, machine authentication has been successfully completed.
Suresh Vina
When the user returns and logs in, EAP-Chaining helps to chain the user authentication alongside the pre-existing machine authentication. As a result, the user can have full network access.
EAP-Chaining ensures that only authenticated users on authenticated devices can access the network. In other words, not only must the device itself be authenticated (machine authentication), but the user on that device must also be authenticated (user authentication).
Cisco ISE Introduction
Supplicant and authenticator are something you might already have (if you don’t, why are you even reading this, right? Haha), but an authentication server is something you may not have. When you start implementing 802.1X, one of the decisions you need to make is choosing the correct product. I’ve only worked with ISE so far, so I’m going to stick with it. But again, you can choose any RADIUS server.
Suresh Vina
Cisco ISE is a comprehensive product that supports a lot of functionalities. There is a learning curve, but once you understand the basics, you can build on top of the fundamentals. Once you have Cisco ISE up and running, you have to configure a few things to use it with your 802.1X project.
Regardless of which protocol you use, you need to set up the following.
- Add a certificate which ISE presents to the clients during EAP authentication.
- Add Active Directory to Cisco ISE.
- Add authenticators (Switches or Access Points).
- Create 802.1X Policies.
I covered this in detail in my previous blog posts, feel free to check them out for deep dives.
MAC Authentication Bypass (MAB)
You must be wondering by now what happens if the end device doesn't support 802.1X. Let's take a TV as an example. All smart TVs connect to the network, and they don't support 802.1X. How do we manage these devices? Well, that's when you use MAC Authentication Bypass (MAB). Basically, what we're doing here is taking the MAC address of each device and adding it to the ISE. So, when you try to connect this TV to your network, the switch or AP will first ask the TV for credentials via EAPoL messages, but the TV has no idea what this is, so it keeps quiet. The switch will wait for a predefined amount of time and then fall back to MAB. With MAB, the switch will send the MAC address of the TV as both the username and password. When the request comes to the ISE, ISE will check its database to see if the MAC exists; if yes, the access will be granted.
I just want to point out that this is a very simplified version of MAB, and there are many moving parts to it. I recommend referring to the official documentation if you want to learn more.
An Example Scenario
I will try to explain how Cisco ISE handles the requests coming from the clients. Let’s say 'Bob' is an employee with a company-issued laptop. Let's assume we decided to use EAP-TEAP as the EAP method. When he walks into the office and connects the laptop to the wired port (he is yet to sign in or log in to the laptop), the switch blocks all the connections and asks for credentials from the laptop.
The laptop (assume it's Windows) is already preconfigured to handle 802.1X. Windows is clever enough to know that Bob is not logged in to the laptop yet, so it will provide the 'machine' certificate to the switch. On the ISE, we would have configured a policy to check if the CN or SAN of the certificate (usually the name of the laptop) exists in Active Directory; if it does, grant the access.
We can go one step further and say, for 'machine' authentication, only allow DNS, DHCP, and block everything else. So, before Bob logs in, the laptop will get the IP address and use DNS in the background. Suppose Bob goes to make a coffee and comes back to the desk and logs in. As soon as he logs in, Windows will create another EAP session, but this time it will send the 'user' certificate. Again, we will have a policy on ISE that checks if the CN or SAN of that certificate (mostly the name of the user) is allowed to connect. If yes, the access will be granted.
Since we used EAP-TEAP, both EAP sessions will be cryptographically bound, so essentially, to get full access, the users need to be in Active Directory and should be using a laptop that exists in Active Directory. This ensures a secure and verified connection throughout the authentication process.
Next, let's look at another scenario where 'Bob' brings his personal laptop and connects to the network; what will likely happen is the personal laptop doesn't use 802.1X, so it falls back to MAB. But ISE wouldn't have the MAC address of the personal laptop in its database. We have two choices here: either we can block all access, or we can place this laptop into a dedicated guest VLAN. ISE will send a message to the switch saying, 'put this device into VLAN X.' You can also apply an ACL to the switch port dynamically. Usually, we block access to RFC1918, so any traffic from the laptop to the private IP address will be blocked at the switch port level.
Recap
Let's recap what we've covered so far, starting from what we need to implement 802.1x. First, you need a supplicant, which is just a fancy name for end devices; let's use a Windows laptop as an example. You need to configure the Windows laptop and enable 802.1X. It's pretty easy and can be done via GPO.
So, now the laptop knows that when it connects to an 802.1x protected network, it needs to provide credentials or certificates to the authenticator. The authenticator, which is either a switch or an access point, acts as a middleman and blocks all connections until the authentication is successful. The authentication server is responsible for managing any policies and granting or denying access to the supplicant.
If you are still unsure or confused, feel free to leave a comment or reach out to me via the 'Contact Me' page. I'm here to help clarify any questions you might have!


