Netpicker is a tool that brings together config backups, security/compliance checks, and automation in one place. Netpicker supports 130+ network vendors, including Cisco, Juniper, Arista, Palo Alto, and Fortinet. It also integrates well with tools like Netbox, Nautobot, and Infrahub for inventory, and Slurp’it for network discovery. You can also reuse your existing Python scripts to run checks or automate tasks across your network.
In this post, we'll go through how to set up Netpicker and configure device backups for free. We'll also look at how Netpicker stores these backups and how you can compare or view the diff to see what has changed over time.
Netpicker has partnered with me for this post, and they also support my blog as a sponsor.
Netpicker Initial Setup
To get started, head over to the Netpicker website and fill out the form with your name and email. You’ll receive an email shortly with the download instructions. Netpicker comes with a free-for-life license that gives you unlimited device backups and basic automation. You’ll also get a ‘Professional’ license for 10 devices to run unlimited tests, check CVEs and experience the full functionality. If you want to learn more about Netpicker pricing, please visit the pricing page.
The email includes installation steps, and you can choose between using an OVA or Docker. The OVA is a virtual machine with Docker already installed, so it's ready to go. If you choose the Docker option, you'll run it on your own VM. In this post, we'll install Netpicker using Docker on our VM.
SSH into your VM (using Ubuntu 22.04 in this example), then clone the repo and change into the directory. This repo contains all the necessary files to run Netpicker using Docker.
git clone https://github.com/netpicker/netpicker
cd netpicker
docker compose up -d
The docker compose up -d command reads the docker-compose.yml file and starts all the required containers in the background. It takes care of setting up the services Netpicker needs, such as the web UI, database, and Git backend.
Once you run it, give it a few minutes for the containers to come online. After that, you can log in to the web UI at http://IP_ADDRESS using the default username admin@admin.com and password 12345678.

Adding Devices to Netpicker
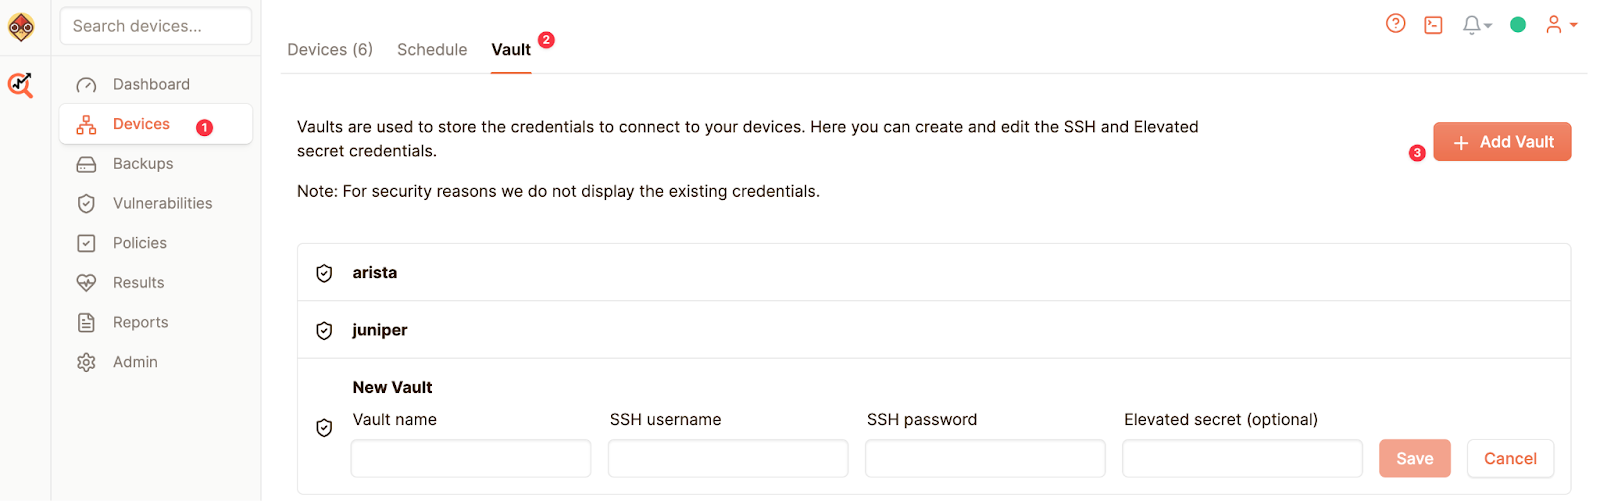
Now that we have Netpicker installed and our goal is to back up device configs, the first step is to add some devices. You'll also need to provide login credentials, which are stored in what Netpicker calls a vault.
Depending on your environment, you might have different credentials for different vendors or purposes. For example, campus devices might use one set of credentials, while production or dev environments use another. In that case, you can create separate vaults for each.
To create a vault, go to the Devices tab, then click on the Vault section, and select Add Vault. In this example, I’ve created two vaults, one for Arista devices and one for Juniper.
You can add devices to Netpicker in multiple ways. The simplest method is to add them manually by providing the device’s IP address, name, platform, and the vault to use for authentication. Alternatively, Netpicker also supports importing devices from sources like Slurp'it and NetBox.
First, let’s look at how to import devices from NetBox. I already have four Arista devices in NetBox, so let’s see how we can bring them into NetPicker.
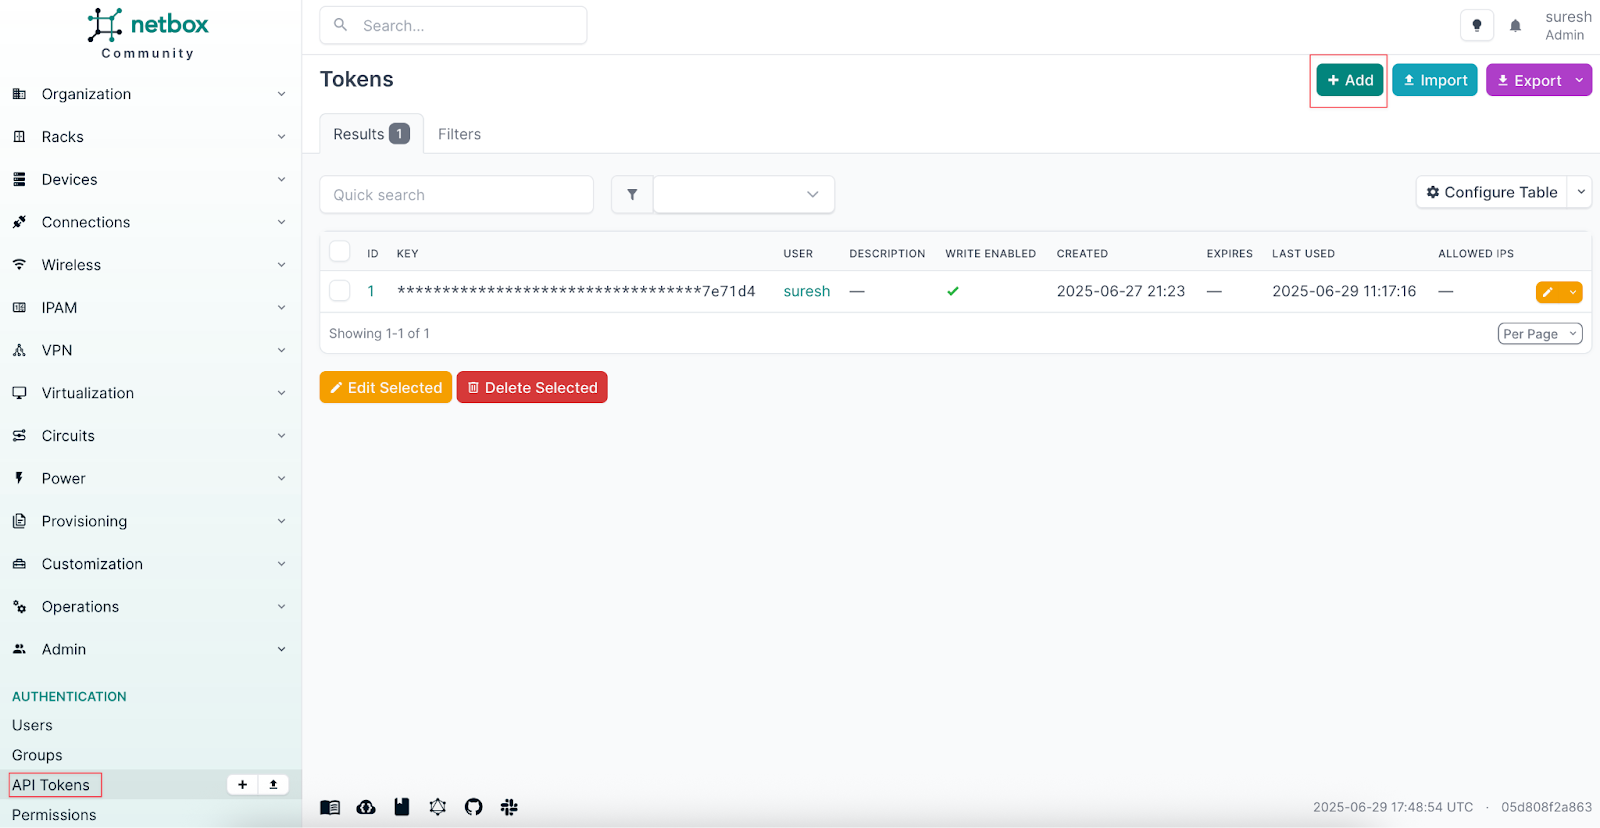
Step 1: Generate API Token in NetBox
To import devices from NetBox, you’ll need an API token. You can generate this by navigating to API Tokens in NetBox and clicking Add. Once created, copy the token; you’ll need it in the next step.
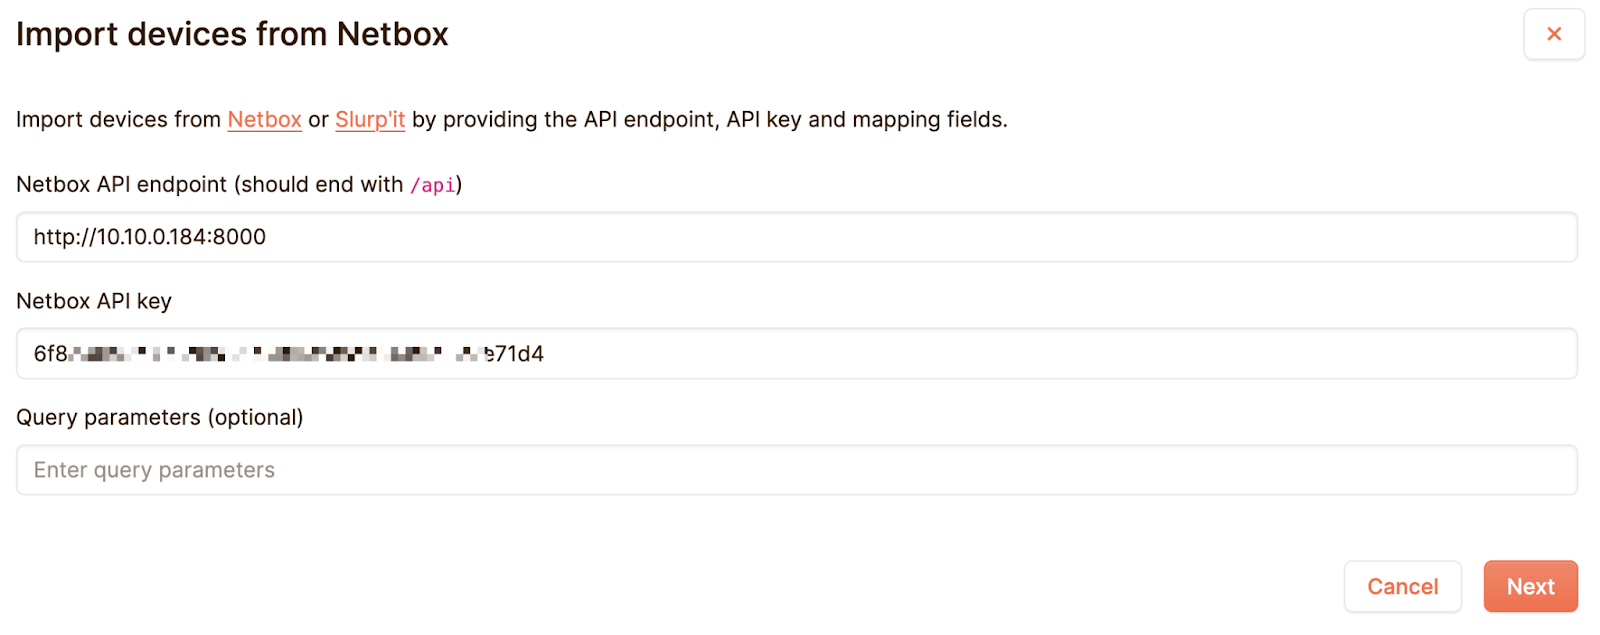
Step 2: Import from NetBox
In Netpicker, go to the Devices tab and click Add devices > Import from NetBox. You'll be prompted to enter the following:
- NetBox API endpoint
- NetBox API key (the token you just generated)
Click Next, and NetPicker will fetch devices from NetBox.
Step 3: Field Mapping and Vault Selection
Once devices are retrieved, you’ll see a mapping screen where you can confirm:
- IP address / FQDN field
- Name field
- Platform field
- Tags field (optional)
- Vault to use for these devices (e.g. arista)
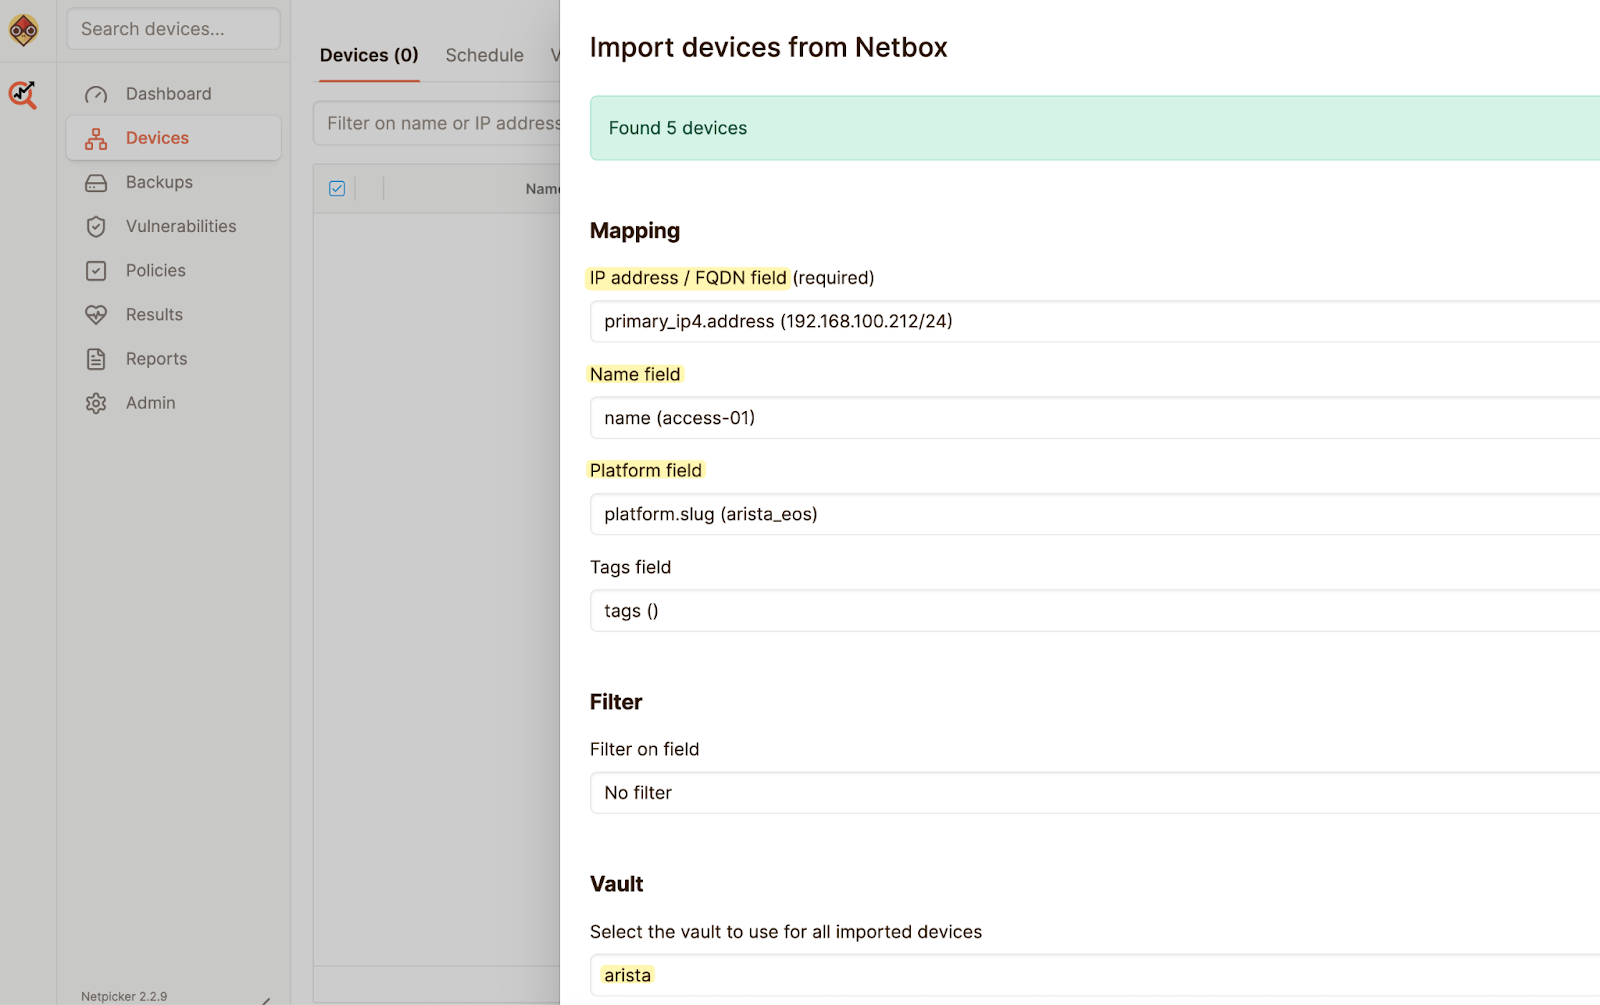
Review the details and complete the import. When importing devices from NetBox into Netpicker, field mapping is an important step. This allows Netpicker to understand and correctly assign the information from NetBox to its own device inventory.
If you're familiar with NetBox, you'll know that you can associate a primary IP address with a device. NetPicker maps this field to the IP address / FQDN field. Similarly, the device name in NetBox is mapped to the Name field in NetPicker, and the platform (e.g. arista_eos, juniper_junos) is mapped to the Platform field.
The platform value should match the device_type used by Netmiko, since Netpicker relies on it for CLI access and config collection. Even after you've imported the devices, you can still update the platform using the bulk edit feature if needed.
Here's an example from my NetBox instance for a device named access-01
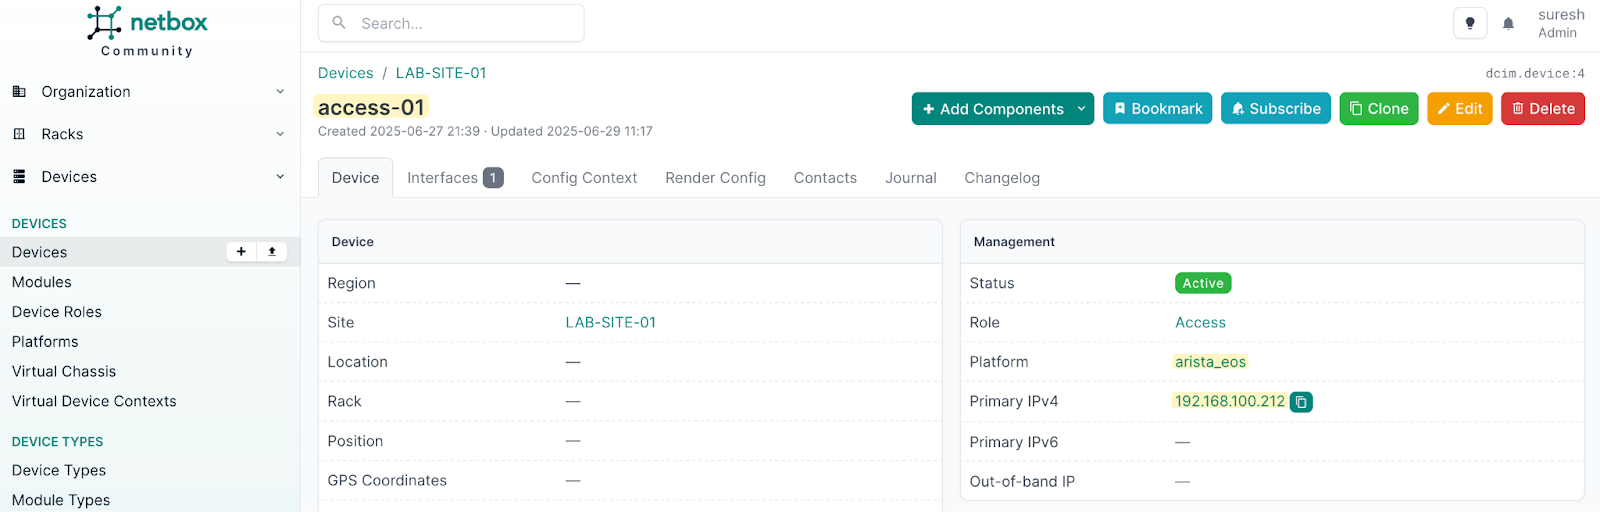
When importing, Netpicker uses this mapping to automatically fill in the device details.
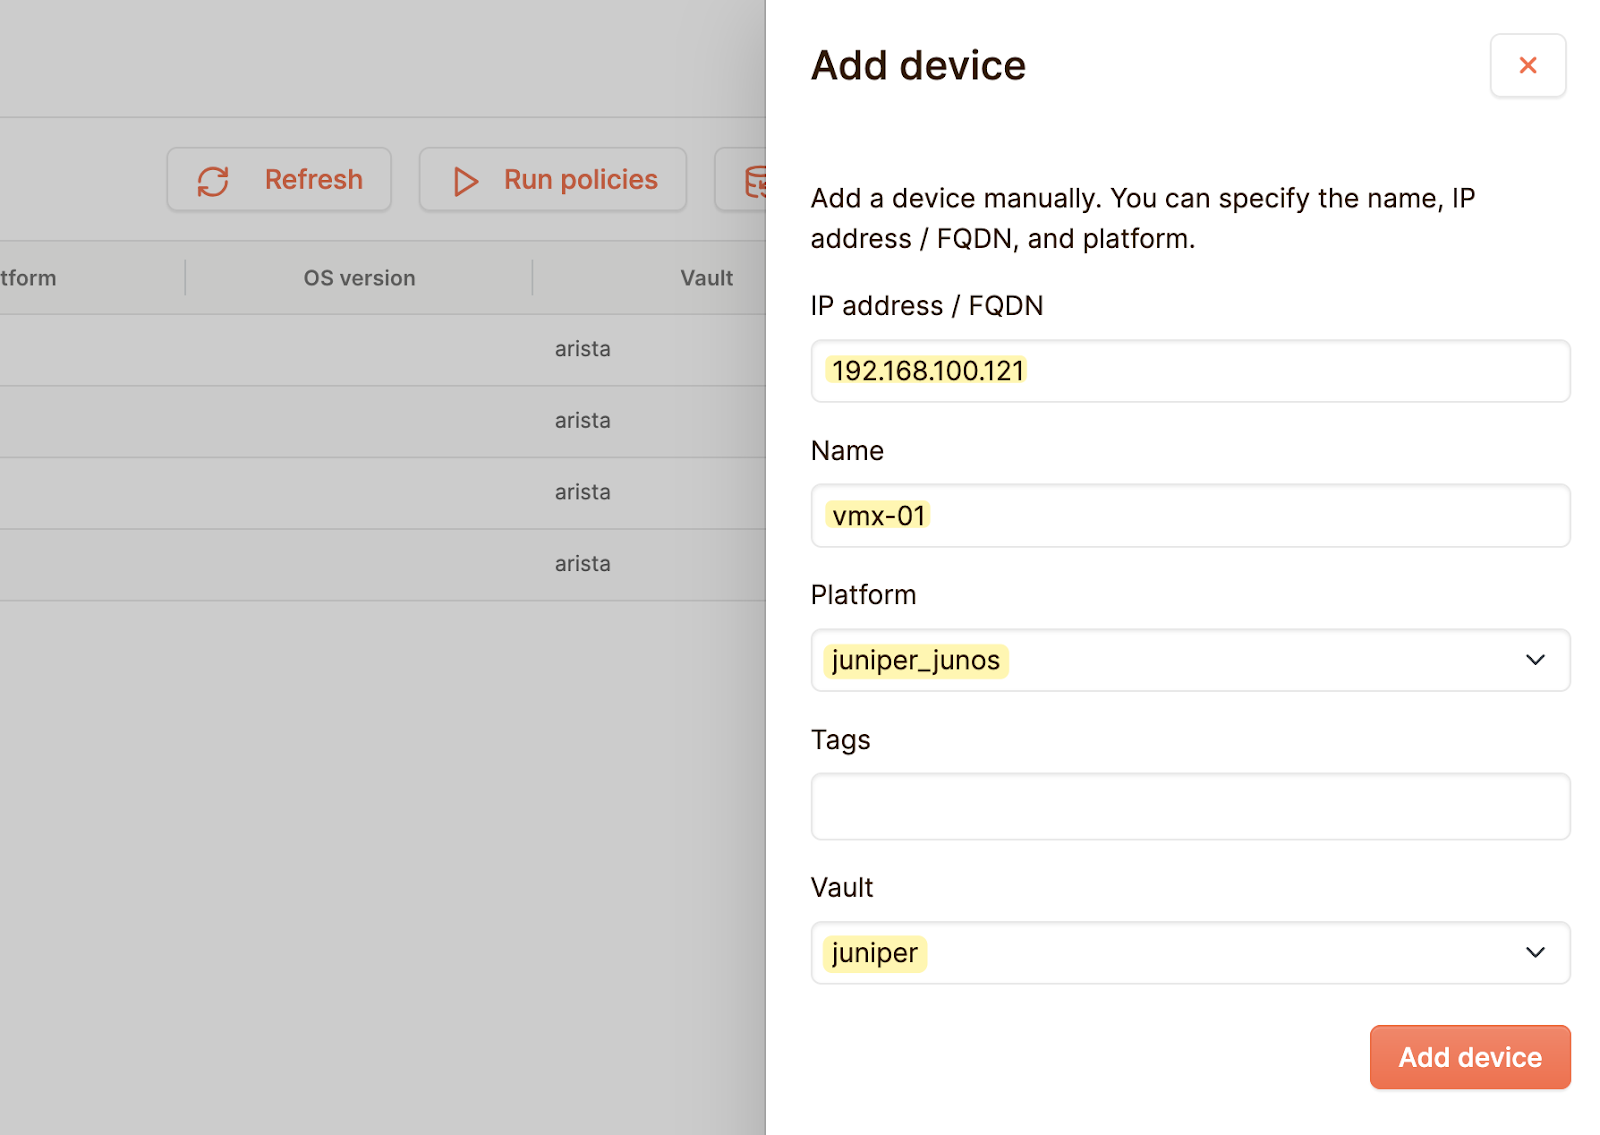
You can also manually add devices if you prefer, just provide the required info like IP, name, platform, and vault by clicking Add device from the same Devices menu. Here, I’m adding two Juniper devices manually.
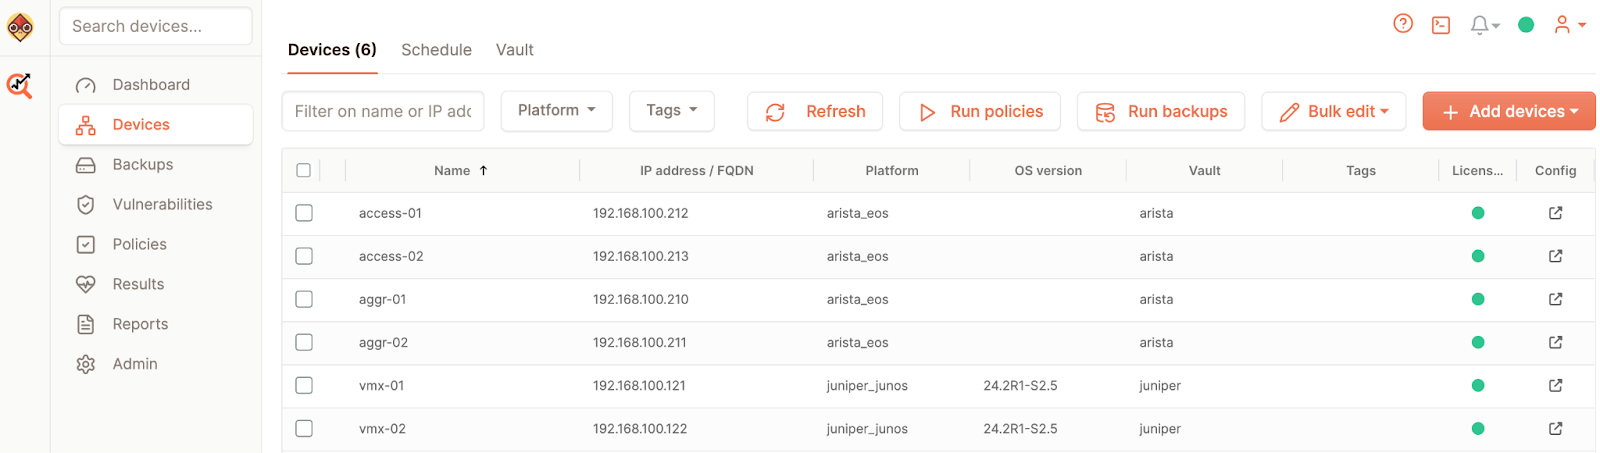
After the import is completed, we’ll have six devices in total - four Arista and two Juniper.
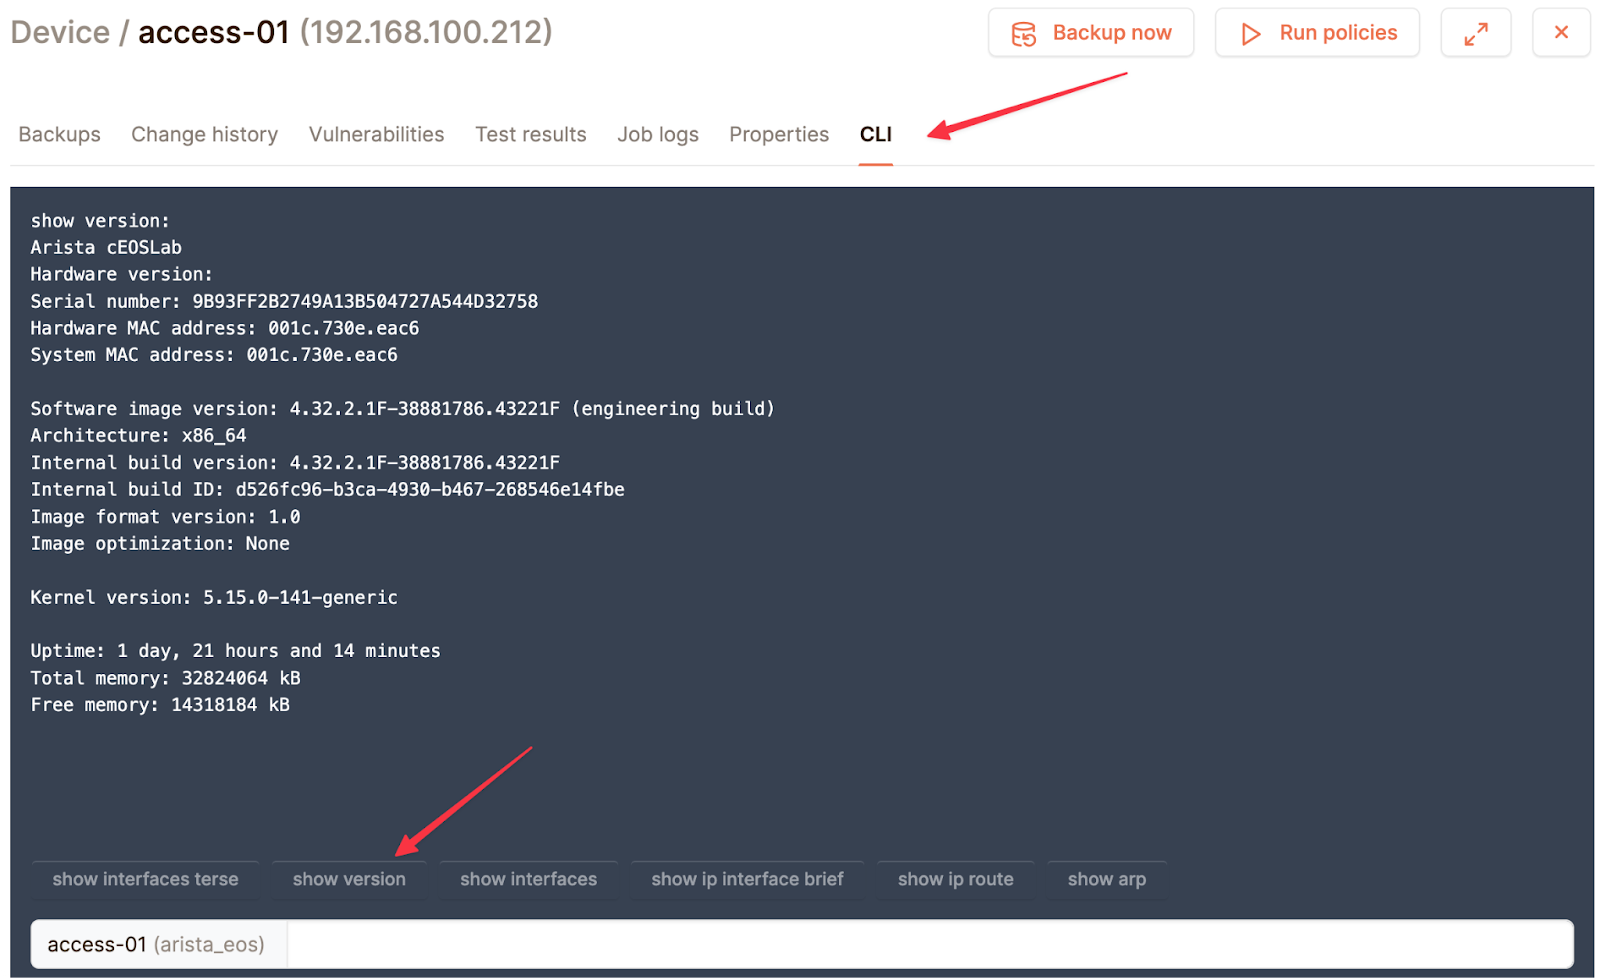
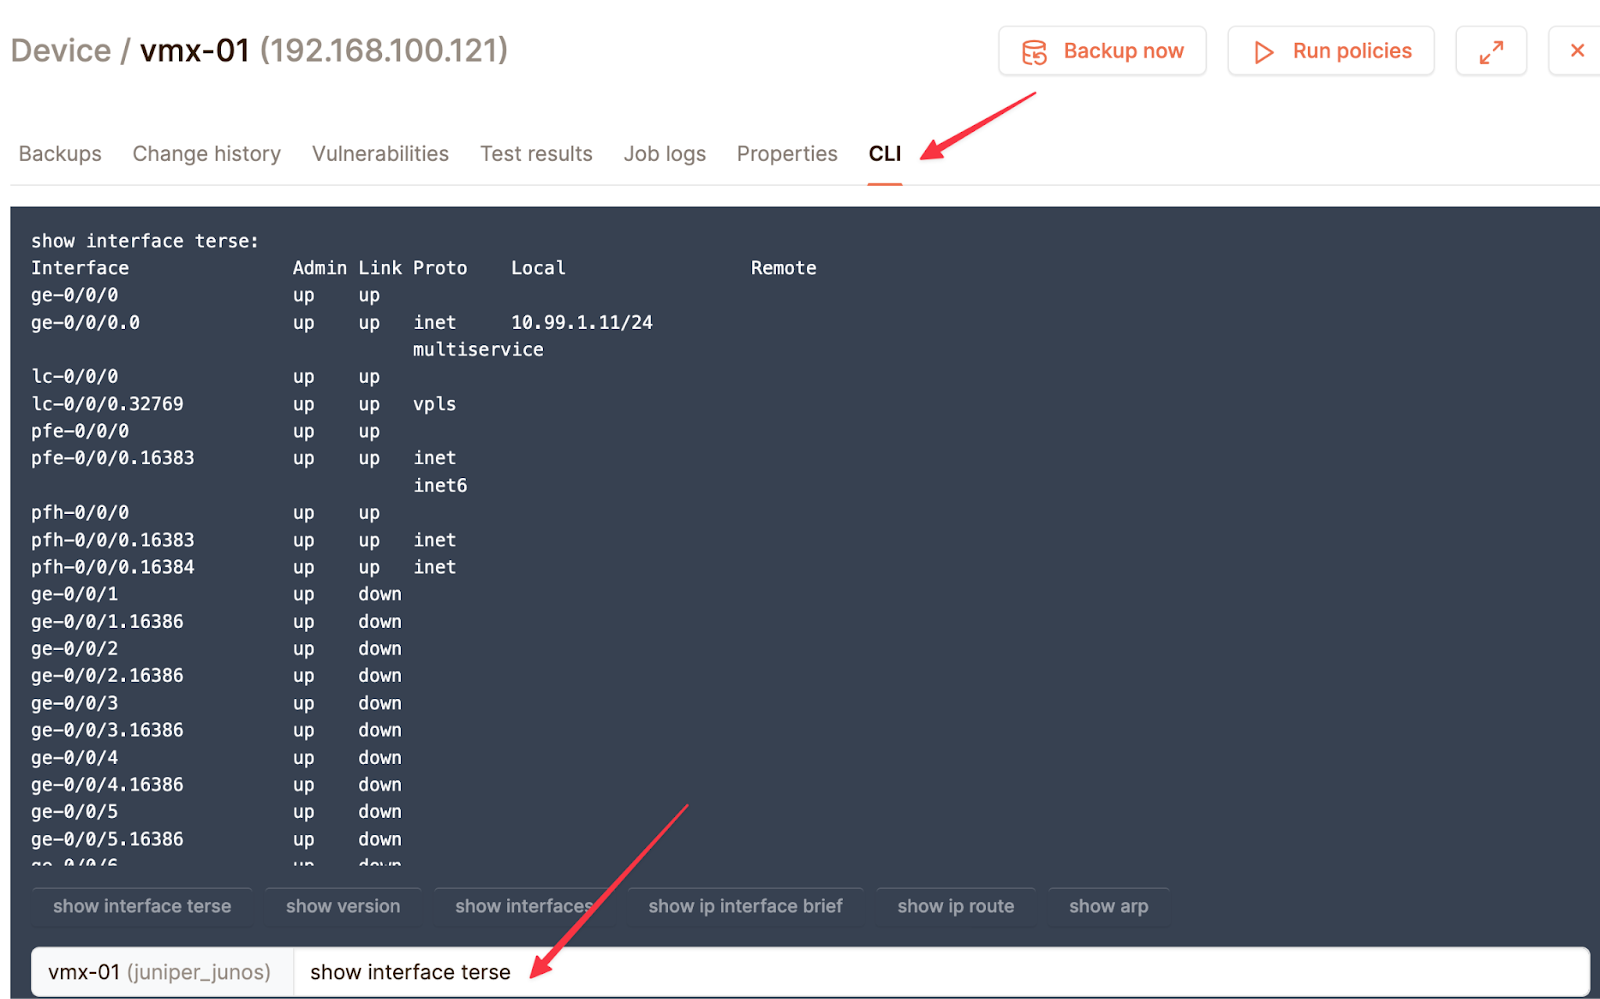
To make sure Netpicker has connectivity to these devices and can successfully log in, you can select a device, go to the CLI tab, and run any show command. You can either type in a command or choose from one of the pre-defined options. I’m going to run a quick test on one Arista and one Juniper device to confirm that CLI access works as expected.
Setting up Configuration Backup
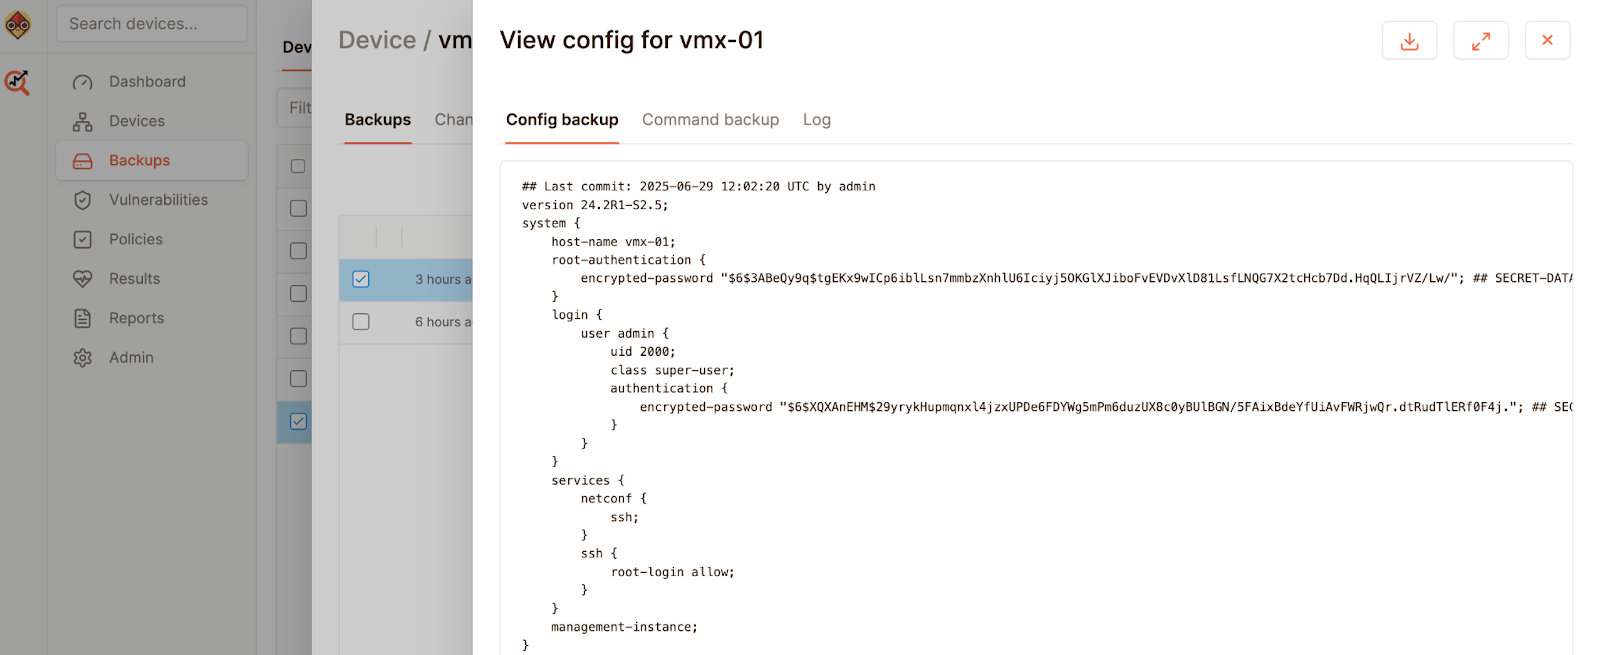
Next, let’s set up backups. This is as simple as going to the 'Backups' section and clicking on 'Run backups'. Within a few seconds, Netpicker will collect and store the running configuration from each device.
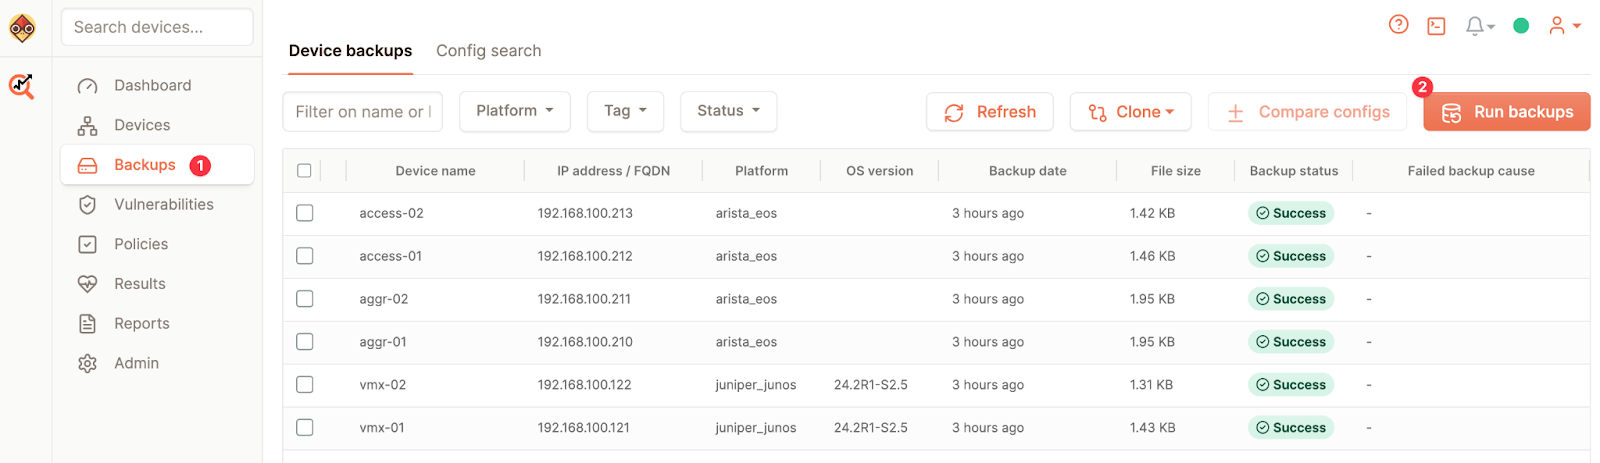
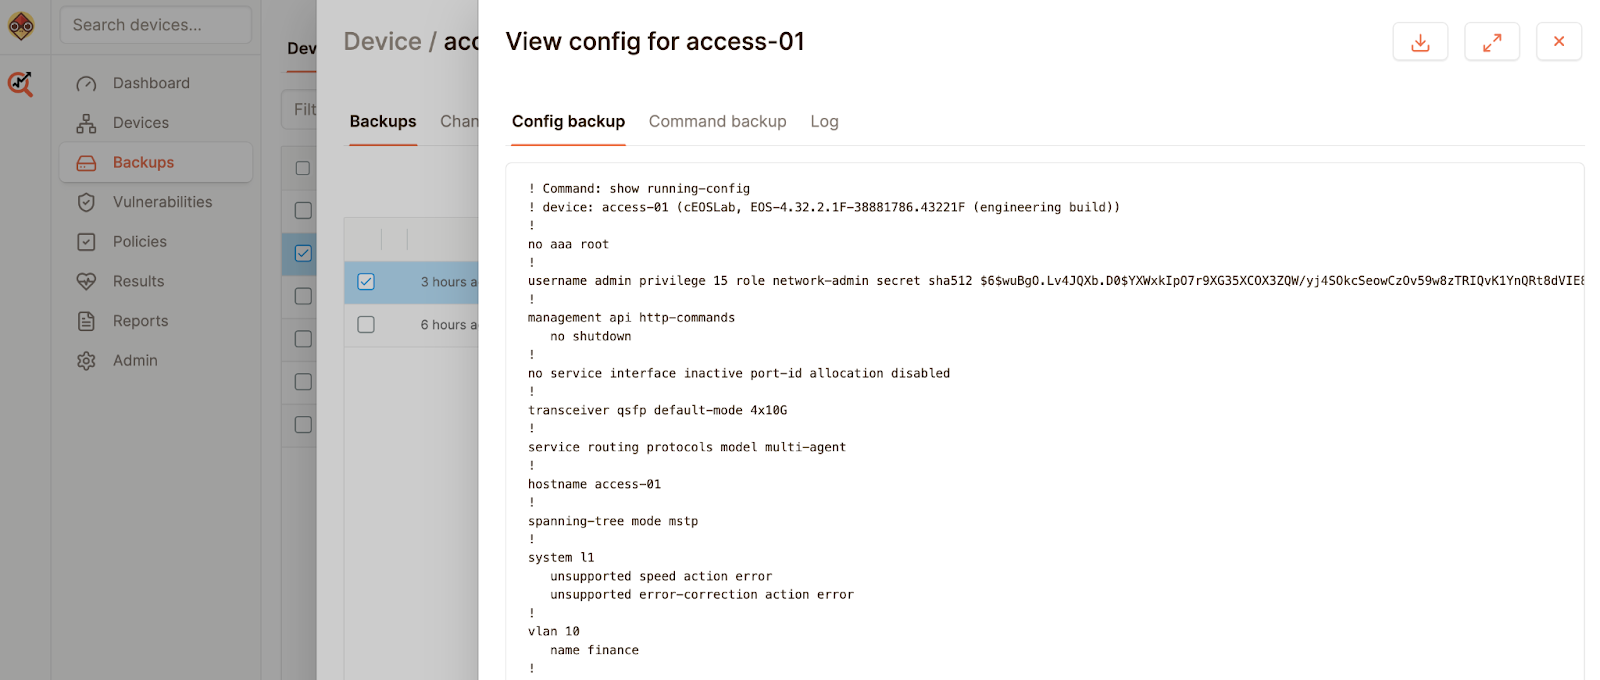
As shown below, you can see the backup status for each device and also view the actual configuration that was retrieved.
Backup Schedule
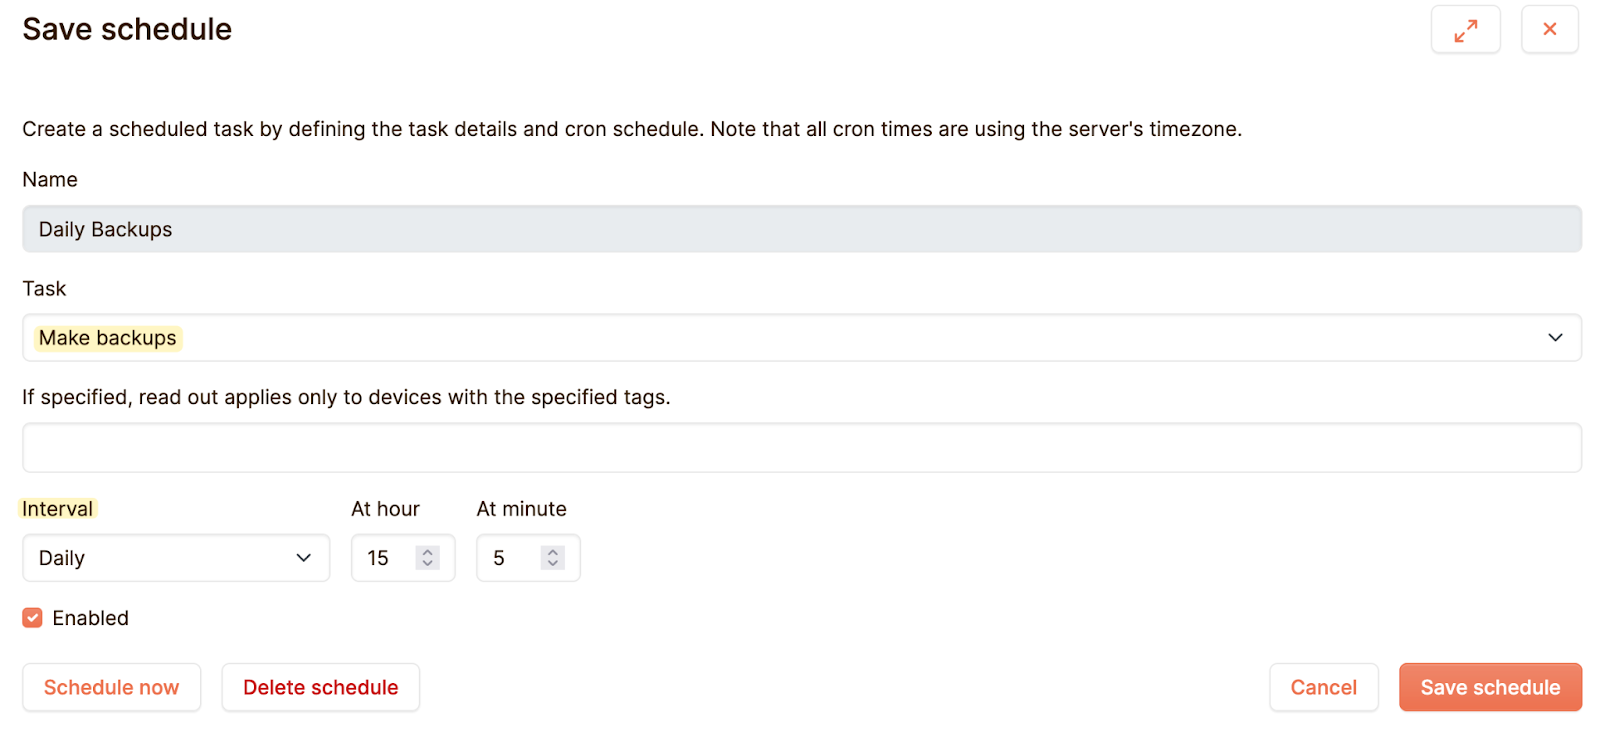
Of course, with config backups, we don’t want to come in and back up the config manually, right? So let’s set up a backup schedule. If you thought setting up backups was easy, setting up a schedule is even easier. Head over to Devices > Schedule and simply add a new schedule.
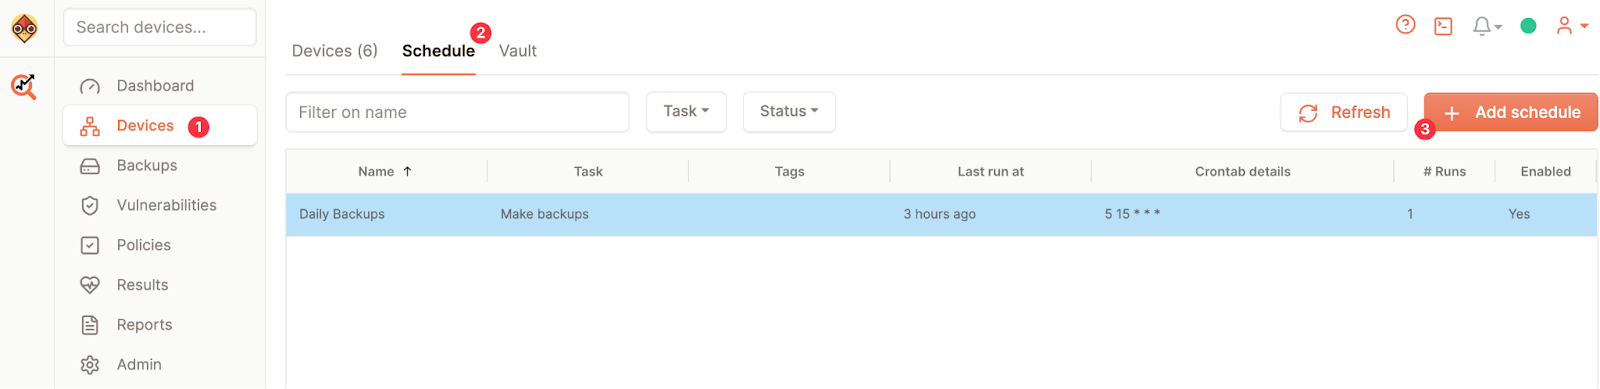
Give it a name, select 'Make backups' for the task and choose the interval. I'm going daily at 15:05 and save the schedule. That’s all. Netpicker will now back up the configs daily at 15:05.
Config Diffs
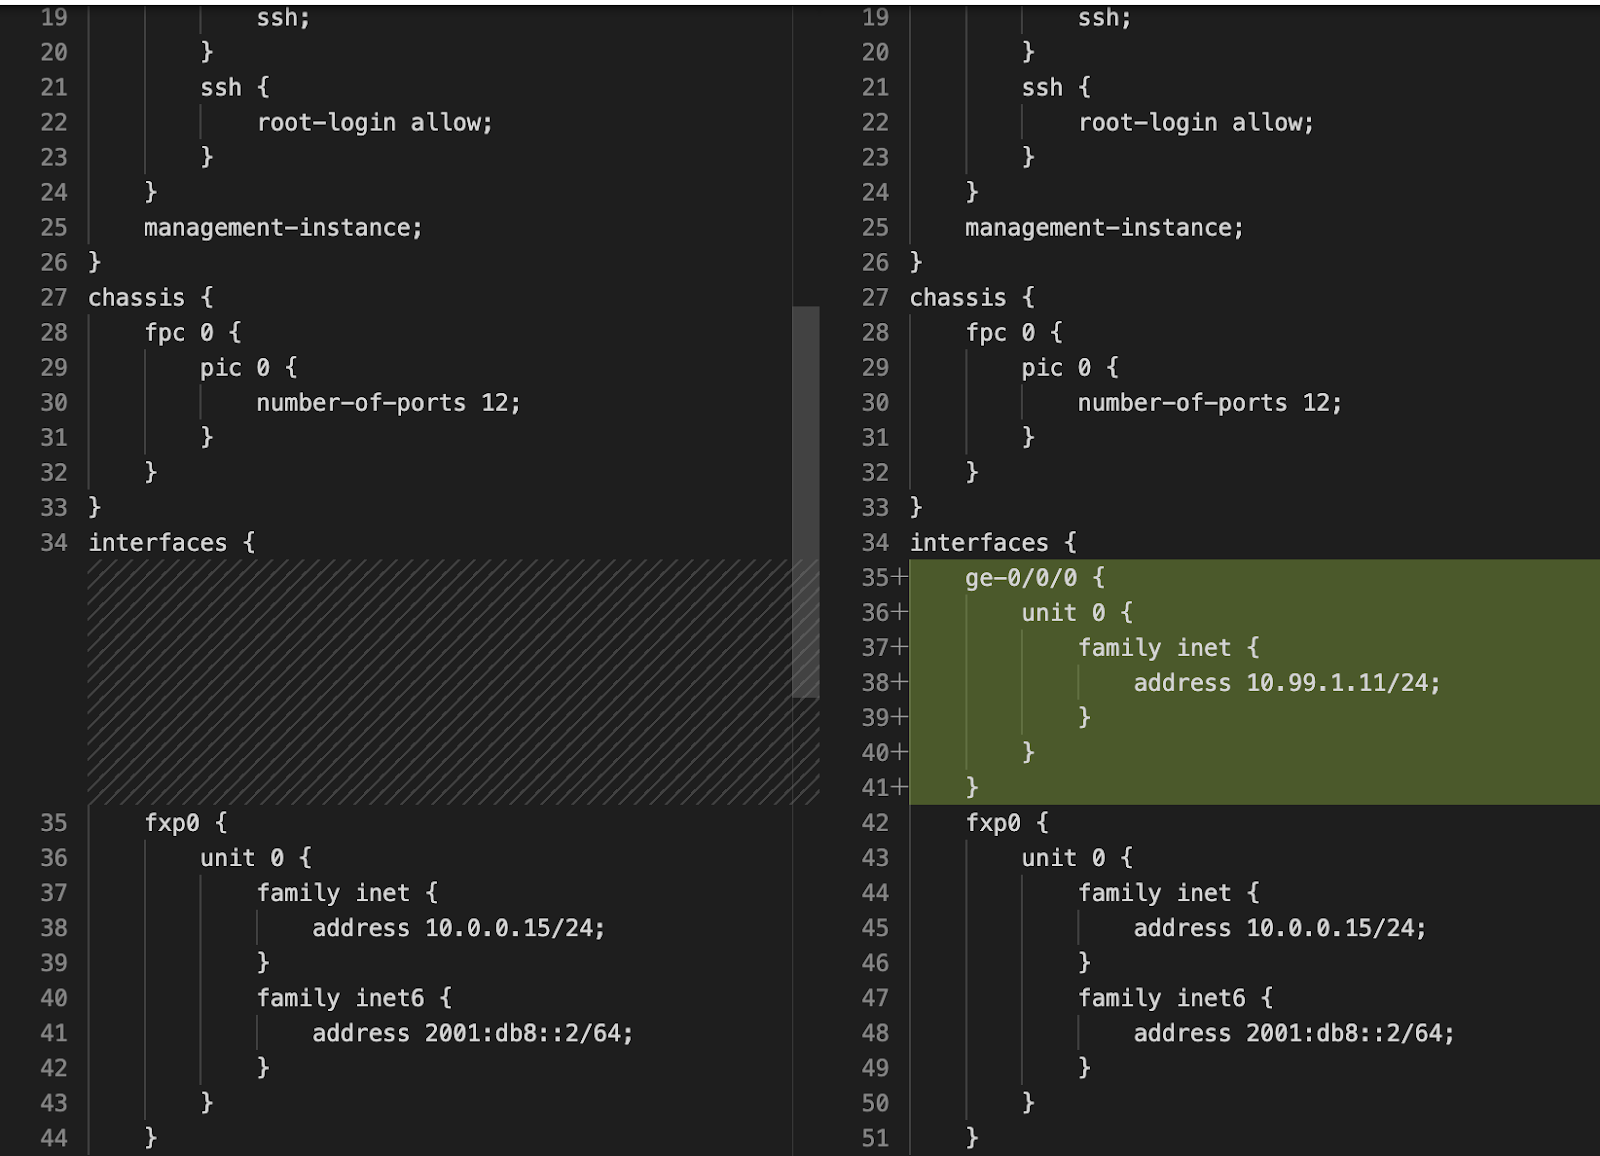
Netpicker also allows you to view the configuration differences between two backups. To show how this works, I made some simple changes on two devices. On access-01, I added a new VLAN, and on vmx-01, I assigned an IP address to the ge-0/0/0 interface. After making these changes, I triggered another backup from Netpicker for both devices.
access-01#conf ter
access-01(config)#vlan 60
access-01(config-vlan-60)#name dummy-vlan
access-01(config-vlan-60)#end
access-01#wr
Copy completed successfully.
admin@vmx-01# set interfaces ge-0/0/0 unit 0 family inet address 10.99.1.11/24
[edit]
admin@vmx-01# show | compare
[edit interfaces]
+ ge-0/0/0 {
+ unit 0 {
+ family inet {
+ address 10.99.1.11/24;
+ }
+ }
+ }
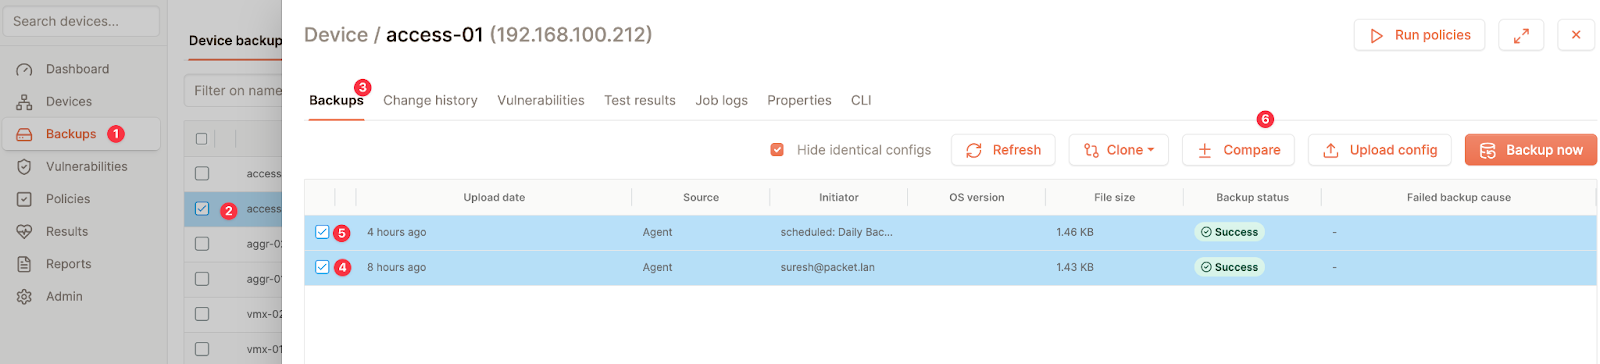
[edit]Once you have two backups for a device, you can compare them to see what changed. In this example, for access-01, you’ll now see two backup entries. To compare them, select the older backup first and then the newer one, and click the 'Compare' button.
Netpicker will show you the exact difference between the two versions.
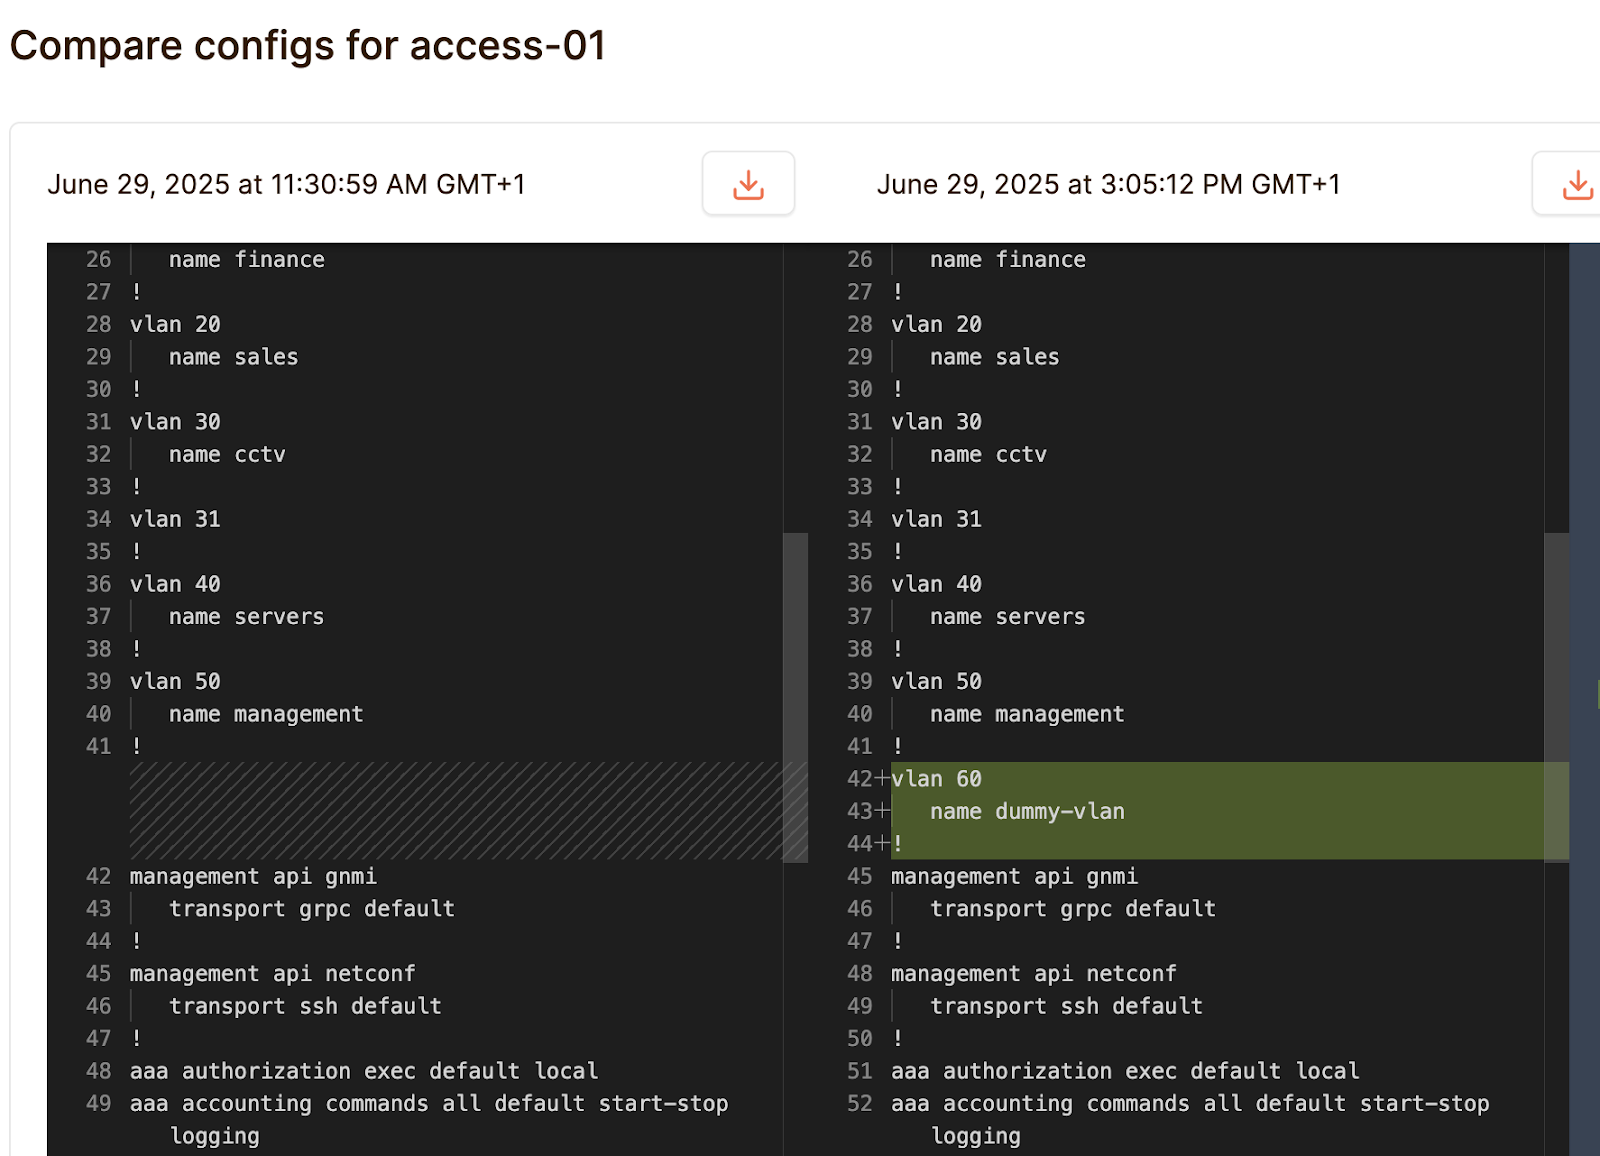
One important note is that the order in which you select the backups does matter. If you select the newer backup first, followed by the older one, the diff will show the new VLAN as being removed instead of added. So, always make sure to select the older backup first and then the newer one to see the correct change direction. Here is the config diff for vmx-01that shows the IP address assigned to the interface.
Netpicker Config Search
Another handy tool in Netpicker is config search. You can search for any config string, and Netpicker will scan all device backups to show you exactly where that string appears. This is useful if you want to quickly find things like IP addresses, interface names, or specific commands across your network devices.

Cloning the Config Backup Repository
Netpicker stores device configuration backups in a Git repository. You may have already noticed that when viewing config diffs, the output looks just like a typical Git diff. That’s because under the hood, it really is a Git repo.
If you want to keep a local copy of the configs, for example, to search through them using your own tools or view diffs in a terminal, you can simply clone the repo to your machine. Netpicker makes this easy by displaying the Git URL right on the dashboard under Backups > Clone.
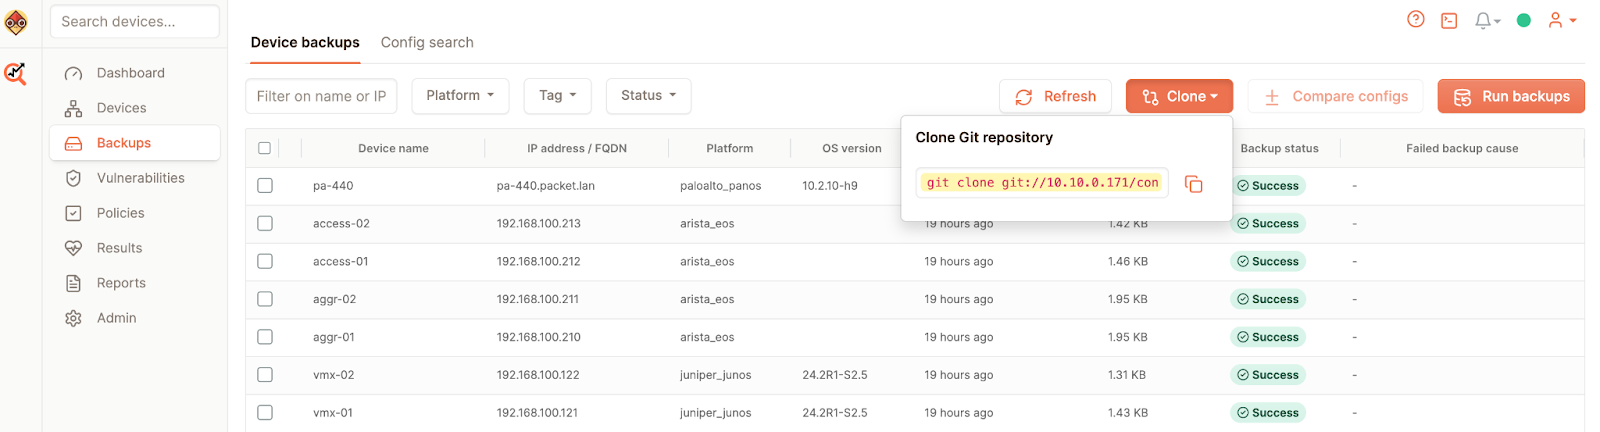
However, to make this work, you need to ensure the Git daemon container (gitd) is listening on port 9418. To do that, go to your Netpicker VM and edit the docker-compose.yml file. Find the gitd service and add the port mapping like this.
gitd:
  image: "netpicker/gitd:2.2.9"
  container_name: gitd
  labels:
    netpicker.io: service
    service.netpicker.io: gitd
  ports:
    - "9418:9418"
  volumes:
    - git:/git
Once you’ve updated the file, restart the containers by running docker compose up -d again. After that, you’ll be able to clone the repository from your local machine using the Git URL shown in the UI. The cloned directory will include folders named after the devices, and you’ll have access to their full config history.
git clone git://10.10.0.171/configs/default.git default-configs
Cloning into 'default-configs'...
remote: Enumerating objects: 72, done.
remote: Counting objects: 100% (72/72), done.
remote: Compressing objects: 100% (68/68), done.
remote: Total 72 (delta 29), reused 0 (delta 0), pack-reused 0 (from 0)
Receiving objects: 100% (72/72), 423.20 KiB | 47.02 MiB/s, done.
Resolving deltas: 100% (29/29), done.ls
192.168.100.121 192.168.100.210 192.168.100.212 pa-440.packet.lan
192.168.100.122 192.168.100.211 192.168.100.213Closing up
That wraps up our look at setting up Netpicker and getting started with configuration backups. We went through installing Netpicker using Docker, adding devices, setting up vaults, importing from NetBox, running and scheduling backups, comparing configs, searching through configuration data, and even cloning the backup Git repo locally.
If you want to explore more advanced features like security testing, compliance checks, or integration with Slurp’it for network discovery, there’s plenty more to dig into. And if you have any questions or want to learn more about Netpicker or Slurp’it, feel free to reach out to their friendly team; they are always happy to help.