Hi all, welcome back to part 4 of the Network CI/CD blog series. So far, we've covered the purpose of a Network CI/CD pipeline, the problems it solves for Network Engineers, and how to set up GitLab, including creating projects, installing runners, and understanding GitLab executors. We also looked at how to use GitLab variables to securely hide secrets.
In this part, we'll explore how to manage a campus network using Nornir and Napalm and deploy configurations through a CI/CD pipeline. Let's get to it!
 Suresh Vina
As I mentioned previously, I'm not a CI/CD expert at all and I'm still learning. The reason for creating this series is to share what I learn with the community. The pipeline we are building is far from perfect, but that's okay. The goal here is to create a simple pipeline that works and then build upon it as we go. This way, you can start small and gradually improve and refine your own Network CI/CD pipeline over time.
Here is the GitLab repository for this example so you can follow along. Feel free to clone the repo, explore the pipeline setup, and try it out in your environment.
Simple Campus Network
Here, I’m using a simple 2-tier campus network. I have two access switches that connect to the distribution/aggregation switches. In real-world scenarios, you might have multiple access switches, but for simplicity, I am only using two. The default gateway for the VLANs is on the distribution switches. The distribution switches run VRRP between them, where aggr-01 is the primary, and aggr-02 is the secondary.

At the moment, let’s assume we have 3 VLANs, but as your company grows, we may need to create more VLANs. If we manage the configuration manually, the process for adding a new VLAN would involve preparing the config to:
- Create the VLAN on all 4 switches.
- Allow the VLAN on all the trunks.
- Create SVIs on the distribution switches.
- Add VRRP configurations.
There is always the risk of making a mistake or forgetting to add the VLAN to some trunks. Even if we manage to configure everything correctly, we still need to ensure that we run some validation tests after each change, such as:
- Are all uplinks up?
- Are all SVIs operational?
- Did we save the running configuration to the startup configuration?
- Did the change break anything?
These are all manual and time-consuming tasks. Therefore, our ultimate goal is to automate this entire process by creating a CI/CD pipeline that does everything for us, from deploying the configuration to validating the changes.
A Quick note on Nornir, Napalm and ANTA
As part of this example, I’m using Nornir to manage the inventory and generate the configurations, Napalm to push the configurations to the devices, and Arista’s ANTA framework to run the tests. I’ve covered each of these tools extensively in previous posts, and they are out of the scope of this particular blog post.
At a very high level, I define the VLANs, trunk, and Layer 3 configurations as a YAML file. I then use the Nornir Jinja2 plugin to generate the configuration dynamically. Once the configuration is ready, Napalm pushes it to the devices. Finally, ANTA runs the tests to ensure everything is working as expected.
Suresh Vina Suresh Vina
Explain the Pipeline
Let's say our campus network is running perfectly fine. At any given time, we want to ensure the following are working as expected. While we could add more tests, let’s focus on these for now.
- The running configuration is saved to the startup configuration.
- The distribution switches always have a default-route and can ping 1.1.1.1.
- The SVIs and the Port-Channels on the distribution switches are up.
Now, say we receive a request to create a new VLAN. This involves making the following changes.
- Adding the VLAN to all switches
- Adding it to the trunks.
- Creating an SVI with VRRP configuration on the distribution switches.
But our goal is to automate the process and not touch the switch CLI right? So, since we’re using a CI/CD pipeline with GitLab, the first step is to clone the repository and create a new Git branch. In this branch, you can make the necessary changes by adding the new VLAN and updating the appropriate variables. Once you’re satisfied with the changes, commit and push the branch. This triggers the pipeline, but since you’re still in the new branch, only certain pipeline jobs run. This is like running mini-tests to see if I'm doing things right without affecting the real device.
- Validate the VLAN ID (ensuring it falls within the allowed range of 10-100).
- Run a dry_run using Napalm, which connects to the devices and simulates applying the configuration. The configuration changes are applied within a session and discarded afterwards, so the live config remains unaffected. It will also print out what would change if the configuration were actually applied.
If the pipeline passes (i.e., the VLAN ID is valid and the configuration has no errors like an invalid IP address), the next step is to create a merge request. This signifies that you want to merge your new branch into the ‘main’ branch. Once the merge request is created, someone from your team can review and approve it.
As soon as the merge request is approved and merged into the ‘main’ branch, the pipeline kicks off again, but this time, more jobs run because it’s triggered from the ‘main’ branch.
- Run the VLAN validation again, but also perform ANTA (Arista Network Test Automation) tests to ensure everything is functioning as expected before the change is applied. This includes checking that the running configuration matches the startup configuration, the default route is present and all SVIs and Port-Channels are up.
- Perform another dry_run, applying the config in a session and then aborting, as another check to ensure there are no issues with the configuration.
- Deploy the configuration, where the changes are actually pushed to the running configuration and applied to the devices.
- Run ANTA tests again after the configuration is applied, to verify that the new changes didn’t break anything.
If all stages pass, the configuration change is successfully implemented. The benefit of this approach is that you don’t need to manually check anything, everything is integrated into the pipeline and automated.
A Quick Note on ANTA Tests
ANTA (Arista Network Test Automation) is a Python library that allows us to write network tests declaratively, making it easy to validate the state of the network. With ANTA, we can define tests in simple YAML files and run them as part of our CI/CD pipeline.
- Inventory - The inventory defines the network devices we want to test. Each device is listed with its IP address, name, and optional tags to categorize devices (e.g., primary, secondary). This makes it easy to target specific devices for testing.
- Catalog - The test catalog defines the specific tests we want to run. For example, you can check for differences in the running configuration, verify the presence of specific routes in the routing table, check connectivity between devices, and ensure that Port-Channels and SVIs are up.
#tests/anta_inventory.yaml
---
anta_inventory:
  hosts:
  - host: 192.168.100.210
    name: aggr-01
    tags: ['primary']
  - host: 192.168.100.211
    name: aggr-02
    tags: ['secondary']
#tests/anta_catalog.yaml
---
anta.tests.configuration:
- VerifyRunningConfigDiffs:
anta.tests.routing:
generic:
- VerifyRoutingTableEntry:
vrf: default
routes:
- 0.0.0.0
anta.tests.connectivity:
- VerifyReachability:
hosts:
- source: Management0
destination: 1.1.1.1
anta.tests.interfaces:
- VerifyPortChannels:
anta.tests.interfaces:
- VerifySVI:
Let's Look at an Example
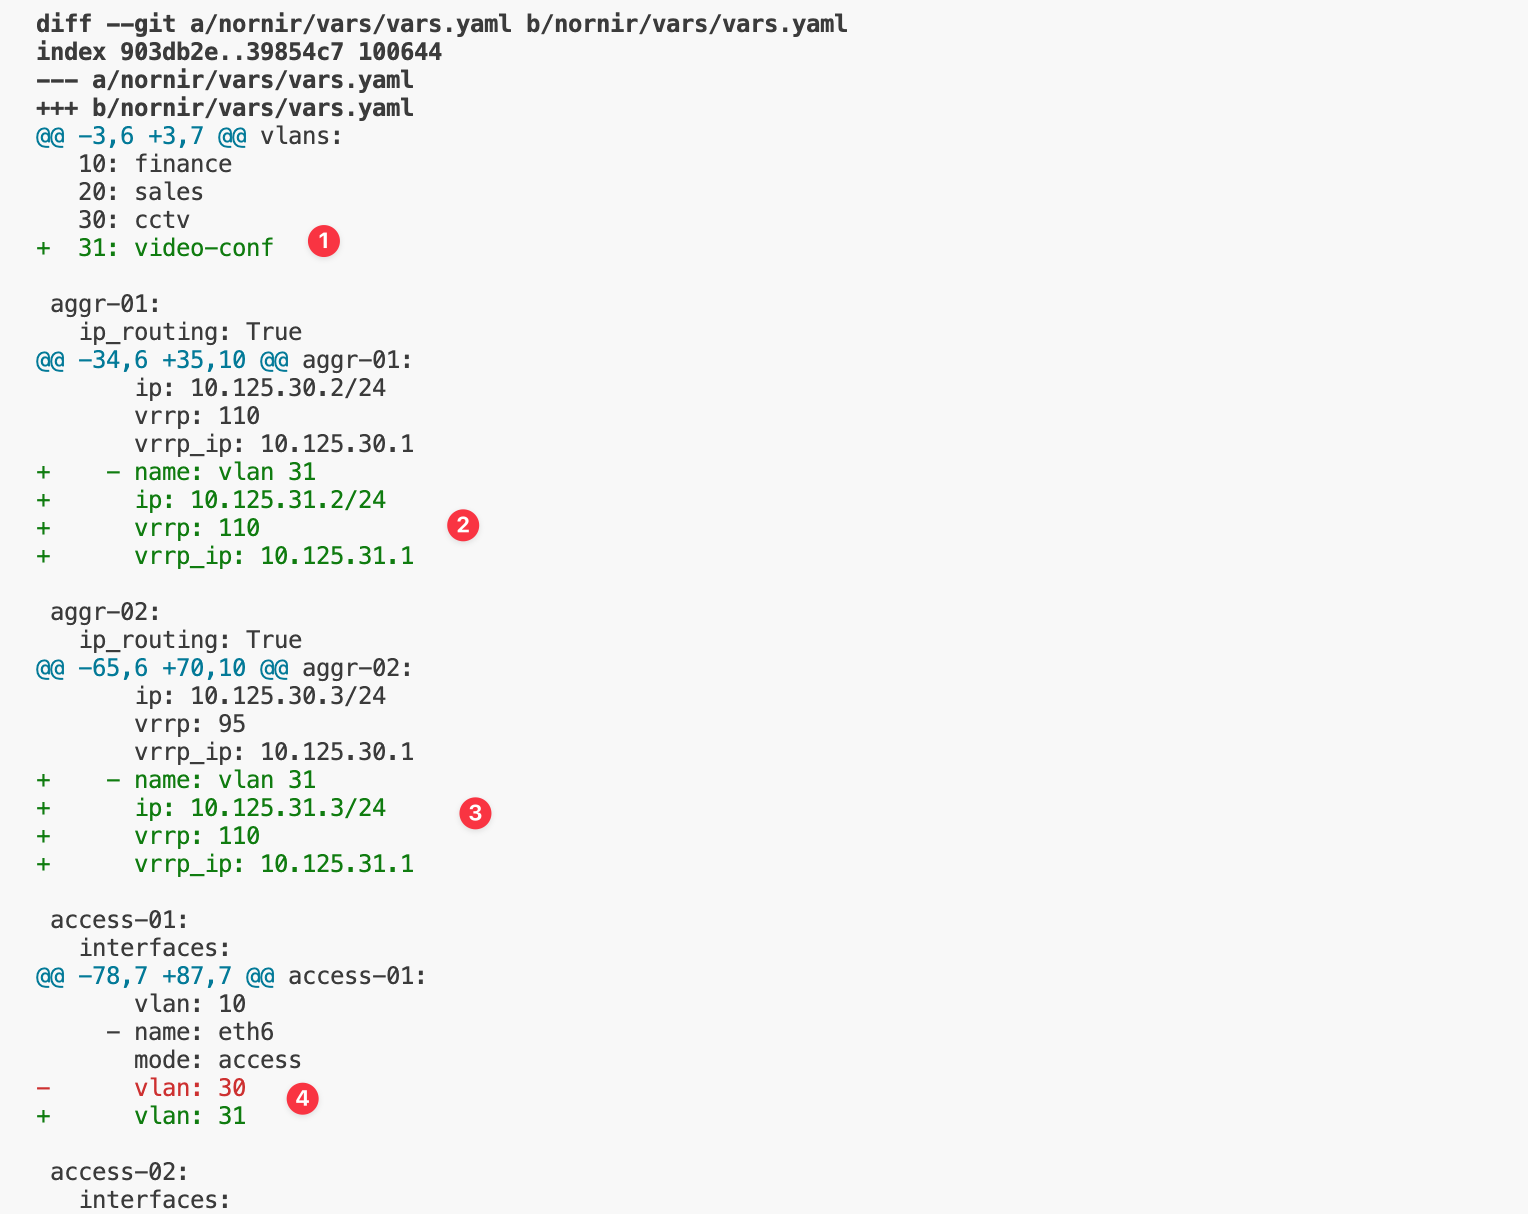
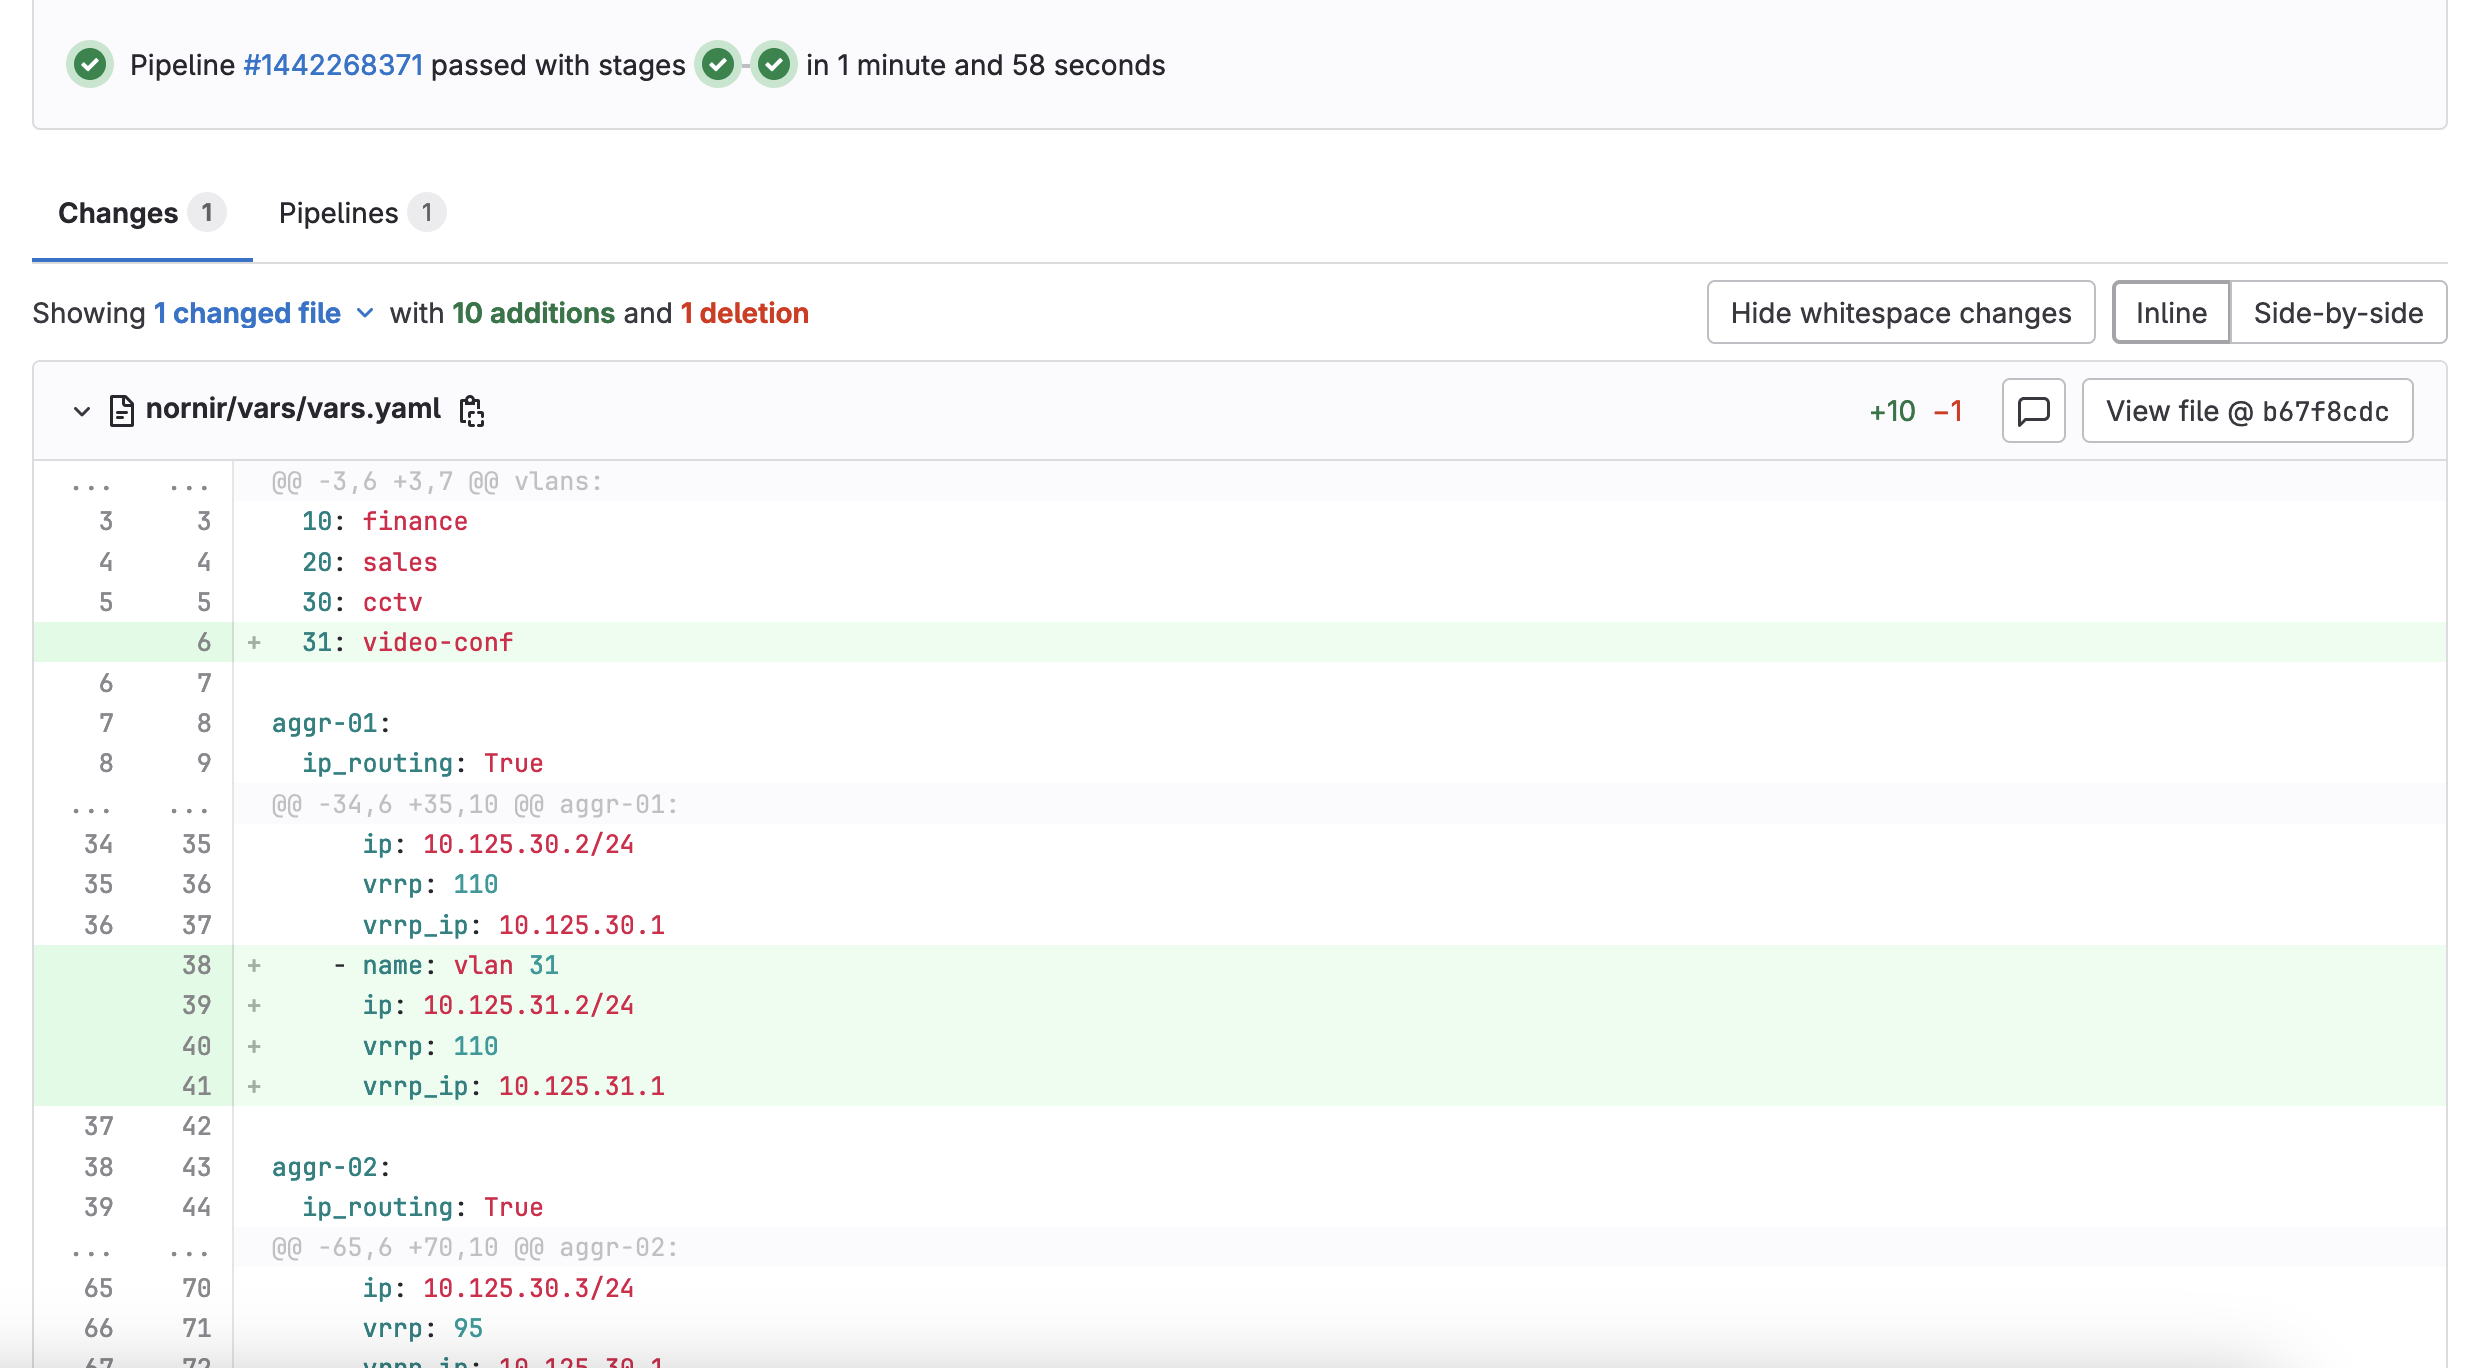
Let’s say we’re going to create a new VLAN 31 with the subnet 10.125.31.0/24. As discussed earlier, the first step is to create a new branch in GitLab. After that, you can make the necessary changes to the configuration file by adding the new VLAN and subnet. Here is how our vars.yaml file looks before adding the new VLAN. Here is the link to the Git repo if you want to follow along.


#nornir/vars/vars.yaml
---
vlans:
  10: finance
  20: sales
  30: cctv

aggr-01:
  ip_routing: True
  stp: 4096

  interfaces:
    - name: eth3
      po: 1
    - name: eth4
      po: 1

    - name: eth5
      mode: trunk
    - name: eth6
      mode: trunk

    - name: po1
      mode: trunk

    - name: vlan 10
      ip: 10.125.10.2/24
      vrrp: 110
      vrrp_ip: 10.125.10.1
    - name: vlan 20
      ip: 10.125.20.2/24
      vrrp: 110
      vrrp_ip: 10.125.20.1
    - name: vlan 30
      ip: 10.125.30.2/24
      vrrp: 110
      vrrp_ip: 10.125.30.1

aggr-02:
  ip_routing: True
  stp: 8192

  interfaces:
    - name: eth3
      po: 1
    - name: eth4
      po: 1

    - name: eth5
      mode: trunk
    - name: eth6
      mode: trunk

    - name: po1
      mode: trunk

    - name: vlan 10
      ip: 10.125.10.3/24
      vrrp: 95
      vrrp_ip: 10.125.10.1
    - name: vlan 20
      ip: 10.125.20.3/24
      vrrp: 95
      vrrp_ip: 10.125.20.1
    - name: vlan 30
      ip: 10.125.30.3/24
      vrrp: 95
      vrrp_ip: 10.125.30.1

access-01:
  interfaces:
    - name: eth1
      mode: trunk
    - name: eth2
      mode: trunk

    - name: eth5
      mode: access
      vlan: 10
    - name: eth6
      mode: access
      vlan: 30

access-02:
  interfaces:
    - name: eth1
      mode: trunk
    - name: eth2
      mode: trunk

    - name: eth5
      mode: access
      vlan: 20
    - name: eth6
      mode: access
      vlan: 30
Here, I’m adding the new VLAN (31: video-conf) to the list and configuring the new subnet 10.125.31.0/24 on both distribution switches. These variables are then rendered into the actual configuration using the Jinja2 template. I'm also configuring one of the switch ports as VLAN 31 (eth6 on access-01 switch)
Once the changes are made, you can commit the changes by running git add to stage the modified file, followed by git commit -m "Added VLAN 31" to commit the changes. Finally, push the changes to your branch using git push origin.
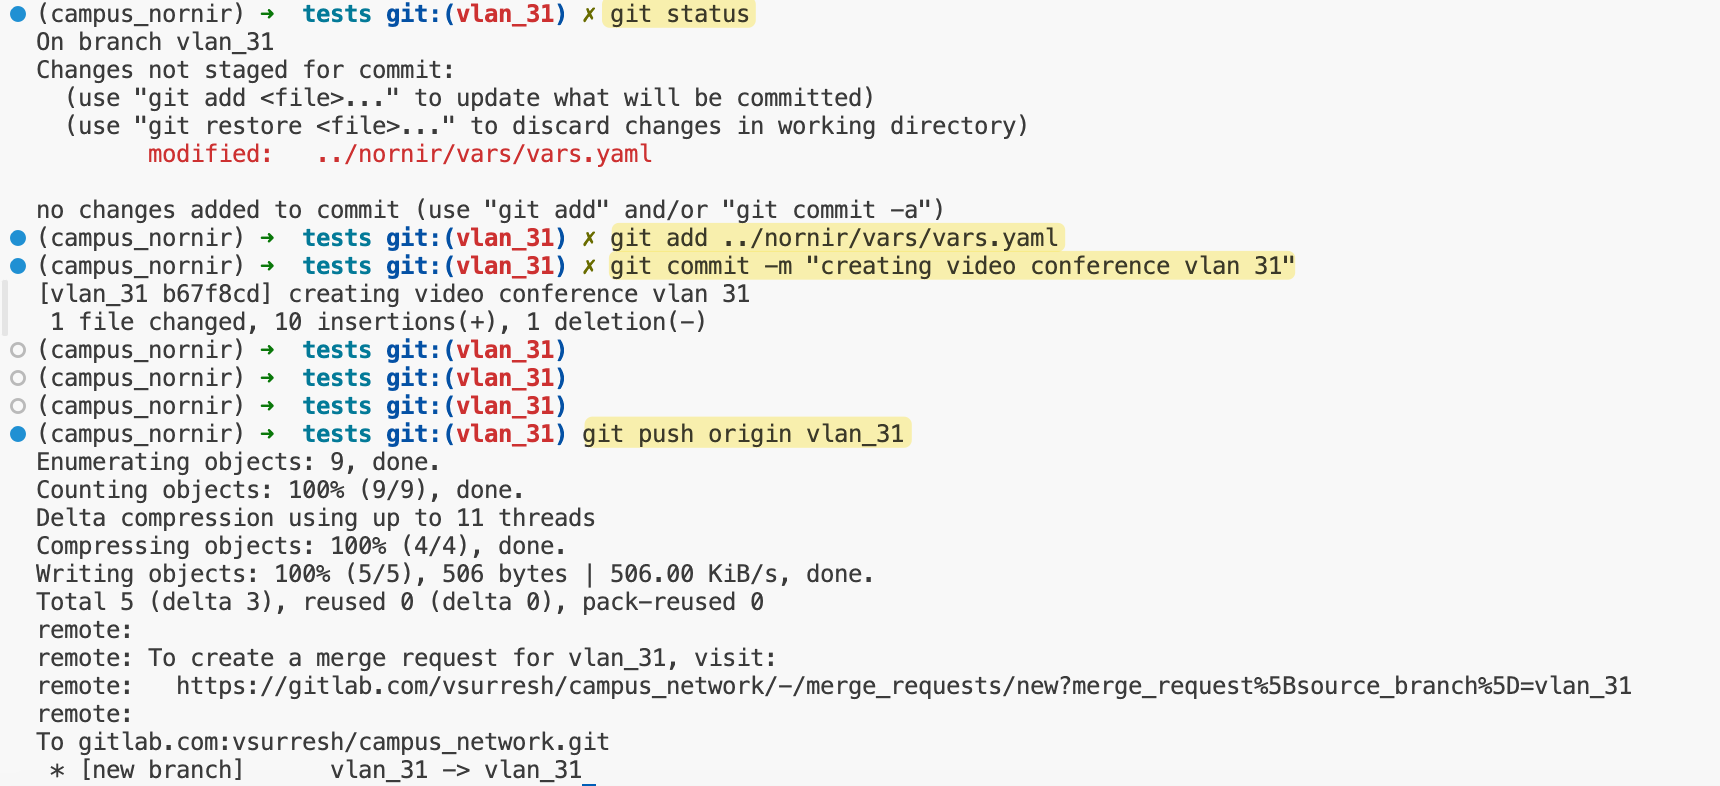
As soon as I push the changes, the pipeline is triggered. Here’s how the pipeline is structured. It consists of four stages - pre-test, stage, deploy, and post-check.
#.gitlab-ci.yml
default:
  image: python:3.10

stages:
  - pre-test
  - stage
  - deploy
  - post-check

Pre-Checks (ANTA):
  stage: pre-test
  before_script:
    - pip install -r requirements.txt
  script:
    - cd tests
    - python anta_tests.py
  only:
    - main

Pre-Checks (VLAN Validation):
  stage: pre-test
  before_script:
    - pip install -r requirements.txt
  script:
    - cd tests
    - ansible-playbook valid_vlan.yaml

Staging:
  stage: stage
  before_script:
    - pip install -r requirements.txt
  script:
    - cd nornir
    - python push_config.py

Deploy:
  stage: deploy
  variables:
    DRY_RUN: "false"
  before_script:
    - pip install -r requirements.txt
  script:
    - cd nornir
    - python push_config.py
  only:
    - main

Post-Checks (ANTA):
  stage: post-check
  before_script:
    - pip install -r requirements.txt
  script:
    - cd tests
    - python anta_tests.py
  only:
    - main
The Pre-Checks (ANTA) stage runs a series of tests using Arista’s ANTA framework, but it is configured to run only in the main branch, as indicated by the only: main directive. This ensures that these tests run only when changes are merged to the main branch. Similarly, Pre-Checks (VLAN Validation) validate the VLAN configuration using Ansible, making sure the VLANs meet the requirements before proceeding.
The Staging stage pushes the configuration to the devices via dry_run where we can test it without affecting live traffic. Then, the Deploy stage pushes the actual configuration to the devices. This stage includes a DRY_RUN: "false" variable to indicate that the changes should be applied to the devices for real, instead of a dry run.
Finally, the Post-Checks (ANTA) stage runs another round of ANTA tests after the deployment to ensure that everything is functioning correctly with the new configuration. Similar to the pre-checks, these post-checks also run only in the main branch.
The only: main condition is how we ensure that specific jobs, like the ANTA tests, are only run when the pipeline is triggered from the main branch.
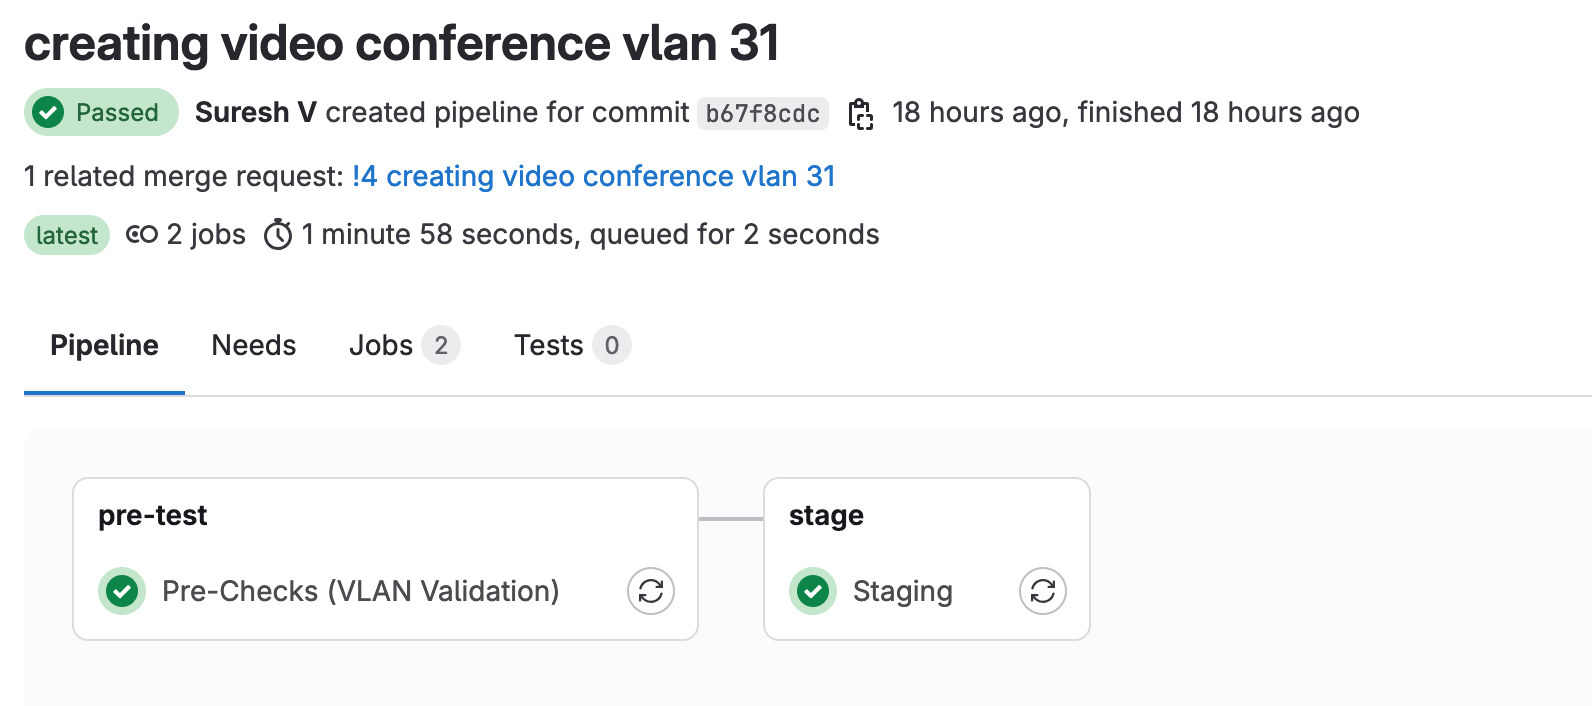
Pipeline From the Branch
Here you can see that when we push our new branch, it only runs two jobs. We can click on each job to see the console output from the runner.
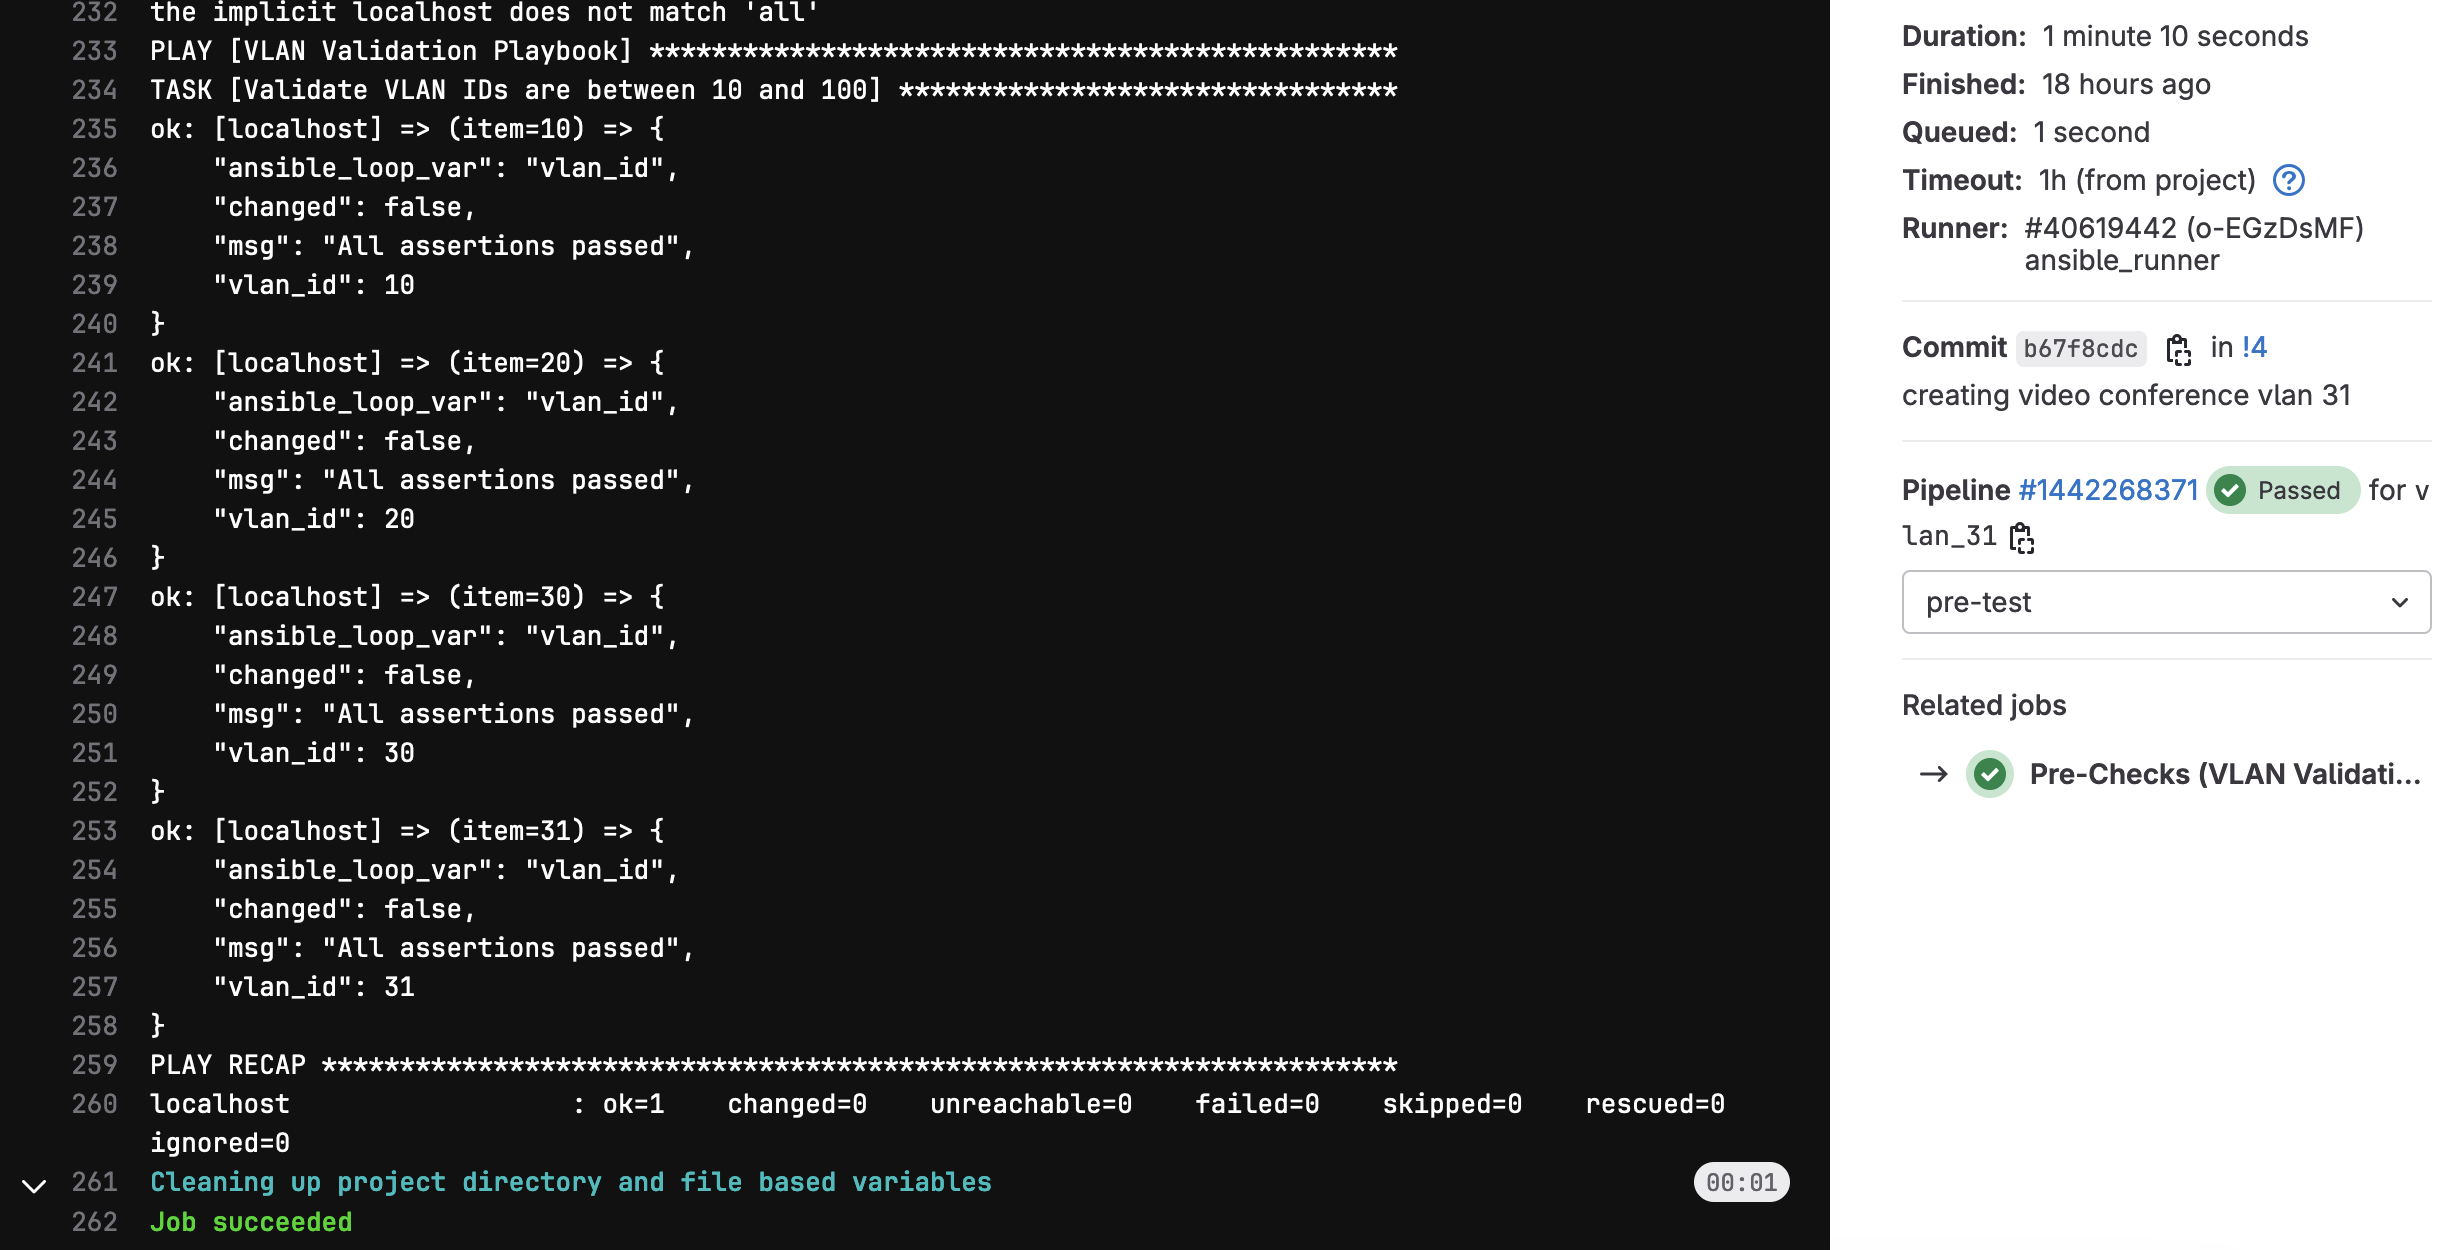
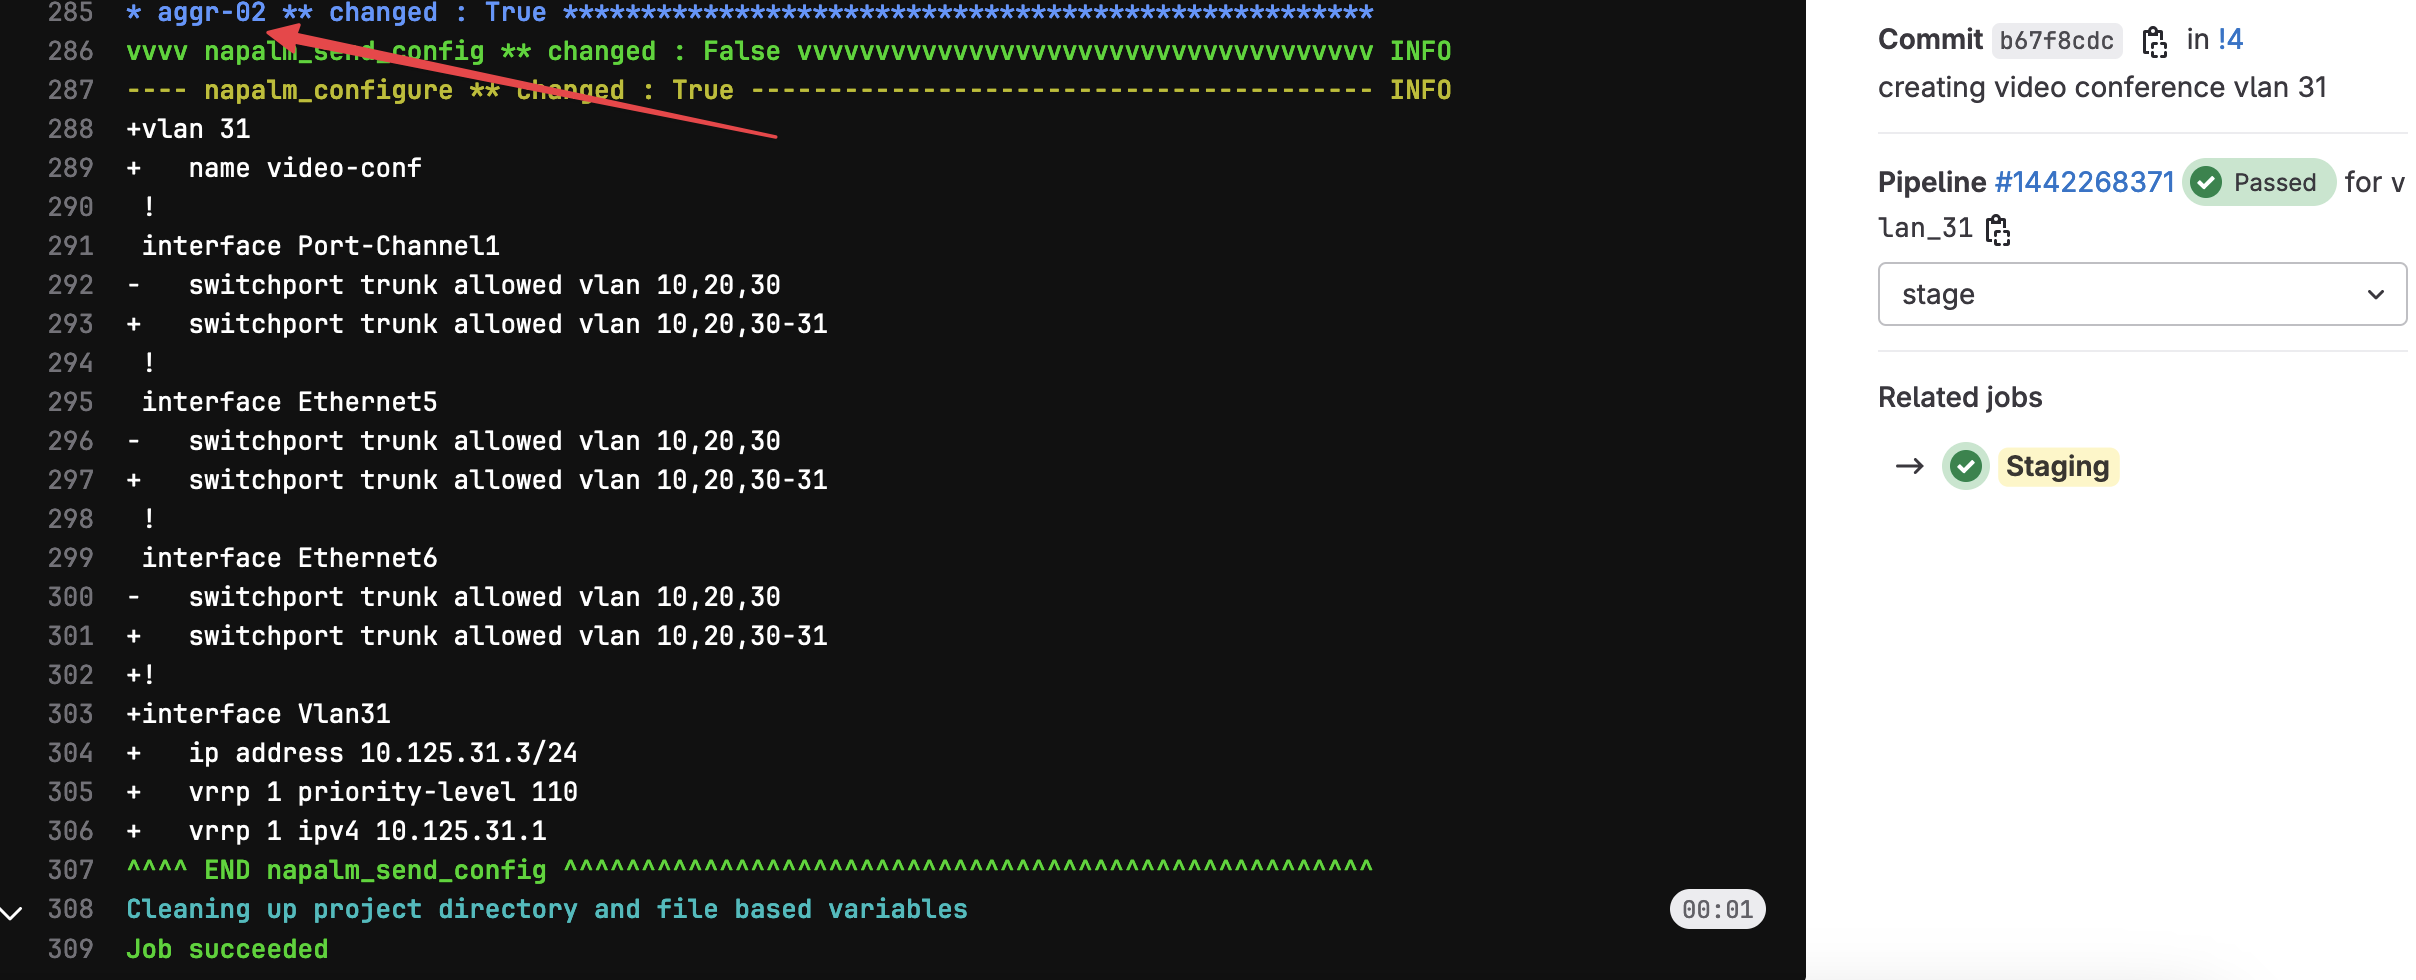
Below you can see that the 'Staging' job outputs what will happen if we apply the change. Anyone reviewing the change can easily see this and make a decision on whether or not to approve the merge request. The below snippet shows the config diff for aggr-02
Merging the Branch
When we create a merge request, GitLab provides a nice visual representation of the pipeline status and the file changes, making the approver’s job easier. Your colleague can review the changes, like the addition of the new VLAN, and approve the request.
As soon as it’s merged into the main branch, the pipeline kicks off again. However, this time, more jobs will run compared to the jobs that were triggered when working in the branch.
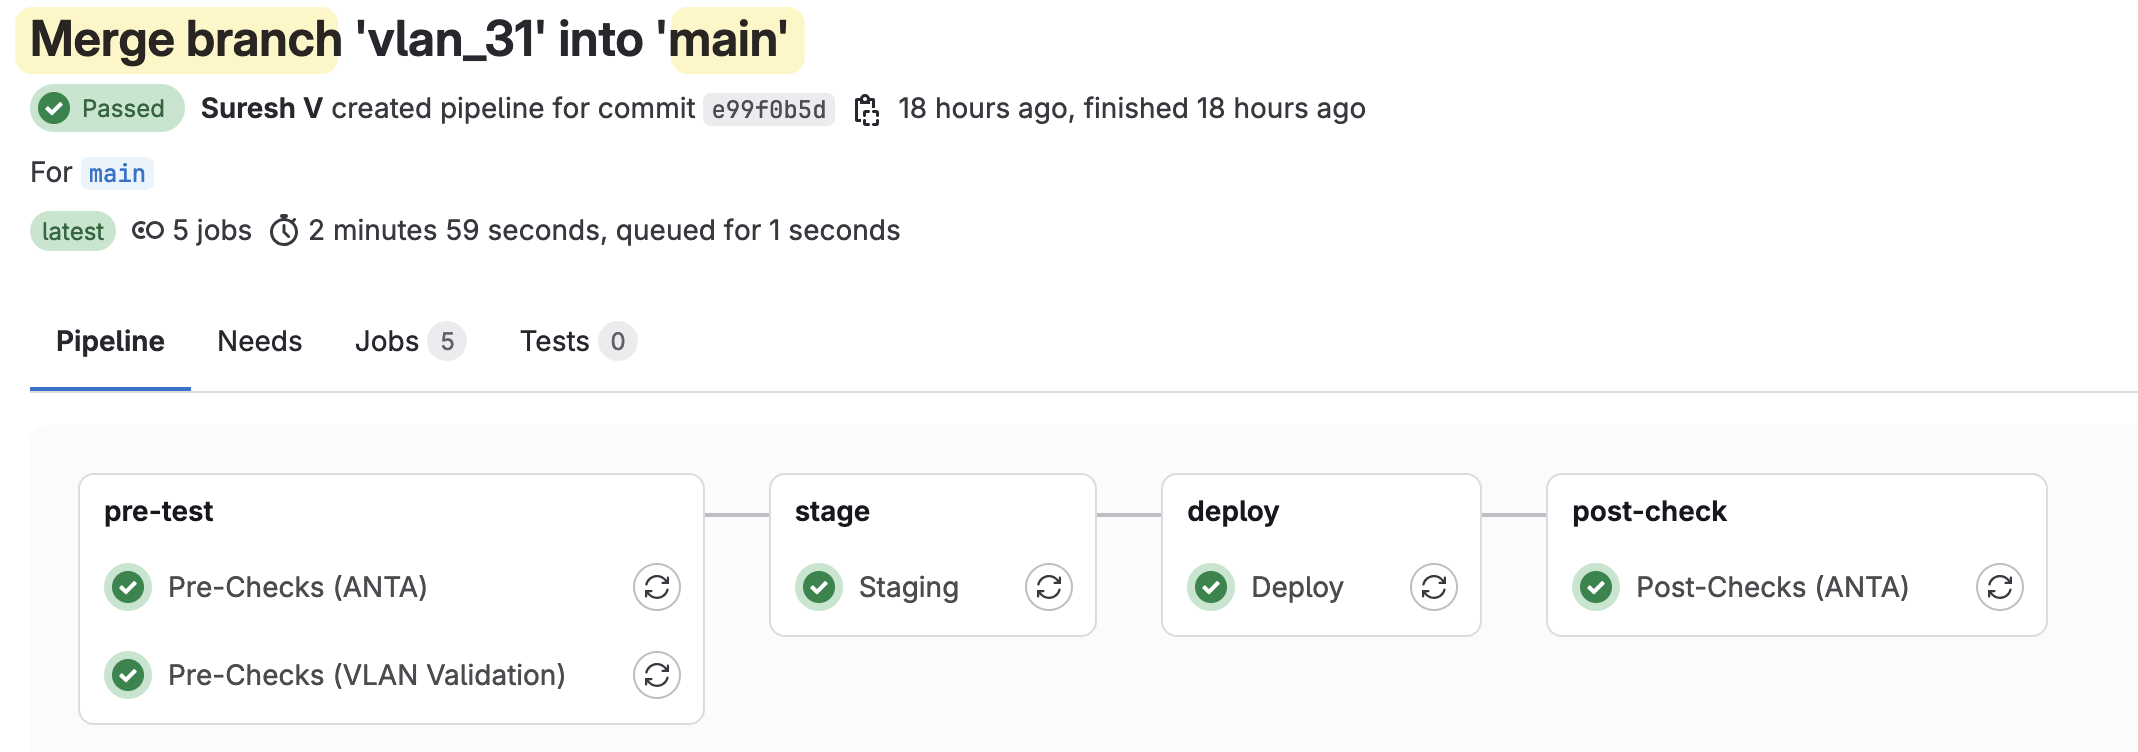
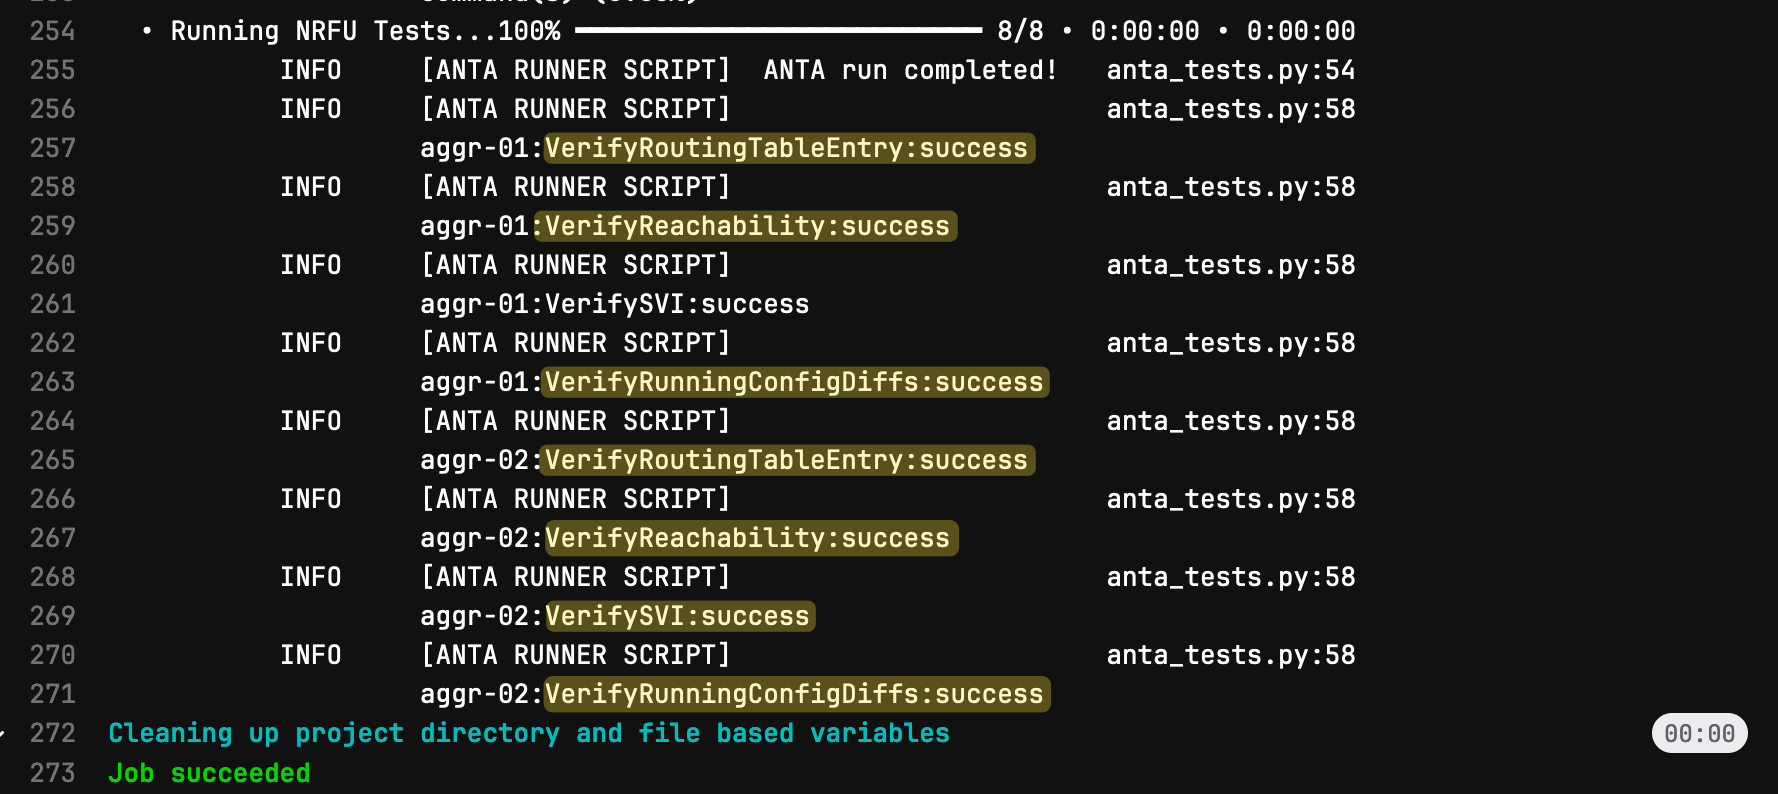
Similar to what we did before, we can click on each job to see the console output for each stage. This gives us detailed insights into what happened during each step. Here’s the console output from the ANTA tests, where we can see the results of the checks, such as verifying the default route, SVIs, and Port-Channels. This helps us confirm that the network is functioning as expected after the new VLAN was added.
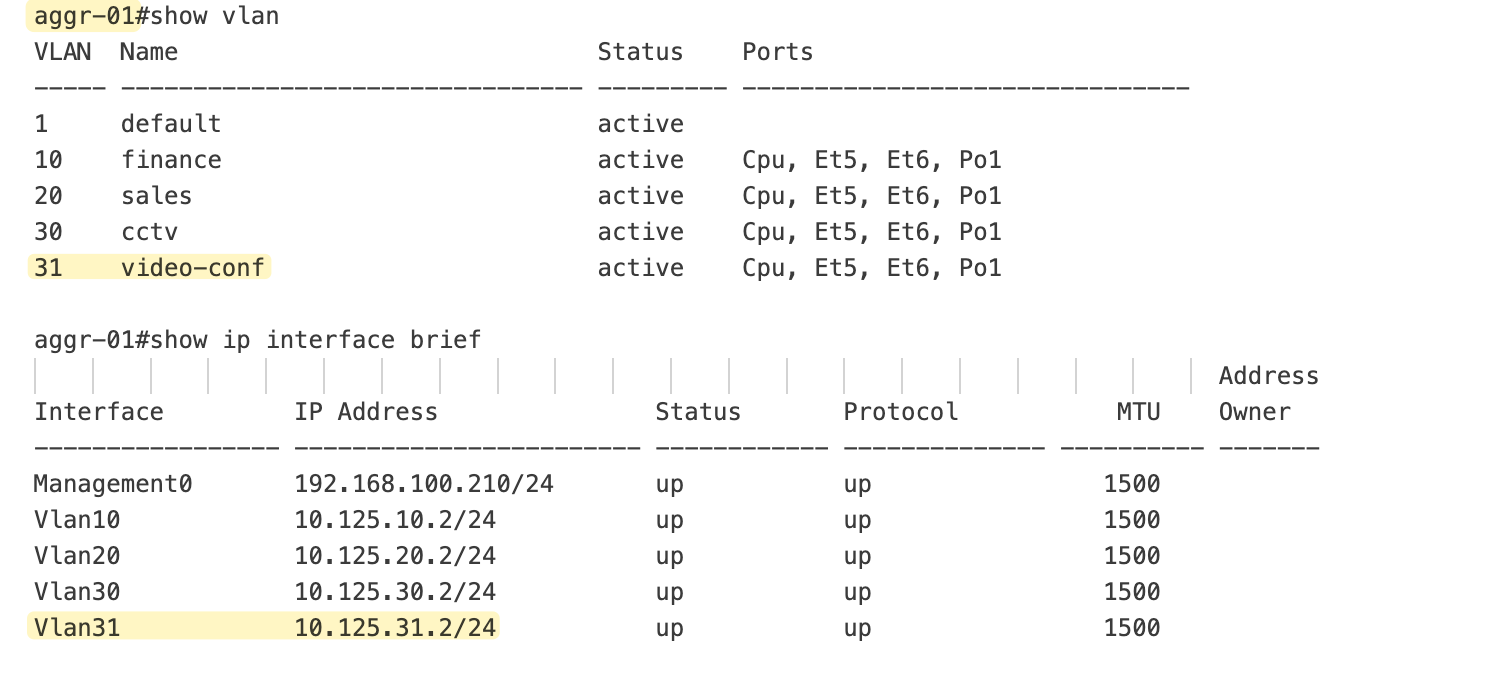
I can also log in to the switch directly to verify the changes as shown below.
Failing Tests
Let’s cover an example of a failing test. Imagine one of our colleagues, unaware of the VLAN ID range we should be using, picked VLAN 110. As usual, they create a branch, add the new VLAN, and push it to GitLab. What do you think will happen? Well, the VLAN validation test will fail because 110 is outside the allowed range. From the console output, we’ll be able to see exactly what went wrong, allowing us to catch this error before it’s deployed.
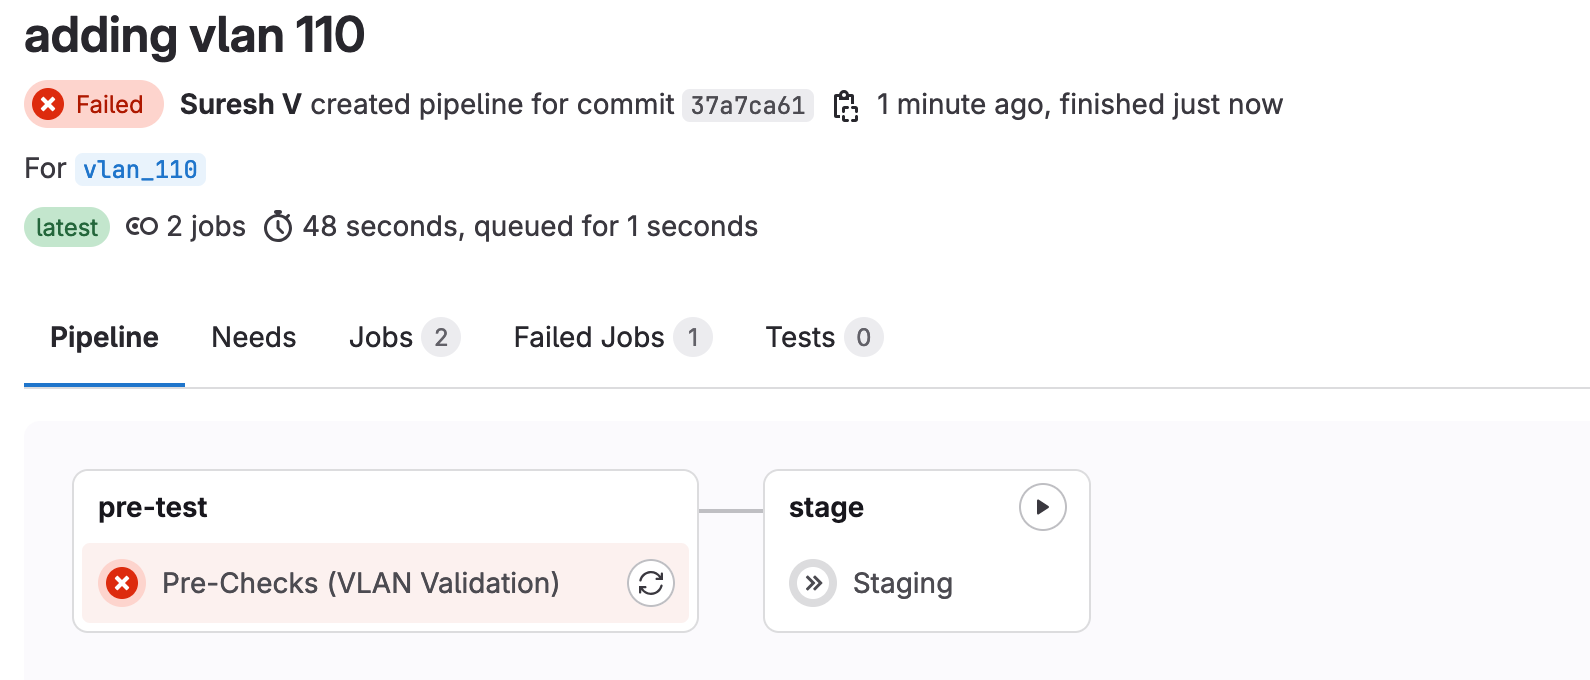
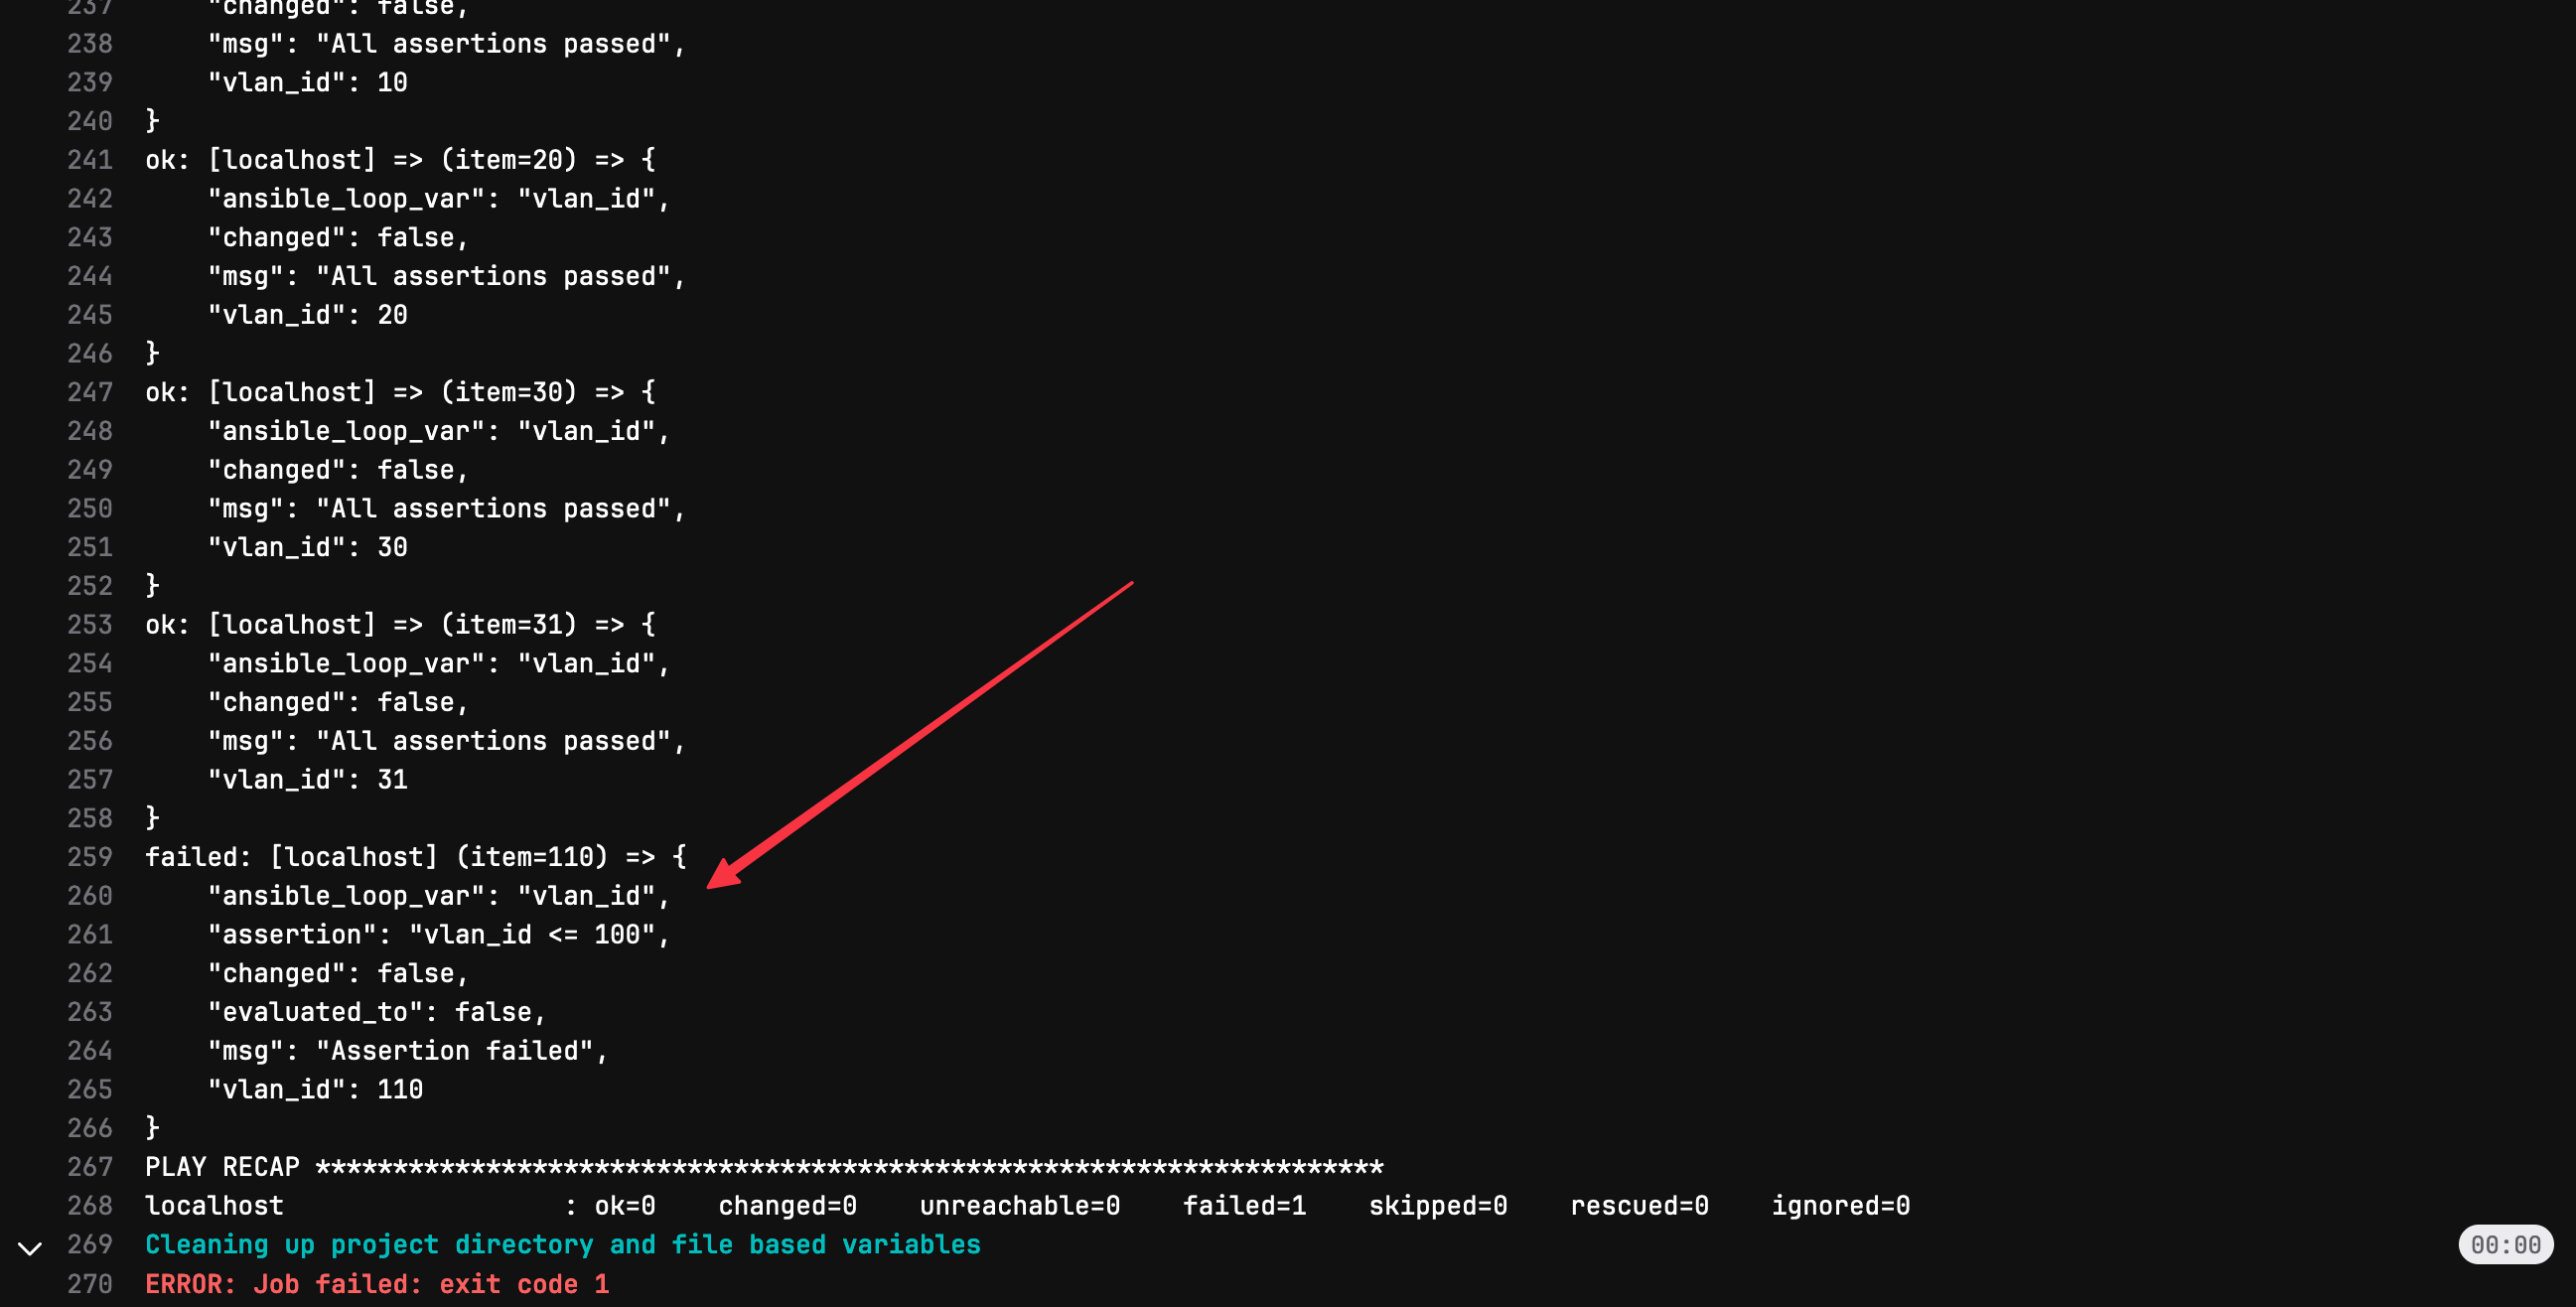
Because the validation stage comes before the staging phase and the validation failed, the pipeline won’t even run the jobs in the next stages.
Closing Up
I know we covered a lot in this post, and I didn’t explain everything in detail but I have good reasons for it. Nornir, Napalm, and even ANTA each deserve their own dedicated blog post. If I try to explain them here in detail, this will be a massive blog post and you may lose interest.
My main goal here was to showcase the CI/CD pipeline in Network Automation, and I hope you got a good sense of how it works.
In upcoming posts, we’ll cover what to do when a post-check fails after your change and how we can revert the configurations to the previous state.