Nornir is a Python library designed for Network Automation tasks. It enables Network Engineers to use Python to manage and automate their network devices. Unlike tools like Ansible which rely on domain-specific languages, Nornir leverages the full power of Python, giving you more flexibility and control over your automation scripts.
Nornir feels like what you'd get if Ansible and Python had a baby. If you're used to Ansible, you know that you first set up your inventory, write tasks, and execute them on all or selected devices concurrently. Nornir operates similarly, but the big difference is you use Python code instead of any Domain Specific Language.
Who Is This Course For?
This course is perfect for Network Engineers who are eager to dive into Network Automation. I've designed it assuming you already have basic knowledge of Python, like working with different data types, writing functions, and using libraries such as Netmiko.
If you're completely new to Python, I recommend you start with my Python Basics course first. This will help you get up to speed and make the most out of what we'll cover in this Nornir course. If you don't want to go through the full course and looking for a quick guide on how Nornir works, feel free to check out my blog post below.
 Suresh Vina
What We Will Cover in This Course?
- What Nornir is?
- What problem does it solve?
- Nornir and Netmiko
- Nornir Installation
- Introduction to Nornir Inventory
- Nornir Plugins (Netmiko, Nornir, print_result, Jinja2 etc)
- Creating a First Nornir Script
- Inventory Filtering
- Nornir Results
- Nornir Ansible Inventory
- Nornir NetBox Inventory
A Long Time Ago in a Galaxy Far, Far Away...
Okay, maybe I exaggerated a bit there, haha. So, before I started using Nornir, my go-to tool for Python Automation was 'Netmiko'. It worked really well, I could send commands and configure multiple devices at once, and so on.
Netmiko was designed to do one thing really well, connect to devices via SSH (or Telnet) and execute commands. It excels at the tasks it's designed for. However, the challenge begins (not really a problem, more like a limitation) when you have a lot of devices to manage and multiple tasks to execute across all or a subset of these devices. Since Netmiko doesn’t have built-in inventory management like Ansible, for example, I ended up creating my own inventory system like this.
username = 'username'
password = os.environ.get('passwd')

switches = {
    "switch-01": "10.1.10.1",
    "switch-02": "10.1.10.2",
    "switch-03": "10.1.10.3",
    "switch-04": "10.1.10.4",
    "switch-05": "10.1.10.5",
}

gateway = {
    "device_type": "cisco_ios",
    "host": '10.10.10.1',
    "username": username,
    "password": password
}
This setup works okay, but it's not ideal. It’s much more difficult to filter devices or run specific tasks on specific devices. Netmiko also run tasks sequently and deosn't have any native implementation for concurrent execution.
Nornir addresses all of these issues by providing robust inventory management, concurrent task execution, and results management, making it a powerful tool for network automation.
Our Working Environment
Throughout this course, I'll be using my Ubuntu desktop to install and run Nornir. You can follow along using any operating system you prefer, whether it's Windows, Mac, or another Linux distribution. Just make sure that you have Python installed, ideally version 3.9 or later.
For creating the labs, I'm using ContainerLab, but feel free to use any lab environment you are comfortable with, such as EVE-NG or Cisco's CML. The key point to remember is that whatever setup you choose, the node running Nornir should be able to reach your network devices via SSH.
In the examples, I'll mainly use Cisco and Arista devices, and possibly Juniper if needed. You are welcome to use any vendor's devices that suit your learning or available resources.
I've installed Python 3.10.12 on my Ubuntu desktop. For this course, I'm going to use a Python virtual environment to install Nornir. A virtual environment is a self-contained directory that contains a Python installation for a particular version of Python, plus a number of additional packages. This allows you to manage separate package installations for different projects, so you don't have any version conflicts or dependencies issues.
Here’s how you can set up your own virtual environment and install Nornir. Create a virtual environment and activate the virtual environment.
python3 -m venv venv
source venv/bin/activate
Install Nornir inside the virtual environment
pip3 install nornir
Nornir Introduction
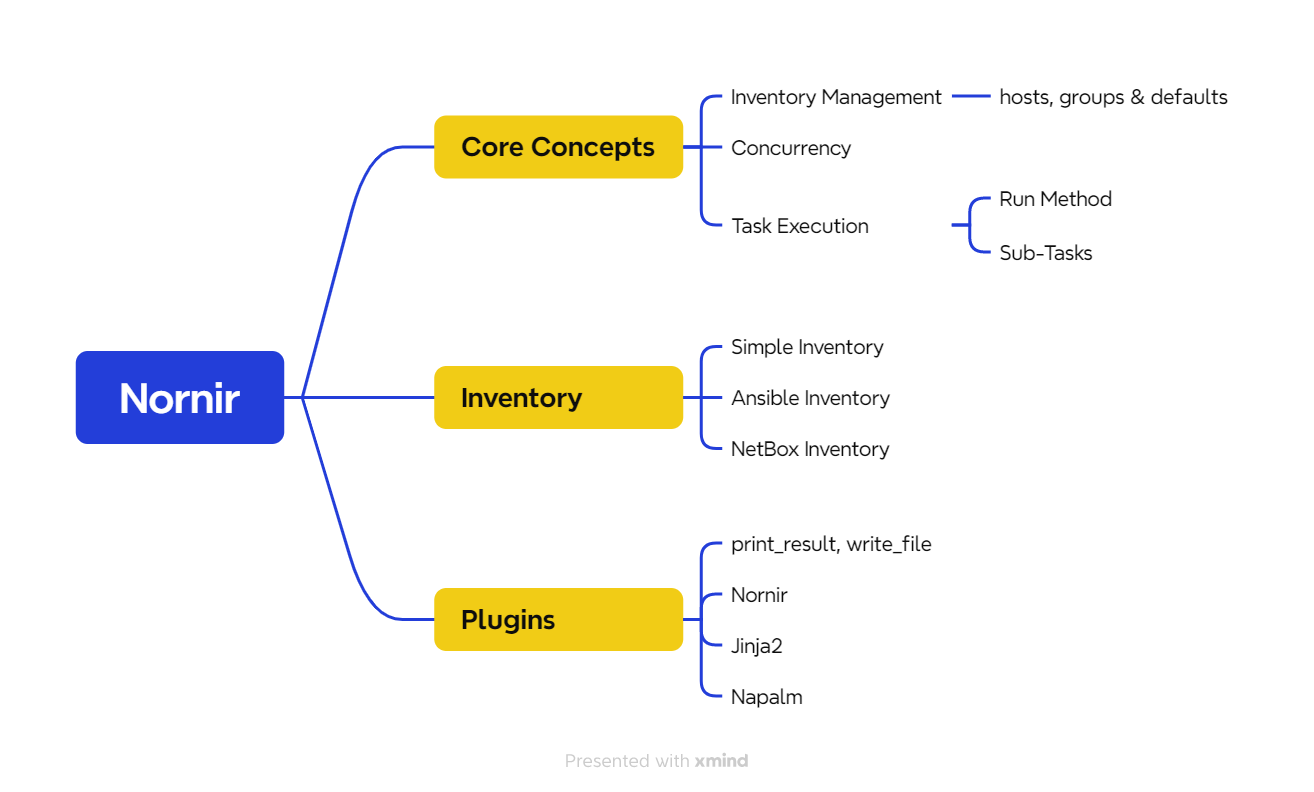
Here's a quick look at the main building blocks of Nornir, together, these components form a robust framework for network automation.
- Inventory - This is where you store information about your devices. Nornir's inventory system is flexible, allowing you to define devices, their credentials, and other details in a structured format.
- Tasks - These are the actions you want to perform on your devices, like sending commands or configurations. In Nornir, you write tasks as Python functions.
- Plugins - Nornir supports plugins to extend its functionality. Plugins can be used for tasks, inventory management, or adding new features.
- Parallel Execution - One of Nornir's strengths is its ability to run tasks in parallel across multiple devices. This built-in feature speeds up network automation tasks significantly, especially when dealing with large networks.
- Results - Nornir has a powerful feature known as Results. After executing tasks on your devices, Nornir collects and stores the outcomes in a Results object.
Nornir Files & Directory Structure
For any Nornir project, it is essential to have a configuration file and an inventory. Nornir supports multiple inventory types, such as Ansible Inventory or NetBox inventory, but for beginners, we will focus on the Simple Inventory.
For a Simple Inventory, you need to create three key files - hosts, groups, and defaults.
- Hosts - This file contains information about each device, including its hostname, IP address, and any device-specific variables.
- Groups - This file is used to define groups of devices that share common configurations and variables.
- Defaults - Here, you can specify default settings that apply to all devices and groups unless specifically overridden within the hosts or groups files.
.
├── config.yaml
├── defaults.yaml
├── groups.yaml
└── hosts.yaml

0 directories, 4 files
config.yaml
This config.yml file is a configuration for Nornir that outlines how it should manage its inventory and execute tasks. It's written in YAML, a human-readable data serialization standard, making it straightforward to understand and modify.
#config.yaml
---
inventory:
  plugin: SimpleInventory
  options:
    host_file: 'hosts.yaml'
    group_file: 'groups.yaml'
    defaults_file: 'defaults.yaml'

runner:
  plugin: threaded
  options:
num_workers: 5- Inventory - Specifies how Nornir should load information about network devices. It uses the
SimpleInventoryplugin, pointing to three files (We also have other inventory plugins which can read from Anisble's inventory files or NST tools like NetBox)hosts.yamlfor individual device detailsgroups.yamlfor settings common to groups of devices, anddefaults.yamlfor default settings applicable to all devices if not overridden in the other files.
- Runner - Controls how Nornir runs tasks across devices. Here, the
threadedplugin is used withnum_workersset to 5, meaning tasks will be executed in parallel across up to 5 devices at a time.
hosts.yaml
This file contains details about each network device. For every device, you can specify parameters such as its hostname, IP address, platform type (e.g., Cisco, Arista, Juniper), and credentials. Nornir uses this information to connect to and manage the devices individually. For this example, I'm starting out with two cisco devices.
#hosts.yaml
---
csr-01:
  hostname: 192.168.100.101
  groups:
    - cisco

csr-02:
  hostname: 192.168.100.102
  groups:
    - cisco
groups.yaml
The groups.yaml file is used to define common settings for groups of devices. For example, if you have several devices from the same vendor or within the same part of your network, you can group them and assign shared parameters like vendor or credentials. Devices in hosts.yaml can be associated with one or more groups, inheriting the group's settings.
#groups.yaml
---
cisco:
  platform: cisco_ios
defaults.yaml
defaults.yaml provides default settings that apply to all devices unless explicitly overridden in hosts.yaml or groups.yaml. This is useful for global settings like default credentials, timeout values, or any other parameters you want to apply network-wide. Here, I've defined the default credentials.
#defaults.yaml
---
username: admin
password: admin
When Nornir runs, it combines these files to build a complete picture of your network. It starts with the defaults.yaml as the base, then layers on any relevant settings from groups.yaml, and finally applies any specific settings from hosts.yaml. This hierarchical approach allows for both broad and granular control over device management and task execution, ensuring that each device is configured and managed with the right parameters.
Suresh Vina
Inventory Inheritance Example
Let's take csr-01 from the hosts.yaml as an example to explain the inheritance.
csr-01Details - It has its own uniquehostname(192.168.100.101) and is part of theciscogroup.- Inheritance from
groups.yaml -Sincecsr-01is associated with theciscogroup, it inherits theplatform: cisco_iossetting defined under theciscogroup ingroups.yaml. - Inheritance from
defaults.yaml -The globalusernameandpasswordare not specified directly incsr-01or under theciscogroup. So,csr-01inherits the default credentials (username: admin,password: admin) specified indefaults.yaml.
This way, csr-01 gets a complete set of parameters through inheritance, its own hostname, the platform from its group, and the global username and password for login. Not only you can group devices with vendors, you can also group devices using their function, geographical location etc.
Creating Our First Nornir Script
Let's look at a simple example to understand how our first Nornir script works, especially using the inventory examples we just discussed.
from nornir import InitNornir

def say_hello(task):
    print('My Task Works! Yaay')

nr = InitNornir(config_file='config.yaml')
nr.run(task=say_hello)
#output
My Task Works! Yaay
My Task Works! YaayImporting Nornir - The script starts by importing InitNornir Class from the Nornir library. This is essential for initializing our Nornir environment and you always need this. This is like going into configure terminal in Cisco devices to make any config changes.
Defining a Task Function - Next, we define a simple task function say_hello that takes task as an argument. This function merely prints a message, My Task Works! Yaay. In Nornir, tasks are functions that you want to execute on your network devices. The task argument is a key part of this; it represents the task being executed and carries information and context about the current device it's running against.
Initializing Nornir - We then create an instance of Nornir using InitNornir, specifying our config.yaml as the configuration file. This configuration includes our inventory setup with hosts.yaml, groups.yaml, and defaults.yaml, defining our network devices and their properties.
Running the Task - Finally, we use the .run() method on our Nornir instance to execute the say_hello task across all devices specified in our inventory. Because our config.yaml specifies a runner with 5 workers, tasks can be executed in parallel across up to 5 devices at a time.
Output - Given our inventory setup, the script prints My Task Works! Yaay once for each device in the inventory. Since we have two devices, we see the message printed two times, indicating the task executed successfully on each device.
To summarize what we learnt so far, Nornir run a task (or tasks) concurrently in one or more devices and return a result (or results)
What are nornir plugins?
In the previous example, I defined my own function and executed it against the devices in the inventory. Nornir plugins are essentially Python functions already created by awesome people so, we don't have to reinvent the wheel.
Think of Nornir as a toolbox for Network Automation, and plugins are like extra tools you add. Just like a carpenter adds a new hammer or wrench to their toolkit for specific jobs, you can add plugins to Nornir to handle special network tasks or work with certain devices. Each plugin gives Nornir new abilities, making it better suited for your needs, similar to how the right tool helps a carpenter work more efficiently.
The print_result plugin in Nornir is a helpful plugin designed to display the results of tasks executed across network devices. This plugin takes the output from various operations performed by Nornir's tasks and formats them in a clear, readable way. By using print_result, we can easily review and verify the changes or statuses reported by tasks without manually going through raw output.
You can find the list of plugins here, for this part, we will focus on the print_result plugin. print_result plugin is part of the nornir_utils plugin collection. You can install them using pip3 as shown below.
pip3 install nornir_utilsNornir Script with print_result plugin
In the updated script to use print_result plugin. This function formats the results nicely, similar to how Ansible displays its output. It clearly shows which devices the tasks were run against and presents the results in an organized, easy-to-read manner. This makes it much easier to quickly understand the status and output of each task across your network devices.
from nornir import InitNornir
from nornir_utils.plugins.functions import print_result

def say_hello(task):
    return 'My Task Works! Yaay'

nr = InitNornir(config_file='config.yaml')
result = nr.run(task=say_hello)

print_result(result)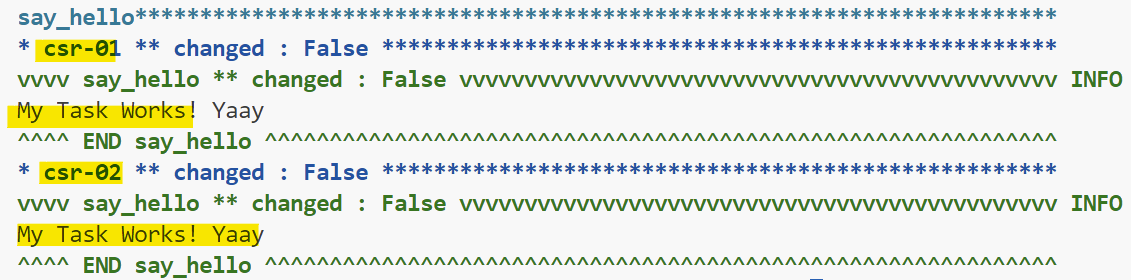 Suresh Vina
Closing Up
In this part, we've covered what Nornir is, how to install it, and how to set up a Nornir inventory along with a simple script. We also explored how to use the print_result plugin. In the upcoming section, we will look at the Netmiko plugin to connect to devices and execute commands.
Suresh Vina