Nornir is a Python library designed for Network Automation tasks. It enables Network Engineers to use Python to manage and automate their network devices. Unlike tools like Ansible which rely on domain-specific languages, Nornir leverages the full power of Python, giving you more flexibility and control over your automation scripts.
Nornir feels like what you'd get if Ansible and Python had a baby. If you're used to Ansible, you know that you first set up your inventory, write tasks, and execute them on all or selected devices concurrently. Nornir operates similarly, but the big difference is you use Python code instead of any Domain Specific Language.
My Life Without Nornir
Before I discovered Nornir, my approach to Python automation involved manually setting up a list of devices, specifying each one's vendor, and credentials. This setup could be a simple Python list or a dictionary. Then, I'd loop through each device with a for loop, using libraries like Netmiko or Napalm to execute tasks. These tasks ranged from getting data from the devices to sending configurations. Here is a very simple snippet of managing the devices and using them with Netmiko. This method can get complicated very easily once you start adding more and more devices.
username = 'username'
password = os.environ.get('passwd')

switches = {
    "switch-01": "10.1.10.1",
    "switch-02": "10.1.10.2",
    "switch-03": "10.1.10.3",
    "switch-04": "10.1.10.4",
    "switch-05": "10.1.10.5",
}

gateway = {
    "device_type": "cisco_ios",
    "host": '10.10.10.1',
    "username": username,
    "password": password
}
While this method served its purpose, it came with a significant drawback, the lack of an inventory system. Adding to that, I tried making things faster by using concurrent.futures to run tasks in parallel across different devices. This meant tasks could be done more quickly, as several devices could be worked on at the same time. However, this wasn't a built-in feature of the tools I was using; it required extra coding and effort to implement parallel execution. Nornir addresses all of these shortcomings.
Prerequisites and Key Points
First off, diving into Nornir assumes you have a fair understanding of Python and its basics. If you're starting from scratch with Python, I highly recommend checking out my study guide to get up to speed. It’s designed to build a solid foundation in Python.
It’s also crucial to remember that Nornir isn’t here to replace tools like Netmiko or Napalm, rather, it's meant to work alongside them. Think of Nornir as a framework that orchestrates your automation tasks. For you to SSH to network devices, you'll still rely on plugins like Netmiko. We'll dive deeper into how these tools integrate with Nornir in the upcoming sections.
Installing Nornir is as simple as running the pip install command.
pip install nornir Suresh Vina
Nornir Introduction
Here's a quick look at the main building blocks of Nornir, together, these components form a robust framework for network automation.
- Inventory - This is where you store information about your devices. Nornir's inventory system is flexible, allowing you to define devices, their credentials, and other details in a structured format.
- Tasks - These are the actions you want to perform on your devices, like sending commands or configurations. In Nornir, you write tasks as Python functions.
- Plugins - Nornir supports plugins to extend its functionality. Plugins can be used for tasks, inventory management, or adding new features.
- Parallel Execution - One of Nornir's strengths is its ability to run tasks in parallel across multiple devices. This built-in feature speeds up network automation tasks significantly, especially when dealing with large networks.
- Results - Nornir has a powerful feature known as Results. After executing tasks on your devices, Nornir collects and stores the outcomes in a Results object.
We will go through each one of them in detail using a few examples.
Nornir Files & Directory Structure
Here is my directory structure and the files (please ignore nornir.log which get created automatically)
(venv) suresh@ubuntu-desktop:~/Documents/blog/nornir_blog$ tree -I venv
.
├── basic.py
├── config.yaml
├── defaults.yaml
├── groups.yaml
├── hosts.yaml
└── nornir.log

0 directories, 6 files
config.yaml
This config.yml file is a configuration for Nornir that outlines how it should manage its inventory and execute tasks. It's written in YAML, a human-readable data serialization standard, making it straightforward to understand and modify.
#config.yaml
---
inventory:
  plugin: SimpleInventory
  options:
    host_file: 'hosts.yaml'
    group_file: 'groups.yaml'
    defaults_file: 'defaults.yaml'

runner:
  plugin: threaded
  options:
num_workers: 5- Inventory - Specifies how Nornir should load information about network devices. It uses the
SimpleInventoryplugin, pointing to three files (We also have other inventory plugins which can read from Anisble's inventory files or NST tools like NetBox)hosts.yamlfor individual device detailsgroups.yamlfor settings common to groups of devices, anddefaults.yamlfor default settings applicable to all devices if not overridden in the other files.
- Runner - Controls how Nornir runs tasks across devices. Here, the
threadedplugin is used withnum_workersset to 5, meaning tasks will be executed in parallel across up to 5 devices at a time.
hosts.yaml
This file contains details about each network device. For every device, you can specify parameters such as its hostname, IP address, platform type (e.g., Cisco, Arista), and credentials. Nornir uses this information to connect to and manage the devices individually. For this example, I'm starting out with five devices. (two Ciscos and three Aristas)
#hosts.yaml
---
csr-01:
  hostname: 10.10.50.41
  groups:
    - cisco

csr-02:
  hostname: 10.10.50.42
  groups:
    - cisco

eos-01:
  hostname: 192.168.100.11
  groups:
    - arista

eos-02:
  hostname: 192.168.100.12
  groups:
    - arista

eos-03:
  hostname: 192.168.100.13
  groups:
    - arista
groups.yaml
The groups.yaml file is used to define common settings for groups of devices. For example, if you have several devices from the same vendor or within the same part of your network, you can group them and assign shared parameters like vendor or credentials. Devices in hosts.yaml can be associated with one or more groups, inheriting the group's settings. Here, I'm defining the platform for each group and the credentials for the 'arista' group.
#groups.yaml
---
cisco:
  platform: cisco_ios

arista:
  platform: arista_eos
  username: admin
  password: admin
defaults.yaml
defaults.yaml provides default settings that apply to all devices unless explicitly overridden in hosts.yaml or groups.yaml. This is useful for global settings like default credentials, timeout values, or any other parameters you want to apply network-wide. Here, I've defined the default credentials.
#defaults.yaml
---
username: admin
password: Cisco123
When Nornir runs, it combines these files to build a complete picture of your network. It starts with the defaults.yaml as the base, then layers on any relevant settings from groups.yaml, and finally applies any specific settings from hosts.yaml. This hierarchical approach allows for both broad and granular control over device management and task execution, ensuring that each device is configured and managed with the right parameters.
Inventory Inheritance Example
Let's take csr-01 from the hosts.yaml as an example to explain the inheritance.
csr-01Details - It has its own uniquehostname(10.10.50.41) and is part of theciscogroup.- Inheritance from
groups.yaml -Sincecsr-01is associated with theciscogroup, it inherits theplatform: cisco_iossetting defined under theciscogroup ingroups.yaml. - Inheritance from
defaults.yaml -The globalusernameandpasswordare not specified directly incsr-01or under theciscogroup. So,csr-01inherits the default credentials (username: admin,password: Cisco123) specified indefaults.yaml.
This way, csr-01 gets a complete set of parameters through inheritance, its own hostname, the platform from its group, and the global username and password for login. Not only you can group devices with vendors, you can also group devices using their function, geographical location etc.
Suresh Vina
Creating Our First Nornir Script
Let's look at a simple example to understand how our first Nornir script works, especially using the inventory examples we discussed before (with csr and eos devices).
from nornir import InitNornir

def say_hello(task):
    print('My Task Works! Yaay')

nr = InitNornir(config_file='config.yaml')
nr.run(task=say_hello)
#output
My Task Works! Yaay
My Task Works! Yaay
My Task Works! Yaay
My Task Works! Yaay
My Task Works! YaayImporting Nornir - The script starts by importing InitNornir Class from the Nornir library. This is essential for initializing our Nornir environment.
Defining a Task Function - Next, we define a simple task function say_hello that takes task as an argument. This function merely prints a message, My Task Works! Yaay. In Nornir, tasks are functions that you want to execute on your network devices. The task argument is a key part of this; it represents the task being executed and carries information and context about the current device it's running against.
Initializing Nornir - We then create an instance of Nornir using InitNornir, specifying our config.yaml as the configuration file. This configuration includes our inventory setup with hosts.yaml, groups.yaml, and defaults.yaml, defining our network devices and their properties.
Running the Task - Finally, we use the .run() method on our Nornir instance to execute the say_hello task across all devices specified in our inventory. Because our config.yaml specifies a runner with 5 workers, tasks can be executed in parallel across up to 5 devices at a time.
Output - Given our inventory setup, the script prints My Task Works! Yaay once for each device in the inventory. Since we have five devices (csr-01, csr-02, eos-01, eos-02, eos-03), we see the message printed five times, indicating the task executed successfully on each device.
print_result plugin
Let's look at our second example on how to use the print_result plug-in. If you have used Ansible before, you would know that it gives a nice output showing what's going on.
You can install the plug-in using pip install command.
pip install nornir_utilsfrom nornir import InitNornir
from nornir_utils.plugins.functions import print_result
def say_hello(task):
return 'My Task Works! Yaay'
nr = InitNornir(config_file='config.yaml')
result = nr.run(task=say_hello)
print_result(result)In the updated example, the significant addition is the use of print_result from the nornir_utils plugin. This function is designed to neatly display the results of tasks executed by Nornir on your network devices.
Importing print_result - We've added a new import statement to bring in the print_result function. This plug-in is used for formatting and printing the outcome of our tasks in a readable manner.
Storing and Printing Results - Instead of directly printing a message within the say_hello task, we now return the message. The main script captures the output of the nr.run method in a variable named result. This variable holds detailed information about the task execution on each device. Finally, print_result(result) is called to display this information.
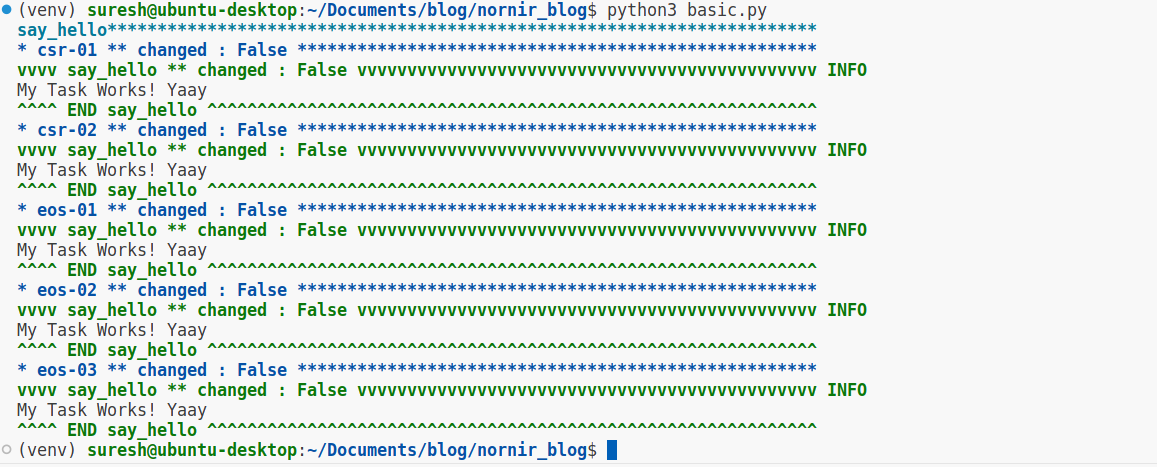
The output is structured to provide detailed feedback on the task execution across each device in your inventory. Here’s a breakdown.
- Task Name - The script starts by mentioning the task name (
say_hello) as a header for the output section. - Device Name and Change Status - Each device the task was executed on is listed with its name (e.g.,
csr-01,eos-01) and a change status (changed : False). This status indicates whether the task made any changes to the device's state. In this case, no changes were made. - Task Outcome: Below each device name, the result of the task is shown. Since our task simply returns a message, "My Task Works! Yaay" is printed under each device.
- Start and End Markers - Each device's result section is enclosed within
vvvvand^^^^markers, providing clear visual segmentation. TheINFOlabel next to the task name within this block indicates the nature of the output.
Suresh Vina
Accessing the host's parameters
The task.host object allows us to access various parameters of the host on which the task is currently executing. You can retrieve specific details like.
task.host- The name of the current device.task.host.groups- The group(s) the device belongs to.task.host.hostname- The hostname or IP address of the device.
By using task.host along with its attributes, we're able to dynamically insert each device's specific information into our task's return message.
from nornir import InitNornir
from nornir_utils.plugins.functions import print_result

def say_hello(task):
    return f'My Task Works! Yaay {task.host} - {task.host.groups} - {task.host.hostname}'

nr = InitNornir(config_file='config.yaml')
result = nr.run(task=say_hello)
print_result(result)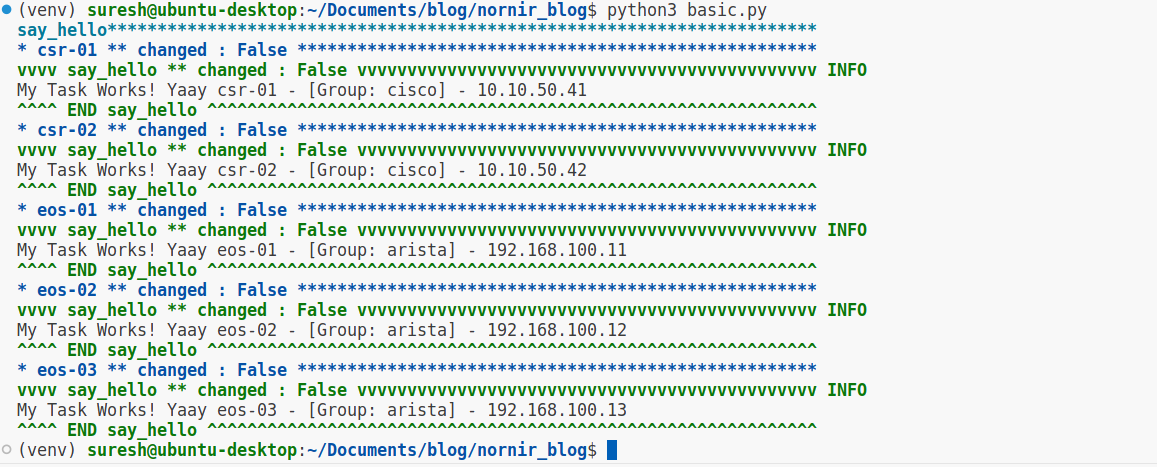
Filtering Devices
Here is another example of how you can run the tasks on specific devices. For the sake of simplicity, I'm going to run the task only on Arista devices. You can learn more about filtering here.
from nornir import InitNornir
from nornir_utils.plugins.functions import print_result

def say_hello(task):
    return f'My Task Works! Yaay {task.host} - {task.host.groups} - {task.host.hostname}'

nr = InitNornir(config_file='config.yaml')
nr = nr.filter(platform='arista_eos')

result = nr.run(task=say_hello)
print_result(result)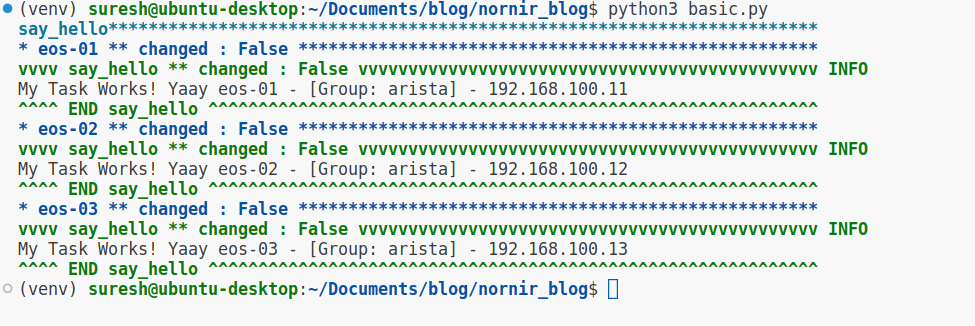
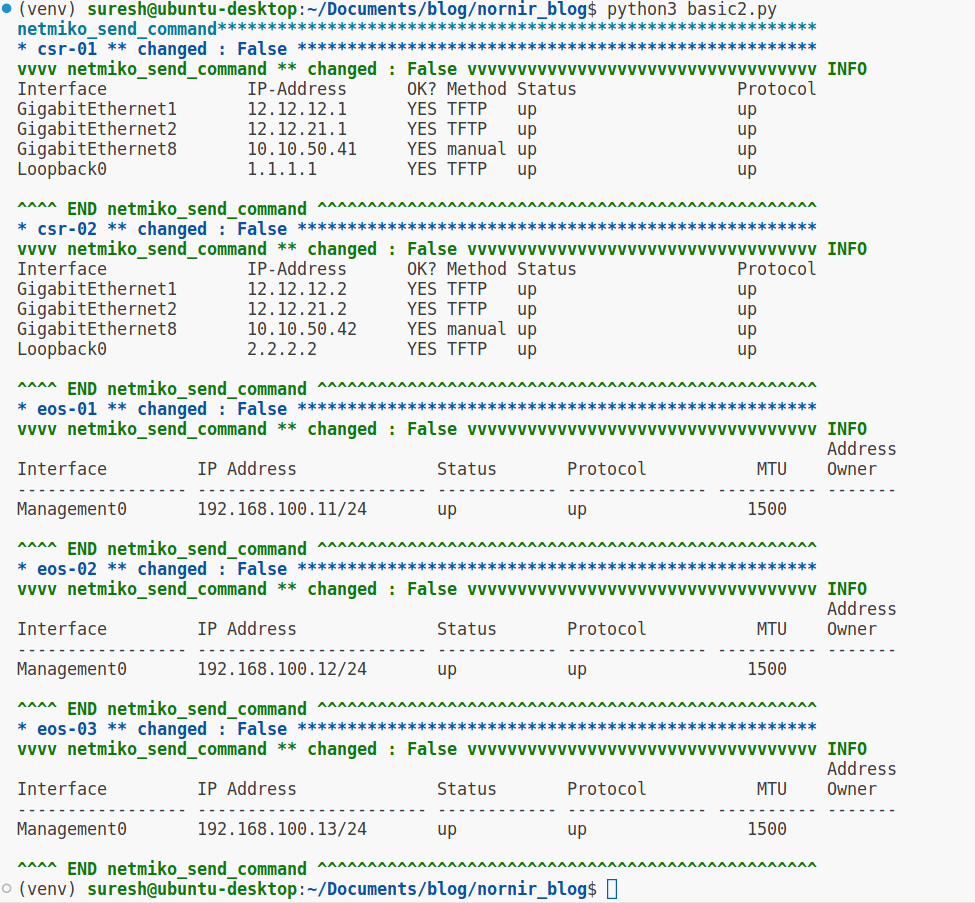
nornir_netmiko plug-in
Now, we've come to the really cool part where we actually start executing commands on devices and seeing the output. You might think, like I did when I was just getting started, "Alright, I'll just create a new function, import Netmiko's ConnectHandler, and get on with it, right?"
But here’s a pleasant surprise, the awesome teams behind Nornir and Netmiko have already done a lot of the heavy lifting for us. They've created plug-ins that we can easily import. To get the netmiko plug-in, all you need to do is run pip install nornir_netmiko. This simple command fetches and installs everything you need to start sending commands to your network devices through your Nornir scripts.
pip install nornir_netmikofrom nornir import InitNornir
from nornir_netmiko.tasks import netmiko_send_command
from nornir_utils.plugins.functions import print_result
nr = InitNornir(config_file='config.yaml')
results = nr.run(task=netmiko_send_command, command_string='show ip interface brief | excl down')
print_result(results)In this script, we're using the nornir_netmiko plugin, specifically the netmiko_send_command function, to execute commands on network devices. After initializing Nornir, we call nr.run, passing in netmiko_send_command as the task. We specify the command we want to run on our devices with command_string='show ip interface brief | excl down'
 Suresh Vina
Configuring Devices with Nornir and Netmiko
The netmiko_send_config function is used to push configuration commands to devices, in this case specifically targeting Arista devices with platform='arista_eos'.
After filtering for these devices, we execute netmiko_send_config to send configuration commands. The output marked changed : True indicates that the configuration was successfully applied, reflecting changes made on the devices.
from nornir import InitNornir
from nornir_netmiko.tasks import netmiko_send_command, netmiko_send_config
from nornir_utils.plugins.functions import print_result


nr = InitNornir(config_file='config.yaml')
nr = nr.filter(platform='arista_eos')
results = nr.run(task=netmiko_send_config, config_commands=['ntp server 1.1.1.1'])
print_result(results)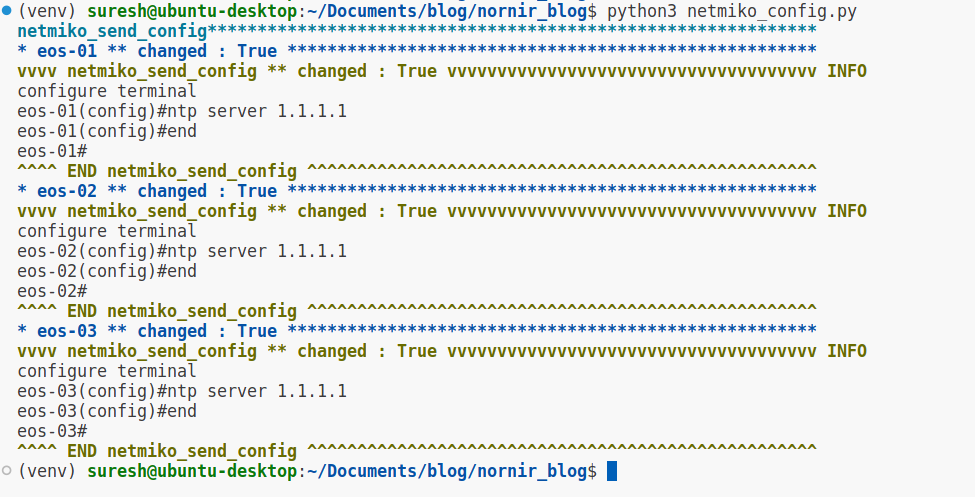 Suresh Vina
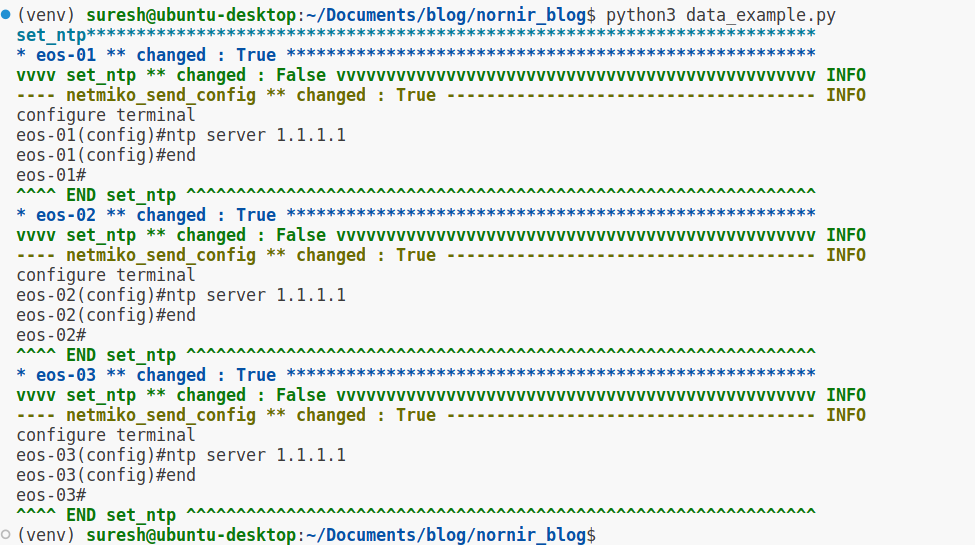
Modified Script and Inventory 'data'
We made a slight change to the script to demonstrate a more dynamic feature of Nornir, accessing host-specific data within a task function for customized configurations across devices.
In the updated groups.yaml file, you'll notice an additional data section under the arista group. This section allows us to define custom data applicable to all devices within this group. Here, we've specified an NTP server address (1.1.1.1) under data, making it accessible to devices associated with the arista group.
#groups.yaml

---
cisco:
  platform: cisco_ios

arista:
  platform: arista_eos
  username: admin
  password: admin
  data:
    ntp: 1.1.1.1
from nornir import InitNornir
from nornir_netmiko.tasks import netmiko_send_command, netmiko_send_config
from nornir_utils.plugins.functions import print_result
def set_ntp(task):
ntp_server = task.host['ntp']
task.run(task=netmiko_send_config, config_commands=[f'ntp server {ntp_server}'])
nr = InitNornir(config_file='config.yaml')
nr = nr.filter(platform='arista_eos')
results = nr.run(task=set_ntp)
print_result(results)The function set_ntp fetches this NTP server address using task.host['ntp'], dynamically inserting it into the configuration command. This method ensures that the NTP server setting applied to each device is retrieved from the inventory, allowing for centralized management of device configurations.
In this example, you would have seen two different ways to run tasks, task.run and nr.run. Here’s a brief explanation of the difference between the two.
task.run- This is used within a task function to execute another task. Think of it as calling a sub-task within your main task. When you usetask.run, you're essentially saying, "While performing this task, go ahead and run these additional tasks as part of it."nr.run- On the other hand,nr.runis used to kick off tasks at the top level. This is the method you call when you want to start your automation process and execute tasks across your inventory of devices.
In summary, nr.run is used to initiate your automation tasks on your network devices, while task.run allows you to organize and modularize your tasks by calling other tasks within a task.
Suresh Vina
Closing Up
I hope you found this post helpful. There's so much to explore with Nornir, and it was quite a challenge to squeeze everything into just one post. I'm considering putting together a study guide on Nornir to dive deeper into its capabilities. If that's something you'd be interested in, please do let me know in the comments.