If you're like me, using Palo Alto firewalls every day, you'll appreciate the value of automation, especially when there are many ways to automate it. Some tasks that could take days to complete manually can be done in a matter of hours with automation. Let's explore some of the tools and practical use cases in this blog post.
Overview
Palo Alto's PAN-OS provides a broad spectrum of automation tools, including Ansible modules, Terraform support, REST-API and even its own Python SDK.
While Ansible is indeed a powerful tool, I often find it somewhat limited due to not having enough modules or being too slow. Terraform is similar with a limited number of modules so, you can't completely automate the configurations.
As for the PAN-OS Python library, despite its potential, my personal experience with it has been a steep learning curve, as it took me a while to figure out how it all works together.
But out of these options, I find the REST API to be my go-to choice. On the contrary, the REST API has always delivered consistent results, proving to be reliable and straightforward. In the following sections, we will go through each option in detail and I'll share some of the use cases of it.
Here's how I think about these tools, If your main goal is to manage the configuration of firewalls, then Ansible or Terraform are good options to consider. They're built for that kind of task. On the other hand, if you're more focused on operational tasks like pulling stats, making quick changes, or monitoring, then Python SDK or REST API might be the way to go. Remember, this isn't a written rule or a one-size-fits-all answer; it's just how I prefer to use these tools based on my experience.
Ansible
If you're new to automation, Ansible is a great place to start. It uses YAML for its configuration, which is super easy to read and write. You don't need to be a programming whiz to get started; if you can write a shopping list, you can write an Ansible playbook.
The best part? Ansible has a good number of modules specifically for Palo Alto. You can easily create objects, services, interfaces, zones, and policies without breaking a sweat. Here is a simple example that creates address-objects, interfaces, zones and a security policy. You define everything declaratively and Ansible goes and figures out how to actually configure them on the firewall.
---

- name: Palo Alto Playbook
  hosts: palo
  gather_facts: false
  connection: local

  collections:
    - paloaltonetworks.panos

  tasks:
    - name: Create Server Object
      panos_address_object:
        provider: '{{ palo_provider }}'
        name: 'server1'
        value: '172.16.1.10'
        description: 'vmware'

    - name: Create Users Object
      panos_address_object:
        provider: '{{ palo_provider }}'
        name: 'users-subnet'
        value: '10.10.10.0/24'
        description: 'users subnet'

    - name: Management Profile
      panos_management_profile:
        provider: '{{ palo_provider }}'
        name: 'Allow Ping'
        ping: true

    - name: Create INSIDE Zone
      panos_zone:
        provider: '{{ palo_provider}}'
        zone: 'INSIDE'
        mode: 'layer3'

    - name: Create USERS Zone
      panos_zone:
        provider: '{{ palo_provider}}'
        zone: 'USERS'
        mode: 'layer3'

    - name: ethernet1/1 config
      panos_interface:
        provider: '{{ palo_provider }}'
        if_name: 'ethernet1/1'
        zone_name: 'INSIDE'
        management_profile: 'Allow Ping'
        mode: 'layer3'
        enable_dhcp: false
        ip: ['172.16.1.1/24']

    - name: ethernet1/2 config
      panos_interface:
        provider: '{{ palo_provider }}'
        if_name: 'ethernet1/2'
        zone_name: 'USERS'
        mode: 'layer3'
        enable_dhcp: false
        ip: ['10.10.10.1/24']

    - name: Allow ping from users to server1
      panos_security_rule:
        provider: '{{ palo_provider }}'
        rule_name: 'allow ping'
        description: 'Allow ping from users to server1'
        source_zone: ['USERS']
        source_ip: ['users-subnet']
        destination_zone: ['INSIDE']
        destination_ip: ['server1']
        application: ['ping']
        action: 'allow'

    - name: Commit
      panos_commit:
        provider: '{{ palo_provider }}'
The above Ansible Playbook lists a series of tasks. Each task uses a specific Ansible module to automate a part of the firewall setup.
- Creating Server and Users Objects: The playbook starts by creating two address objects—one for a specific server and another for a subnet of users.
- Management Profile: Next, it sets up a management profile that allows pinging.
- Defining Zones: Two zones named 'INSIDE' and 'USERS' get created next.
- Interface Configurations: After that, it configures two interfaces and attaches them to the zones we just created.
- Security Rules: It wraps up by adding a security rule that allows pinging from the 'USERS' zone to the 'INSIDE' zone.
- Commit: Finally, the playbook commits all these changes to make them live.
If you want to learn more about using Ansible with Palo Alto, please check out my other blog post below.
Of course, while Ansible is quite handy, it's not perfect. One issue is that there's a limited number of modules available. So, you might run into roadblocks if you're trying to automate more complex tasks that aren't covered.
Also, let's talk speed. If you're dealing with a big setup—think 100+ rules and several hundred objects—Ansible can be slow. Really slow. It could take you upwards of 30 minutes just to complete the rule configurations.
Terraform
First off, Terraform is primarily an Infrastructure as Code (IaC) tool, while Ansible focuses on configuration management. You might be scratching your head, wondering, "Why use Terraform for firewall configurations then?"
Good question. The magic word is 'state'. Unlike Ansible, Terraform keeps track of the state of the device or system you're configuring. This is super handy for managing changes over time.
For instance, let's say you create an object with Ansible and later decide to change its name. If you update the name in your Ansible YAML file and run the playbook, guess what? You'll end up with a brand-new object, and the old one will still be hanging around. Ansible doesn't track state, so it doesn't know any better.
Terraform, however, is stateful. If you change the name of an object, Terraform will actually go in and update it, rather than creating a new one. This ability to manage the state is one of the key differences that set Terraform apart.
Let's look at a simple example that creates a Panorama template, device-group, interfaces, zones, objects and rules. If you want to learn more about Palo Alto and Terraform, please check out my other blog post below.
{
    "hostname": "10.10.10.10",
    "api_key": "LUFRPT1ad567uVphbVRESDlNUURkREcyVDV4anRSVFk9Wi9nWlNoTVJEK0hicWdUQVNJa2N2tYUjZZMHZ1U2lRNTFMQTAwckZ8zgt6wdU5HYcw==",
    "timeout": 10,
    "verify_certificate": false
}

resource "panos_device_group" "dg" {
    name = "test_lab_dg"
    description = "Test Lab"
}

resource "panos_panorama_template" "tp" {
    name = "test_lab_tp"
    description = "Test Lab"
}

resource "panos_panorama_ethernet_interface" "ports" {
    template = panos_panorama_template.tp.name
    for_each = var.interfaces
    name = each.key
    mode = "layer3"
    static_ips = [each.value.ip_address]
    comment = each.value.comment
}

resource "panos_zone" "zones" {
  template   = panos_panorama_template.tp.name
  for_each   = var.interfaces
  name       = each.value.zone
  mode       = "layer3"
  interfaces = [
    for k, v in var.interfaces :
    k if v.zone == each.value.zone
  ]
  depends_on = [panos_panorama_ethernet_interface.ports]
}

resource "panos_address_object" "objects" {
    device_group   = panos_device_group.dg.name
    for_each = var.address_objects
    name = each.key
    value = each.value
    lifecycle {
        create_before_destroy = true
    }
}

resource "panos_security_policy" "rule1" {
    device_group   = panos_device_group.dg.name
    rule {
        name = "users-to-internet"
        source_zones = ["USERS"]
        source_addresses = ["user_subnet"]
        source_users = ["any"]
        destination_zones = ["OUTSIDE"]
        destination_addresses = ["any"]
        applications = ["ssl"]
        services = ["application-default"]
        categories = ["any"]
        action = "allow"
    }
    depends_on = [panos_address_object.objects]

    lifecycle {
        create_before_destroy = true
    }
}

resource "panos_security_policy" "rule2" {
    device_group   = panos_device_group.dg.name
    rule {
        name = "Allow-DNS"
        source_zones = ["USERS"]
        source_addresses = ["user_subnet"]
        source_users = ["any"]
        destination_zones = ["OUTSIDE"]
        destination_addresses = ["dns_server"]
        applications = ["dns"]
        services = ["application-default"]
        categories = ["any"]
        action = "allow"
    }
    depends_on = [panos_address_object.objects]

    lifecycle {
        create_before_destroy = true
    }
}
- Setting up Connection: The first chunk of JSON-like syntax at the top sets up the connection to your Palo Alto device.
- Device and Template Setup: Here, Terraform defines a device group and a template.
- Interface Configuration: This part configures the Ethernet interfaces and IP addresses. It's similar to how you'd set up interfaces in Ansible.
- Zone Configuration: This part creates zones, like 'INSIDE' and 'USERS' in our Ansible playbook. What's neat is the 'for_each' loop that iterates through predefined interfaces—pretty much like looping in Ansible.
- Address Objects: We're creating address objects here, quite similar to the way we created server and user objects in the Ansible playbook.
- Security Policies: Finally, the code defines two security policies, allowing certain types of traffic from one zone to another.
- Dependency and Lifecycle: The 'depends_on' and 'lifecycle' blocks manage dependencies and object lifetimes.
Just like Ansible, Terraform doesn't have a module for every single thing you might want to do with Palo Alto. It's getting better, but you may still hit some limitations.
Pan-OS SDK for Python
First off, I'm still in the early stages of working with the Pan-OS SDK for Python. But from what I've seen so far, I'm quite optimistic about its capabilities. I've documented some of my initial tests and findings in another blog post, which you're more than welcome to check out below.

One thing to note is that Pan-OS SDK leans heavily on Object-Oriented Programming (OOP). So, you'll need a solid understanding of both OOP and basic Python to make the most out of it. If you're new to programming, it might feel a bit overwhelming at first.
With that said, once you're comfortable with the basics, the Pan-OS SDK offers a powerful platform for automating various tasks on your Palo Alto devices. I've written some easy-to-follow examples that show you how to create address objects and security rules. They serve as a good introduction and can help you understand how you could potentially use the SDK for larger projects.
Here are a couple of scripts that create an address-object and a security rule respectively.
from panos.firewall import Firewall
from panos.objects import AddressObject

fw_object = Firewall('my-firewall', 'admin', 'admin')

new_address = AddressObject(
    name='server_1',
    value='192.168.10.10/32',
    type='ip-netmask',
    description='This is server_1 IP'
)

fw_object.add(new_address)
new_address.create()
from panos.firewall import Firewall
from panos.policies import Rulebase, SecurityRule
fw_object = Firewall('my-firewall', 'admin', 'admin')
rules_object = fw_object.add(Rulebase())
new_rule_object = SecurityRule(
name='Allow DNS',
fromzone=['any'],
tozone=['any'],
source=['any'],
destination=['8.8.8.8'],
application=['dns'],
service=['application-default'],
action='allow'
)
rules_object.add(new_rule_object)
new_rule_object.create()REST API
Let's talk about REST API, my personal favourite and go-to tool for automating Palo Alto tasks. I've been using it extensively across various projects, and it's never let me down. The consistency in results is something I can always rely on, making it a robust choice for long-term projects.
What's also great is the quality of documentation Palo Alto offers for their REST API. It's very user-friendly, making the learning curve almost negligible. If you're new to using APIs or just getting started with automating Palo Alto, you'll find the documentation to be a great resource.
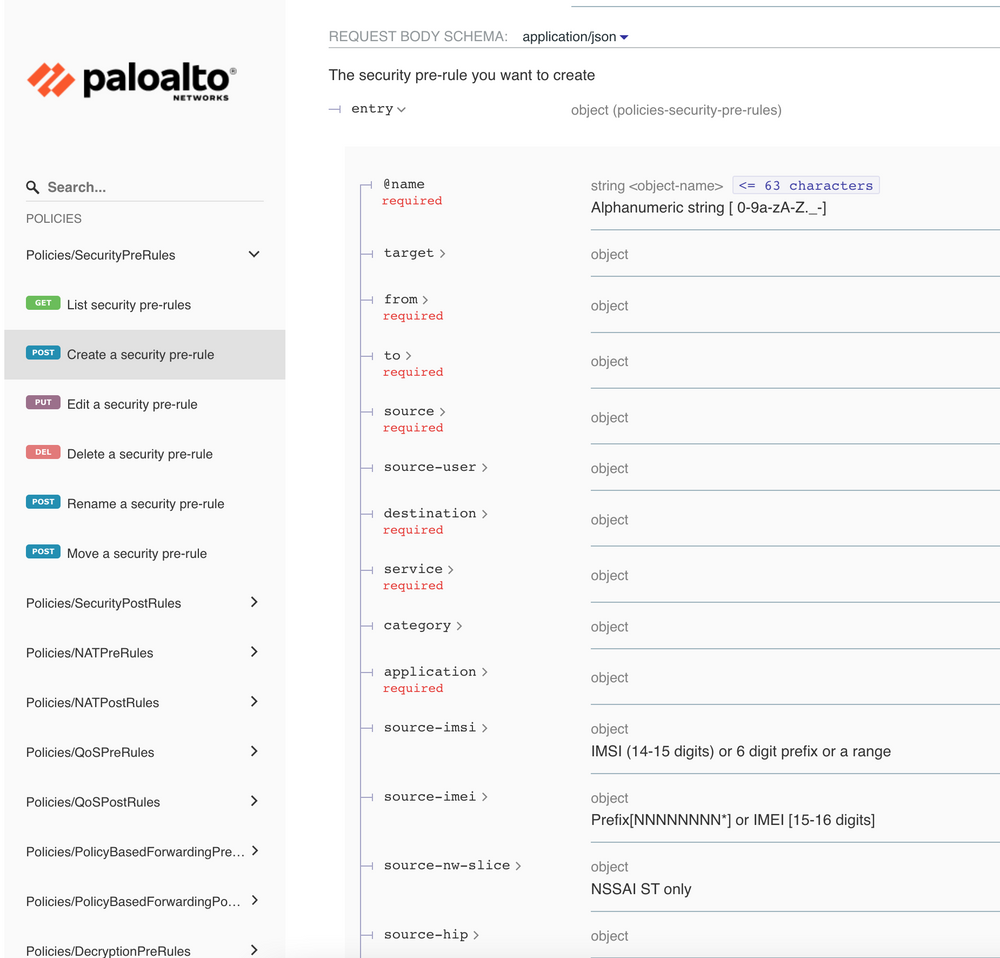
You can simply navigate to https://firewall_ip/restapi-doc to learn how to use the REST interface. Here is an example showing exactly what you need to do to create a security policy.
I've written a series of blog posts that walk you through various use-cases, tips, and tricks to get the most out of REST API. You can start with the first post in the series, which lays the groundwork and gives you a solid understanding of how to get started.
Here is an example that shows creating a security rule using REST API and Python.
import requests
import json

# Disable self-signed warning
requests.packages.urllib3.disable_warnings()


location = {'location': 'device-group', 'device-group': 'lab', 'name': 'allow_users_to_internet'}
headers = {'X-PAN-KEY': 'API_KEY'}
api_url = "https://Firewall_IP/restapi/v10.2/Policies/SecurityPreRules"

body = json.dumps(
    {
        "entry":
        {
            "@name": "allow_users_to_internet",
            "from": {
                "member": ['any']
            },
            "to": {
                "member": ['any']
            },
            "source": {
                "member": ['10.10.10.0/24']
            },
            "destination": {
                "member": ['any']
            },
            "application": {
                "member": ['ssl']
            },
            "service": {
                "member": ['application-default']
            },
            "action": 'allow',
            "log-start": "no",
            "log-end": "yes"
        }
    }
)

r = requests.post(api_url, params=location, verify=False, headers=headers, data=body)
print(r.text)
The Python script uses the requests library to send a POST request to the Palo Alto firewall's REST API. We set up headers and a body containing the details of what we want to configure. After sending the request, the script prints out the response from the API. It's a simple yet effective way to automate tasks on the firewall.
A Note on XML API
Before we wrap up, I want to touch on XML API. While I haven't used it extensively, it's worth mentioning that you can pretty much do everything with it. If Ansible doesn't offer a specific module for a task you need, XML API has got you covered. You can use the element module to insert XML configurations directly into the firewall. So, it's a very powerful tool, but since I don't have much hands-on experience with it, I've chosen to focus on other methods in this post.
To give you an example, if you want to retrieve the serial numbers of all the firewalls in a device-group, you can run this XML show command.
- name: Get the Serial Numbers from Device Group
    paloaltonetworks.panos.panos_op:
      provider: "{{ provider }}"
      cmd: "<show><devicegroups><name>{{ device_group_name }}</name></devicegroups></show>"
      cmd_is_xml: true
    register: cmd_output_xml
As you can see above, the possibilities are endless with XML-API.
Conclusion
To wrap things up, there's no one-size-fits-all solution when it comes to automation. The tool you choose should align with your specific needs and environment. If you're new to automation, starting with Ansible is a great choice because it's easy to learn. But once you're more comfortable and looking for greater flexibility, diving into REST API or the Python SDK can open up new possibilities. So, pick the tool that fits and start automating.


