As the title suggests, Palo Alto's clientless VPN allows users to access internal resources (HTTPS-based) without installing the GlobalProtect client. This is useful when you have an internal application that external contractors need to use, but they may not want to install a VPN client. All they need to do is open a browser, log in to your GlobalProtect portal, and access the applications directly. In this blog post, we'll go through the steps to configure Palo Alto Clientless VPN.
As always, if you find this post helpful, press the ‘clap’ button. It means a lot to me and helps me know you enjoy this type of content.
Overview
GlobalProtect Clientless VPN lets users securely access internal web applications from a browser without installing the GlobalProtect client. This is helpful for providing partners or contractors with access to specific internal applications. You can set up the GlobalProtect portal landing page to give users direct access to these applications.
Clientless VPN acts as a reverse proxy, intercepting and modifying web pages from internal applications before presenting them to remote users. When users access these URLs, their requests pass through the GlobalProtect portal.
Configuring Palo Alto Clientless VPN
At a high level, you need to have the correct certificates, configure the GlobalProtect portal, set up the security zone for Clientless VPN connections, create security policies, configure DNS Proxy, define the applications, and configure access permissions. If you already have GlobalProtect Client VPN, this setup will be straightforward and you will already have most of this configured.
- Certificates and SSL/TLS Profile
- Authentication Profile
- Security Zones
- Security Policies
- DNS Proxy
- GlobalProtect Portal
- Clientless Applications
Throughout this post, we'll use the FQDN vpn.packet.local, which external users will use to connect to the VPN. The assumption is that this FQDN is resolvable from the Internet and points to the firewall's external IP address. In this example, the external IP is assigned to the ethernet1/8 interface in the WAN zone.
Certificates and SSL/TLS Profile
Certificates play an important role in setting up the VPN. When a user connects to the VPN, the client must verify that the server is legitimate. This is done by checking the server’s certificate. The server presents its certificate, and the client verifies the issuing Certificate Authority (CA). If the client trusts the CA, it also trusts the server’s certificate (which, in this case, is issued by the firewall).
Since VPNs are used by both internal and external users, most enterprises use a public CA to issue certificates. This avoids the need to manually import an internal PKI certificate on every client.
For this example, since I’m running this in a lab, I won’t be spending money on a public CA. Instead, I’ll generate a certificate on the firewall, import this CA to the client, and manually configure it to trust the certificate. Then, we’ll generate a server certificate using the CA we just created.
- To import a certificate generated externally (usually via a public CA), navigate to Device>Certificate Management>Certificates and click 'import' at the bottom.
- To generate a certificate on the firewall, navigate to Device>Certificate Management>Certificates and click 'generate' at the bottom.
Since the server certificate needs to be generated on the firewall for this example, first we need to generate a root certificate with a common name of any unique value (other than IP or FQDN of portal/gateway). Then, generate a server certificate signed by the root certificate we just created.
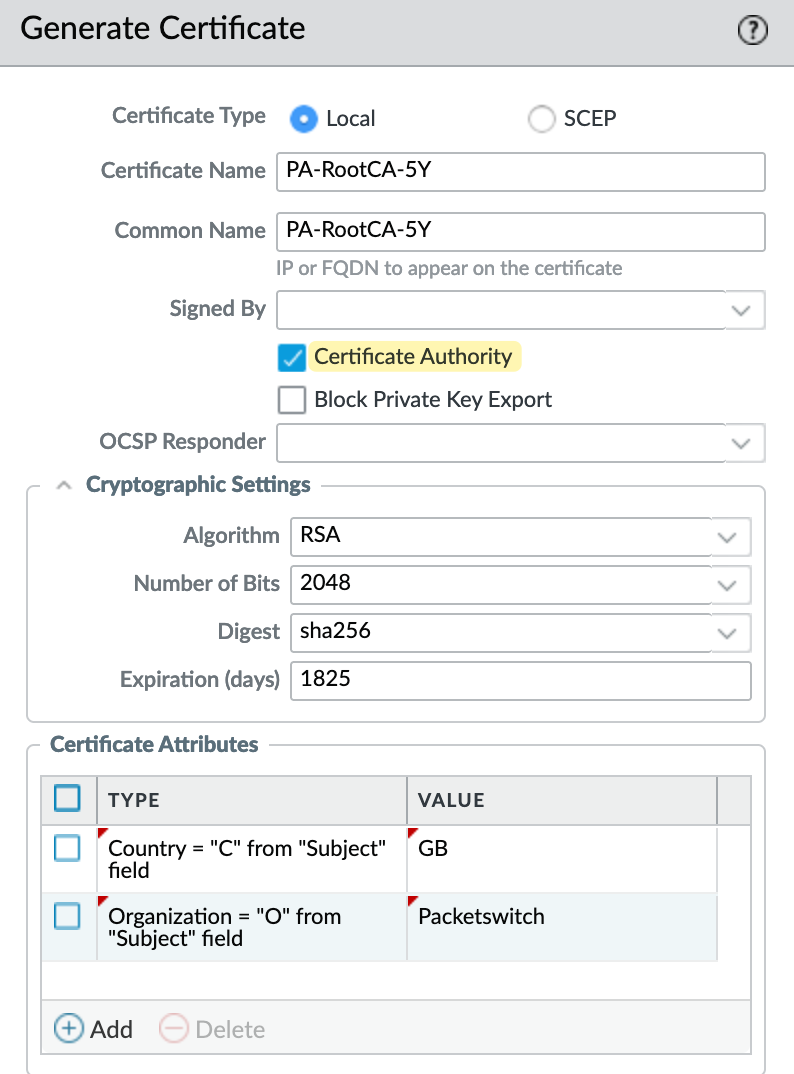
The server certificate's common name must match the portal/gateway's IP or FQDN if the subject alternative name (SAN) does not exist in this certificate. SAN can be created under the optional 'certificate attributes' of type 'hostname' or 'IP'. If SAN exists with at least one entry, then the IP or FQDN being used for portal/gateway must be present in that SAN list.
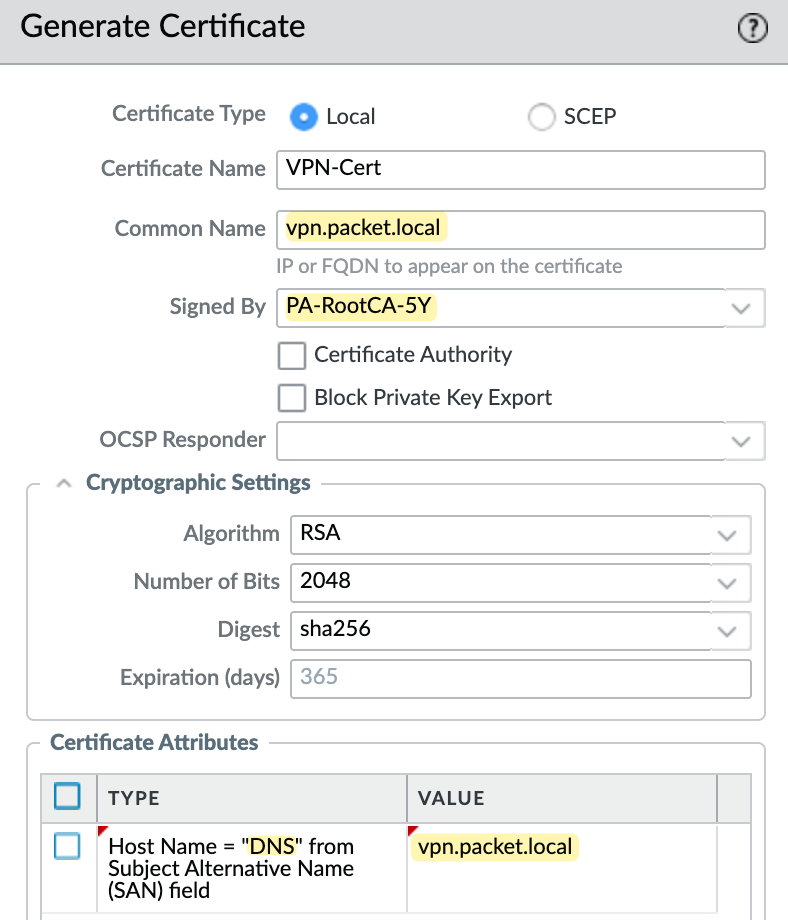
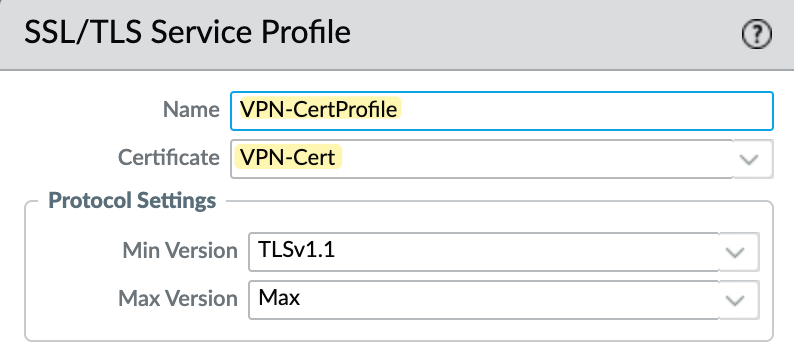
The final step is to create an SSL/TLS Service Profile by navigating to Device > Certificate Management > SSL/TLS Service Profile. Make sure to choose the server certificate we created in the previous step as the Certificate.
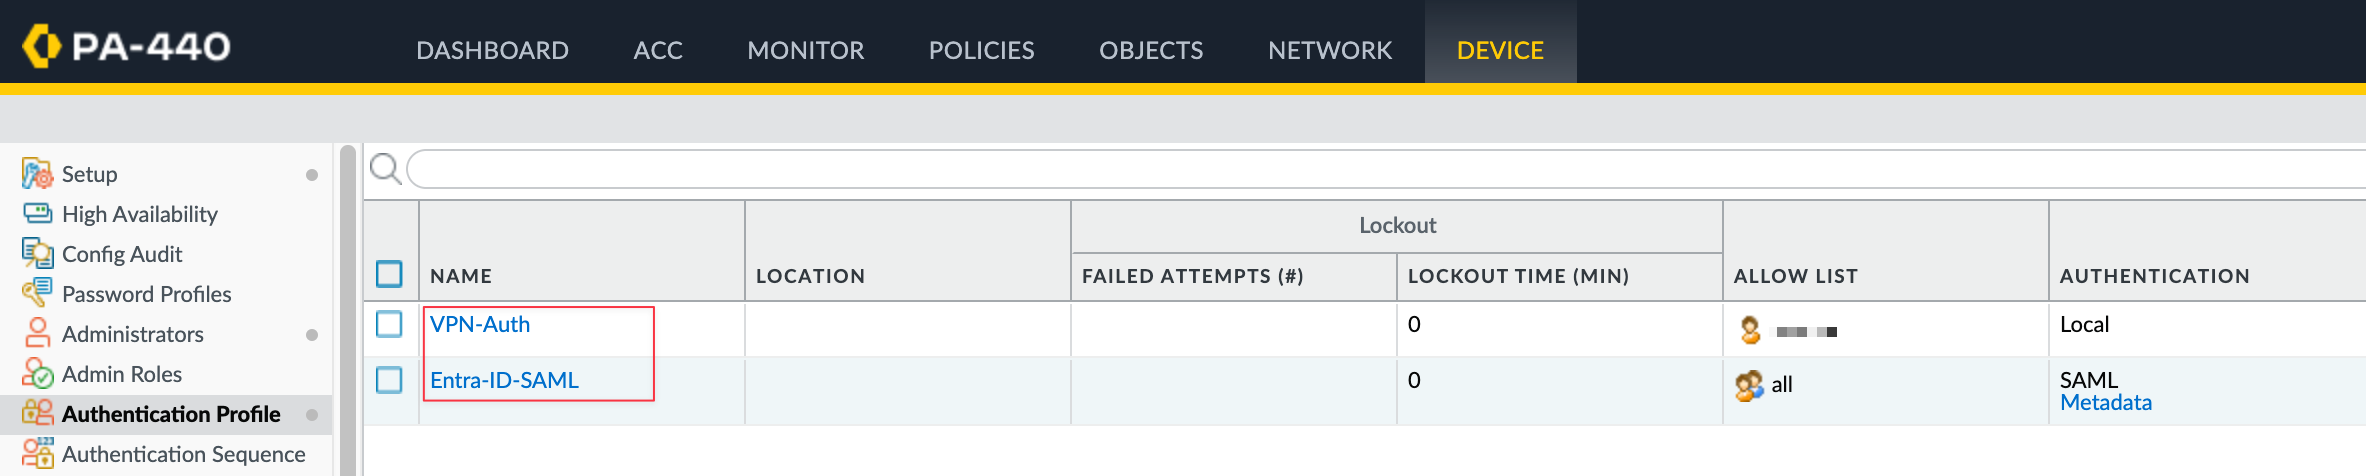
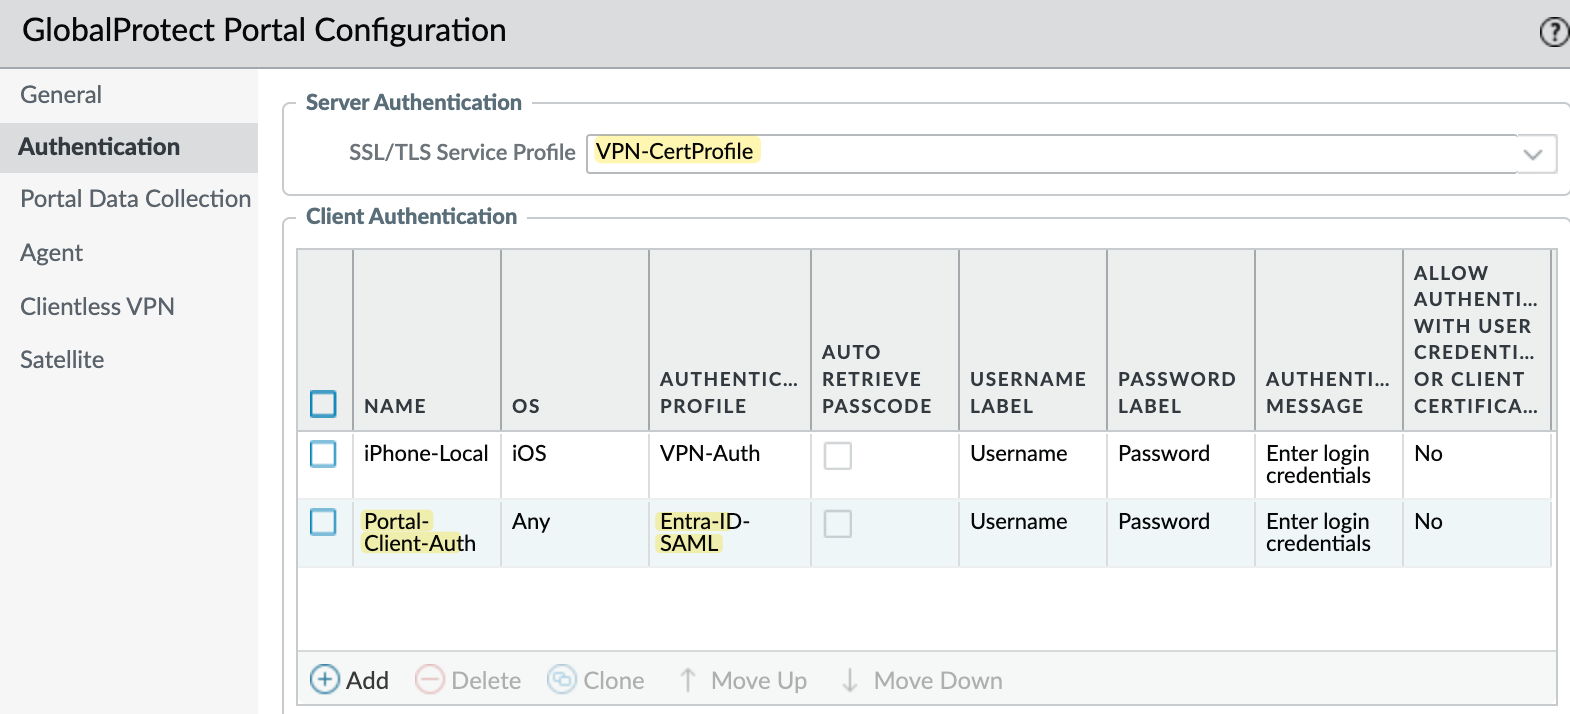
Authentication Profile
An authentication profile defines the authentication service that validates the login credentials of end users. The service can be Local Authentication that the firewall provides or External Authentication Services such as Active Directory or Entra ID. I already covered Entra-ID and SAML in detail so, feel free to check it out below.
Here, I have two authentication profiles, one for the local database and another one for Entra-ID. We will need them later when we configure the Portal.
Security Zones and Policies
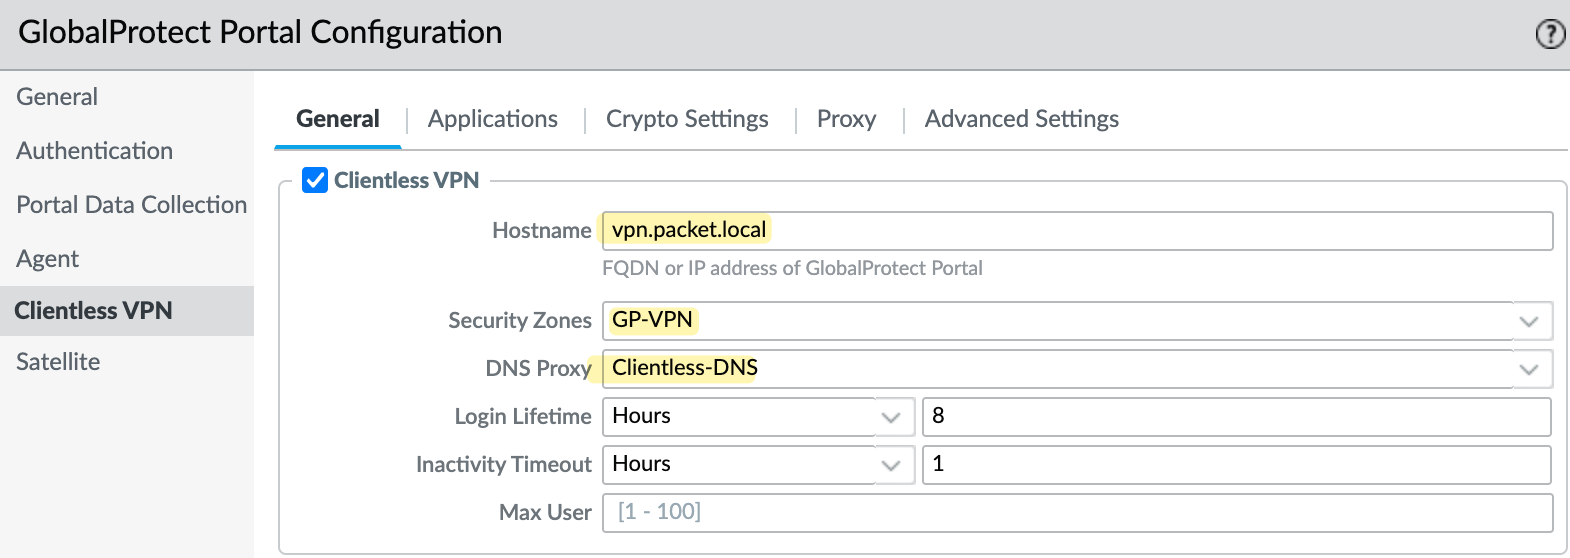
When a user connects using a Clientless VPN, they access internal resources through a browser. We need to associate this traffic with a security zone. Here, I’ve created a new zone called GP-VPN, which we’ll also use later when configuring the portal. You can also use the same zone the GlobalProtect client VPN uses if you wish.
Unlike Client VPN, where each client gets an IP from a pool, Clientless VPN doesn’t assign private IPs. The firewall only sees the public IP of the client. This means that when creating a security policy to allow traffic, we can’t specify a source IP and must set it to any. Your security policy would look like this
- Source Zone -
GP-VPN - Source IP -
Any - Destination Zone - Internal zones where access is needed
- Destination IP - Specific IPs you want to allow

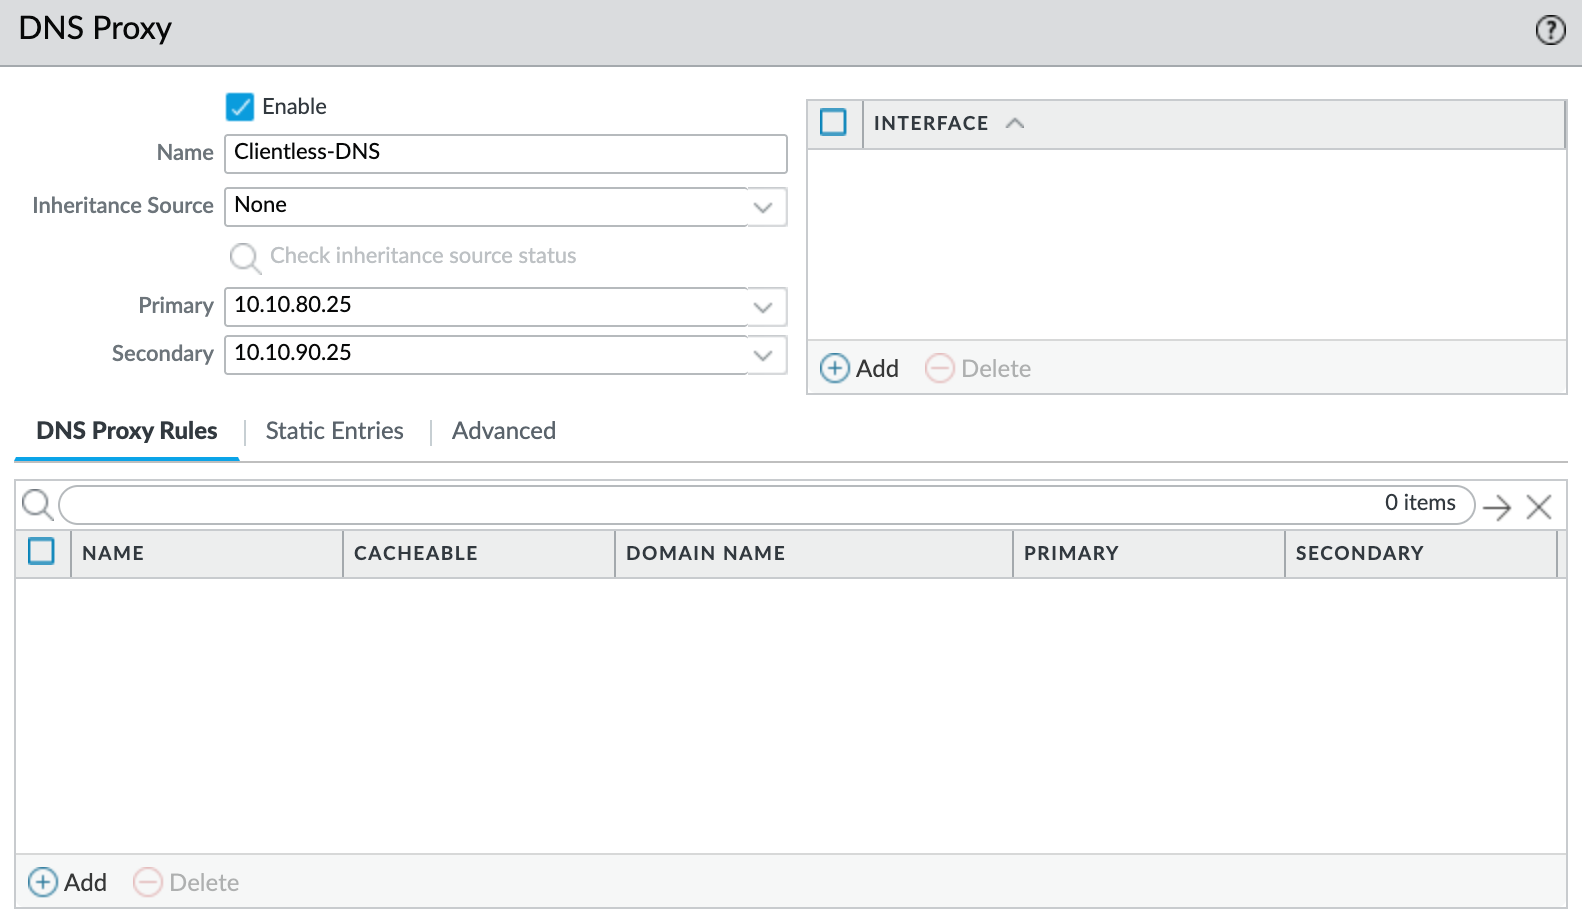
DNS Proxy
We need to create a DNS Proxy, which the VPN will use to resolve application names. In this example, I’ve created a DNS Proxy and configured it to point to my internal DNS servers. Again, we will need this later when we configure the Portal.
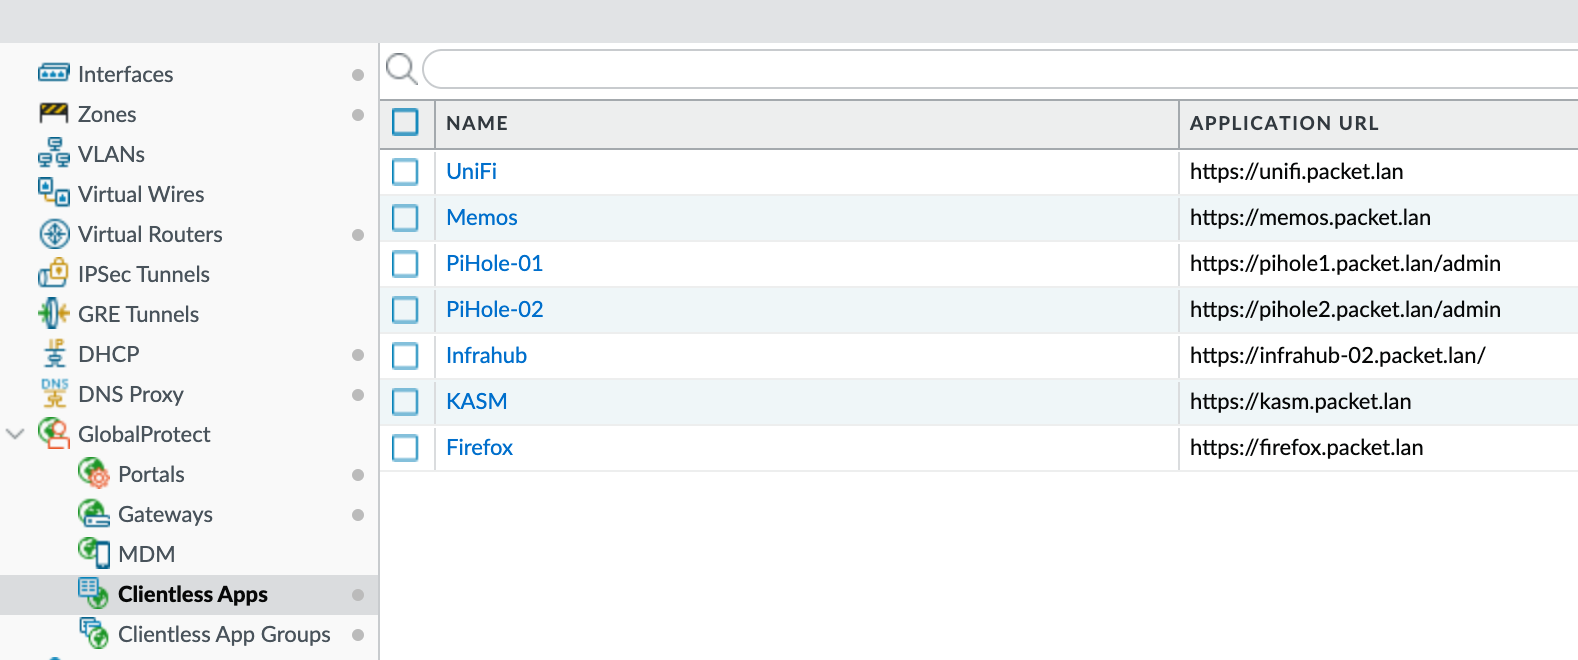
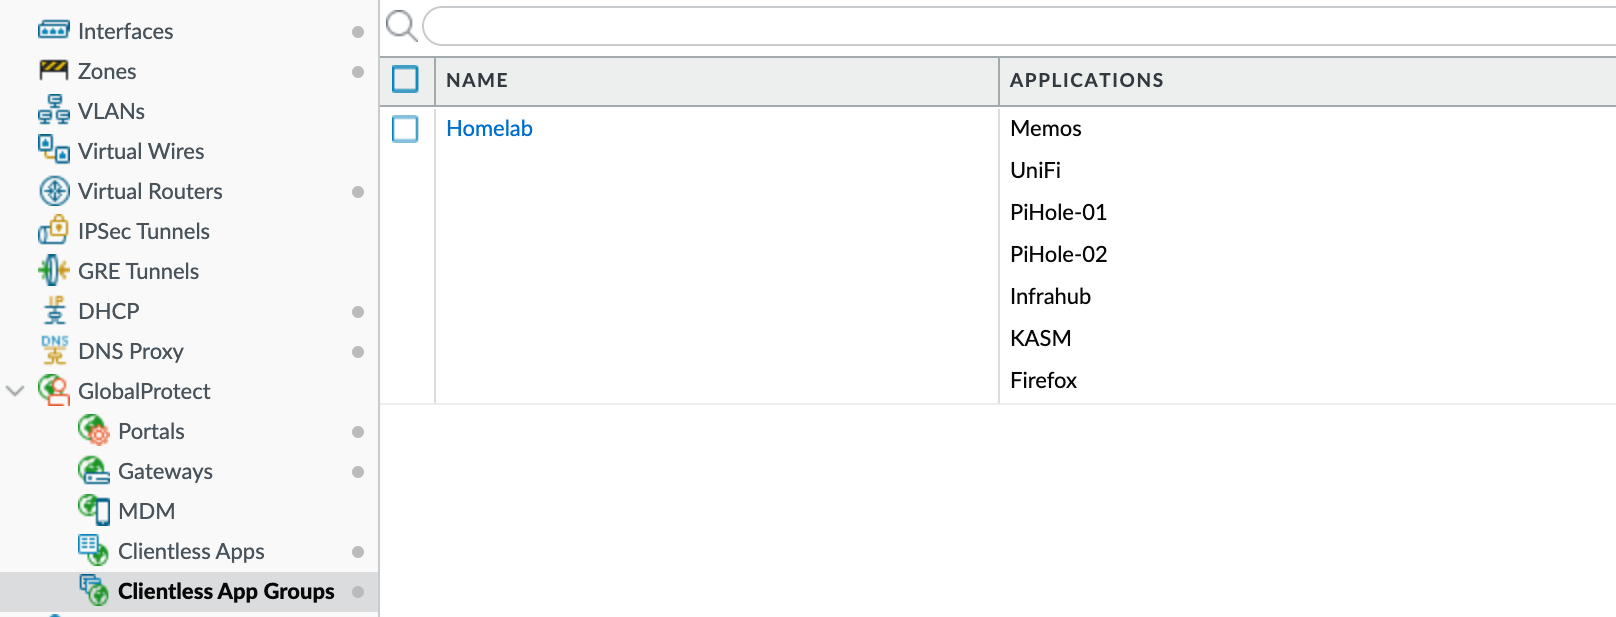
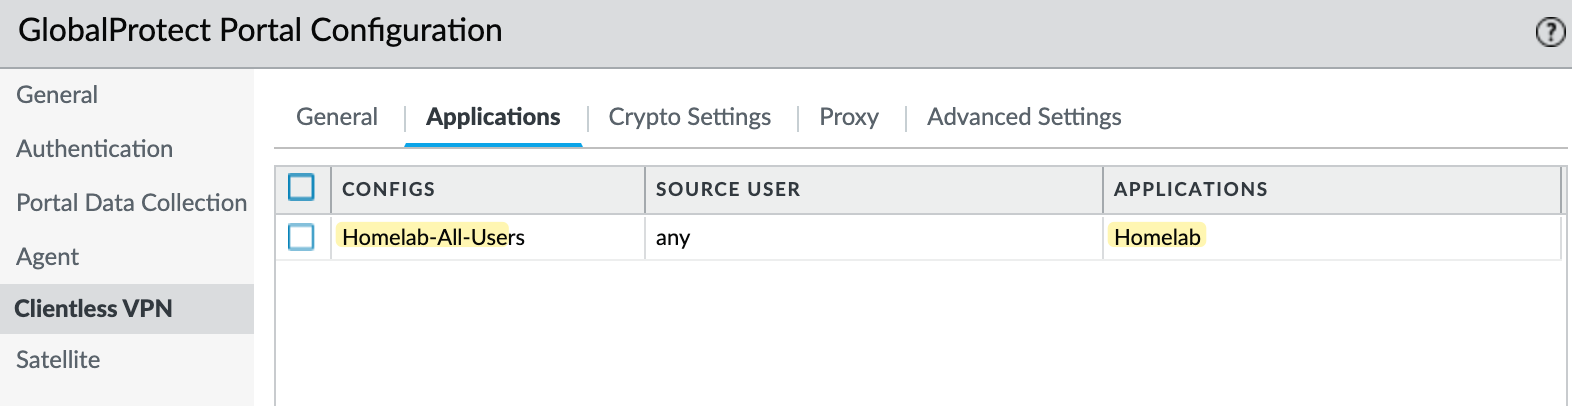
Clientless Apps and Groups
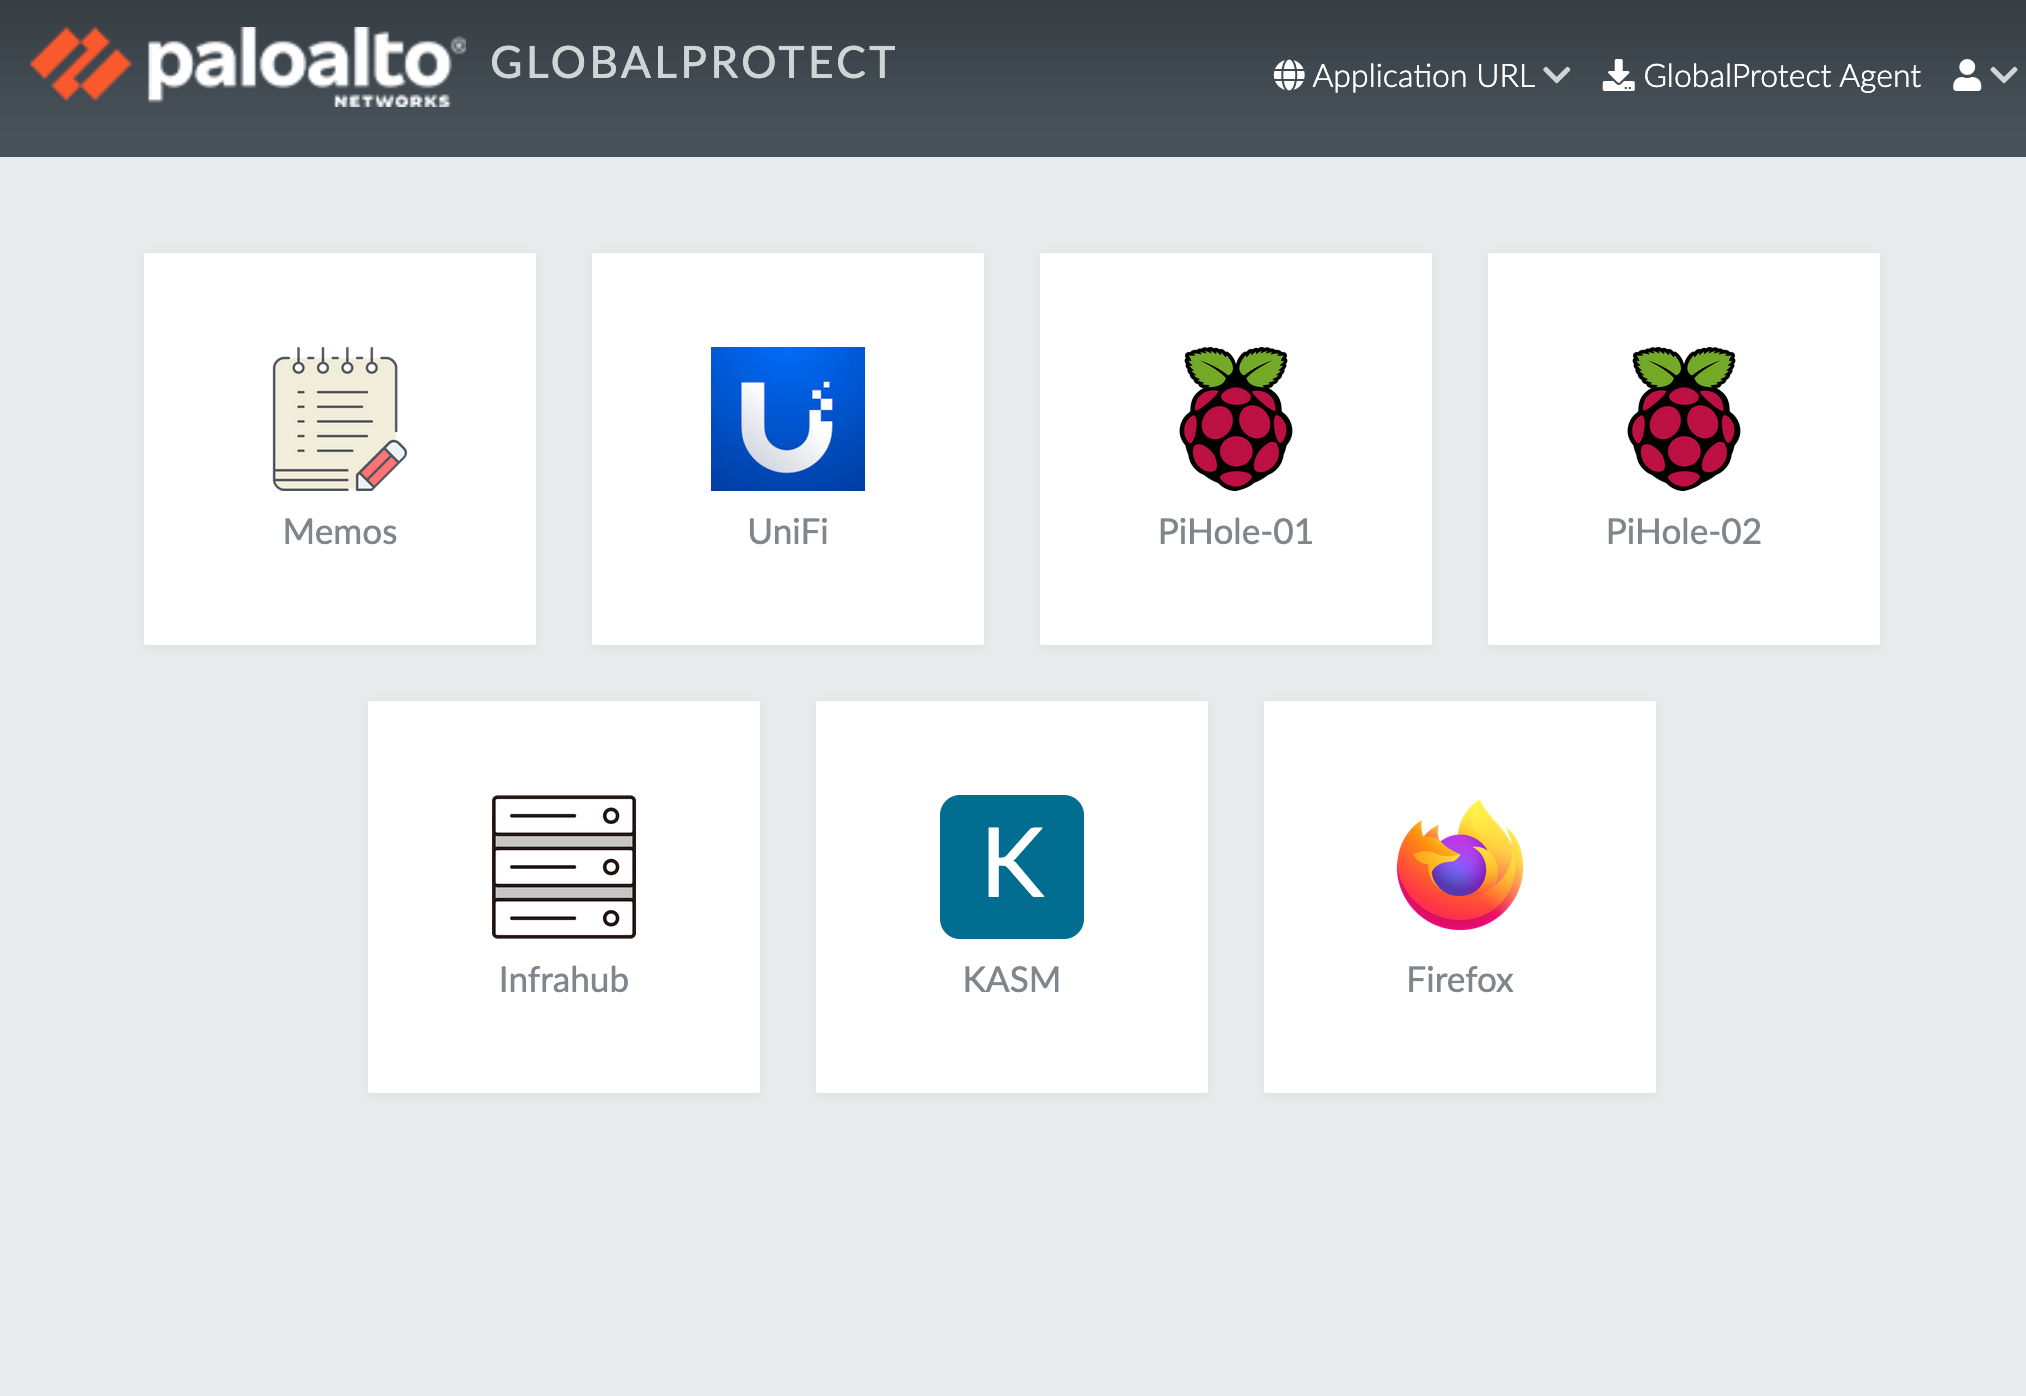
Before configuring the portal, we need to define our applications and organize them into groups. This is useful when managing multiple applications, allowing you to group them by categories like HR, Sales, etc. For this example, I'll add some apps from my homelab and create a group for them.
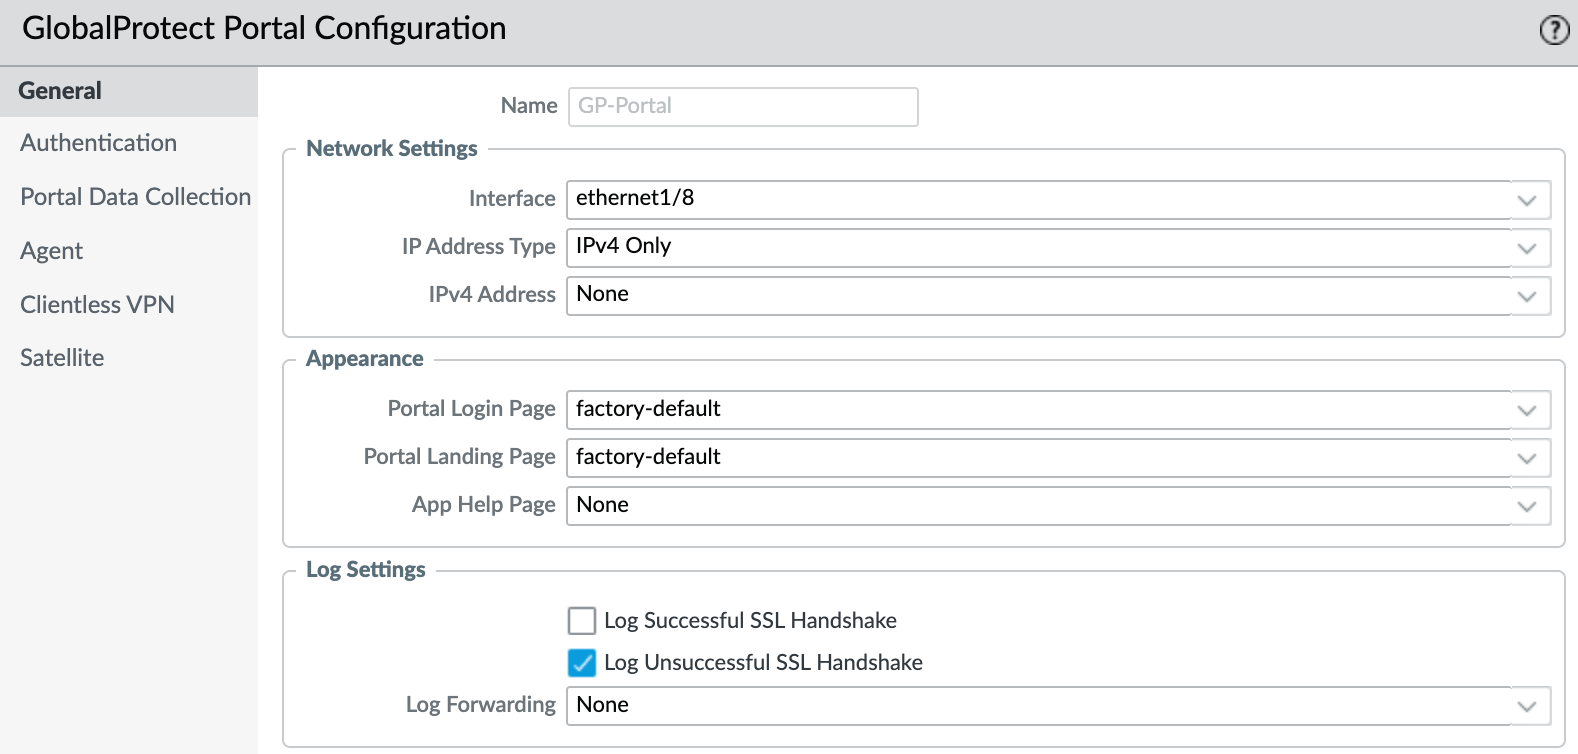
Portal Configuration
Now, we can start configuring the portal. Here, we bring everything together certificates, security zones, policies, DNS proxy, and clientless apps. The following screenshots show how to set it up.
Testing and Verification
Now it's time to test. If I'm outside my home network, anywhere in the world, I should be able to browse to vpn.packet.local, log in, and access the applications.
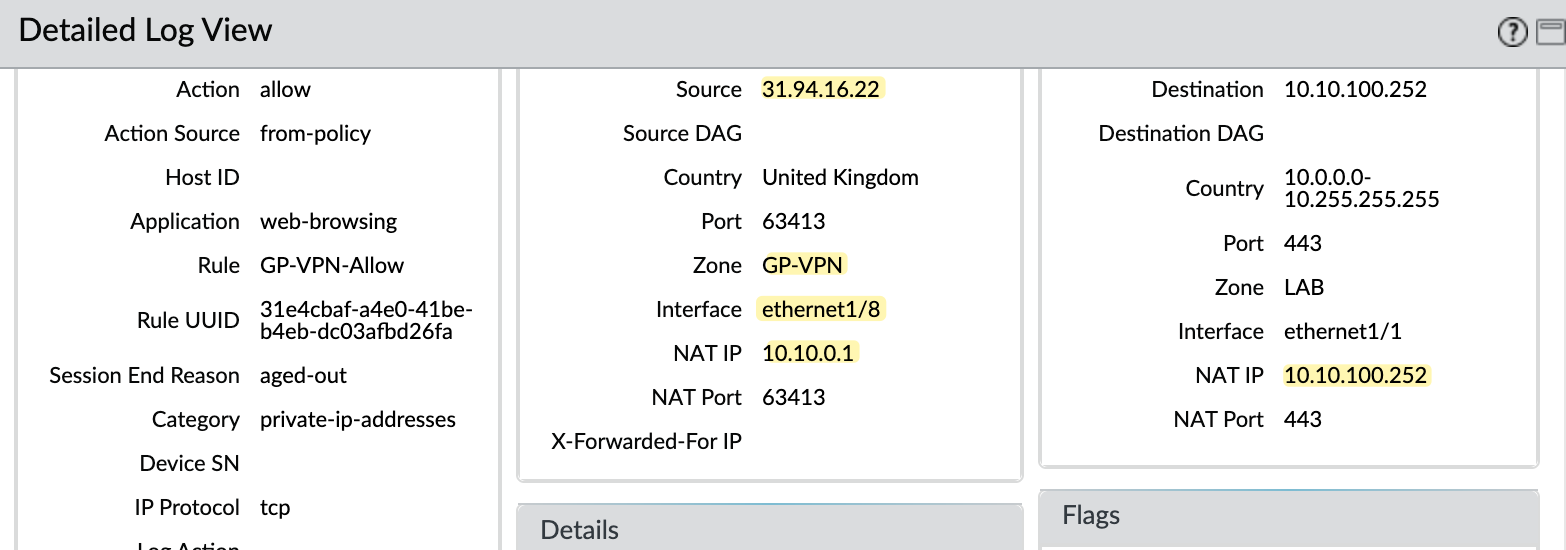
If you look at the traffic logs, you’ll see that the source zone is GP-VPN and the source IP is public. This is why we need to allow ANY IP in the security rule, each user will have a different IP.
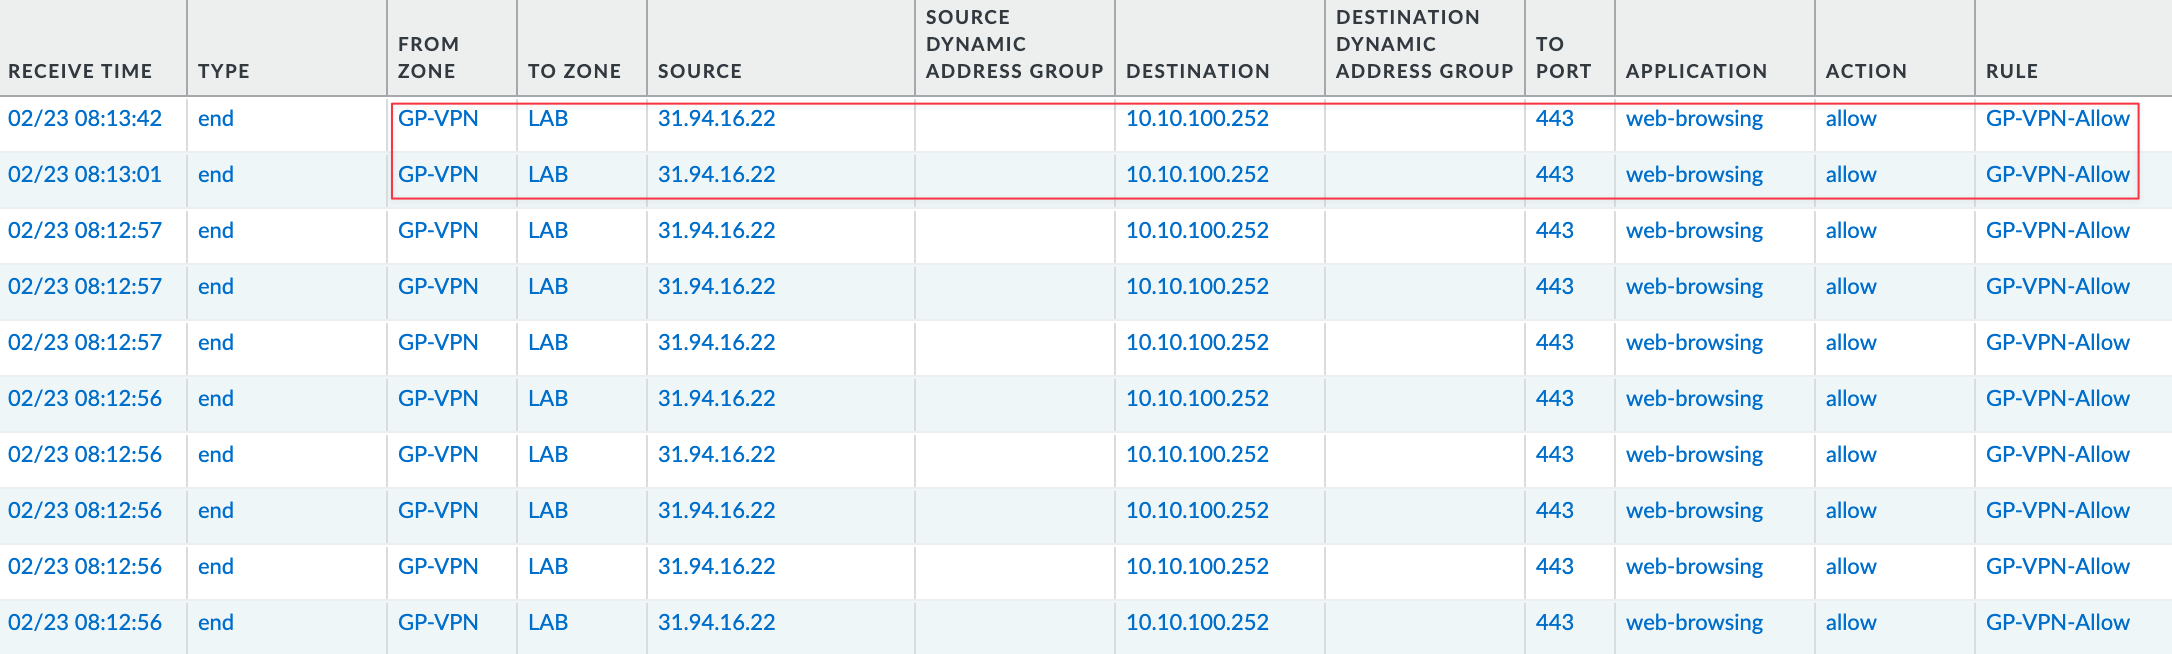
Looking closely at the logs, the firewall receives traffic on ethernet1/8, which is the Internet-facing interface, but the zone associated with this traffic is GP-VPN. The firewall also performs NAT automatically, translating the source IP to its own interface IP (10.10.0.1) before forwarding the traffic to the actual server. This happens without manually configuring a NAT policy.
Some Issues and Considerations
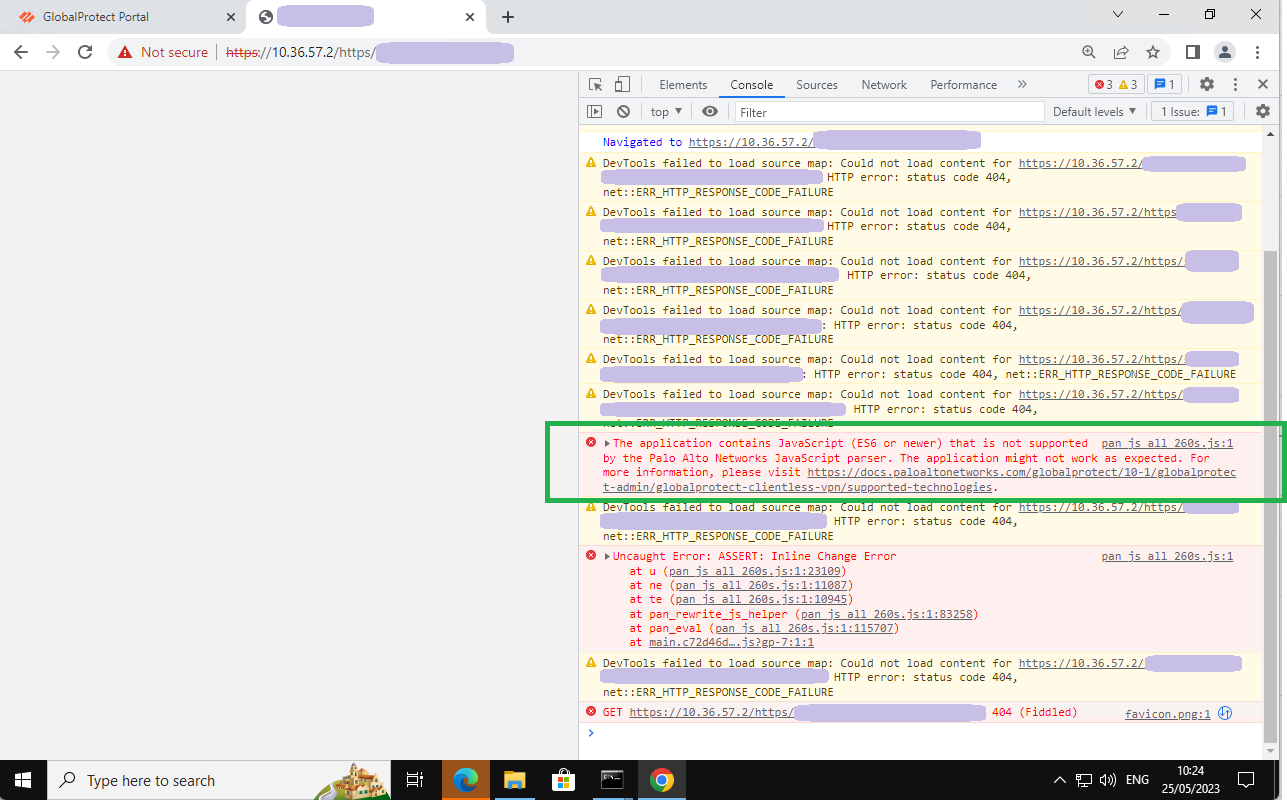
As mentioned at the beginning of the post, not every web app will work. For example, I have an application called KASM Workspaces that works fine internally, but when I added it to the portal, it just wouldn’t load, only a black screen would load. After some troubleshooting (and thanks to a Reddit user), I found out that websites using JavaScript ES6 may not function properly.
Has anyone experienced specific apps not working on Clientless VPN?
by u/vsurresh in paloaltonetworks
If an app doesn’t work for you, you can use the browser's Inspect mode to check for errors, as shown below.