Hi all, if you are here, I assume you're looking to learn about Palo Alto Firewalls, and you've come to the right place. In this blog post, we will cover the very basics of Palo Alto firewalls and how to get started.
Prerequisites
This blog post assumes you have a basic understanding of networking concepts such as routing, Layer 3 interfaces, traffic flow, subnets, and the necessity of a firewall. If you’ve previously used firewalls from different vendors, that’s even better, and you should find it easier to understand the concepts. When I first started with Palo Alto firewalls, I was already working as a network engineer and had experience with Cisco ASA firewalls. However, it still took some time for me to fully understand the nuances. Therefore, my focus here is to explain the nuances of Palo Alto firewalls using simple examples.
What We Will Cover?
In this post, we’ll touch on several key topics related to Palo Alto firewalls, providing an overview without diving too deep into any single area. I’ve written numerous posts on Palo Alto firewalls, and I will include links to those for more in-depth exploration. Here’s what we’ll cover.
- Firewall Basics and Why We Need One?
- Palo Alto Firewall Basics
- Concepts of Security Zones
- Configuration Examples
- App-ID
- Commit - Understanding Candidate vs Running Config
- Viewing Traffic Logs
- Setting Up Your Lab
 Suresh Vina
Firewall Basics and Why We Need One?
If you have experience working with firewalls, you can skip this section. This is primarily for those who have been working as network engineers but don’t have much experience with firewalls.
Unlike routers, whose primary purpose is to forward packets between different subnets, firewalls do much more. While routers can filter traffic using ACLs, they are not designed to be primary packet-filtering devices.
For proper traffic inspection, you need a firewall. Consider a company, “Bakery & Co,” with a head office and several hundred employees. This office likely has different departments, and users from these departments need access to various resources. We don’t want salespeople reading confidential documents from HR, right? A firewall can allow or deny traffic between devices across different subnets. It can also block users from accessing malicious sites or social media networks, depending on your security policies. Additionally, if you have users working remotely, a firewall can secure their access to internal resources over a VPN. A firewall can handle all this and much more.
So, any traffic that crosses a firewall will be inspected against any configured rules. For example, if a user from the office VLAN tries to access Facebook, the traffic will traverse the firewall. You can have a policy that says, "Okay, allow this traffic." If the same user tries to access a server on port 22 (SSH), you could have a policy that says, "Oh, block all SSH traffic." This is just a simple introduction to what firewalls can do.
Palo Alto Firewall Basics
Just like any other Next-Generation Firewall (NGFW), Palo Alto firewalls have interfaces and allow you to configure routes such as static, OSPF, and BGP. They also let you create security policies, NAT policies, and address objects, among many other features. At a minimum, you should know how to configure interfaces, NAT, and security policies.
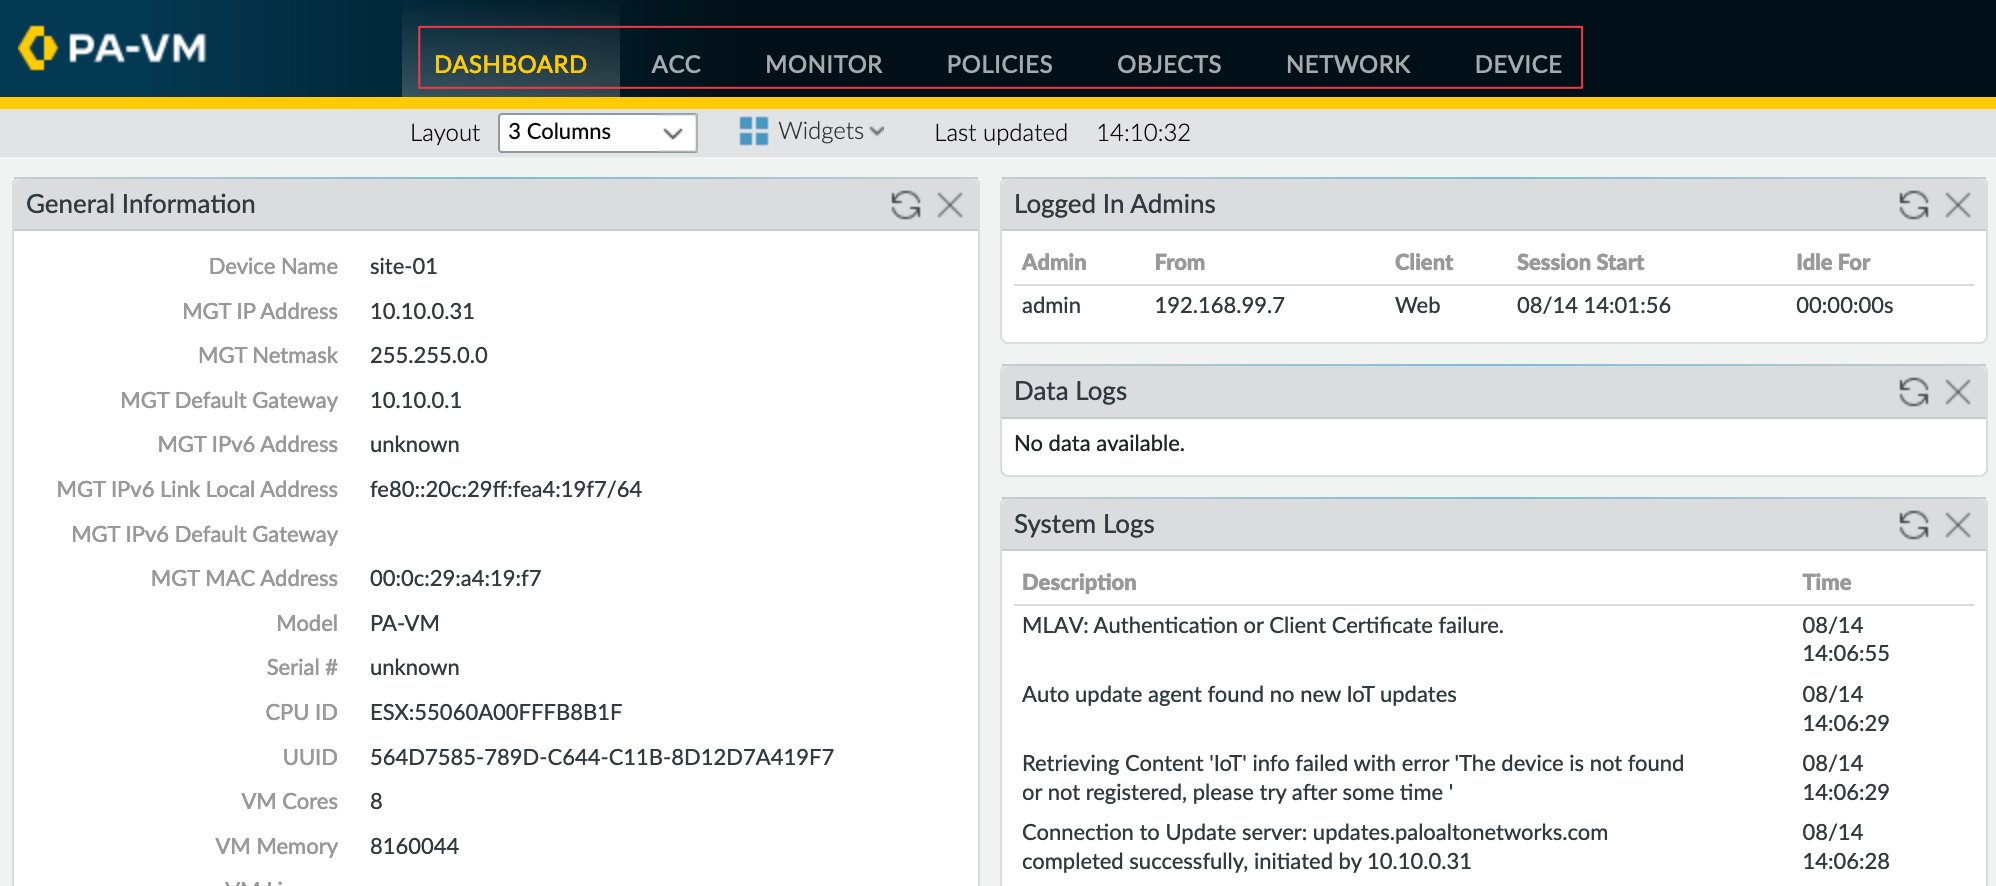
Getting Familiar with Palo Alto Firewall GUI
When using a Palo Alto firewall, you’ll mostly interact with the GUI, which is what I’ve primarily used, keeping the CLI for troubleshooting or running specific show commands. Once logged in to the GUI, you’ll notice seven main tabs at the top, but you’ll find yourself using mostly the last five for everyday tasks.
- Monitor - This tab is used to view traffic logs or system logs, take packet captures, and review configuration audits.
- Policies - Here you configure firewall rules, NAT rules, decryption rules, and policy-based forwarding.
- Objects - This section allows you to configure various items such as address objects, address groups, service objects, URL categories, and security profiles. Typically, you create objects here and reference them in your policies.
- Network - As the name suggests, this tab is for configuring interfaces, creating zones, configuring static or dynamic routing, and managing VPNs.
- Device - This tab is for device-specific configurations like HA settings, administrators, server profiles for services like RADIUS or TACACS, and software updates.
Interfaces, Zones and Policies
Taking our example of “Bakery & Co,” with its head office and several hundred employees, let’s say we’ve purchased a Palo Alto firewall and want to configure the basic features.
- At a minimum, we need two interfaces, one for the users and another for the Internet/ISP. Like configuring any network device, you would navigate to Interfaces, select the interface, and start configuring the IP address on it.
- However, here’s an important distinction, Palo Alto firewalls use a concept called ‘Security Zones.’ This allows you to add one or more interfaces to a ‘zone’ and then reference this zone in policies rather than the actual interfaces themselves.
- For example, if you have separate interfaces for Windows users and Mac users, perhaps because you don’t want Windows and Mac users to communicate, but you want to apply the same security policies for Internet access, you would add both interfaces to the same security zone. Then, use this zone in all your security policies. The same applies to NAT policies, where you can reference a ‘zone’ for the source traffic.
This is a clear difference from firewalls like Cisco ASA or FortiGate, where you would typically apply ACLs directly to an interface or reference the interface in security policies.
Suresh Vina
Example Configurations
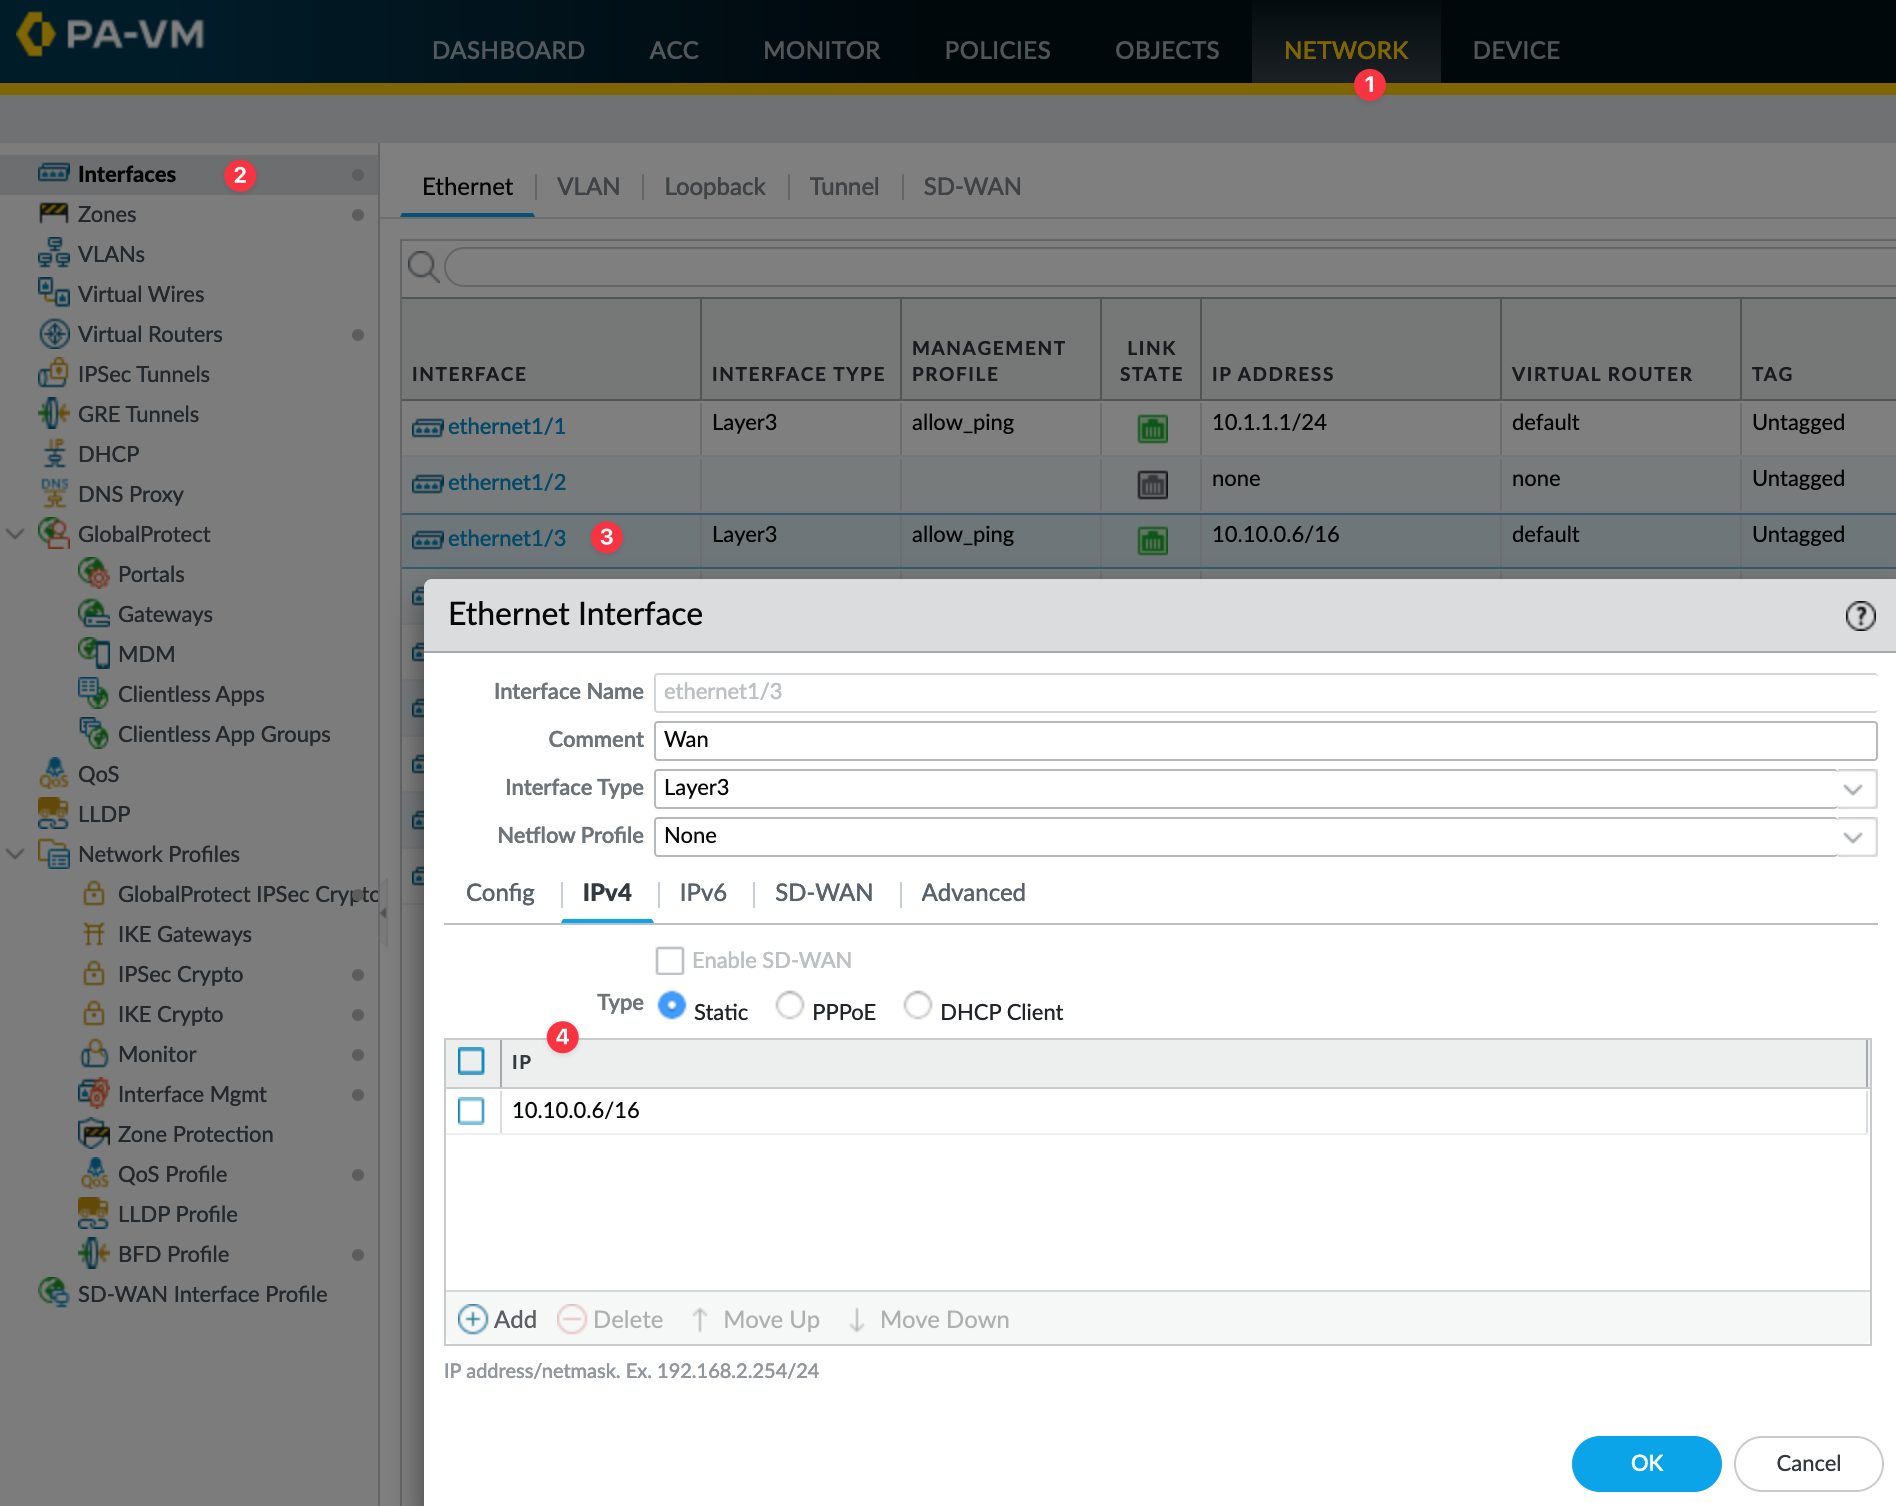
Let's look at a simple example based on our scenario where we are going to configure two interfaces, one for Internal Users and another for the WAN side. For the user subnet, I'm going to use the subnet 10.1.1.1/24, and for the WAN side, I'm going to use 10.10.0.6/16, just pretend this is a public IP for a moment 🥲
We will also create a default static route, two zones called 'Users' and 'WAN'. Finally, a NAT policy and a Security Policy to allow access to the Internet.
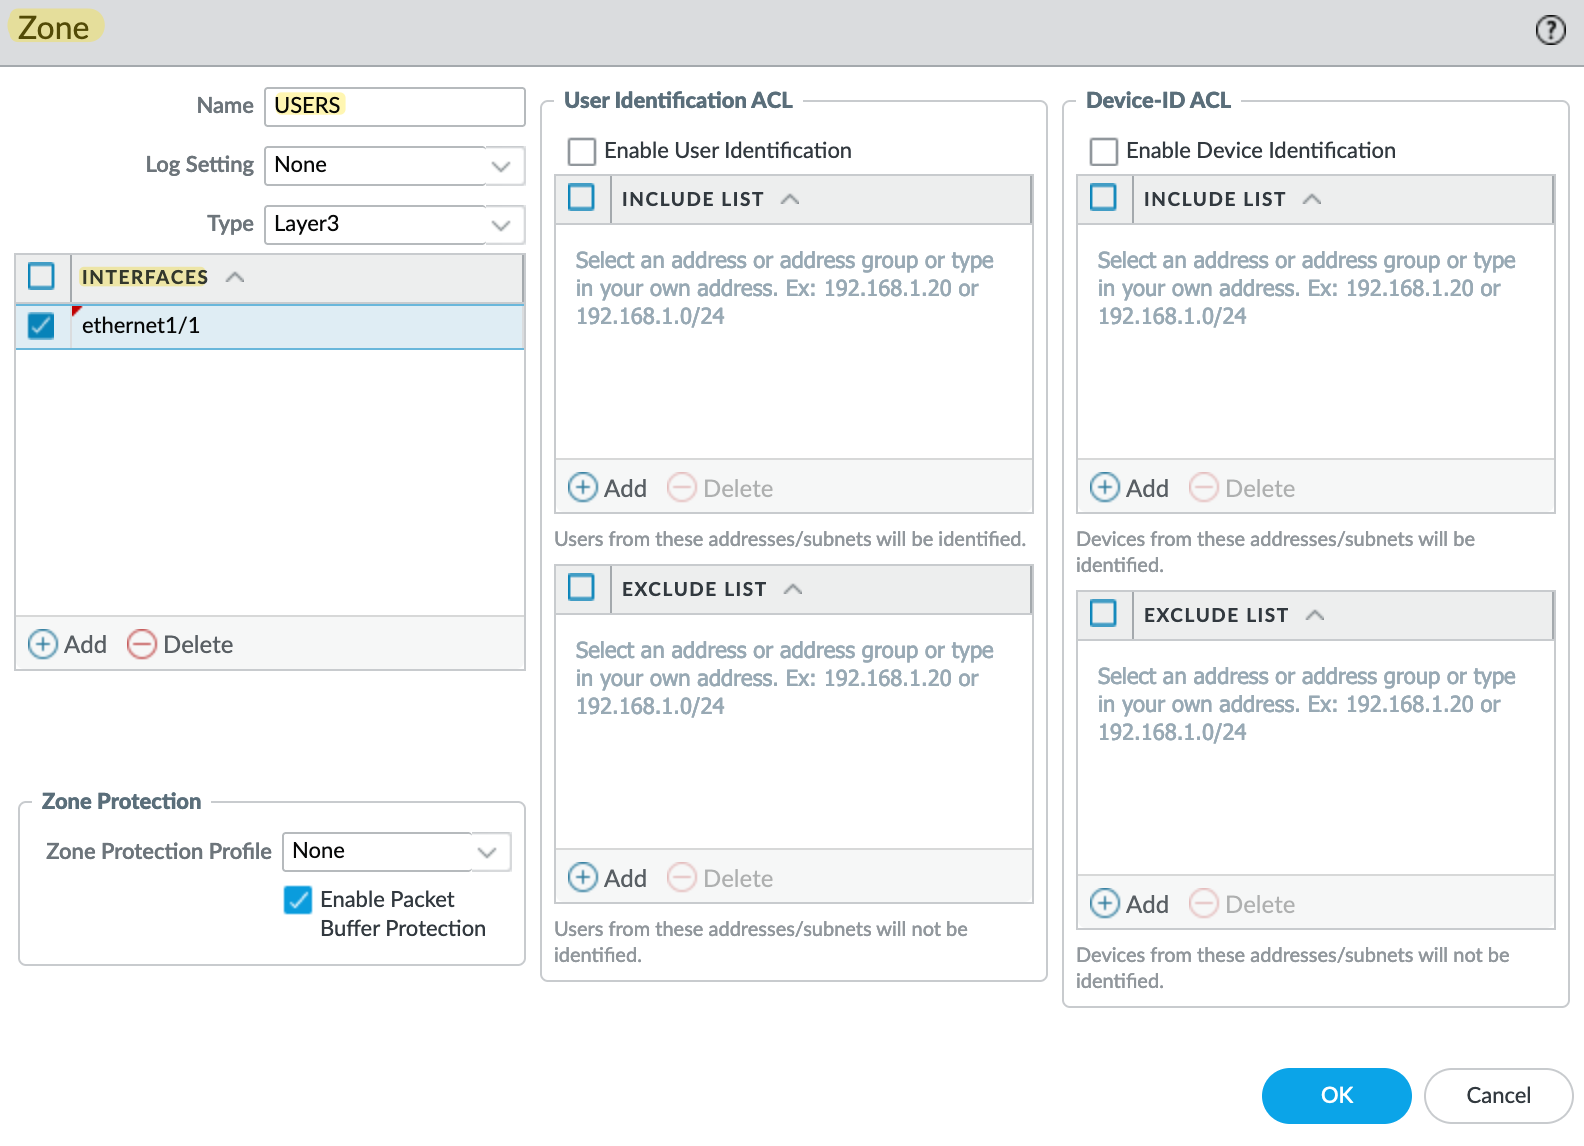
User Interface and Zone
To configure an interface, navigate to Network > Interfaces > select the interface. Here you can assign the IP, add an interface to a zone or any interface-related configuration.
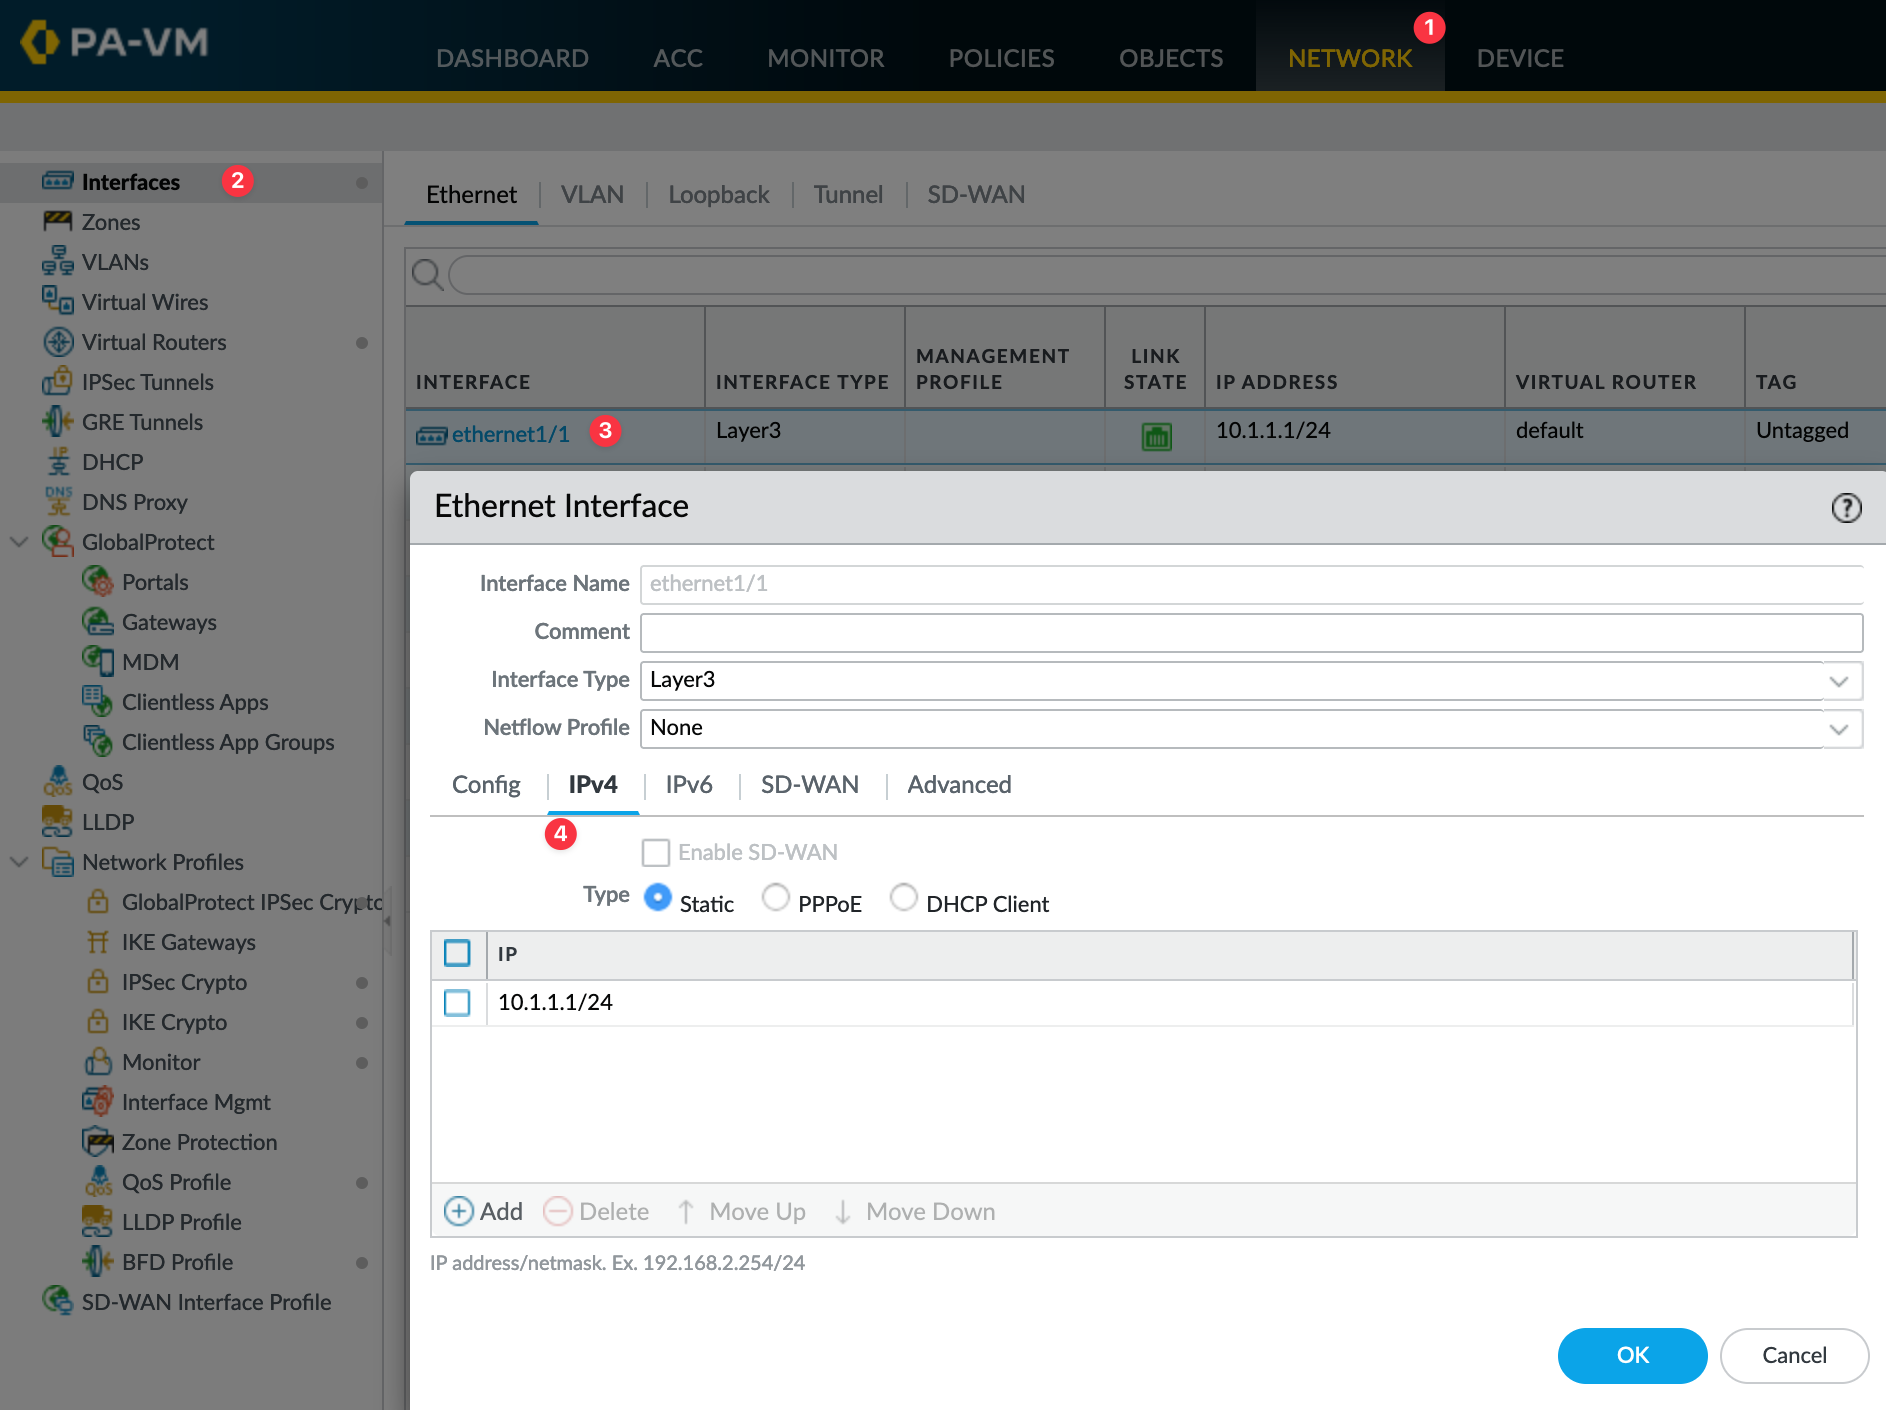
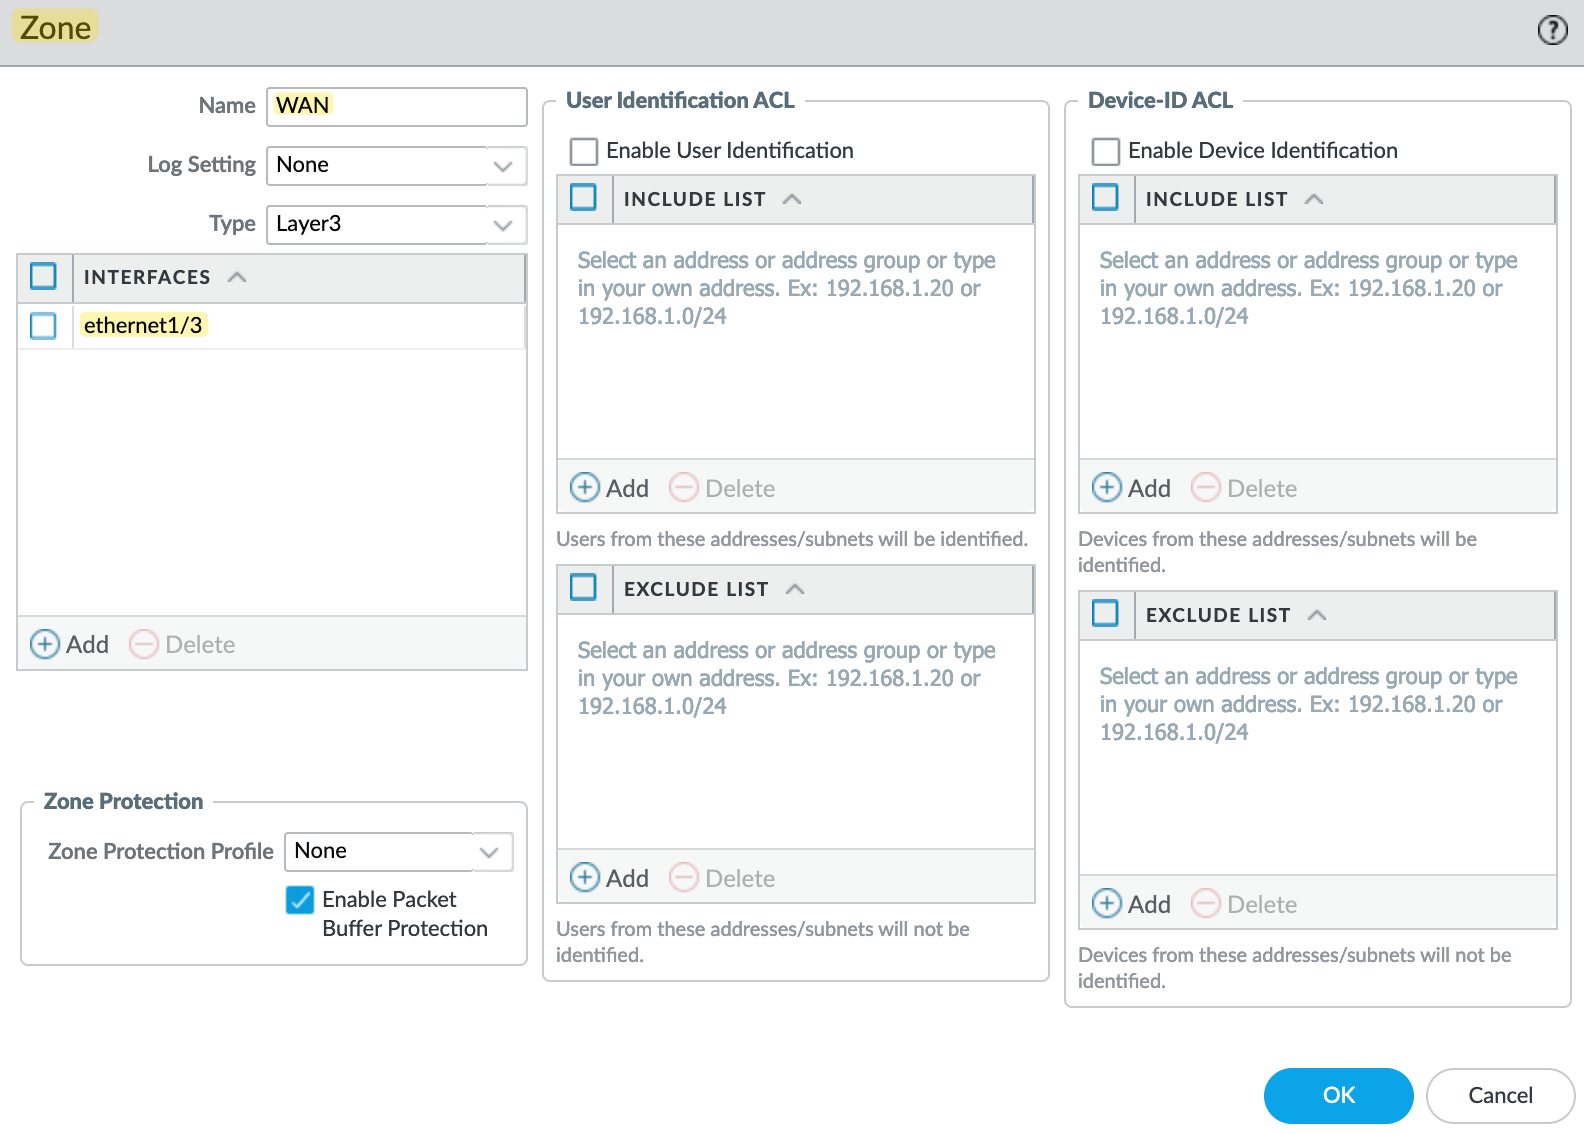
To Configure a zone, navigate to Network > Zones and add a new zone. Here you need to select the 'Type' as 'Layer3' and add the interface we created earlier for the 'users'
WAN Interface and Zone
Static Route
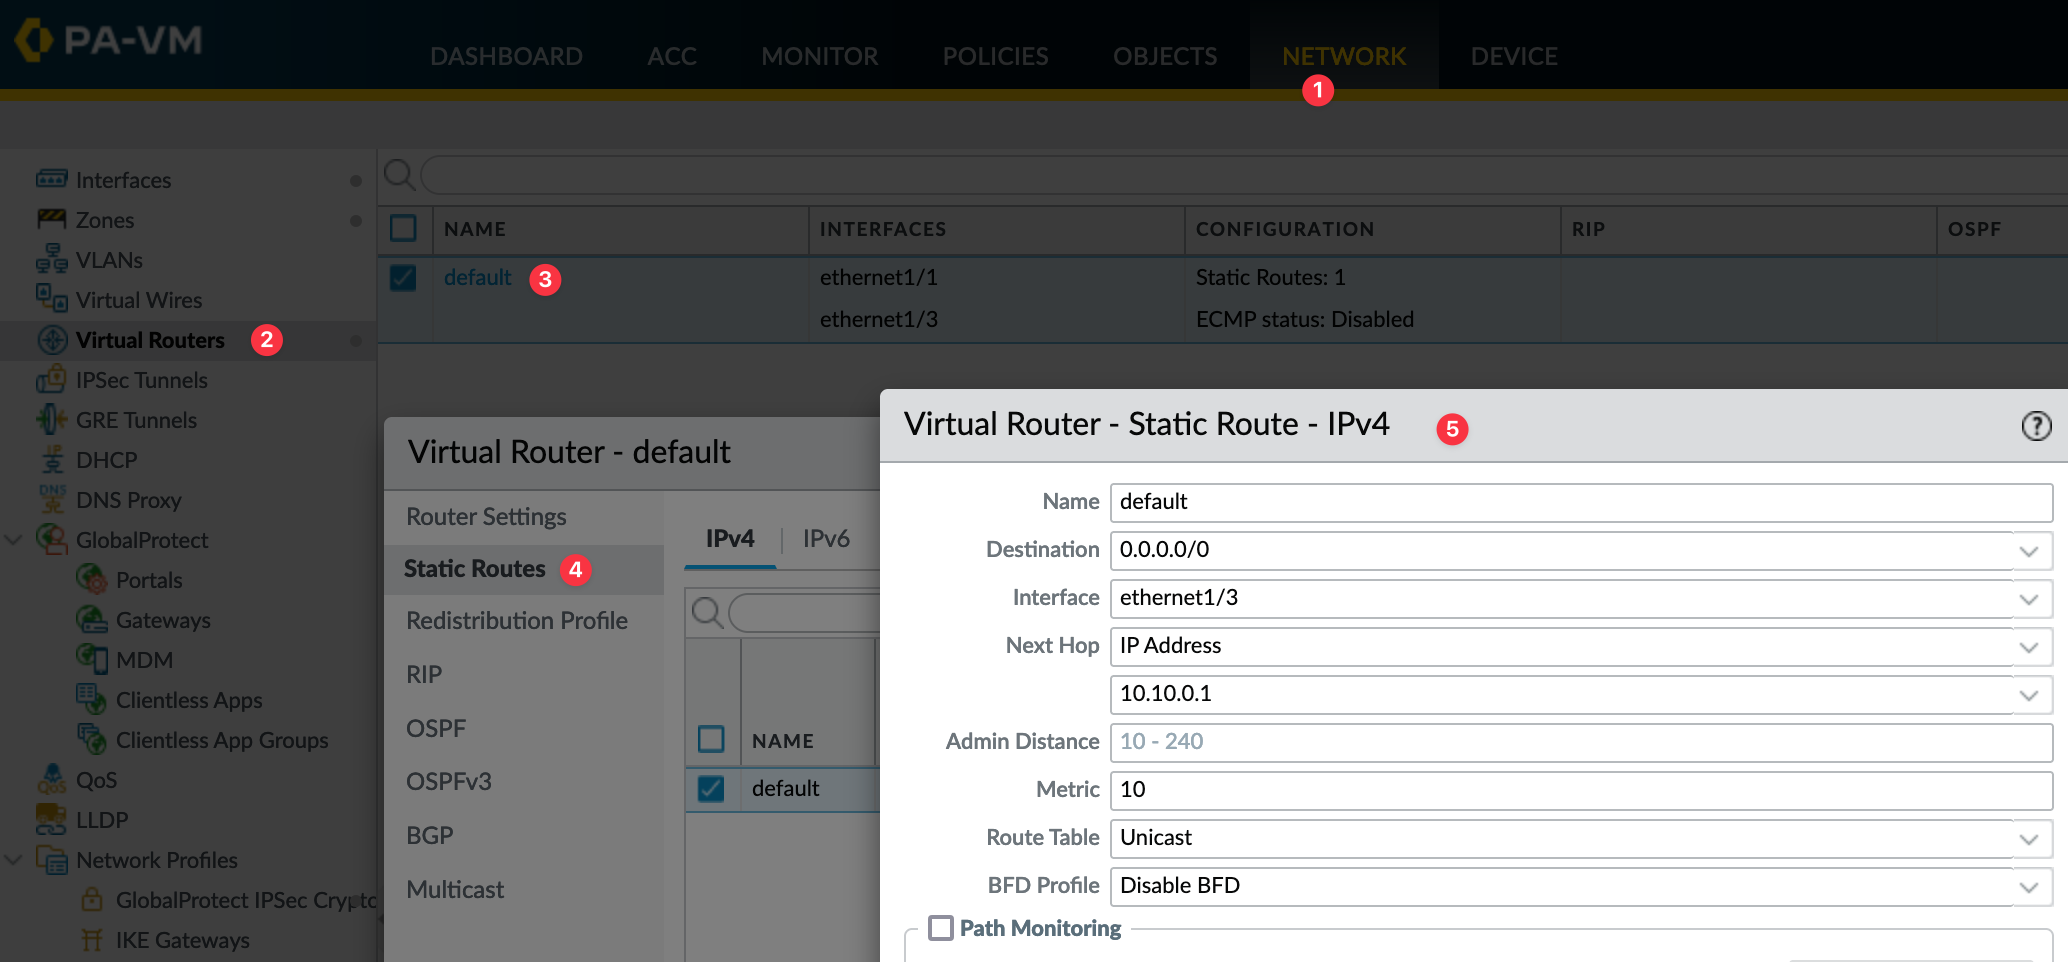
To configure a static route, navigate to Network > Virtual Routers > 'default' > Static Route and create one with the next-hop as shown below.
NAT Policy
In the NAT policy, I'm simply saying,
- If the traffic comes from the 'Users' Zone
- Going to the 'WAN' Zone
- Change the 'Source IP' of the packet to the IP address of the 'ethernet1/3' interface (10.10.0.6)

If you need, you can fine-tune the policy by adding specific source subnets but for the sake of simplicity, I went with 'any'
Security Policy
Let’s look at configuring security policies. Similar to our NAT configuration, we need to specify the source/destination zones, and source/destination IPs. However, the significant difference comes with specifying port numbers, where the concept of ‘App-ID’ comes into play.
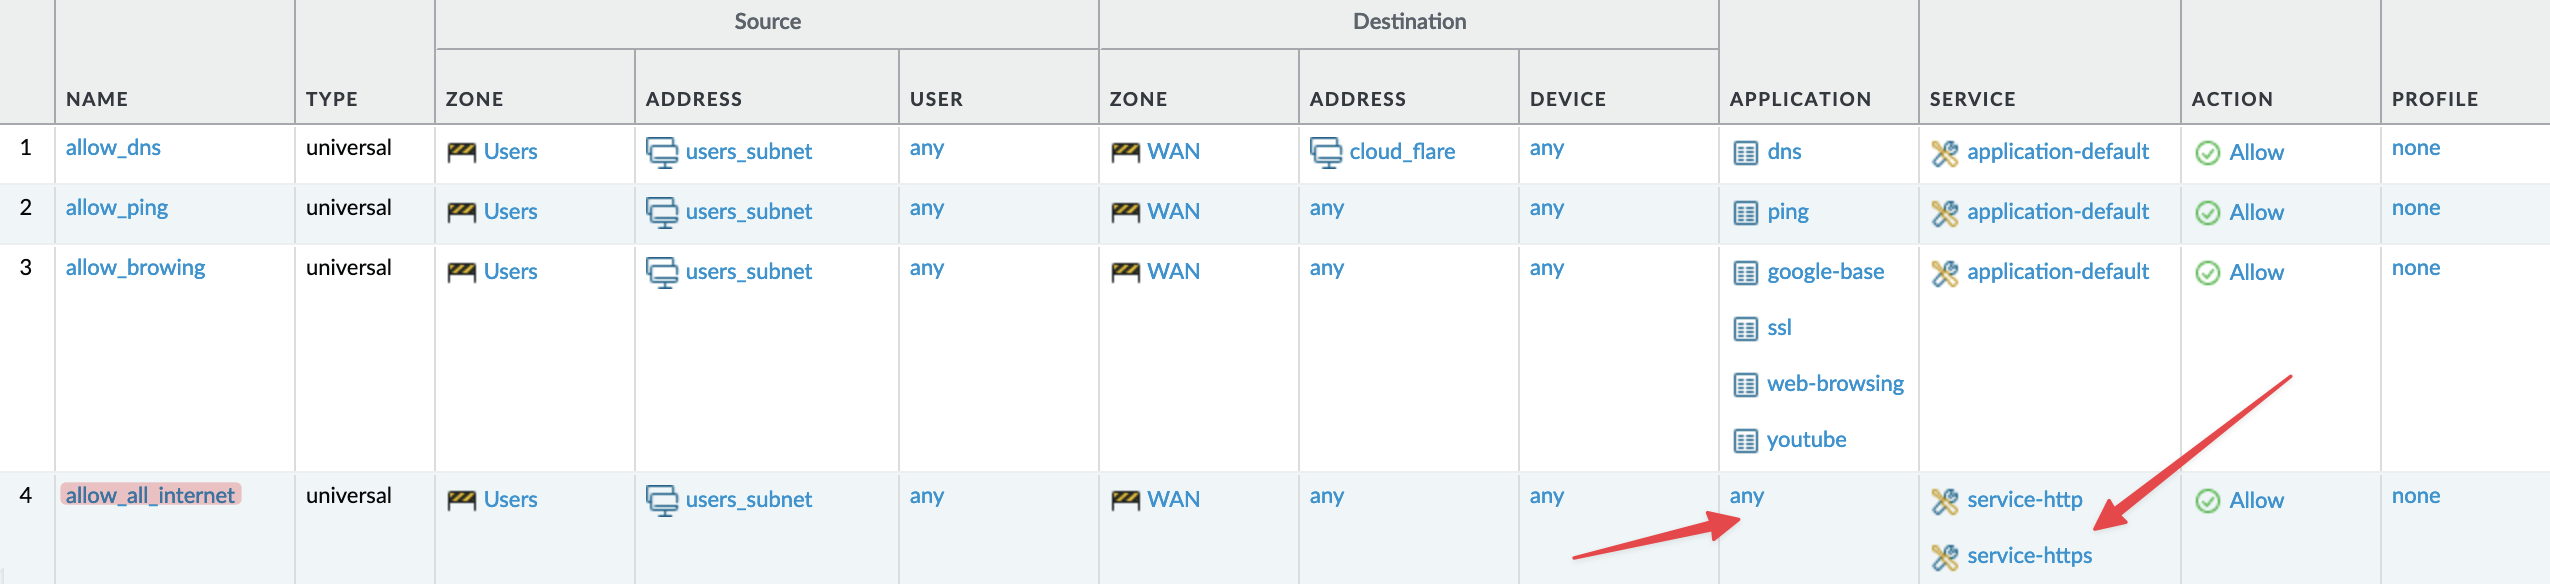
‘App-ID’ is a term used to identify applications instead of relying solely on hard-coded TCP/UDP port numbers. It’s 2024, and we are using a Next-Generation Firewall (NGFW), so we aim to inspect not just at Layer 4 but also look into the application layer. Here’s how I’ve set up three initial policies.
- A policy to allow DNS queries to 1.1.1.1 (CloudFlare).
- A policy to allow Ping to any destination.
- A policy to allow ‘ssl’ and ‘web-browsing’.

In these policies, you’ll notice that we didn’t specify traditional port numbers (which Palo Alto refers to as ‘service’). Instead, we specified the ‘application’ such as DNS. Palo Alto intelligently inspects each DNS query to ensure it genuinely pertains to DNS and uses the default application ports, i.e., UDP/53. If someone attempts to tunnel unauthorized traffic through UDP/53, the firewall will block it.
This approach exemplifies the benefit of using ‘applications’ rather than just allowing traffic on ‘UDP/53’.
The third policy covers ‘web-browsing’ and ‘ssl,’ which you might assume includes all Internet traffic, but it’s not that broad. It permits access to general Internet sites such as blogs, news websites, and e-commerce like booking.com, but not everything.
For example, accessing YouTube, Gmail, or even Google won’t work under this rule because Palo Alto assigns more specific App-IDs to these services. To allow YouTube, you would need to allow the ‘youtube’ App-ID specifically. Managing these individual App-IDs can be burdensome given the thousands available, but there are strategies to simplify this, such as allowing a category like ‘video conferencing’ instead of individual apps.
Alternatively, you could allow ‘services’ like TCP/80 and TCP/443, though this approach undermines the advantages of having an NGFW. So, if you need to allow traffic on port numbers, you need to set the 'application' to 'any' and use port numbers instead as shown below. Palo Alto firewall has some pre-defined 'services' such as 'http' or https' (which I've used in the example below) but you can also create your own custom services by navigating to Objects > Services.
I will try to cover 'App-ID' in a future blog post, so don't forget to subscribe to my blog.
Commit - Understanding Candidate vs Running Config
Another clear distinction between Palo Alto and other firewalls like Cisco ASA or FortiGate is the way configurations are managed. In ASA or FortiGate, changes are applied immediately to the running-config, meaning they take effect right away. However, Palo Alto works with two configuration sets.
- running-config
- candidate-config
Any modifications you make through the GUI or CLI are applied to the candidate-config, leaving your running-config unaffected. This allows you to make changes without impacting your network. Once you are confident with your changes, you can ‘commit’ them, which merges the changes into the running-config.
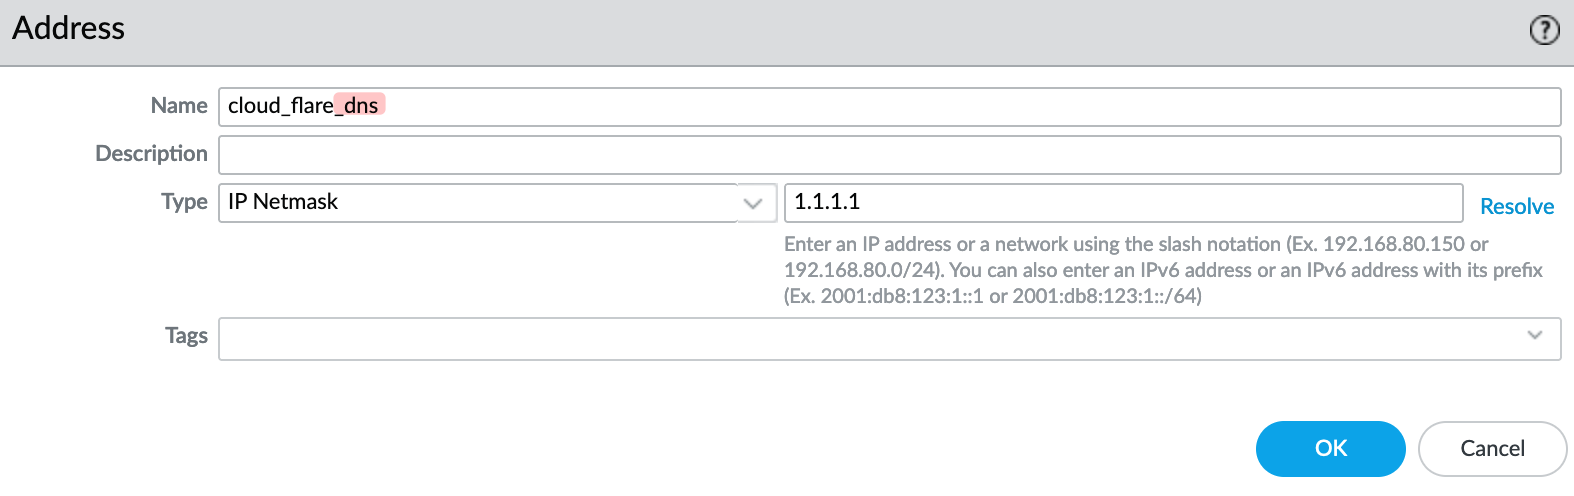
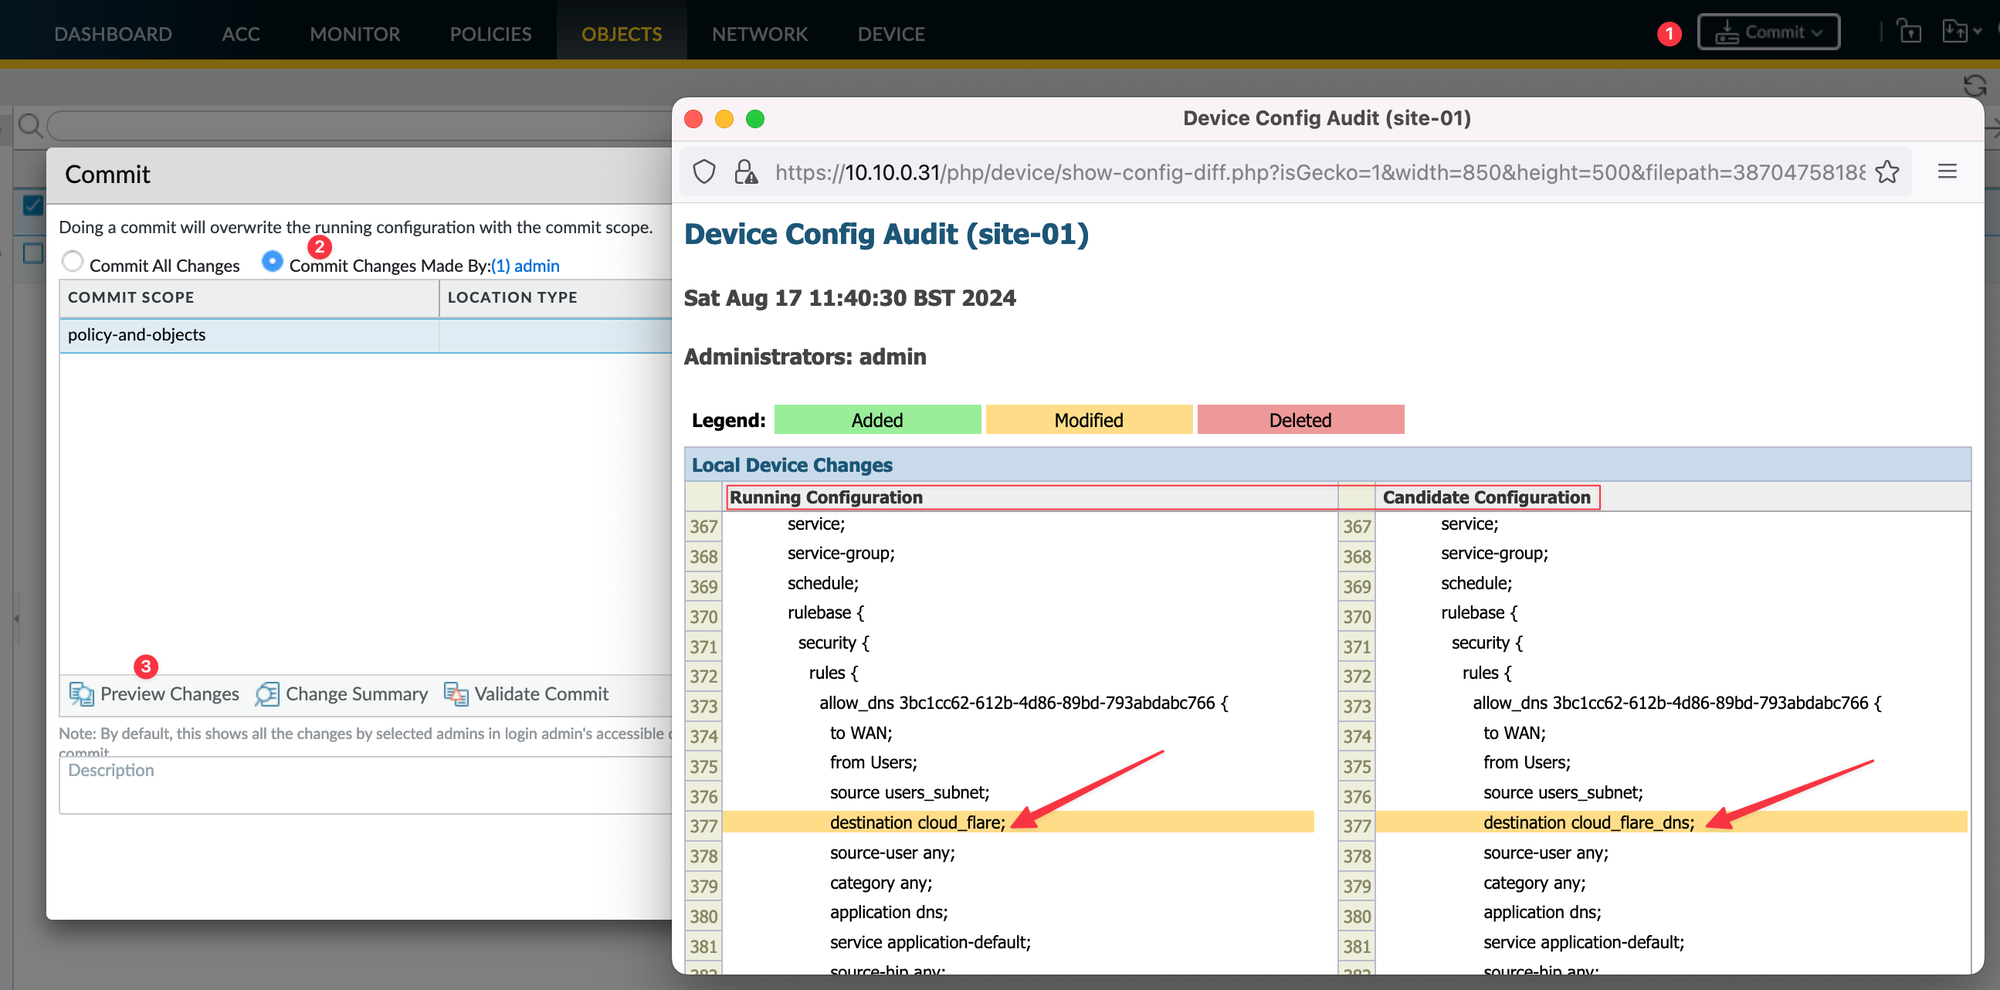
To demonstrate this, I renamed the 'cloud_flare' address object to 'cloud_flare_dns'. These changes won’t take effect until I commit them.
To commit, simply navigate to the ‘commit’ option at the top-right of the GUI. You also have the option to preview the changes. If multiple people are working on or editing the configuration, you can choose to commit only your changes.
Traffic Logs
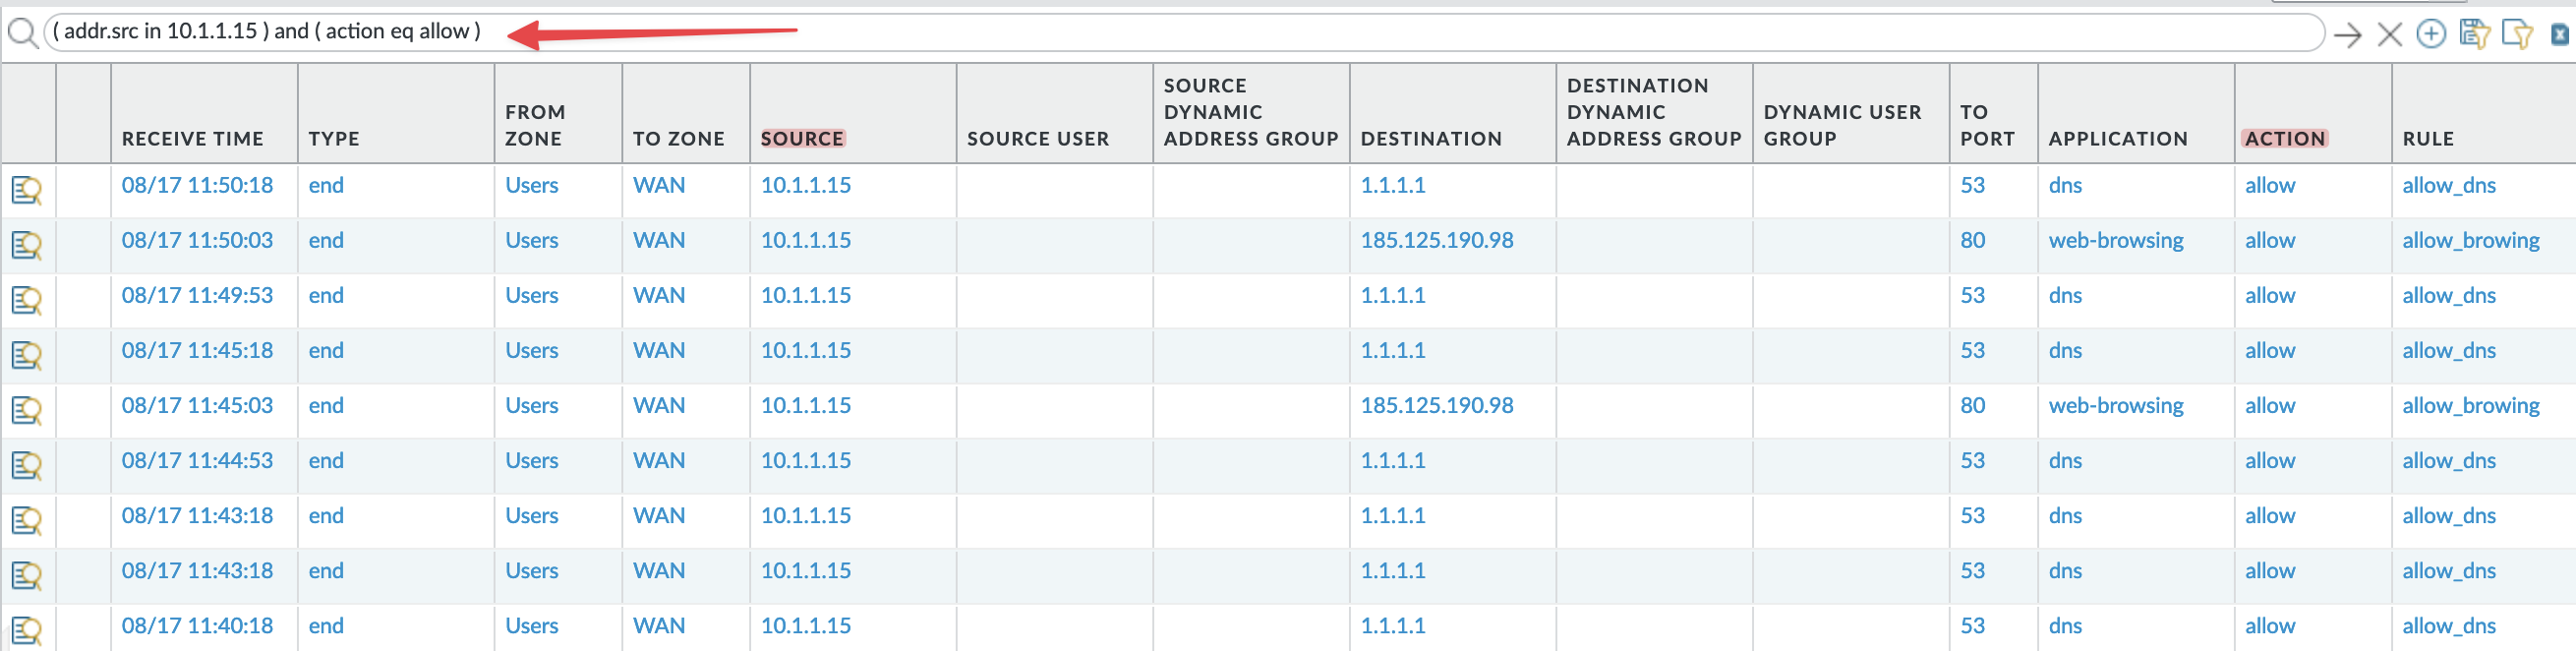
If you work with firewalls, you know how important it is to have the ability to view traffic logs, especially during troubleshooting. Let’s explore where to view the logs and how to set it up. You can view the traffic logs by navigating to Monitor > Logs > Traffic.
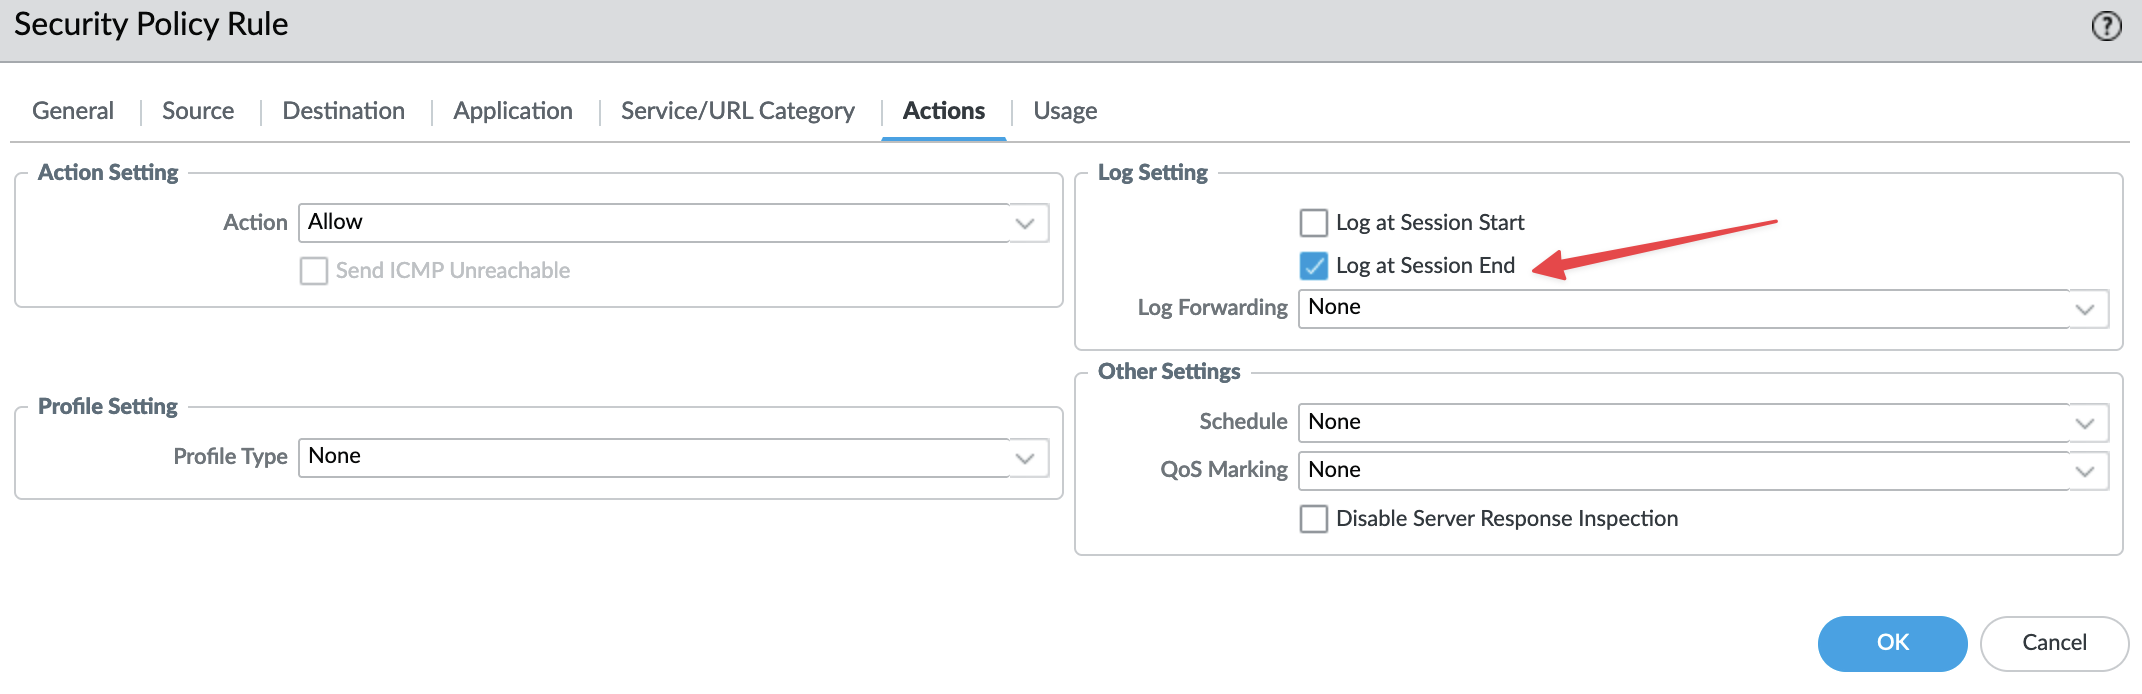
However, the logs won’t be there unless you explicitly tell the firewall to log them. So, how do we do this? When you create a security policy, within the ‘Action’ section, you must enable logging under ‘Log Settings.’
Here, you have two options - ‘Log at Session Start’ or ‘Log at Session End’. I generally prefer using the latter to avoid rapidly filling up storage space with logs. With ‘Log at Session End’, the firewall logs the details of a session when it terminates, such as when a user visits a website and then closes it. This termination removes the session from the session table and triggers the firewall to log the traffic, allowing you to review it afterwards.
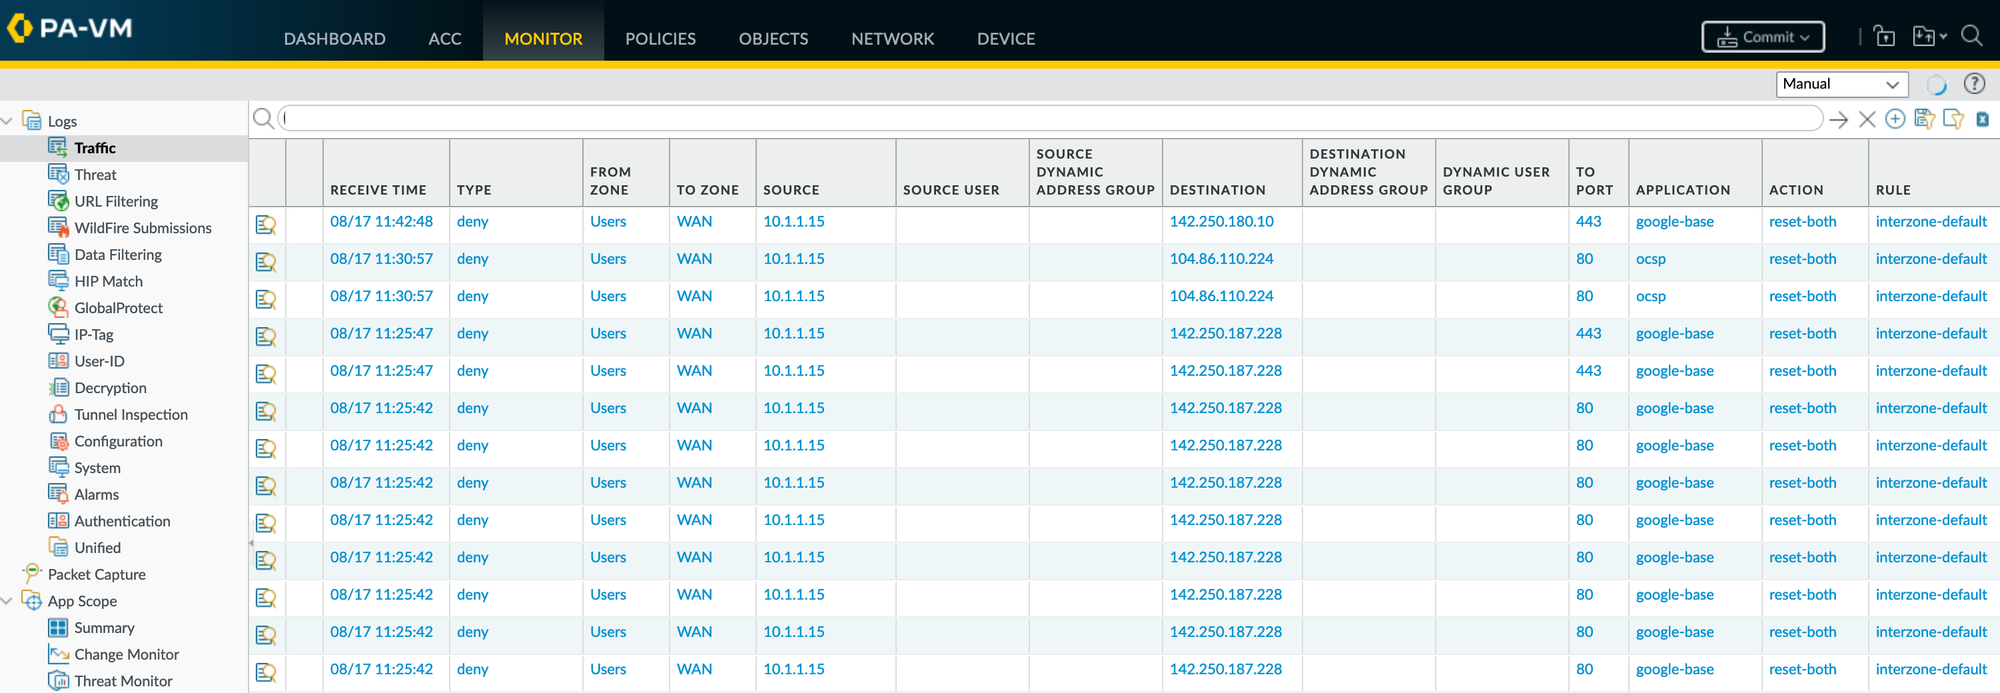
Filtering the traffic logs is as easy as selecting a value from the traffic log output. For example, if you want to see all the ‘allow’ traffic from ‘10.1.1.15’, all you have to do is select a value from the ‘Action’ column and also select a value from the ‘Source’ column as shown below. This selection allows you to quickly and easily isolate specific traffic events, making it simpler to analyze user activities or troubleshoot network issues.
Setting Up Your Lab
The best way to learn is by doing and practising. I highly recommend setting up your own lab to try things out for yourself. There are several options available such as EVE-NG, GNS3, or even running directly on VMware Workstation or ESXi. I’ve written a blog post on how to set this up on VMware Workstation, so feel free to check it out below.
Suresh Vina
Once you have your lab set up, create a hypothetical company and try to set up a small office-like network. Create a subnet for users and another for servers, then try to provide restricted access to the Internet, such as blocking Facebook, etc. This will help you visualize what’s going on and enhance your learning.
Once you have a solid foundation, try to learn how to configure Site-to-Site VPN, and GlobalProtect Remote Access VPN, and understand how ‘User-ID’ or ‘App-ID’ work, and what problems they are designed to solve. But again, the key to progressing is having a solid foundation.