We all know that by default, all the devices in the same VLAN can talk to each other. For example, if you have a switch with multiple devices connected to it and if they are part of the same VLAN, they can communicate without any restrictions. But there are times when you might want to keep the devices in the same VLAN while preventing them from talking to each other. This is where Private VLANs come into play, offering control over who can talk to each other within the 'same VLAN'. So, let’s get started and we will cover the following topics.
- Isolated VLAN, Community VLAN and Promiscuous Port
- A very Simple Private VLAN example
- Private VLAN with Multiple Switches (Trunk)
- Private VLAN to Default Gateway over Trunk
Private VLAN (PVLAN) Introduction
Let's break down how Private VLANs work with a simple scenario. Imagine we have a "users" VLAN where all the laptops connect. Suppose we have a mix of Windows and Linux devices. We want to ensure that Windows devices can't communicate with each other at all. However, it's okay for Linux devices to talk to each other, but they shouldn't communicate with the Windows devices either.
First off, we'll pick a VLAN ID for the 'users' VLAN, let's go with VLAN 10. This is just like any other VLAN and we can also pick a subnet of 10.125.10.0/24. So far, everything looks normal.
Now, considering we have two types of devices in the same VLAN with some restrictions, private VLANs offer a great solution with two types of secondary VLANs.
- Isolated VLAN - Devices in this VLAN cannot communicate with each other. Let's pick VLAN ID 11 - this is for windows devices.
- Community VLAN - Devices can freely communicate within the same community VLAN. Let's pick VLAN ID 12 - this is for linux devices.
IP addresses of the devices stay the same, nothing changes from the device's perspective. They don't even know that we are using private VLANs.
It's important to note that devices from these two secondary VLANs cannot talk with each other. For example, a device in an isolated VLAN won't be able to communicate with a device in a community VLAN.
Now, you might wonder about the default gateway because eventually, these devices might need to communicate outside their VLAN. This is where the 'promiscuous' port comes into play. A promiscuous port can communicate with any other port, making it possible for devices in isolated or community VLANs to reach external networks through this port.
A Very Simple Private VLAN Example
Just to recap, our primary VLAN is 10, isolated VLAN is 11, and community VLAN is 12. Think of the secondary VLANs as sub-VLANs within the primary VLAN 10.
First, configure all three VLANs and then tell the switch that VLANs 11 and 12 are secondary VLANs. After that, we go into the appropriate switch ports and configure them as either VLAN 11 or 12 secondary VLANs, depending on the required isolation or community access. We also need to configure the promiscuous port.
%Private VLANs can only be configured when VTP is in transparent/off
modes in VTP version 1 or 2 and in server/transparent/off modes
in VTP version 3 when pruning is turned off
vtp mode transparent Diagram
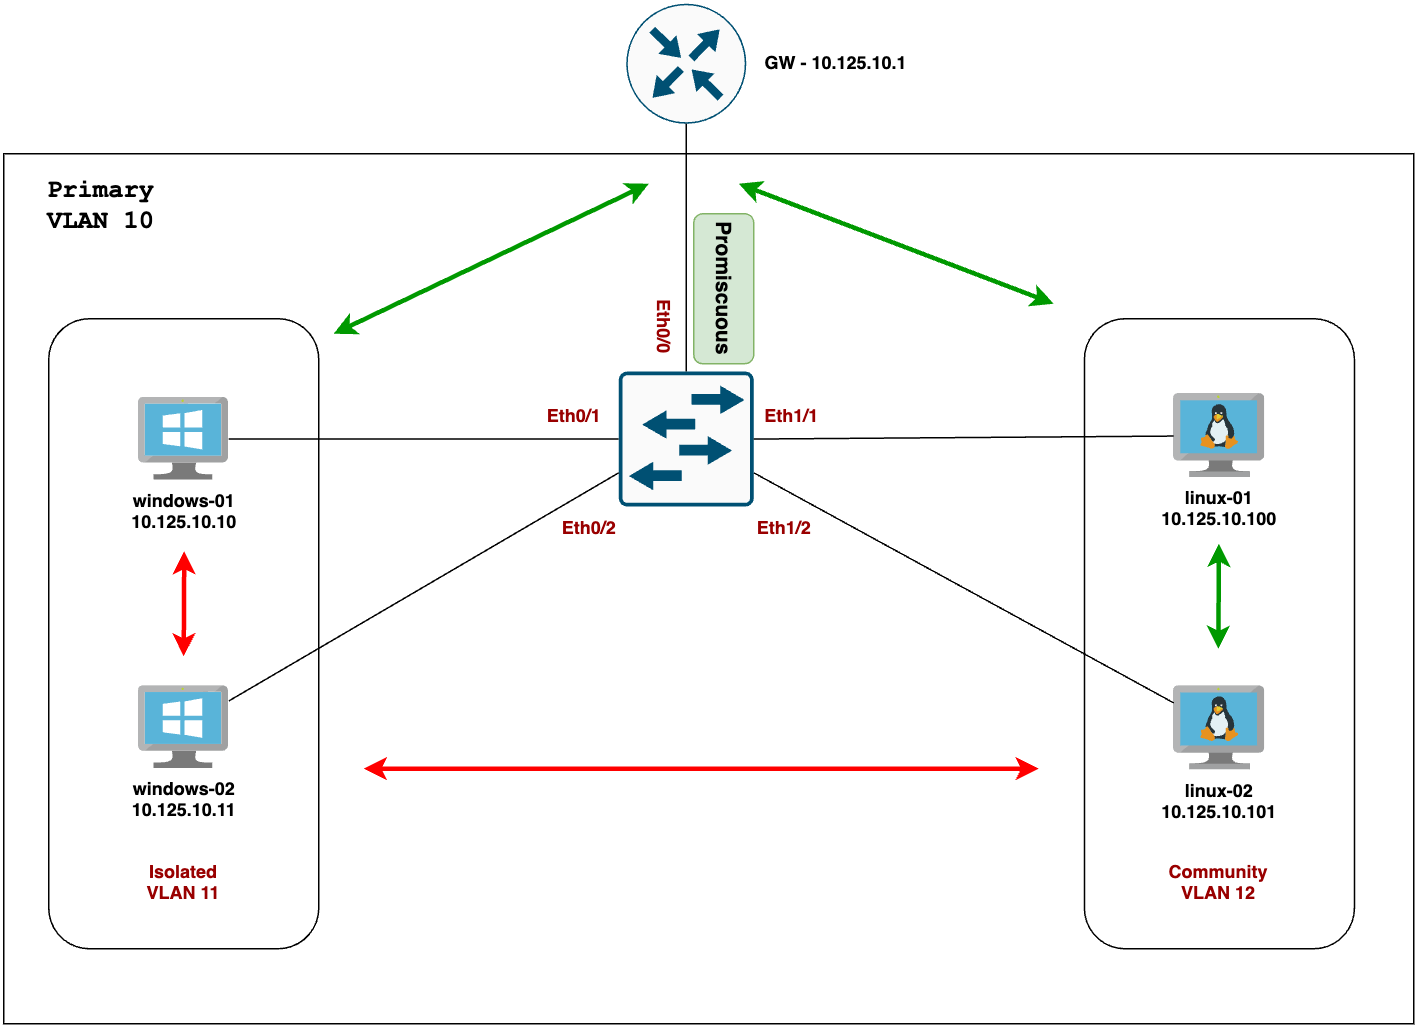
Here I have a very simple diagram with 2 x windows and 2 x linux devices connecting to a single switch. I also have a router (default gateway) that connects to the same switch. As per the requirement, windows devices shouldn't be able to talk to each other (red arrow) and the linux devices can talk to each other (green arrow) but not with windows devices. All the devices should be able to talk to the router.
Once you configured VTP, the next step is to start configuring the VLANs as shown below. Here, I've created
- VLAN 10 as the 'primary' VLAN
- VLAN 11 as 'isolated'
- VLAN 12 as 'community' and
Once you create all three VLANs, just associate the secondary VLANs to the primary VLAN using the private-vlan association command.
Before I apply the changes, the windows devices were able to ping each other. We will re-check this after applying the changes.
windows-02> ping 10.125.10.10

84 bytes from 10.125.10.10 icmp_seq=1 ttl=64 time=2.157 ms
84 bytes from 10.125.10.10 icmp_seq=2 ttl=64 time=0.369 ms
84 bytes from 10.125.10.10 icmp_seq=3 ttl=64 time=0.412 ms
Creating the VLANs
vlan 11
 name USER-ISOLATED
  private-vlan isolated
!
vlan 12
 name USER-COMMUNITY
  private-vlan community
!
vlan 10
 name USER-PRIMARY
  private-vlan primary
  private-vlan association 11
  private-vlan association 12
Configuring Isolated Ports
interface Et0/1
 description WINDOWS
 switchport private-vlan host-association 10 11
 switchport mode private-vlan host
 spanning-tree portfast
end
interface Et0/2
description WINDOWS
switchport private-vlan host-association 10 11
switchport mode private-vlan host
spanning-tree portfast
endIf we re-test the ping, it will fail as we expected.
windows-02> ping 10.125.10.10

10.125.10.10 icmp_seq=1 timeout
10.125.10.10 icmp_seq=2 timeout
10.125.10.10 icmp_seq=3 timeout
10.125.10.10 icmp_seq=4 timeout
10.125.10.10 icmp_seq=5 timeout
Configuring Community Ports
Now, let's do the same for Linux devices. But since we are configuring them as 'community' VLANs, they should be able to ping each other but they can't ping windows devices.
interface Et1/1
 description LINUX
 switchport private-vlan host-association 10 12
 switchport mode private-vlan host
 spanning-tree portfast
end
interface Et1/2
description LINUX
switchport private-vlan host-association 10 12
switchport mode private-vlan host
spanning-tree portfast
endIf we test ping between the linux devices, it should work.
linux-02> ping 10.125.10.100

84 bytes from 10.125.10.100 icmp_seq=1 ttl=64 time=0.437 ms
84 bytes from 10.125.10.100 icmp_seq=2 ttl=64 time=0.418 ms
84 bytes from 10.125.10.100 icmp_seq=3 ttl=64 time=0.503 ms
Ping between the linux and windows devices shoulnd't work.
linux-02> ping 10.125.10.10

host (10.125.10.10) not reachable
Configuring Promiscuous Port
Finally, let's configure the promiscuous port. All the devices should be able to reach the device (router in our case) that's connected to the promiscuous port, mostly the default gateway.
interface Eth0/0
 description GATEWAY
 switchport mode private-vlan promiscuous
 switchport private-vlan mapping 10 11
 switchport private-vlan mapping 10 12
end
Here, all the devices should be be able to ping the router.
#ping test from windows-02

VPCS> ping 10.125.10.1

84 bytes from 10.125.10.1 icmp_seq=1 ttl=64 time=0.302 ms
84 bytes from 10.125.10.1 icmp_seq=2 ttl=64 time=0.381 ms
#ping test from linux-02
linux-02> ping 10.125.10.1
84 bytes from 10.125.10.1 icmp_seq=1 ttl=64 time=0.284 ms
84 bytes from 10.125.10.1 icmp_seq=2 ttl=64 time=0.430 ms
84 bytes from 10.125.10.1 icmp_seq=3 ttl=64 time=0.414 msUseful Show Commands
Here is the output from the common show vlan command.

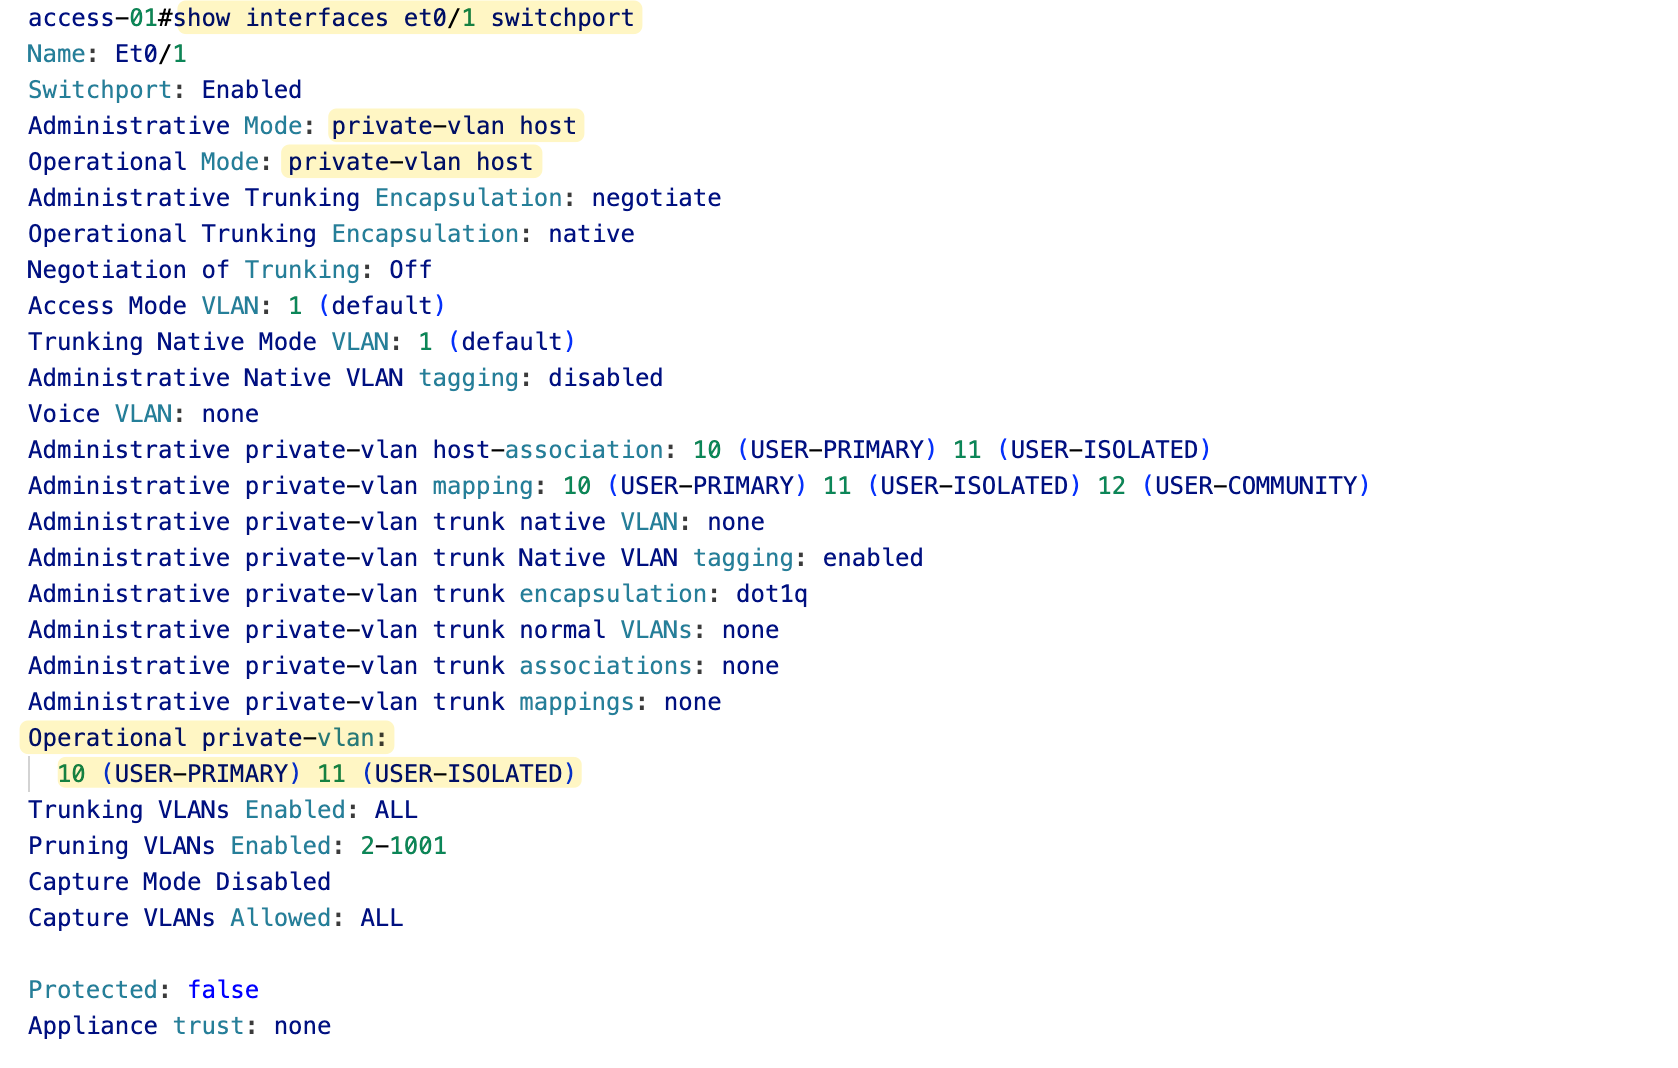
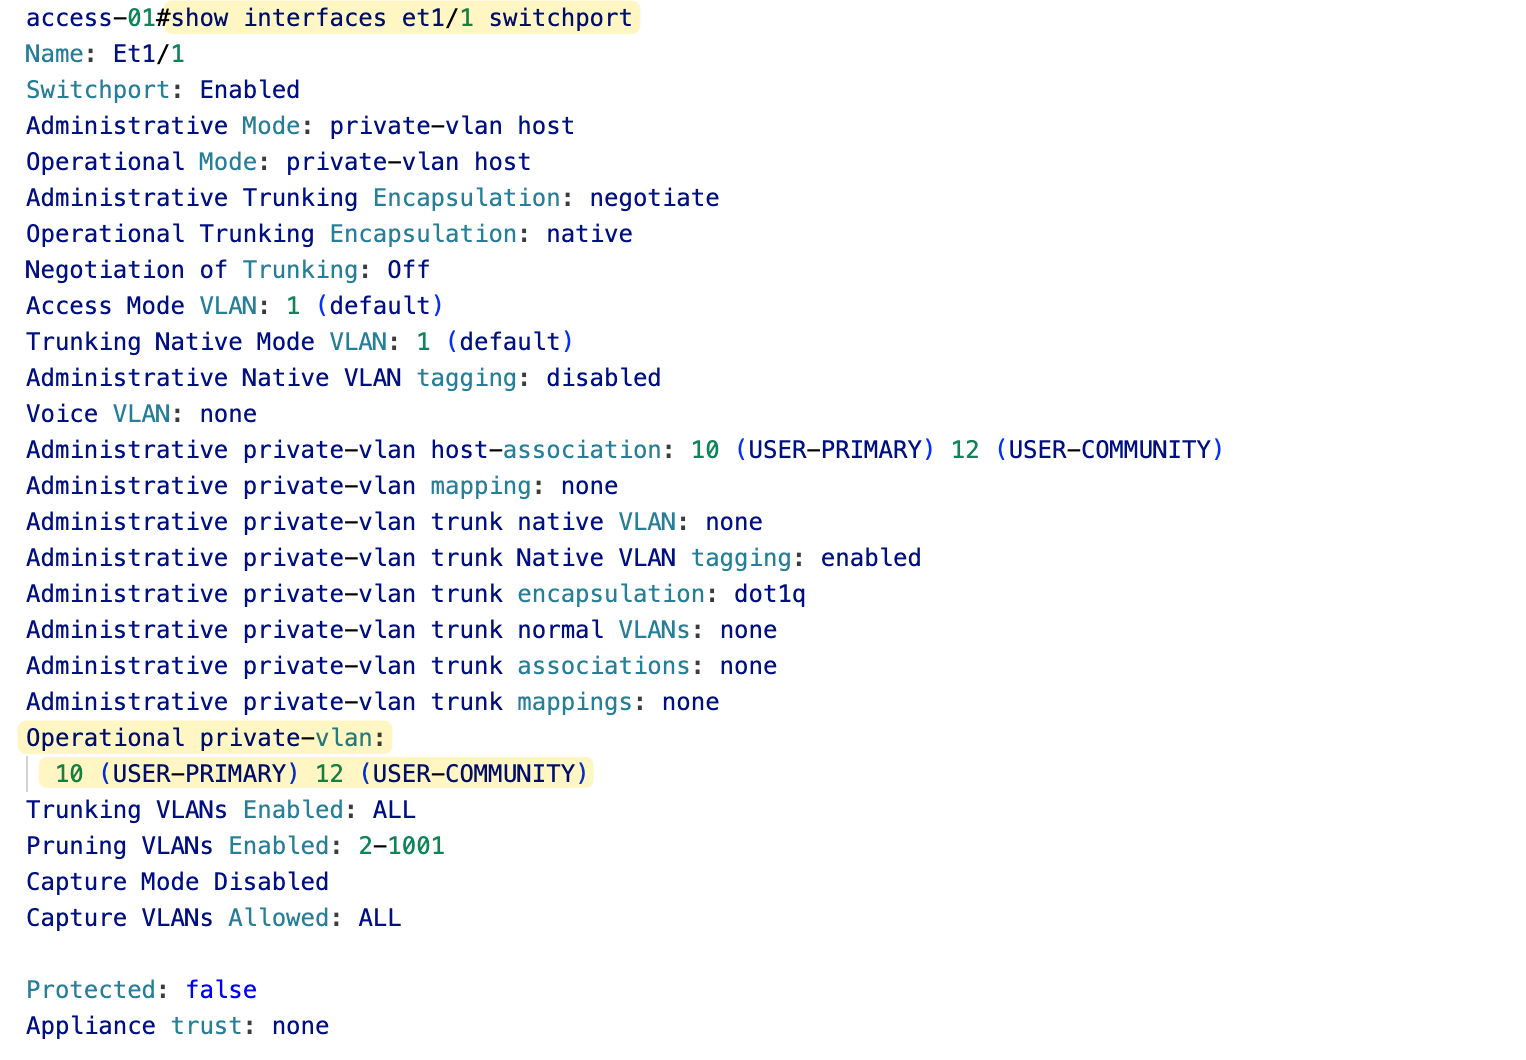
Here is the output from one of the isolated port (windows)
Here is the output from one of the community port (linux)
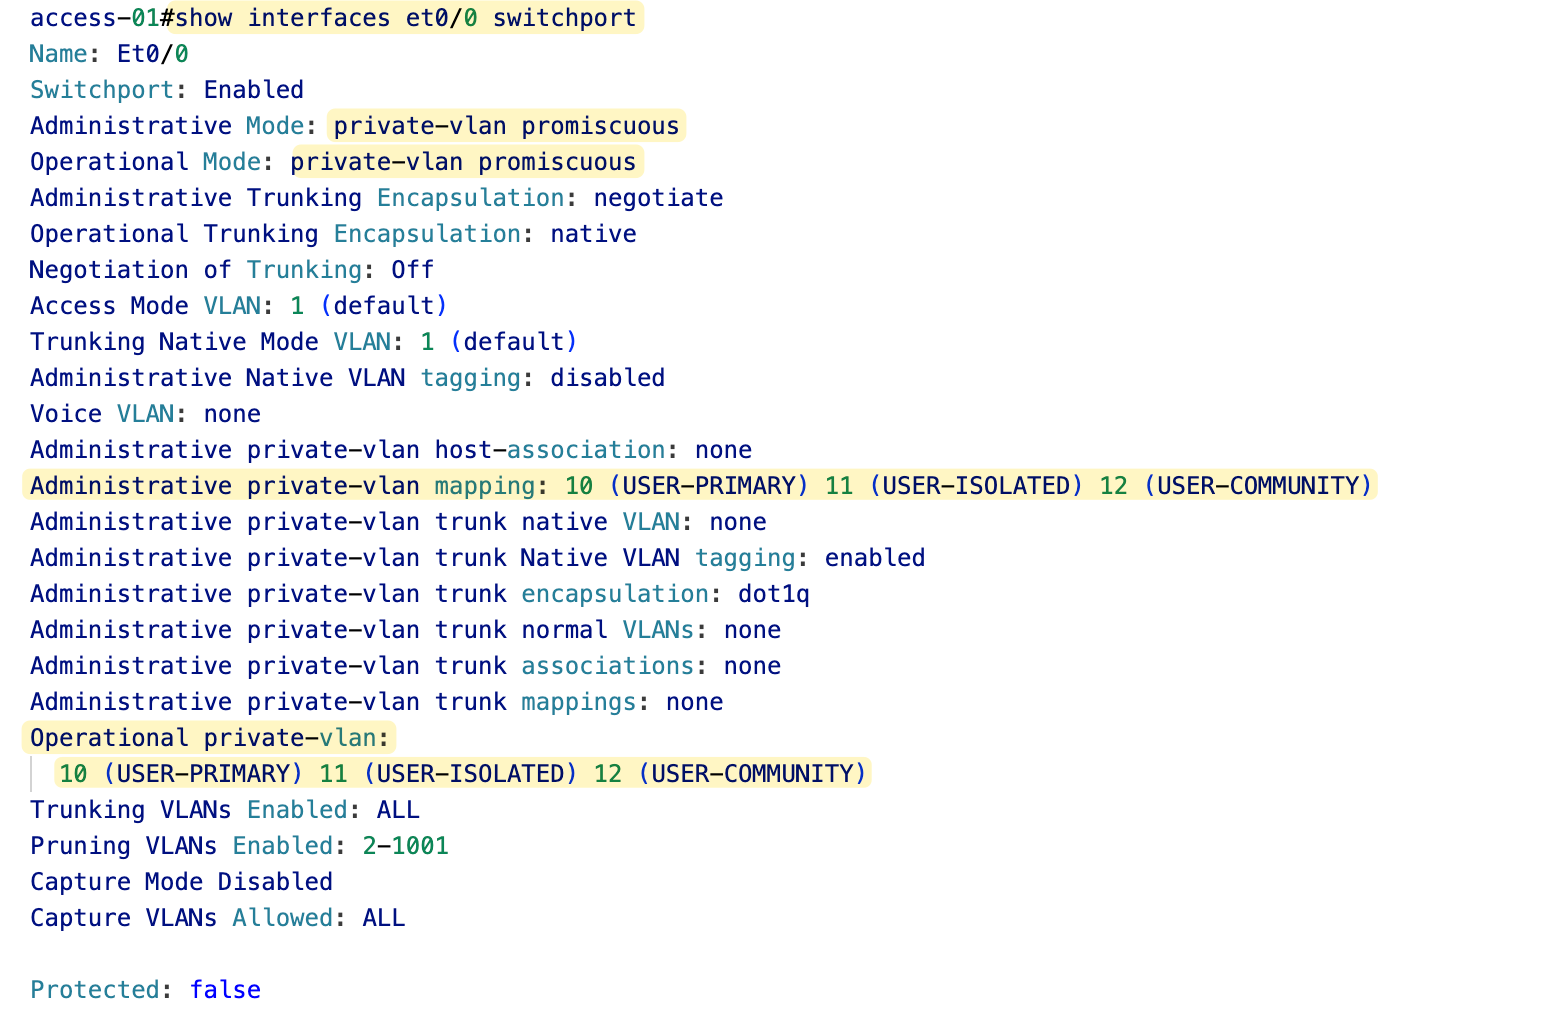
Here is the output for the promiscuous port.
Private VLAN with Multiple Switches
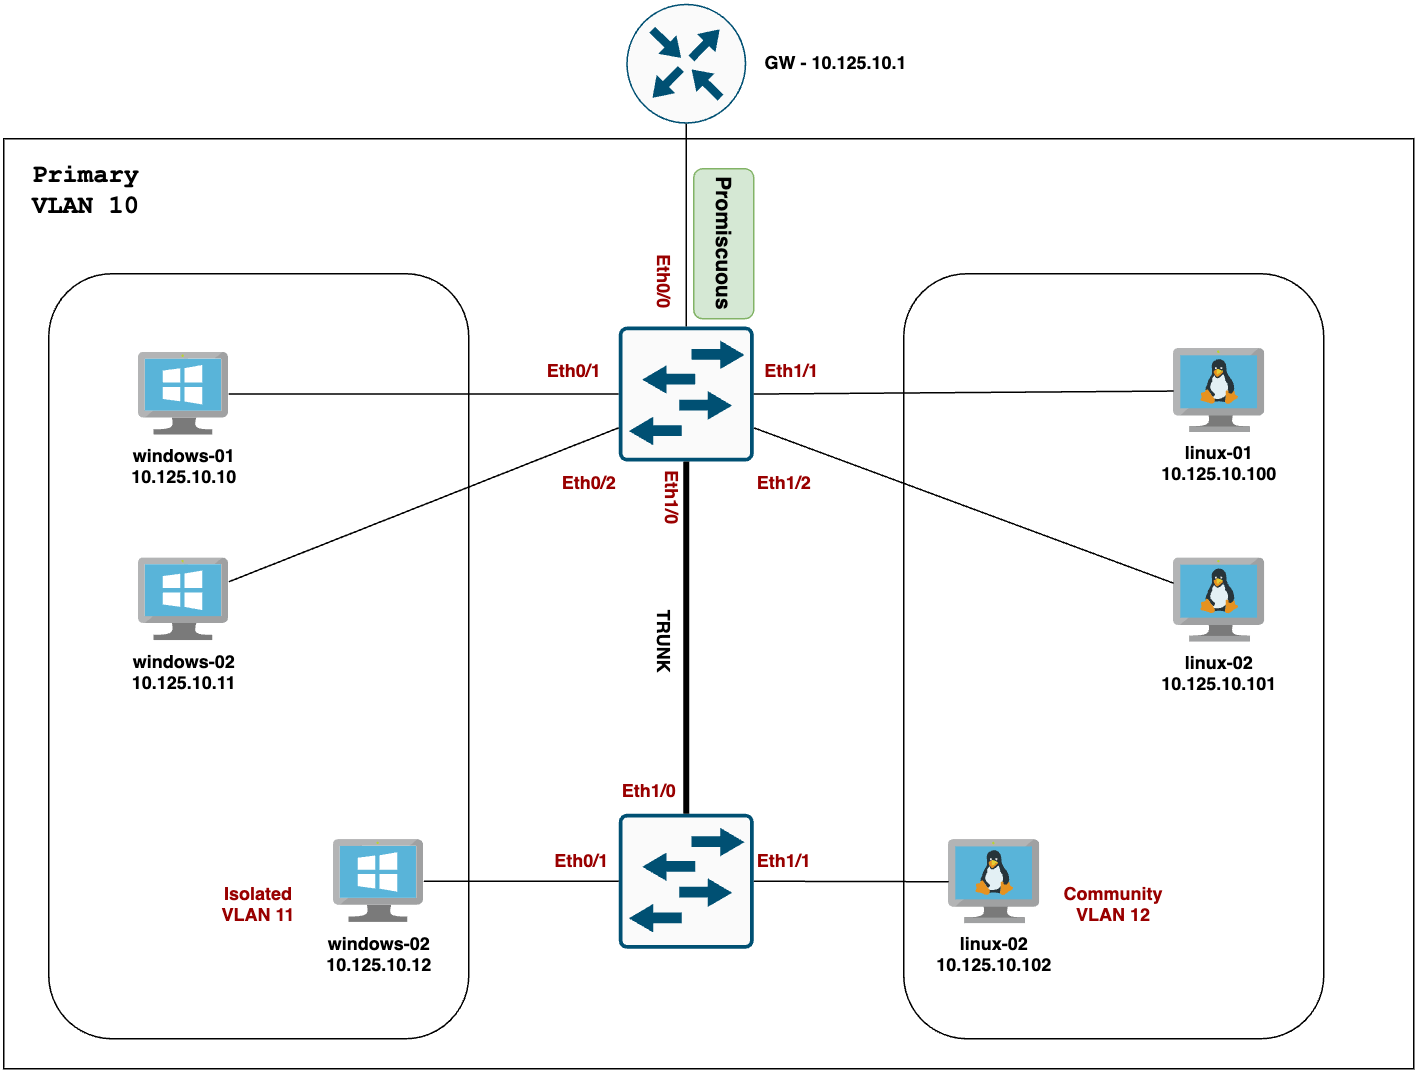
When we introduce a new switch to the mix and connect it to the existing one via a trunk, nothing changes as long as both switches are configured to understand Private VLANs, that is, they both have the same Private VLAN configurations.
#second switch configuration

vtp mode transparent

vlan 11
 name USER-ISOLATED
  private-vlan isolated
!
vlan 12
 name USER-COMMUNITY
  private-vlan community
!
vlan 10
 name USER-PRIMARY
  private-vlan primary
  private-vlan association 11
  private-vlan association 12
Apart from the VLAN configuration, the only other thing you need to do is allow both the primary and secondary VLANs over the trunk (alongside other normal VLANs you may have) That's all.
In our example, I’m going to add a new switch to the mix and apply the following configurations. The windows/linux devices behave the same - Windows can only talk to the promiscuous port (through the trunk), and Linux can talk to the promiscuous port and other community VLAN ports.
interface Ethernet1/0
 switchport trunk encapsulation dot1q
 switchport trunk allowed vlan 10-12
 switchport mode trunk
interface Ethernet0/1
description WINDOWS
switchport private-vlan host-association 10 11
switchport mode private-vlan host
spanning-tree portfastinterface Ethernet1/1
description LINUX
switchport private-vlan host-association 10 12
switchport mode private-vlan host
spanning-tree portfastPrivate VLAN to Default Gateway over Trunk
In the next scenario, you might be connecting the switch to the default gateway, which could be a router or firewall that doesn't understand Private VLANs. In most cases, we'll use a trunk port to connect to the gateway device (like a firewall) and use sub-interfaces on the gateway to route packets (router-on-a-stick).
In this case, we need to convert the trunk port into a special 'private-vlan trunk promiscuous' port. You can pass the primary VLAN and other normal VLANs over this trunk. Please note that you don't need to allow the secondary isolated and community VLANs over this trunk.
interface Et1/10
 description UPLINK-TO-FIREWALL
 switchport private-vlan trunk allowed vlan 5,6,10,20,30
 switchport private-vlan mapping trunk 10 11
 switchport private-vlan mapping trunk 10 12
 switchport mode private-vlan trunk promiscuous
end
Please note that here I'm also passing other normal VLANs like 5,6,20 and 30 over the same trunk.