If you follow my blog, you may know that I recently migrated to Proxmox as my hypervisor, and I absolutely love it. My Proxmox server runs on a custom-built PC with an i9-10900K, 128GB RAM, and 3 x 1TB SSDs. I’m not using anything fancy, just a good number of VMs spread across two of the SSDs.
In this post, we’ll go through the process of setting up Proxmox Backup Server and backing up all the VMs from my Proxmox server to this backup server.
As always, if you find this post helpful, press the ‘clap’ button. It means a lot to me and helps me know you enjoy this type of content.

Why Proxmox Backup Server?
I’ve been running Proxmox for a few months without any backups. I did create some snapshots inside Proxmox in case I messed up a VM, so I could roll back if needed. But this was all manual. What happens if my host machine fails or a VM gets corrupted and I don’t have a snapshot?
This is where Proxmox Backup Server (PBS) comes in. It’s a dedicated backup solution for Proxmox, allowing you to take automated and deduplicated backups of your VMs and containers. Instead of relying on snapshots, PBS ensures you have full backups stored separately, making recovery easy when needed.
Proxmox Backup Server (PBS) works by running on a separate machine where it stores backups from your Proxmox server. You don’t need powerful hardware, even 8GB RAM is more than enough. Proxmox recommends installing PBS bare metal for better performance, but you can also run it as a VM if needed. Once PBS is set up, you simply add it as a datastore in Proxmox, and that’s it. From there, you can schedule backups and restore VMs whenever needed.
Initial Setup
Initially, I considered getting a mini PC and a NAS, adding the NAS to PBS as an NFS store. However, due to budget constraints, I dropped the idea of the NAS for now.
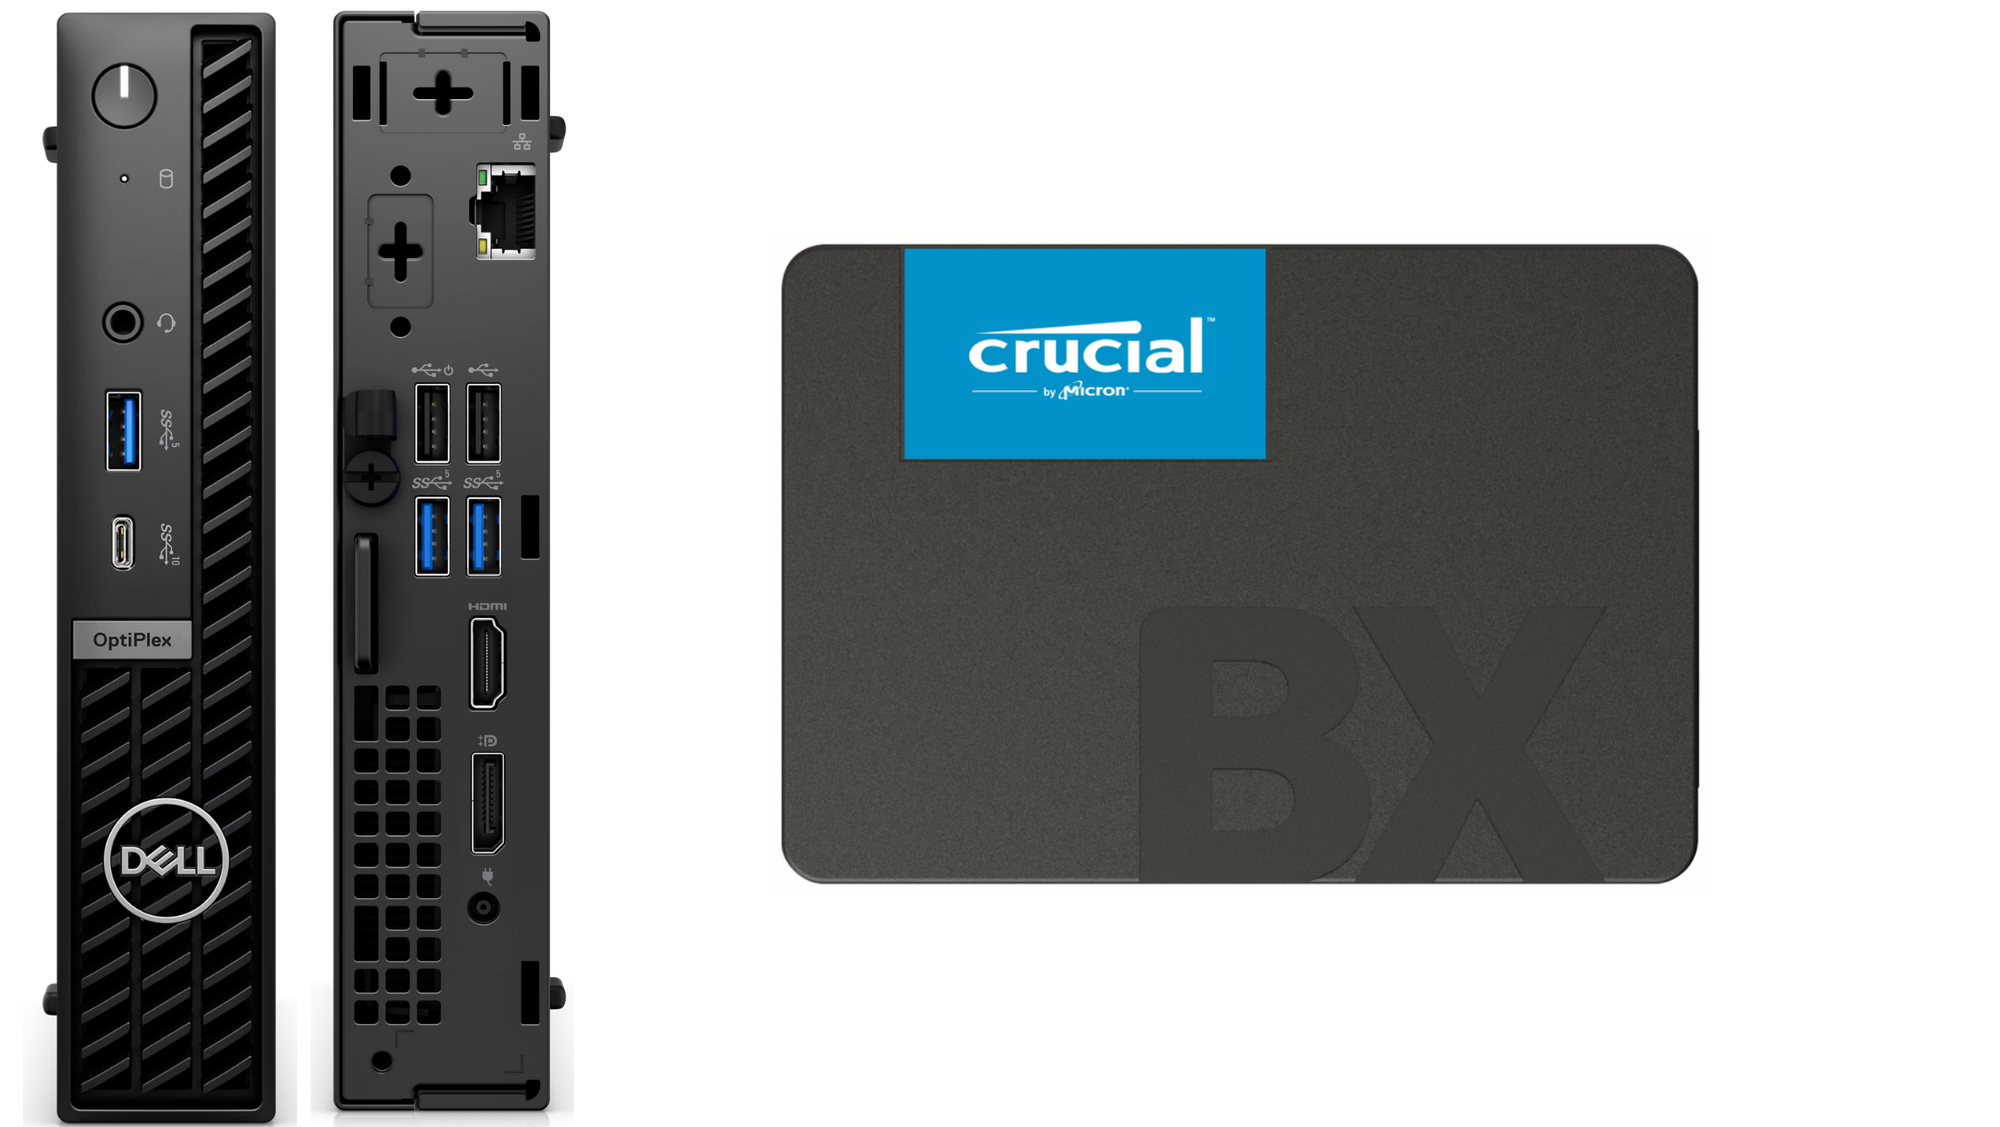
Instead, I picked up a used Dell OptiPlex 7060 Mini PC for £95, which came with an i5-8500T, 16GB RAM, and a 256GB NVMe. I also bought a 2TB SSD from Amazon, which is more than enough for my needs at the moment.
To set up PBS, I downloaded the Proxmox Backup Server ISO, flashed it to a USB drive using BalenaEtcher, and installed it on the Mini PC. The entire installation process took around 10 minutes.
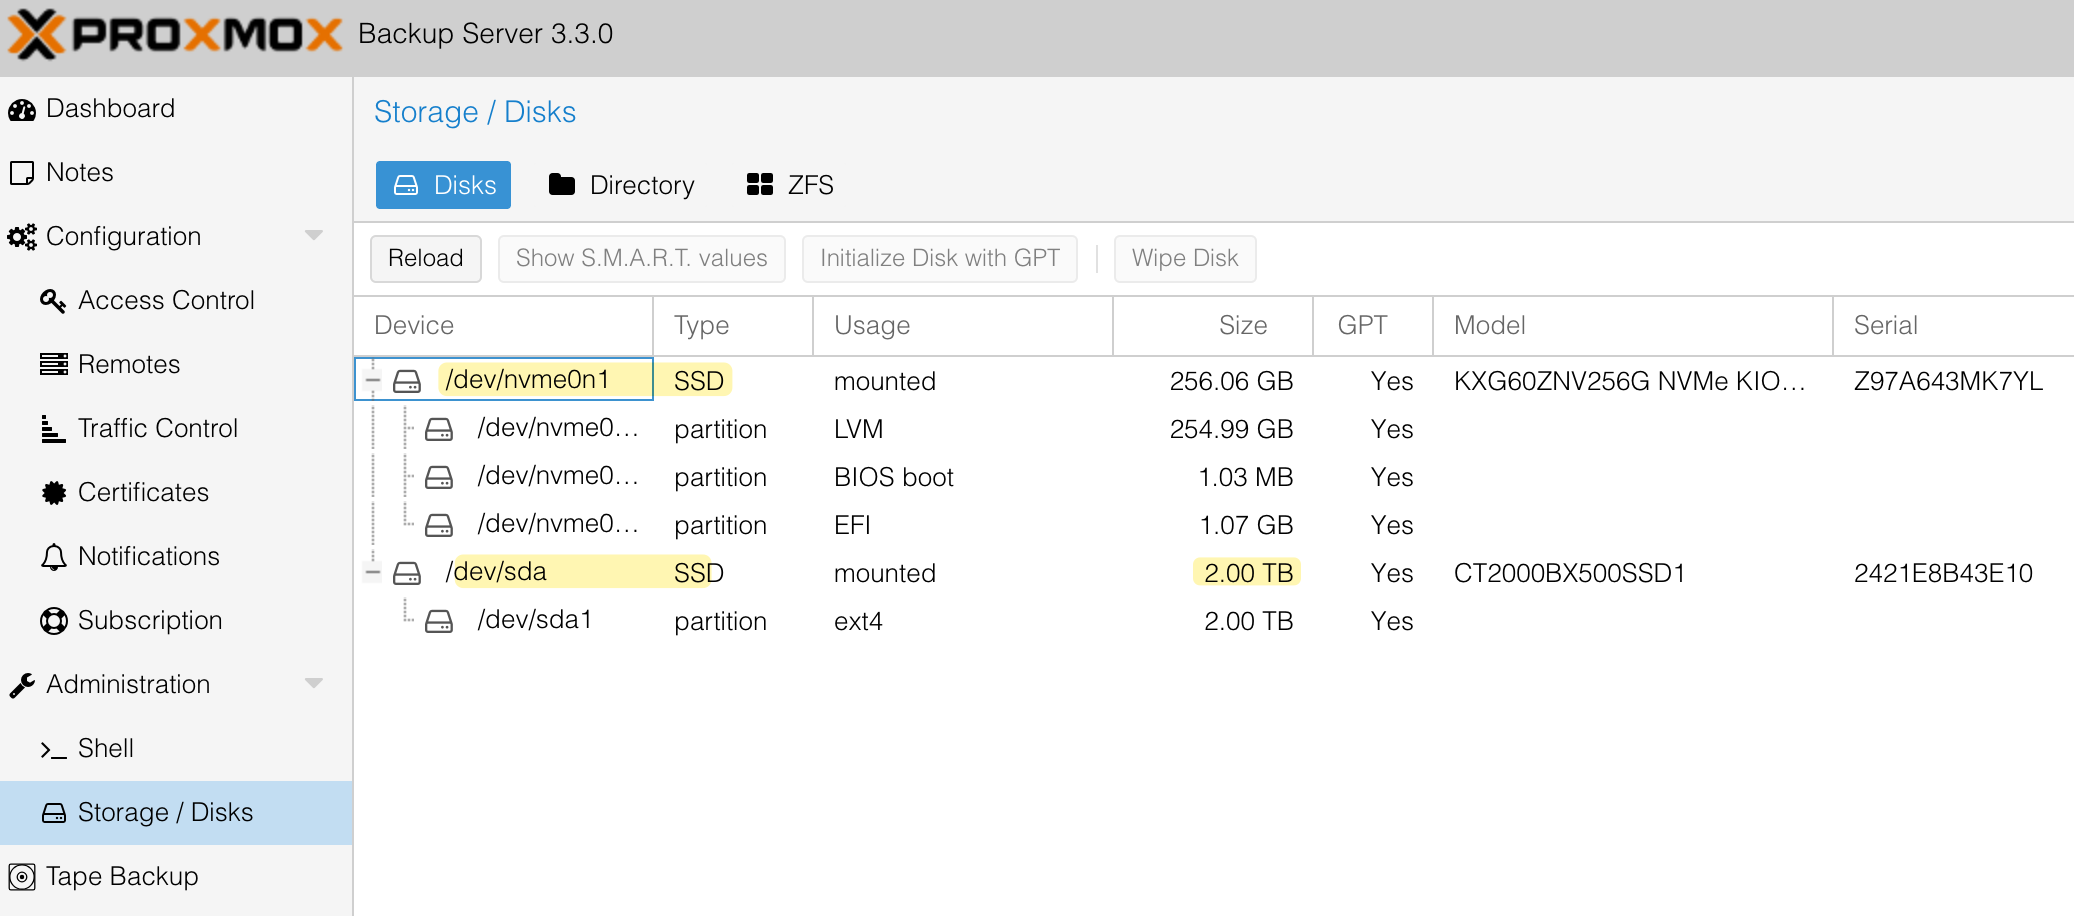
Storage / Disks
If I navigate to Storage → Disks, I can see my two disks - the 256GB NVMe, where PBS is installed, and the new 2TB SSD, which I’ll use to store all my backups.
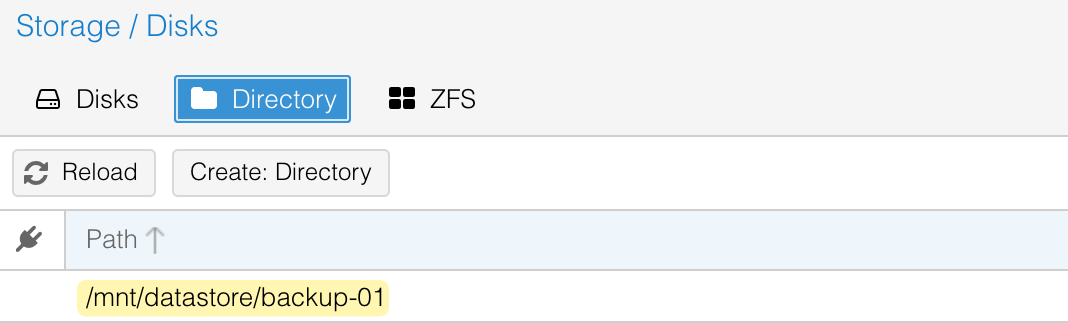
From here, I went to Directory, created a new directory, and selected the 2TB disk. For the file system, I chose ext4. Finally, I named the directory backup-01. This is where all my backups will be stored.
User Account
When adding PBS to Proxmox VE, you’ll need to provide login credentials of the PBS. While you can use the root account, I recommend creating a separate user account specifically for backups as a best practice.
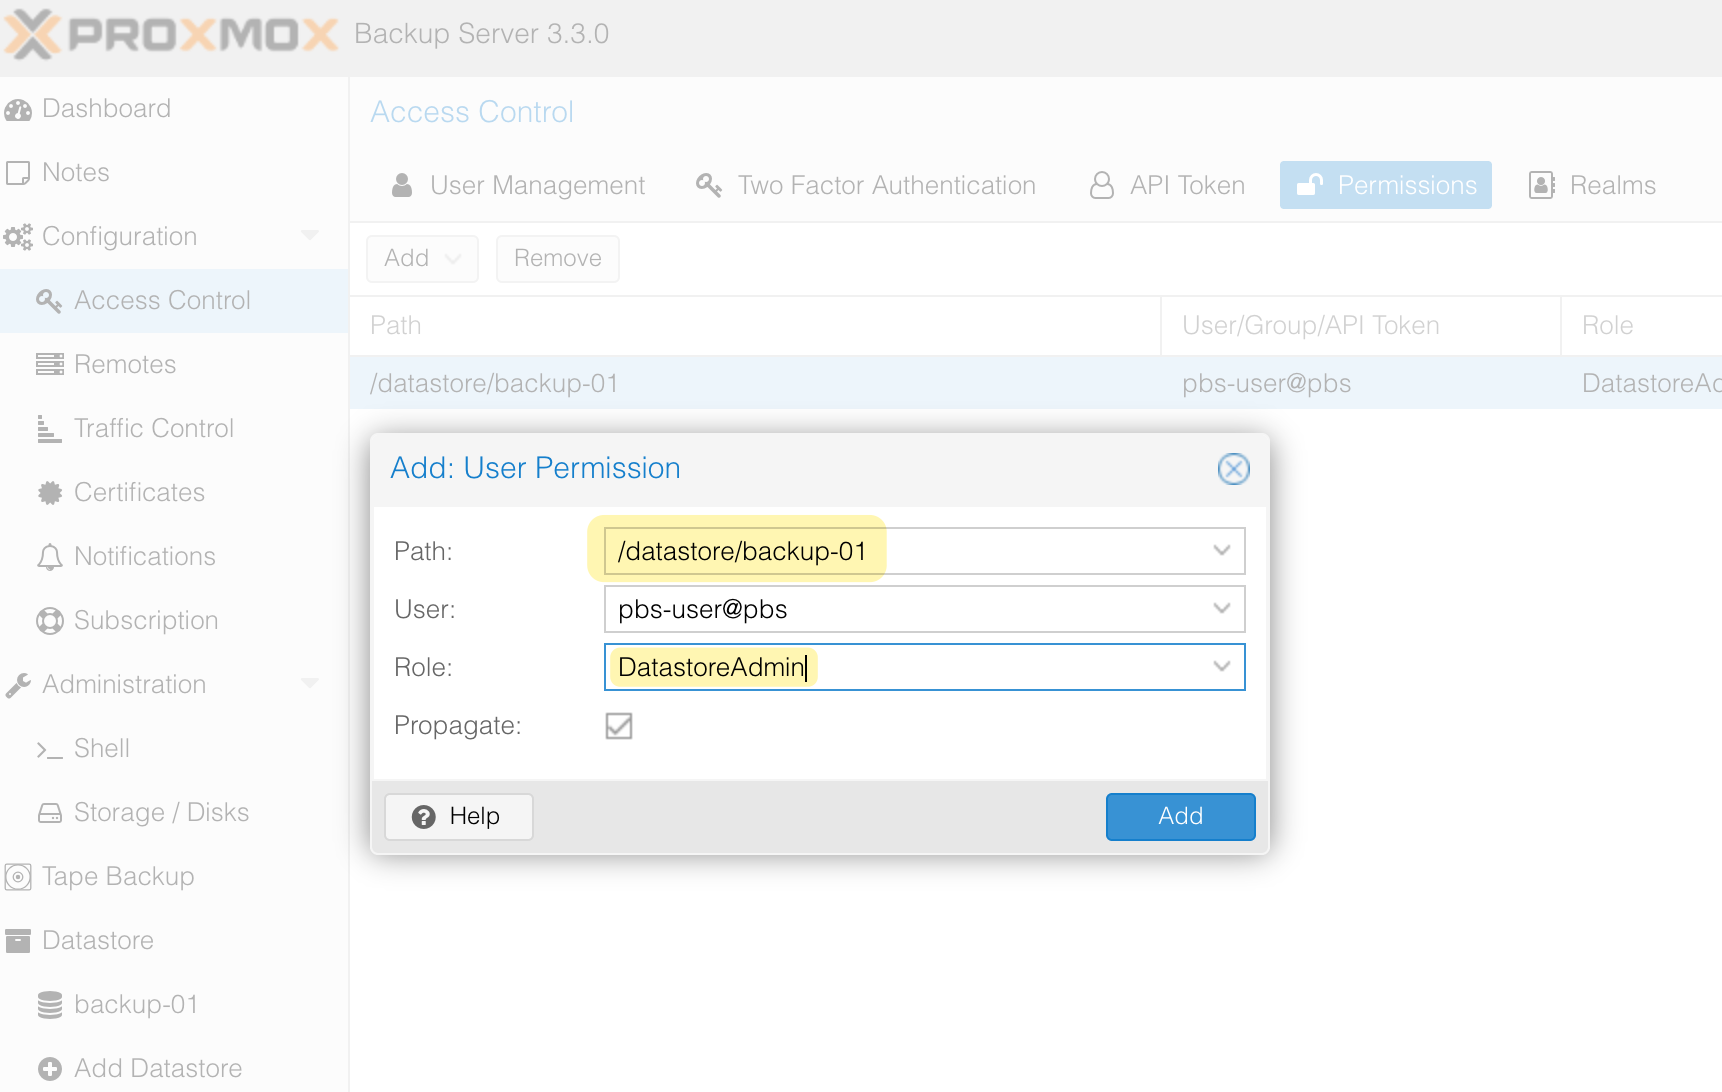
I created a new user on PBS and assigned it the necessary permissions to manage the datastore we created earlier. As shown below, I added the pbs-user@pbs account, granted it the DatastoreAdmin role, and set the path to /datastore/backup-01.
Adding PBS to Proxmox VE
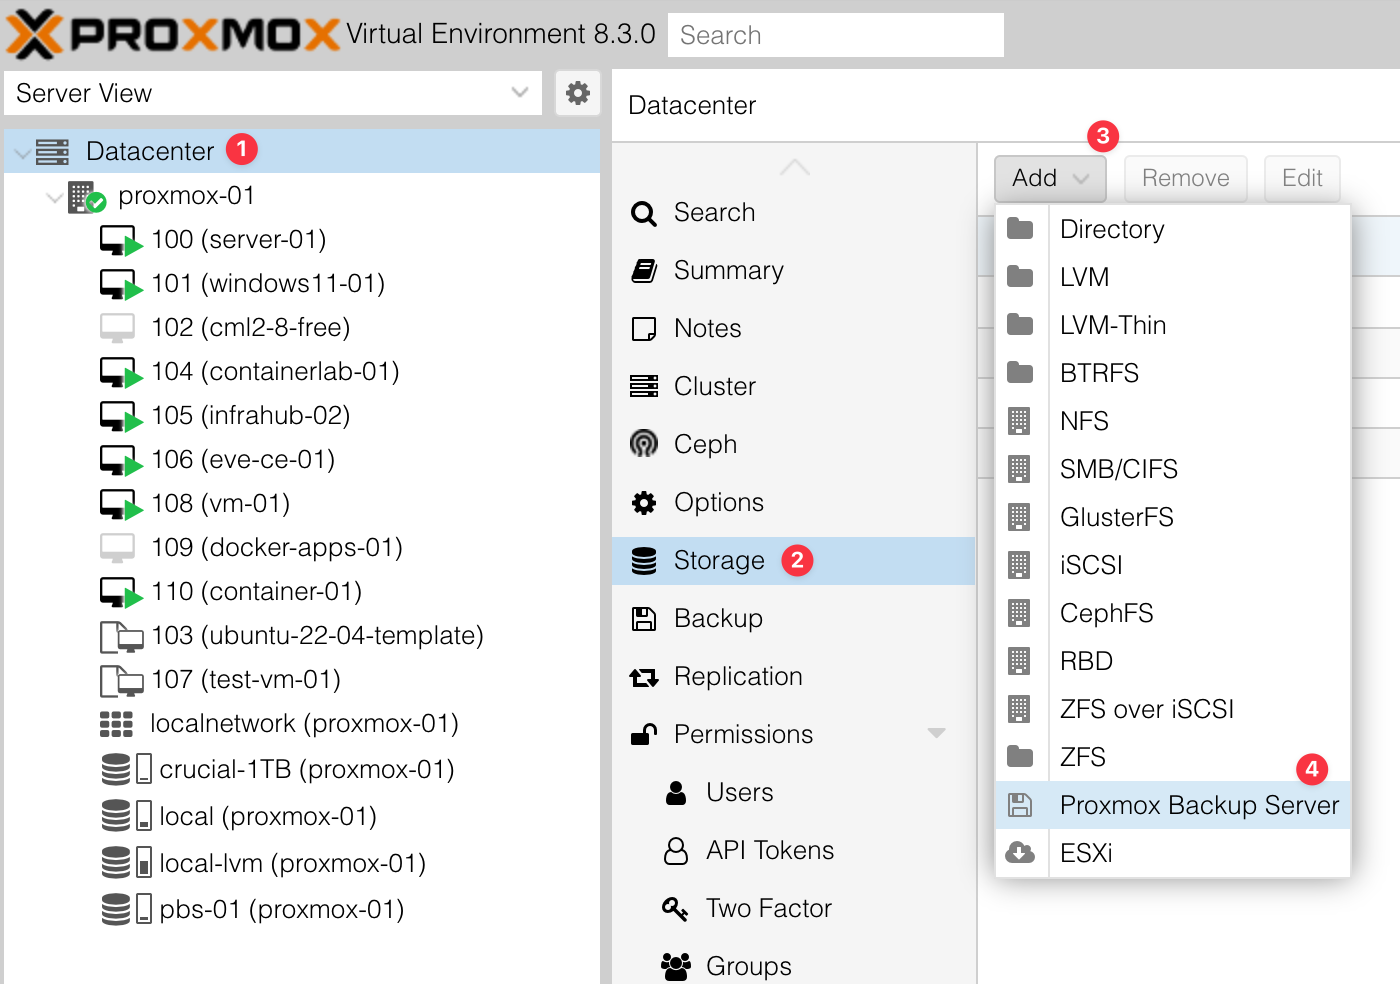
The next step is to add PBS to Proxmox VE. To do this, go to Proxmox VE, select Datacenter, and navigate to Storage > Add > Proxmox Backup Server.
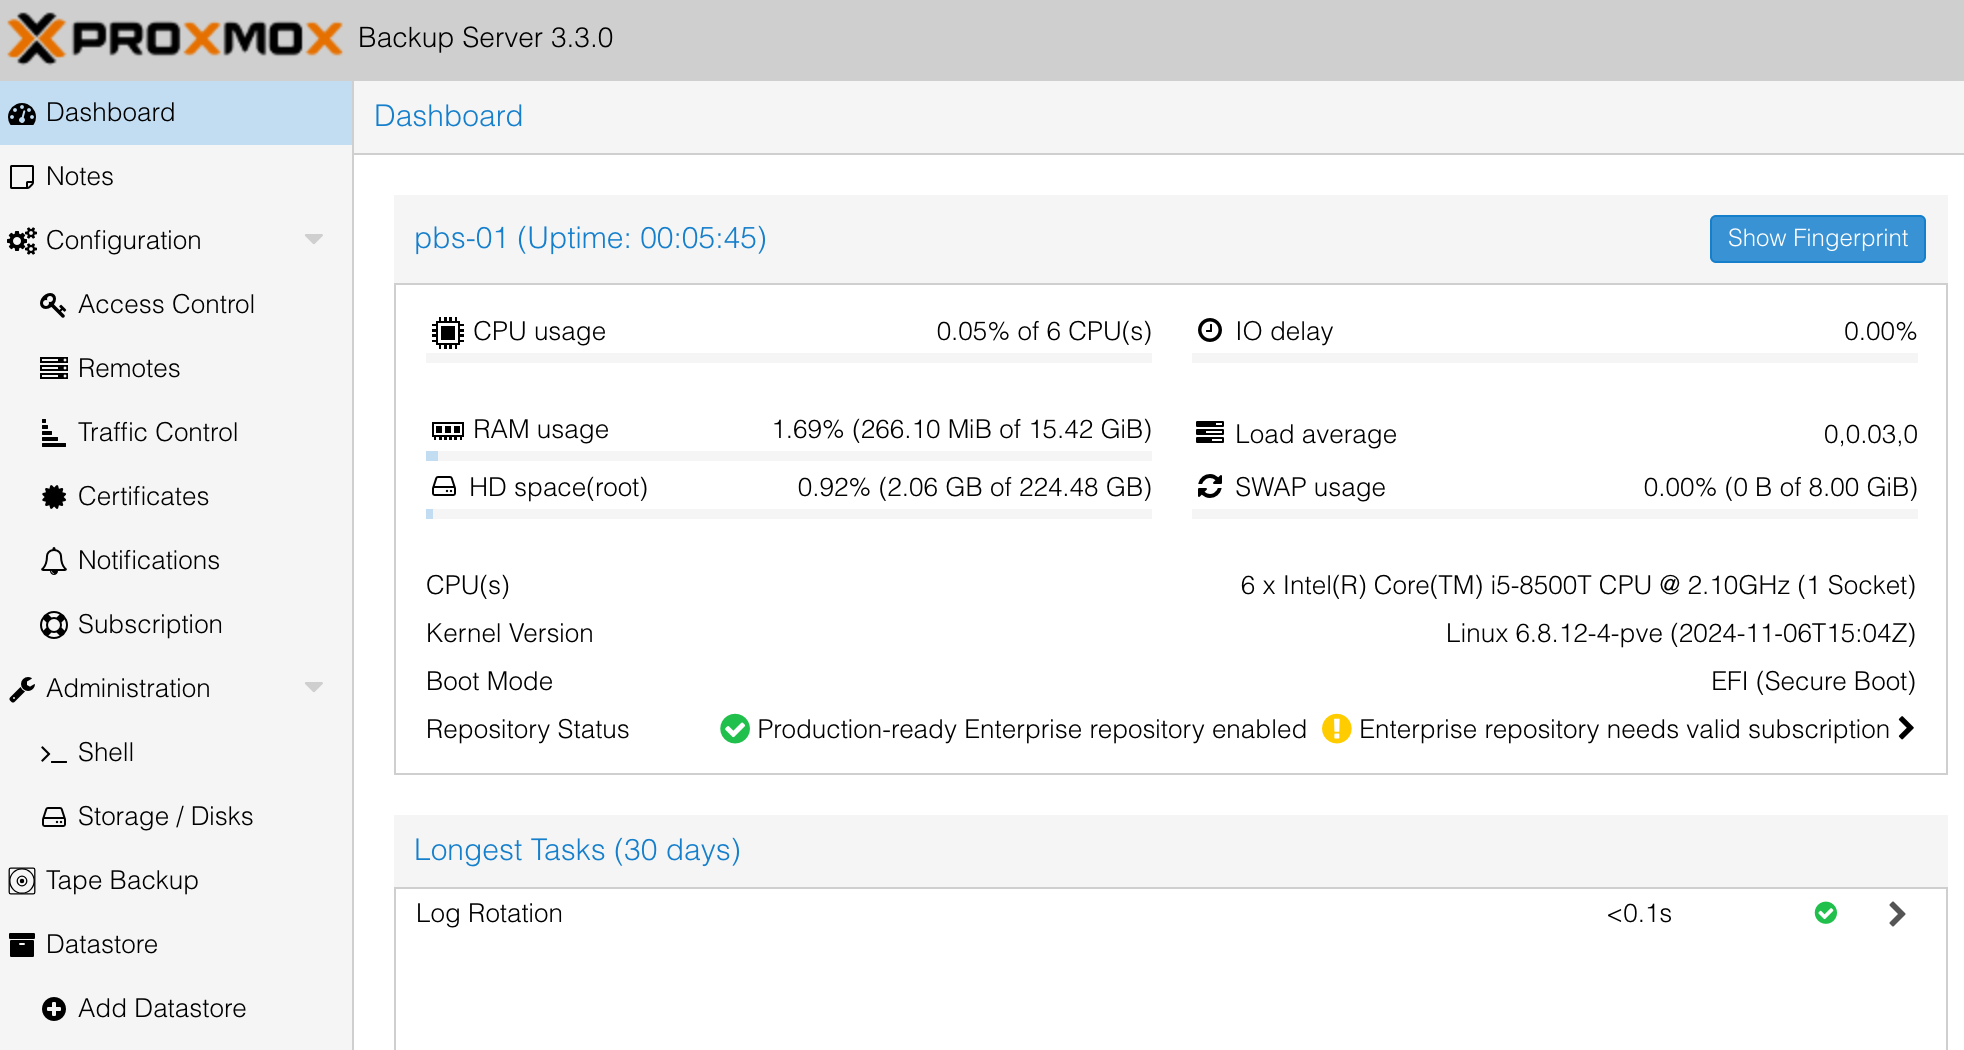
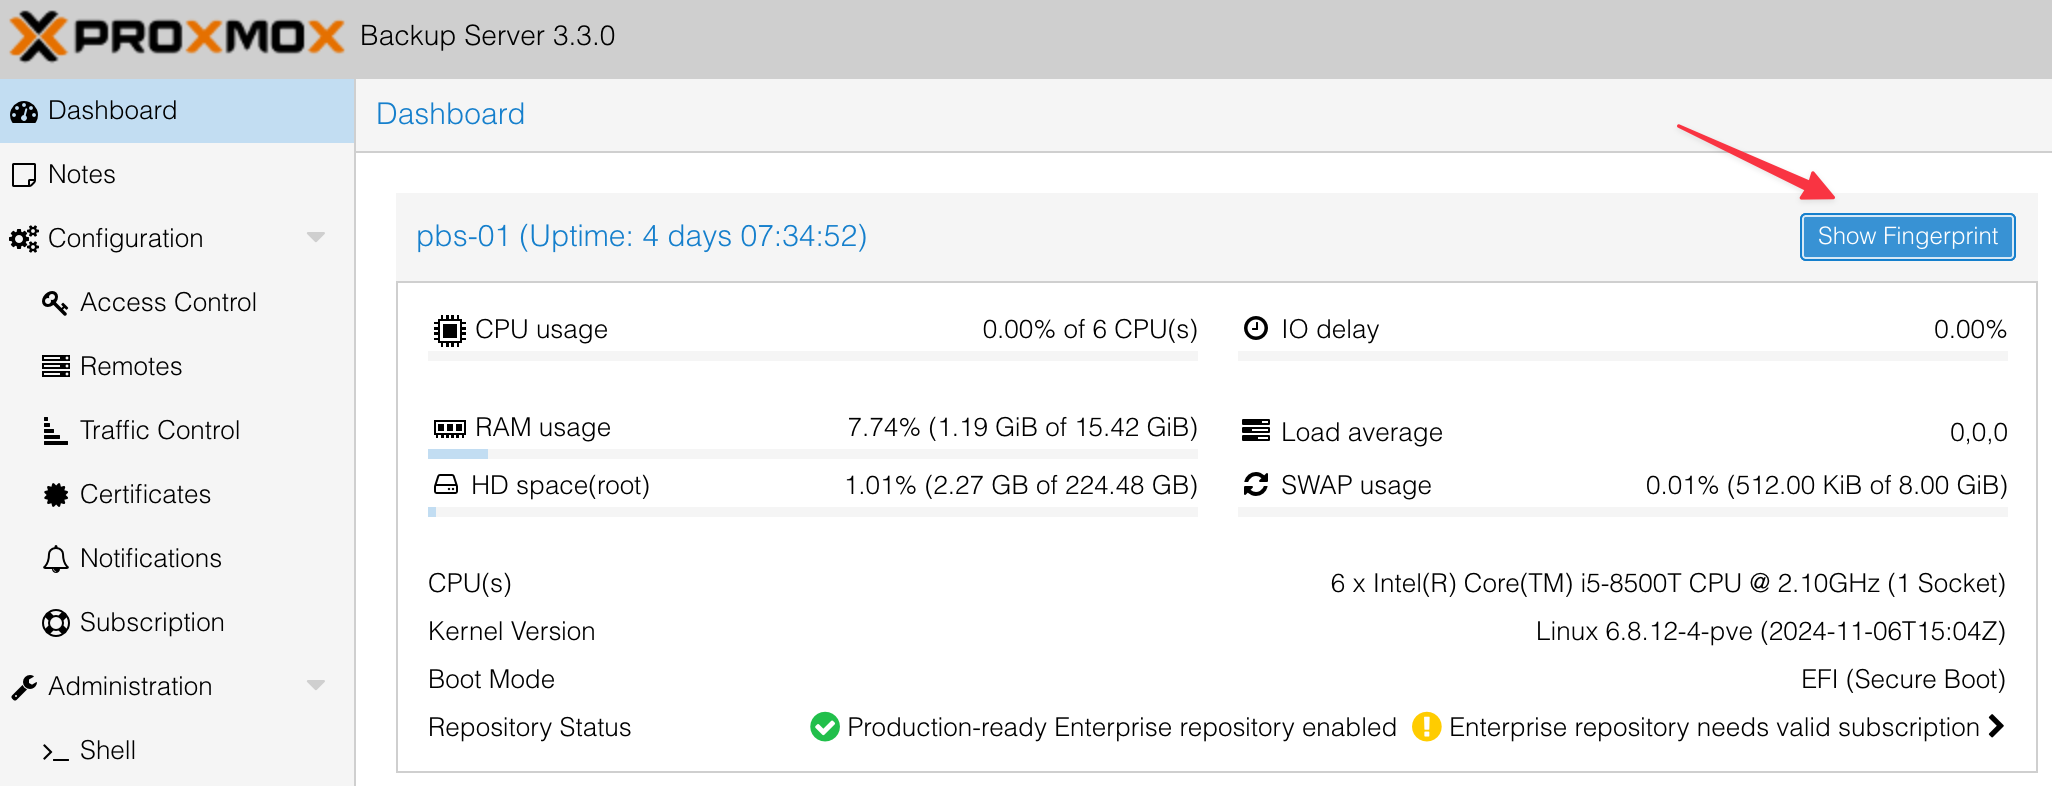
Fill in the required information, including the user account we created earlier. To get the fingerprint, go back to PBS, open the Dashboard, and copy the fingerprint displayed there. Paste the fingerprint into the configuration in Proxmox VE.
For the datastore, enter the same name you used when creating the datastore in PBS, such as backup-01.
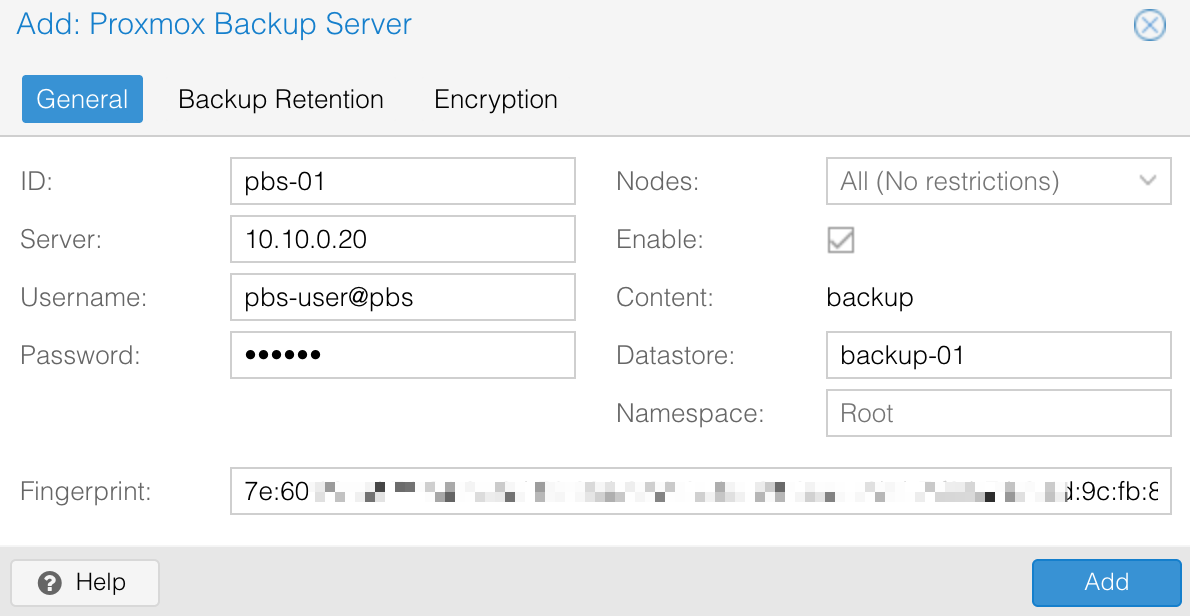
Once completed, Proxmox VE will be connected to PBS and ready to use for backups.
Taking the First Backup
To verify that everything is set up correctly, select any VM in Proxmox, navigate to the Backup tab, and ensure you select PBS as the storage. By default, Proxmox usually selects the local disk, so make sure to change it to PBS before clicking Backup Now.

Wait for the backup process to complete. Once done, go to PBS, navigate to Datastore > backup-01 > Content, and you should see the same backup listed there. This confirms that everything is configured correctly and that the backup system is working as expected.
Backup Schedule
To avoid manually backing up each VM, let’s set up a backup schedule. In Proxmox VE, select Datacenter, navigate to Backup, and add a Backup Job. Here, you can customise how often you want the backups to run. While you can schedule backups as frequently as every hour, I’m happy with daily backups at 2 AM.

For the mode, I chose 'Stop', which temporarily shuts down the VM during the backup to ensure data consistency. It’s the safest option for critical VMs but requires a brief downtime. Other modes include 'Snapshot', which allows backups while the VM is running, and 'Suspend', which pauses the VM during the process. I highly recommend reviewing the documentation to understand these modes and choosing the one that best fits your environment.
Additionally, you can select specific VMs for the backup job, but I chose 'All', so any new VMs I spin up in the future will automatically be included in the backup without needing further configuration. This makes managing backups much easier.
Prune and Garbage Collection
Let’s talk about prune and garbage collection (GC). Prune removes old backup snapshots based on your retention rules, and GC deletes the unused data chunks from the datastore that are no longer referenced by any snapshots, freeing up disk space.
For my setup, I’ve configured prune to run every Friday at 5 AM and GC to run every Sunday at 7 AM. My retention policy keeps the last 6 backups, 2 monthly backups, and 2 yearly backups.
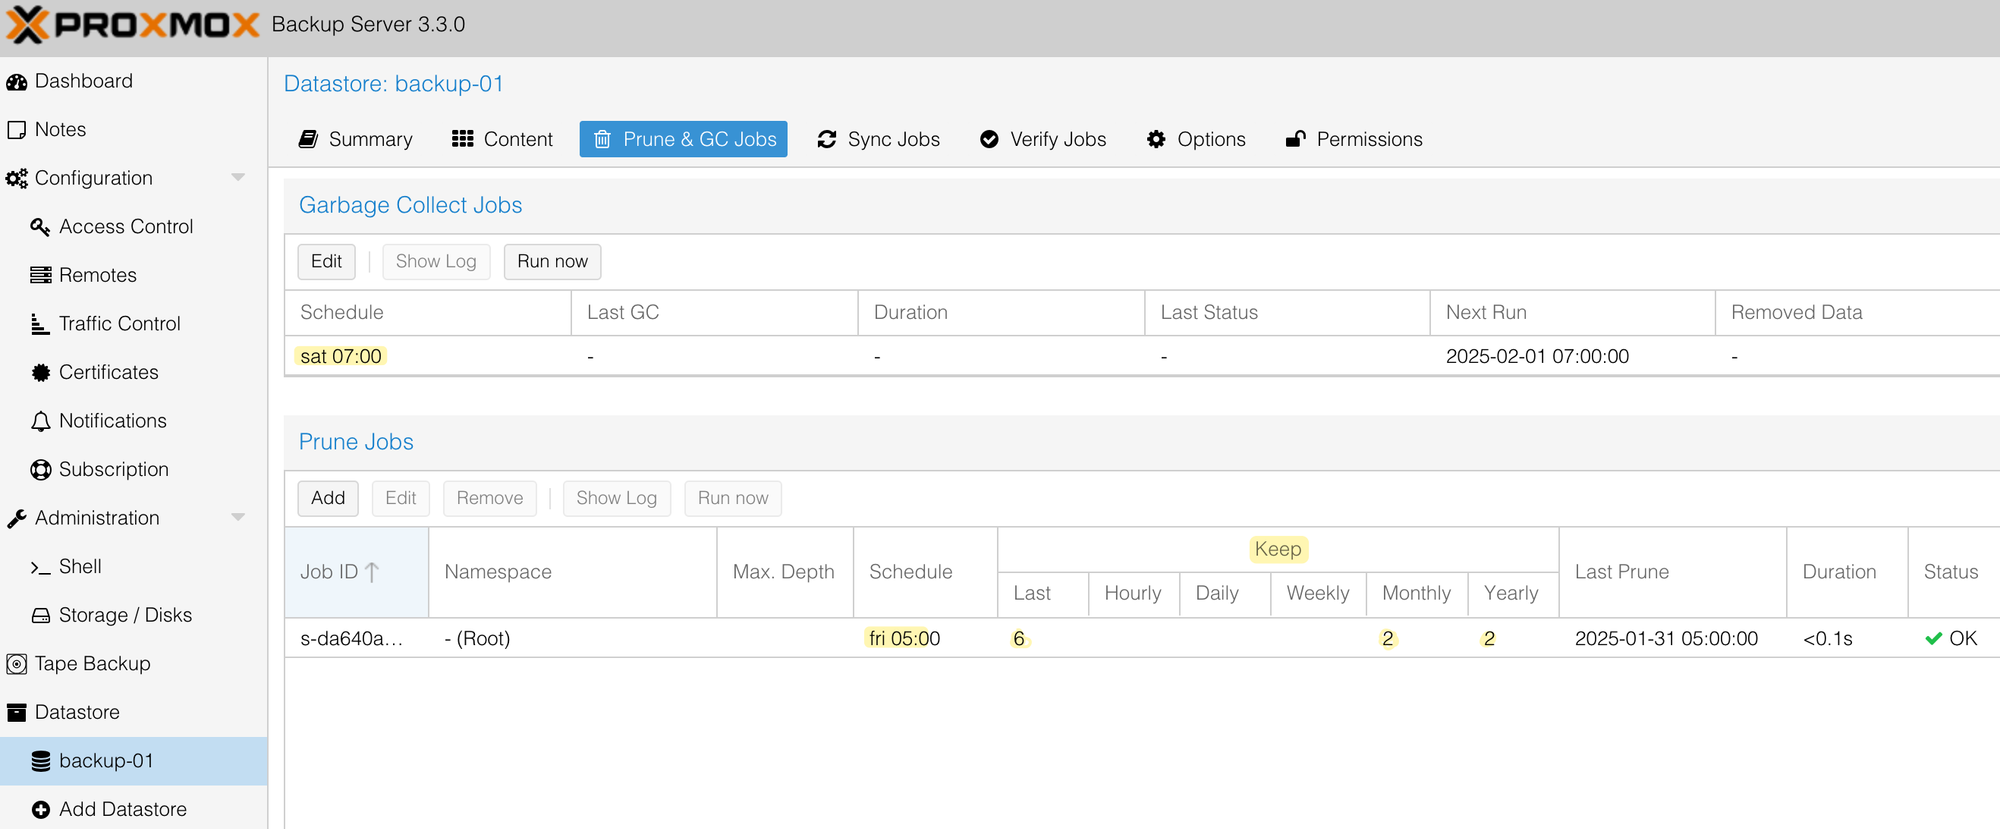
During the prune job, PBS checks all the snapshots in the datastore and removes any that exceed these retention limits. For example, it ensures only the most recent 6 backups are retained for regular intervals, keeps 2 backups from each month, and stores 2 yearly backups for long-term retention.
However, even after prune deletes snapshots, the actual data chunks remain on disk until GC runs. When GC runs, it scans the datastore for any orphaned chunks that are no longer referenced by the remaining snapshots and deletes them permanently. This ensures that disk space is reclaimed while adhering to the retention policy.
Restoring a Backup
Let’s see how to restore a VM from a backup. I’m writing this post on 31st January at 22:10, and my backups run daily at 2 AM, so there should be a backup from 31st January at 2 AM. Now, let’s assume I accidentally corrupted the VM and want to restore it to the last known good state. To simulate corruption (a bit silly, I know), I created a file called corrupted inside the VM.
suresh@vm-template-v1:~$ touch corrupted
suresh@vm-template-v1:~$
suresh@vm-template-v1:~$ ls
29th-jan  30th-jan  50-cloud-init.yaml  corrupted  get-docker.sh
suresh@vm-template-v1:~$
Now that the VM is "corrupted," I’ll restore it. First, I shut down the VM. Then, under the Backup tab in Proxmox VE, I selected pbs-01 as the storage. It displayed two backups - one from 30th January and another from 31st January. I chose the 31st January backup and clicked Restore.
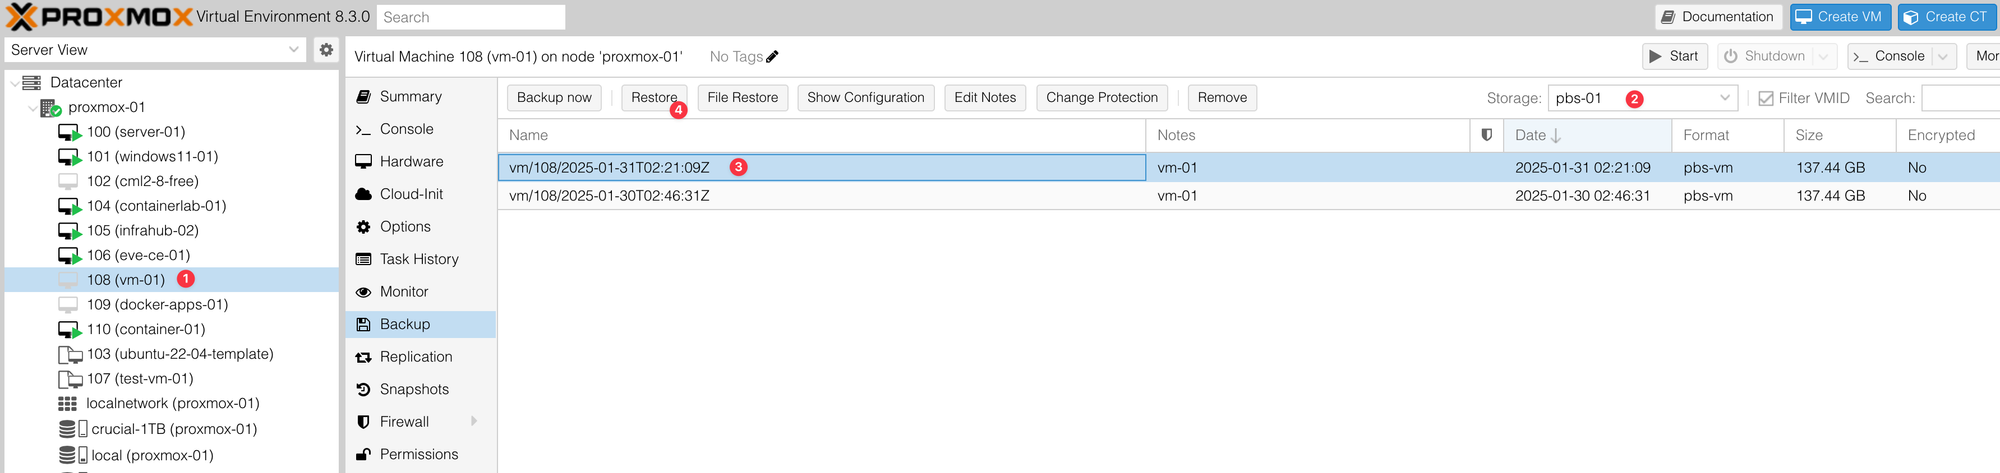
Proxmox gave me a warning that restoring the backup would overwrite the current state of the VM, but that’s fine for this scenario. After a few minutes, the VM was successfully restored.
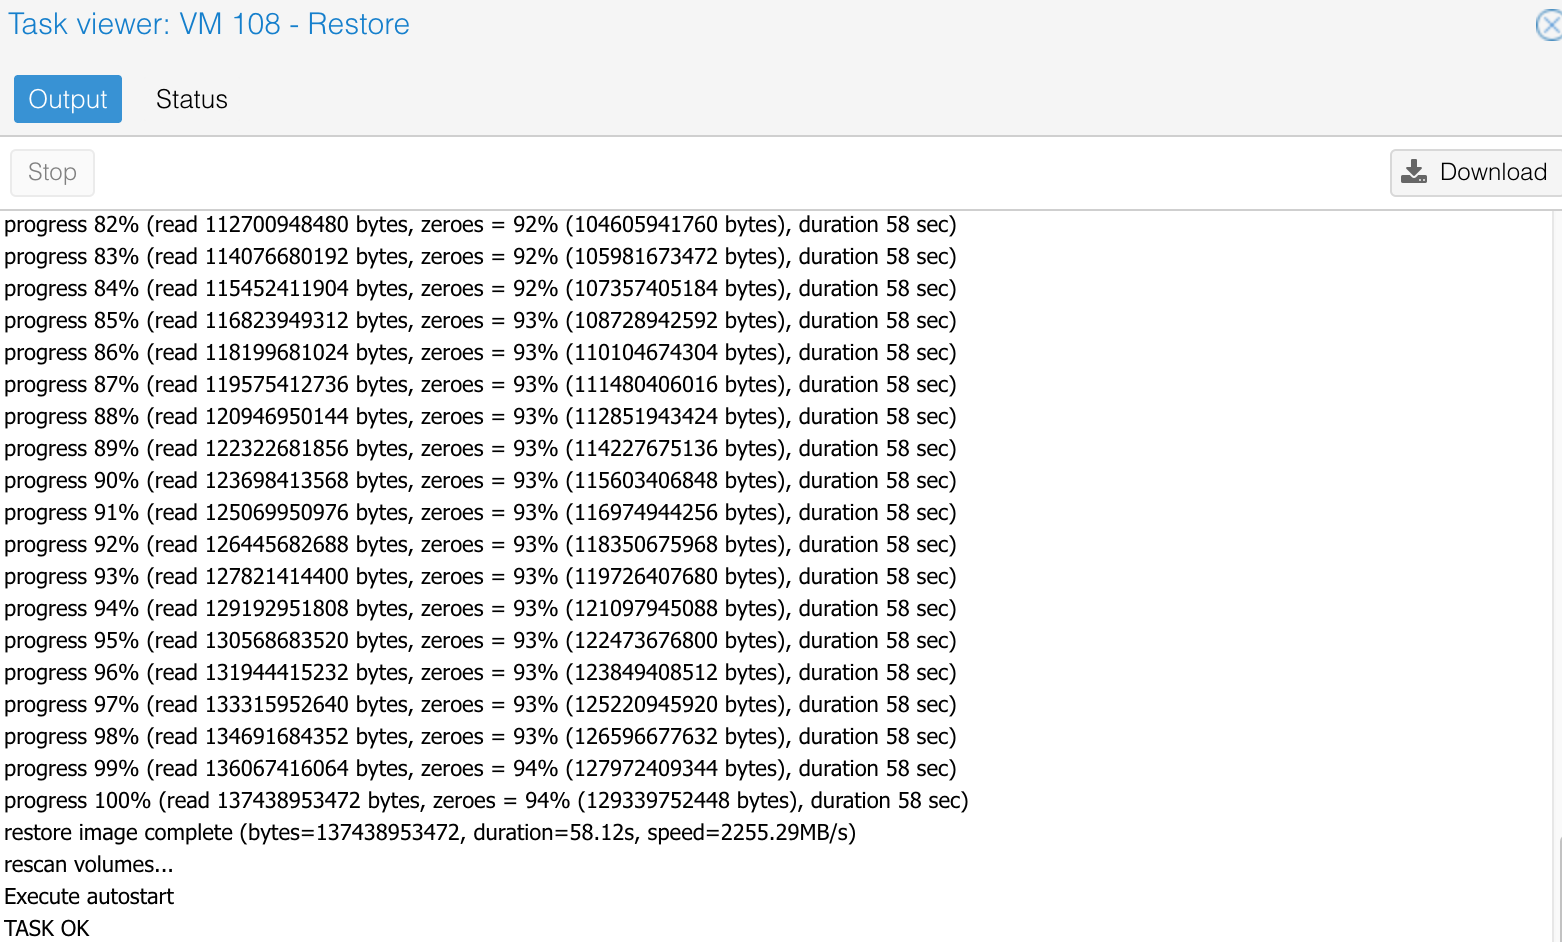
I logged in to the VM, checked for the corrupted file, and it was gone, confirming that the VM was restored to the last known good state.
suresh@vm-template-v1:~$ ls
29th-jan  30th-jan  50-cloud-init.yaml  get-docker.sh
So, what happens if my entire Proxmox VE setup is wiped out? Well, I didn’t test this scenario (and I absolutely don’t want to!) because I have several VMs running. However, from what I understand, the process would involve doing a fresh installation of Proxmox VE and then adding PBS as a storage option just like we did earlier. Once PBS is connected, I should be able to access the backups stored there and restore my VMs as needed.
References
https://artofinfra.com/journey-and-tribulations-proxmox/