Before we get into what Tailscale is or how it compares to a traditional remote access VPN, let’s take a quick look at Tailscale in action. The main problem Tailscale solves is remote access to your internal workloads.
In my homelab, I have a server running Linux. When I’m on my home network, I can access it directly without any issues. But if I step outside and want to access the same server over the Internet, Tailscale makes that much easier and you can have it up and running in about 10 minutes for free.
Typically, you would set up some kind of a VPN, either running on a server or a dedicated firewall. Then, you’d install a VPN client on the devices and point them to the public IP of your VPN server or firewall. That’s exactly what I have at the moment.
Tailscale takes a completely different approach, and you don’t need any of that. I’m not saying one is better than the other, I’m just pointing this out for comparison. I’ve shared my thoughts on the pros and cons of each solution at the end of this post.
Tailscale Installation and Setup
Head over to the Tailscale website and sign up for an account. The free personal plan gives you 3 users and up to 100 devices, which should be more than enough for most people. Once your account is ready, you’ll need to set up Tailscale on at least two devices.
For this example, I’m going to install it on my server (Ubuntu VM) and my macOS machine. Once you’ve signed up and logged in, Tailscale will show you the installation instructions. For Linux, you can simply run the script provided by Tailscale.
curl -fsSL https://tailscale.com/install.sh | sh
Once that’s done, you can bring the device online by running the tailscale up command. With this, you’ll see a link in the terminal to authenticate this device. Just copy the link into your browser and log in to complete the setup.
sudo tailscale up

To authenticate, visit:

        https://login.tailscale.com/a/1265040350150b2

Success.
Next, repeat the steps on another device. This could be Windows, macOS, iPhone, or any other supported device.
For macOS, which I’m using in this example, download and install Tailscale. Just like before, you’ll get a link during the installation to register the device. Copy the link into your browser and complete the login.
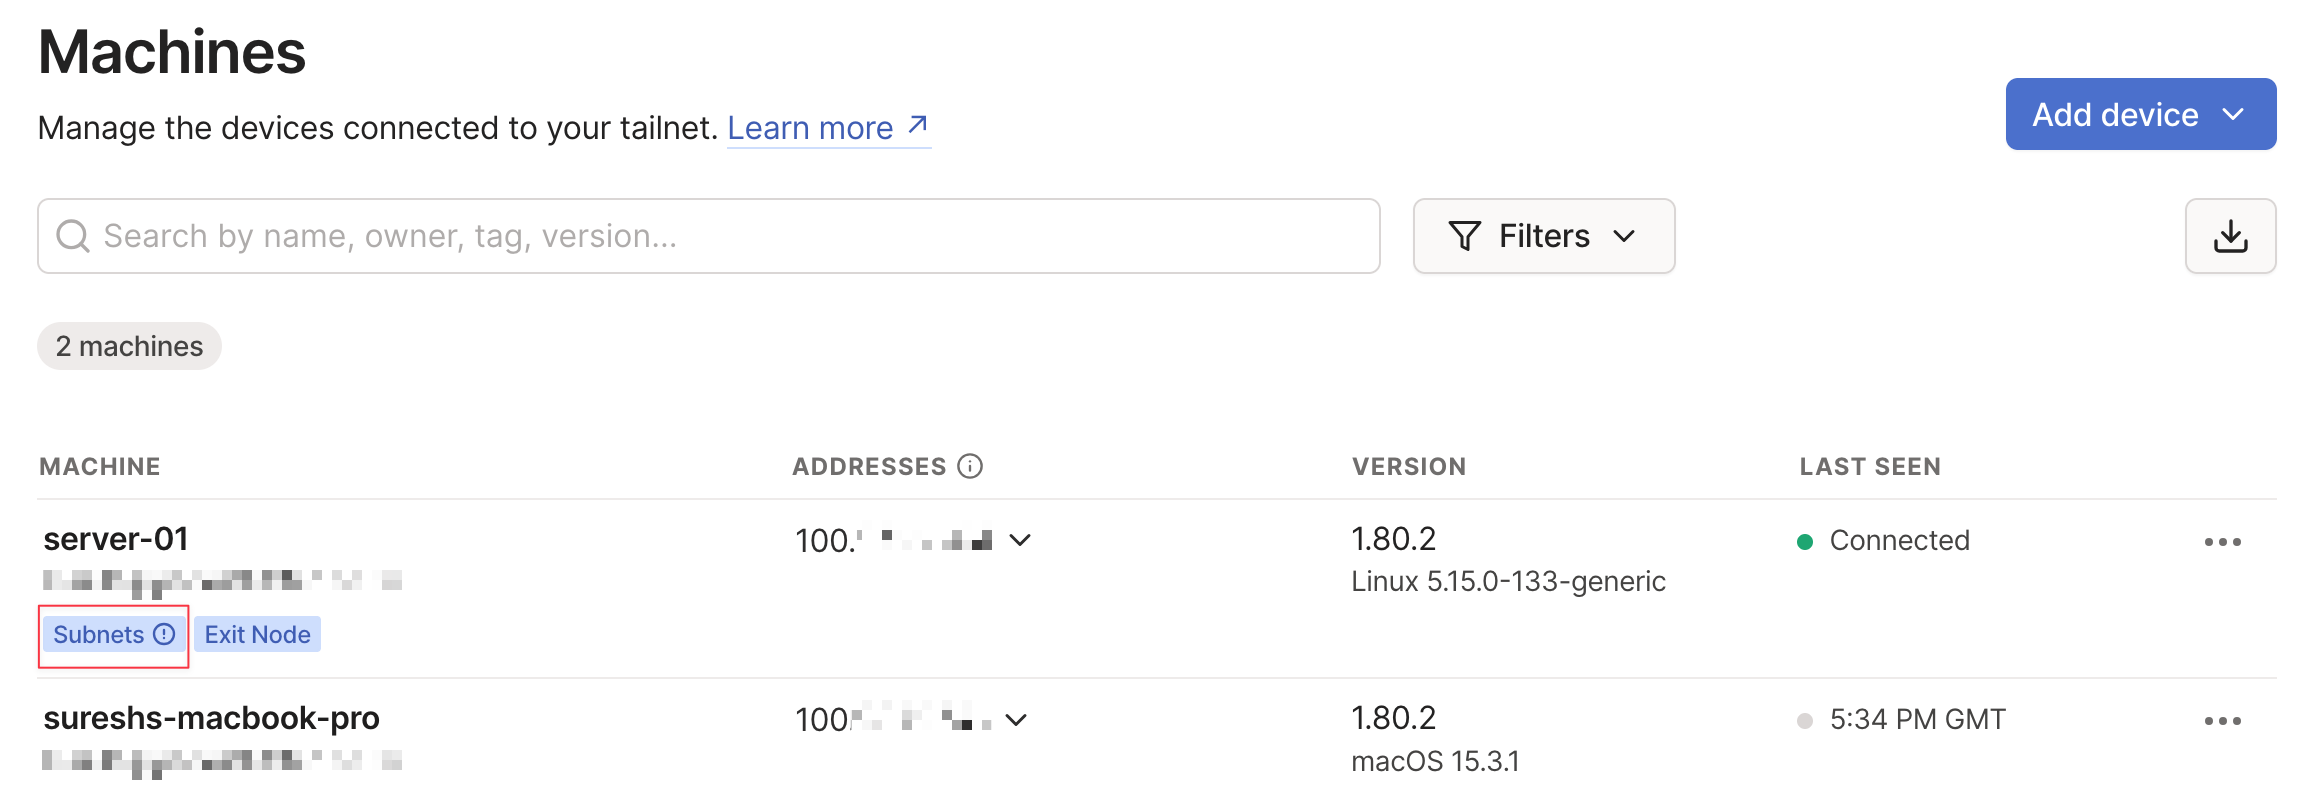
Once that’s done, head over to the Tailscale admin console, and you’ll see both devices listed as connected.
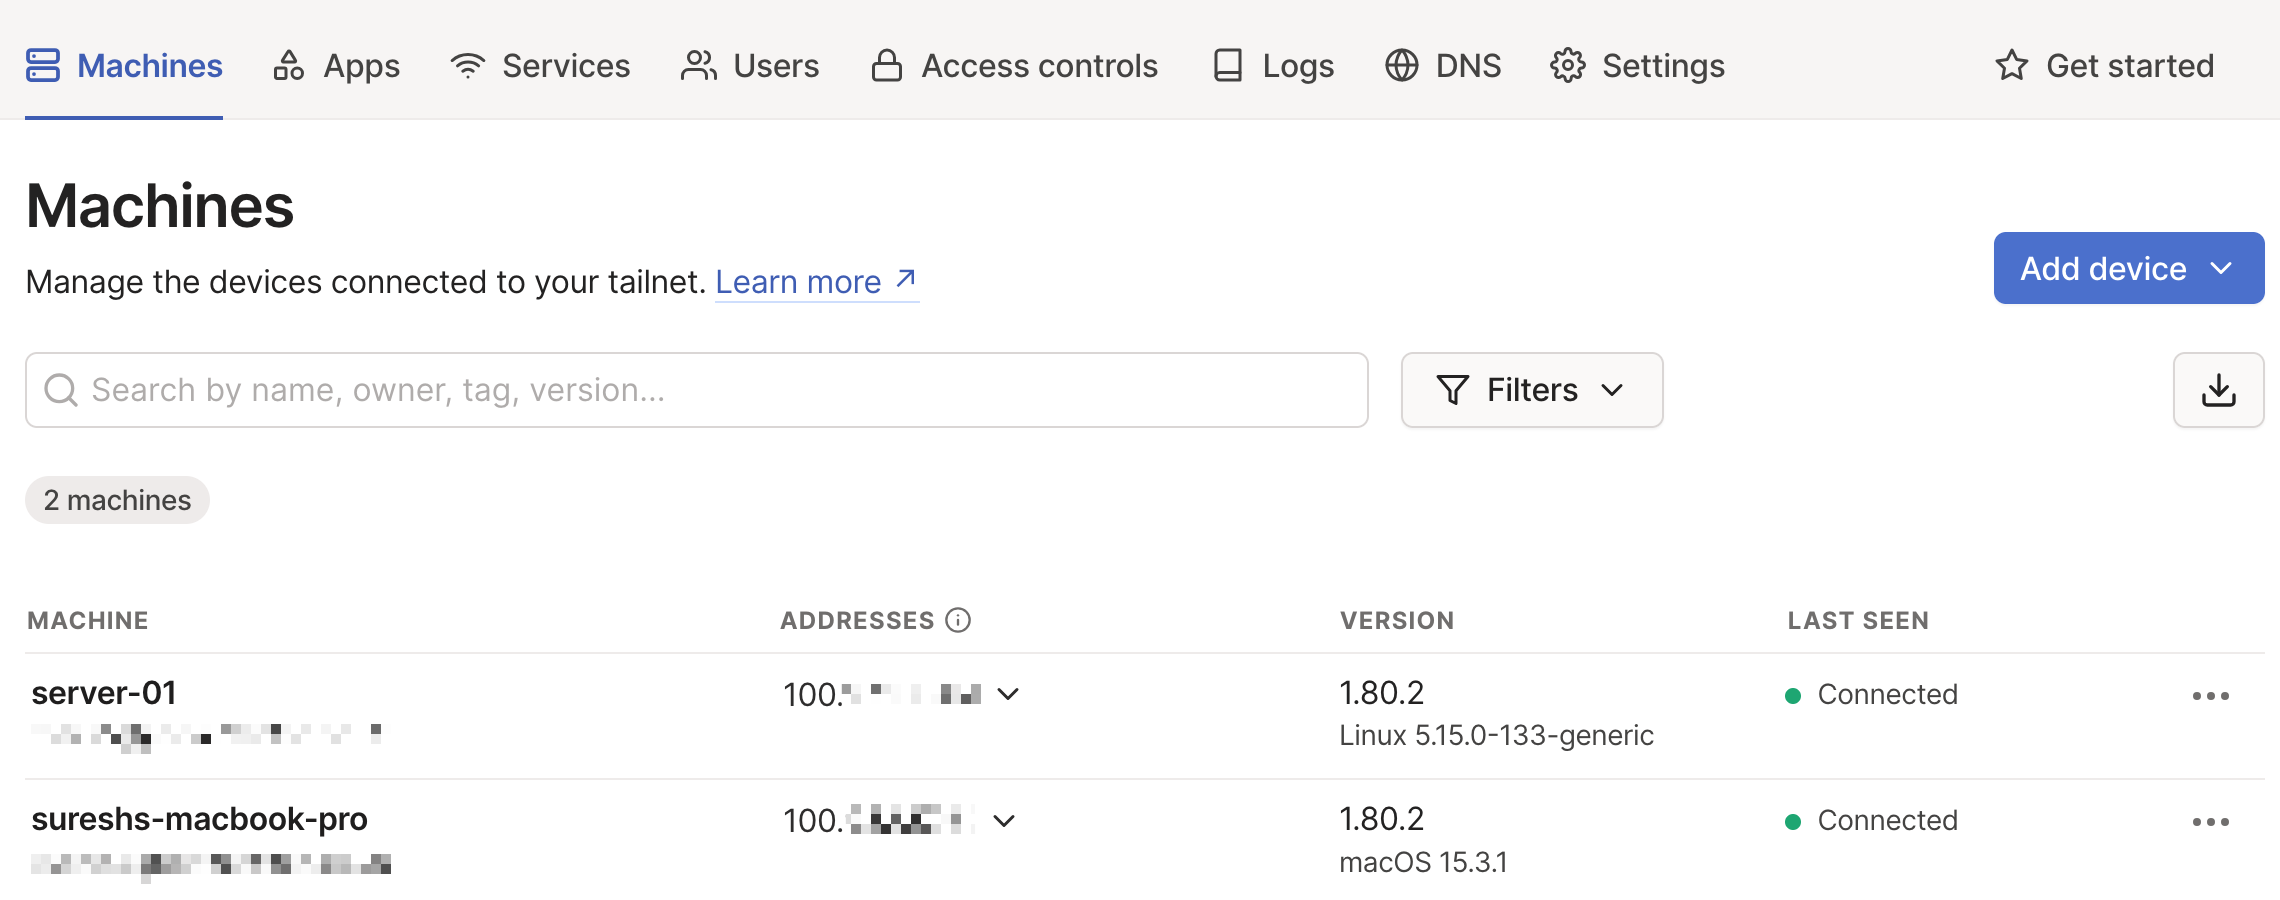
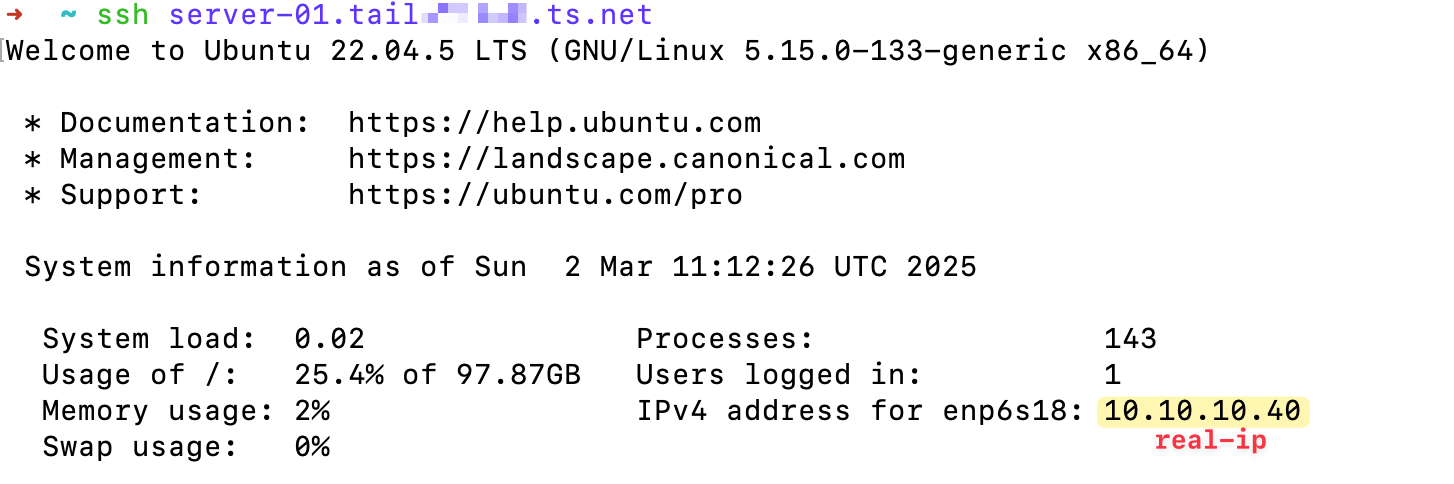
Now, let’s say I take my laptop away from home and I’m working from a coffee shop, and I need to SSH back to my server (called server-01). All I need to do is connect to Tailscale VPN on my macOS and SSH to the server by using the IP or short domain or full domain name that shows up in the admin portal. This is different from the actual IP of server-01 on my home network.

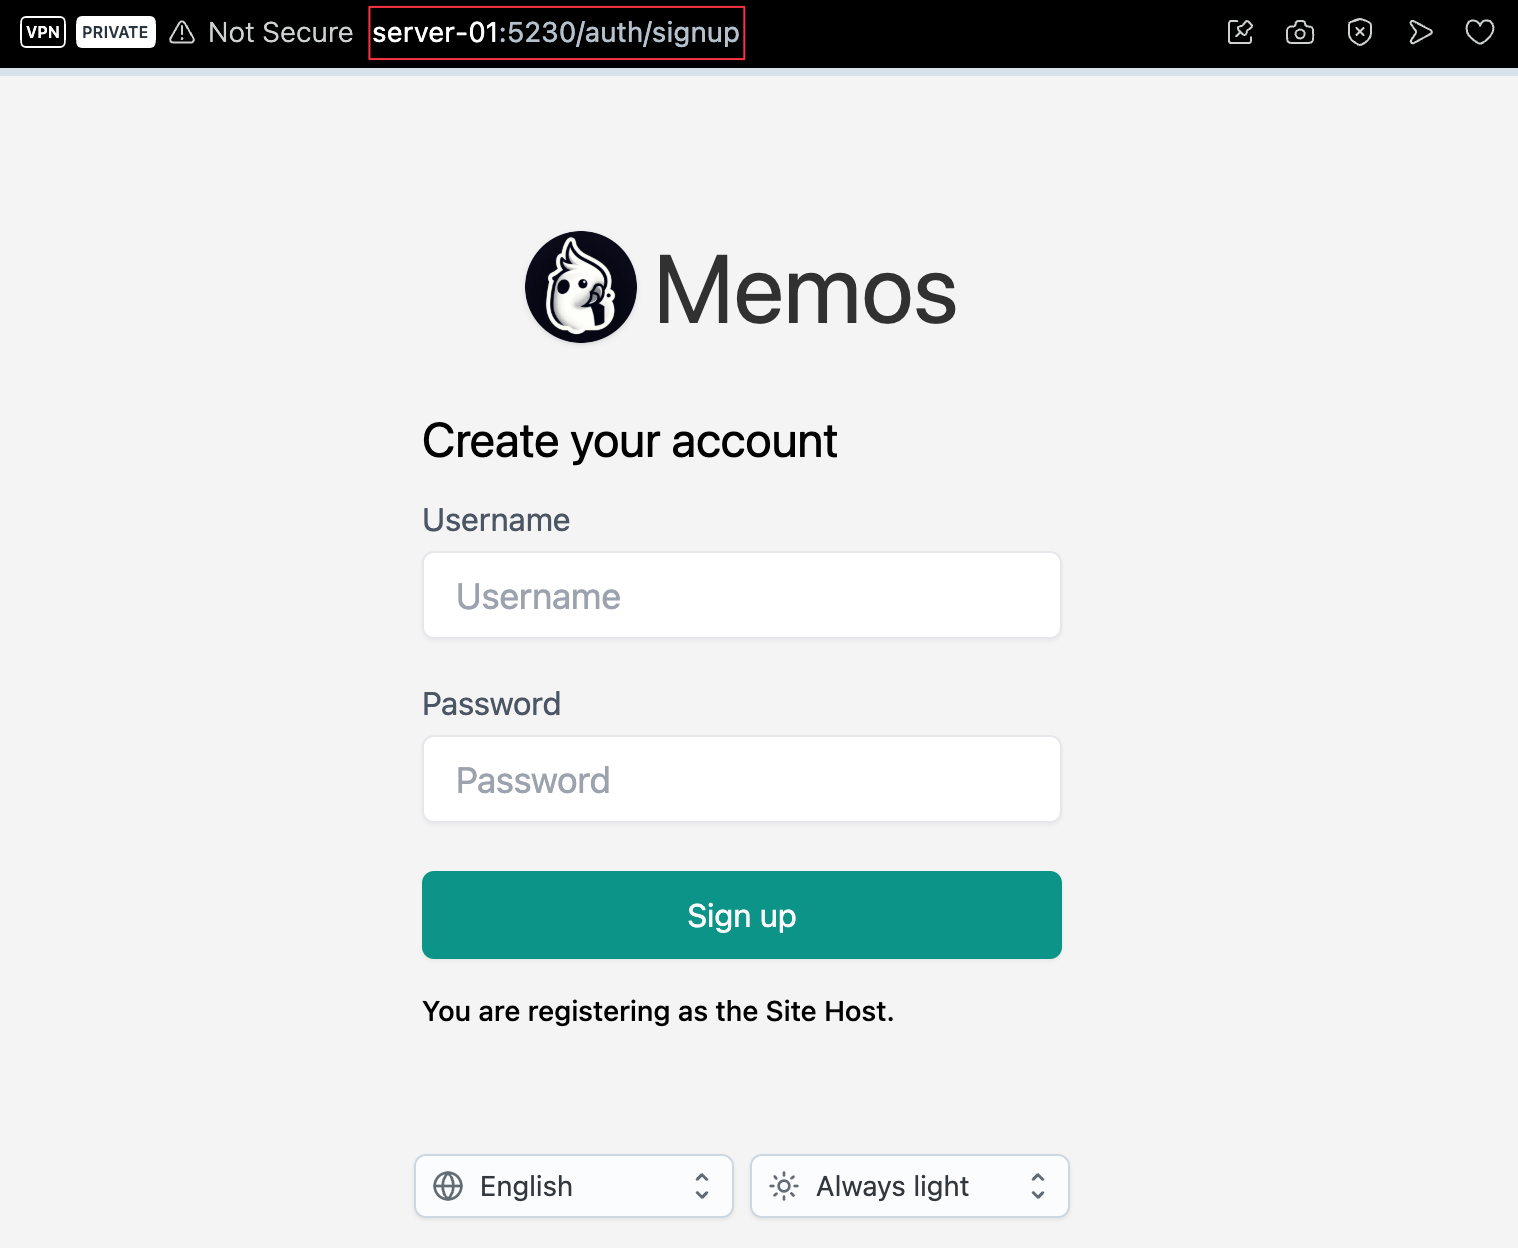
If I have any services running on this server, I can access them directly by visiting something like http://server-01. In this case, I have the 'memos' app (a nice self-hosted note-taking app) running on port 5230. All I have to do is open the browser and visit the URL.
Just to be clear, I’m not connecting to the real IP of the server. Instead, I’m connecting to the IP/domain name that Tailscale assigns to this device.
As you may have noticed, that’s all I had to do. I didn’t need to set up any port forwarding or even tell Tailscale what my public IP was. Tailscale handles all of that behind the scenes, making the whole process seamless.
How Tailscale Works?
Tailscale has a great explanation of how it works, but I’ll try to explain it in my own words. Tailscale is built on top of the WireGuard VPN protocol. If you want to set up WireGuard manually without Tailscale, here’s how it works.
For example, in my homelab, I have a MikroTik router that comes with a built-in WireGuard server. If I want my macOS machine to connect to this server and access my internal resources while I'm away, here are the required steps.
- I need to generate a private/public key pair on both devices and exchange the public keys between them.
- The private key stays on each device and never leaves the local device.
- On the client wireguard device, macOS in this case, I need to specify the public IP and port of the wireguard server, so having a static IP is a must (or you need some sort of dynamic DNS service)
- If I later want to add my iPhone to the WireGuard server, I’d have to repeat the same steps - generate keys, exchange public keys, and configure everything manually.
Tailscale automates this entire process. It handles the key exchange behind the scenes, but the private keys still never leave the device. Even the actual data traffic doesn’t pass through Tailscale’s servers - it goes directly between your devices.
The main difference is that with my current setup (using a normal VPN), I’m connecting directly to my home network (via the Internet, of course), and there’s no third party involved. I’m also connecting to my devices using their real IPs, not the IPs provided by Tailscale.
There are definitely pros and cons to both approaches, and I wouldn’t say one is better than the other - it really depends on what you need.

Tailscale Exit Node
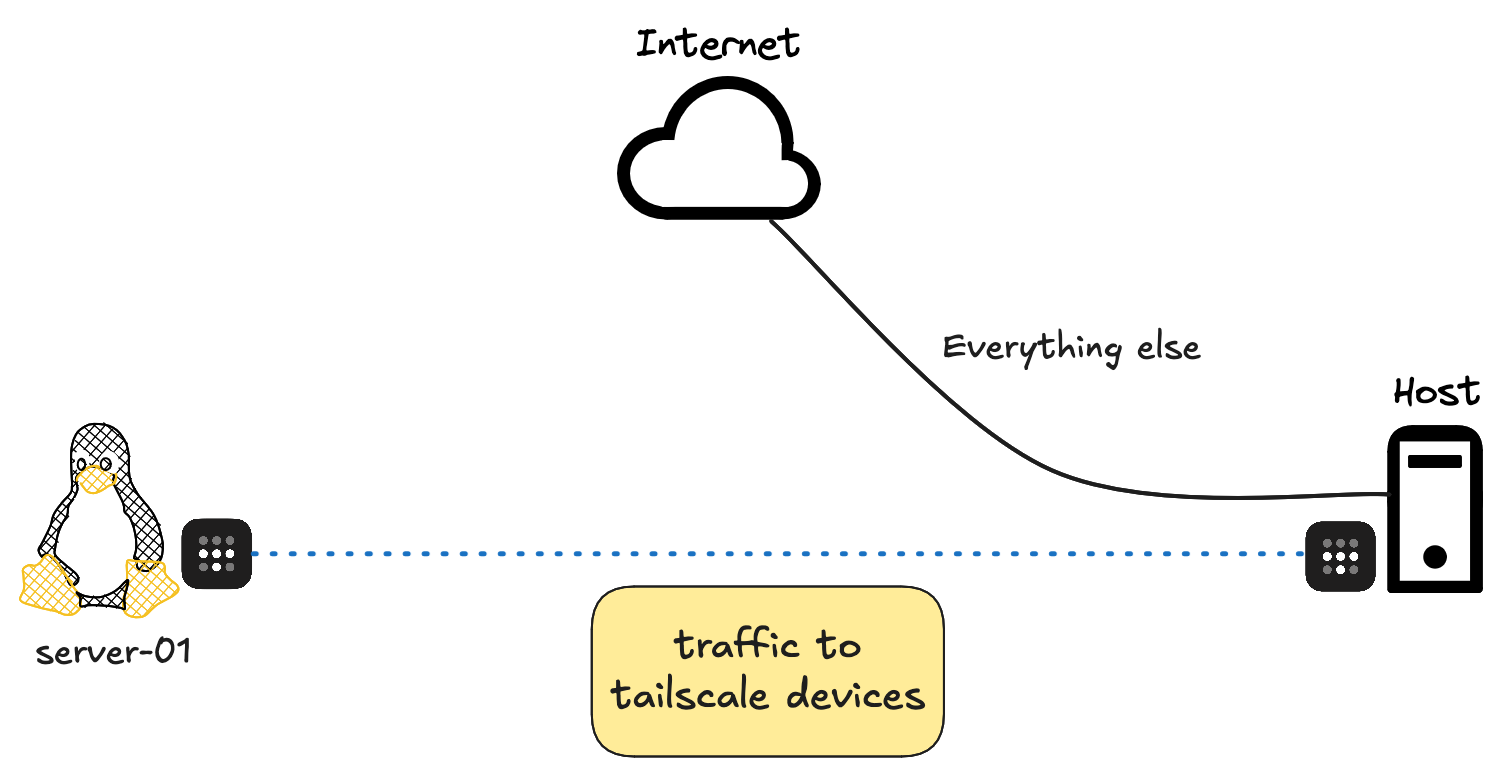
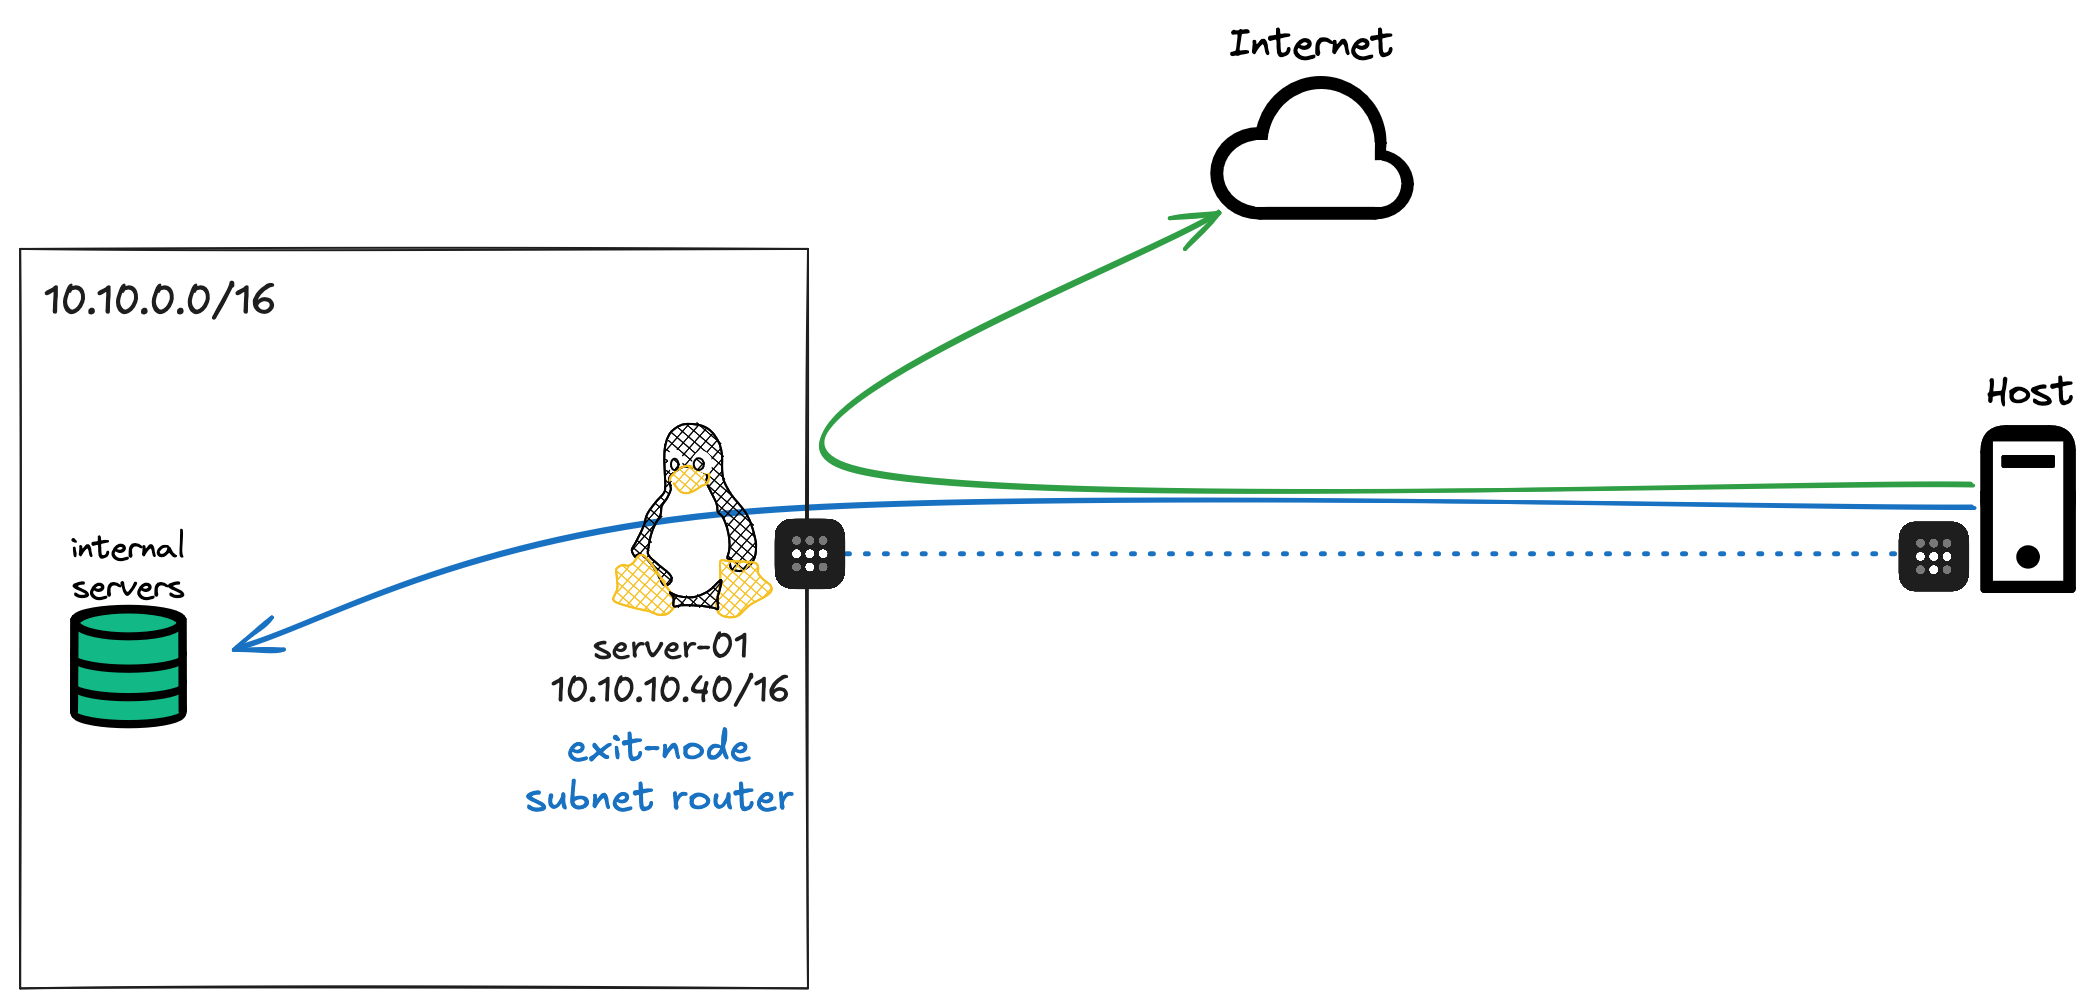
If you look at my previous example and the diagram, you might have noticed that only traffic to server-01 was going through the tunnel while everything else went directly to the Internet.
But what if I want all my traffic to go through my home network so it looks like I’m browsing from home even when I’m outside? That’s where Tailscale’s ‘exit node’ feature comes in. With this enabled, all traffic from my macOS will go through the tunnel, including regular Internet traffic.
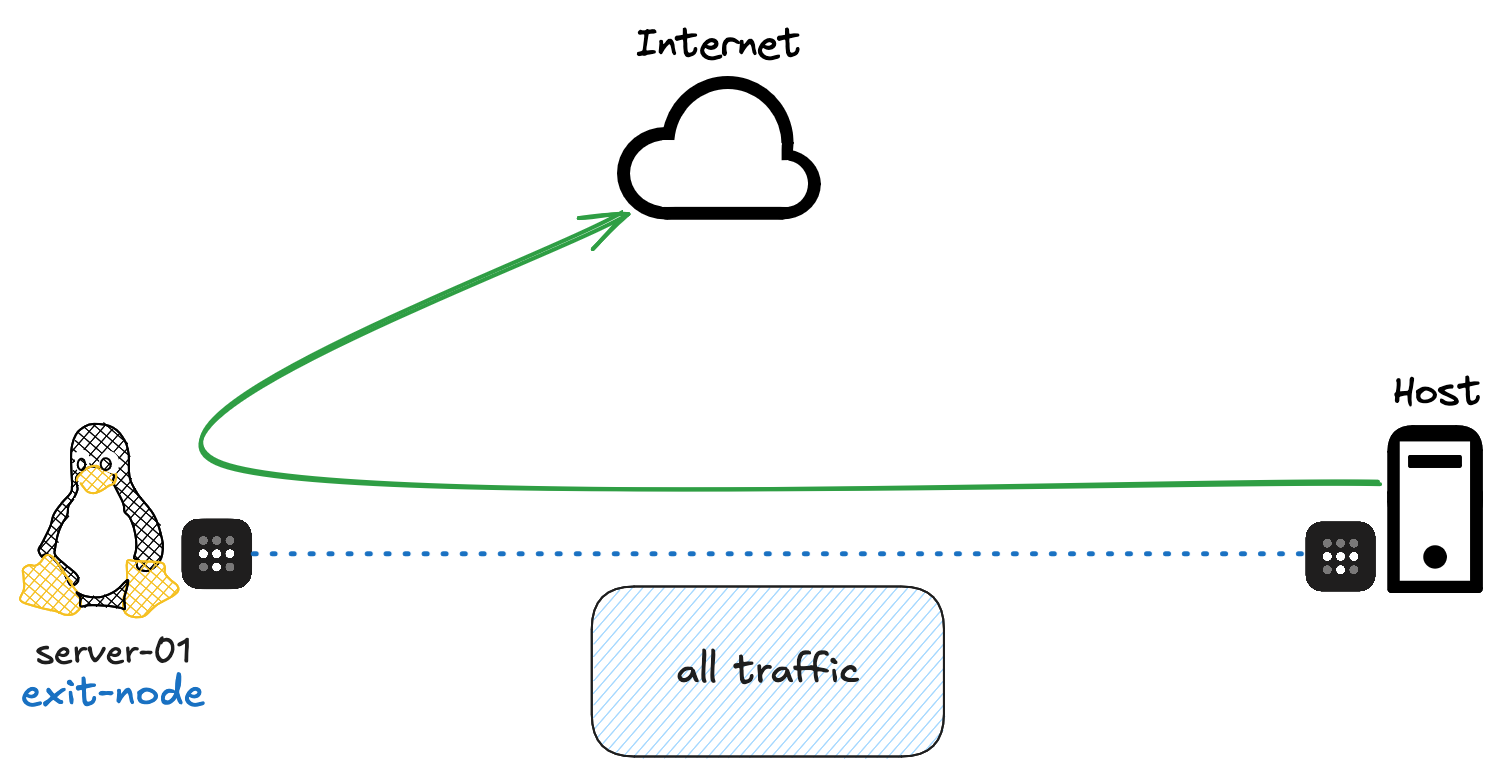
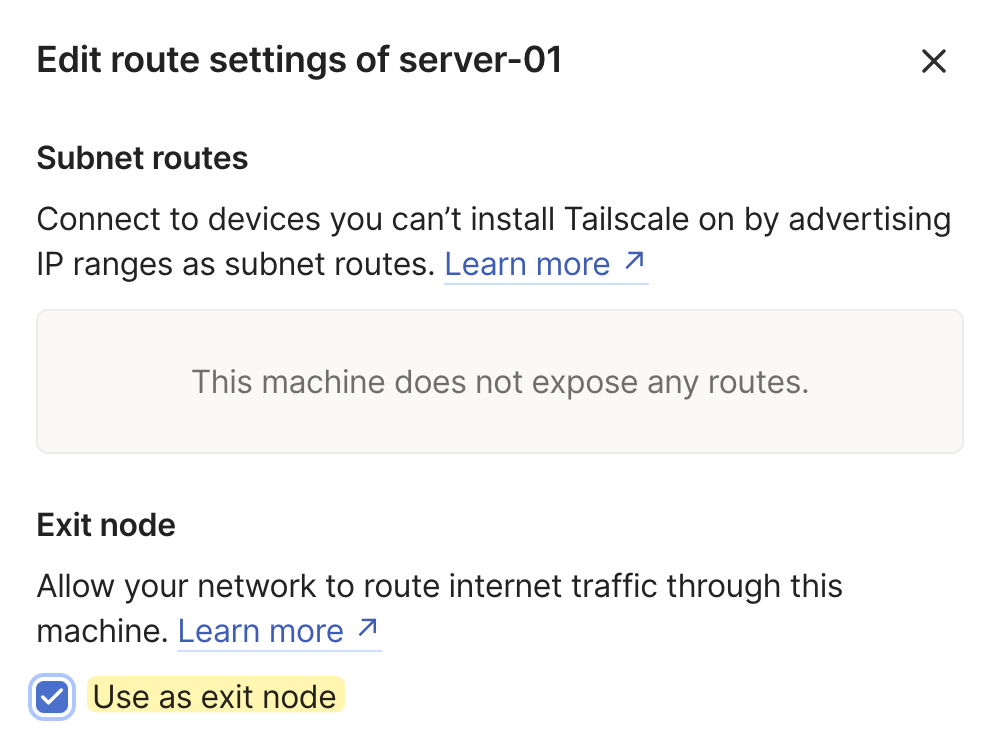
The setup is simple. On server-01, I just need to run a command to make it an exit node.
sudo tailscale up --advertise-exit-node

Warning: IPv6 forwarding is disabled.
Subnet routes and exit nodes may not work correctly.
See https://tailscale.com/s/ip-forwarding
After that, I need to approve it from the Tailscale admin portal. To do that, click on the 'Exit Node' message and put a tick next to 'Use as exit node'
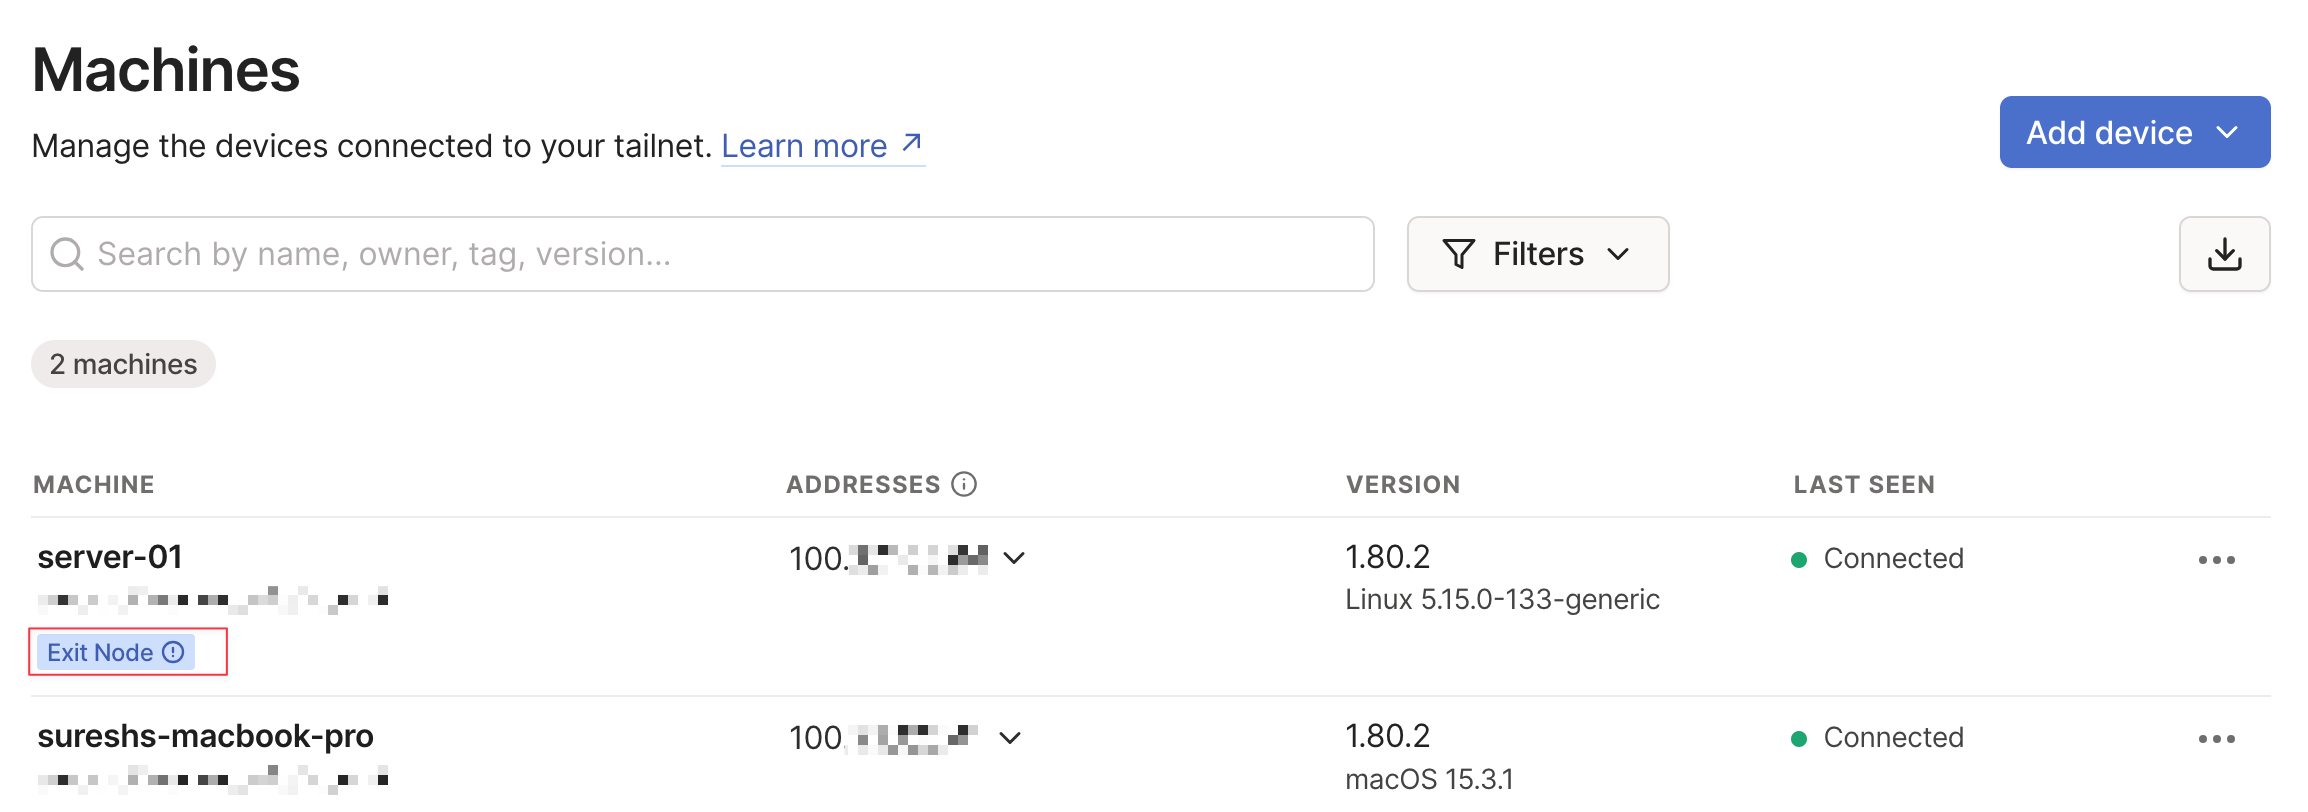
Finally, on my macOS, I can select this newly created exit node, and that’s it.
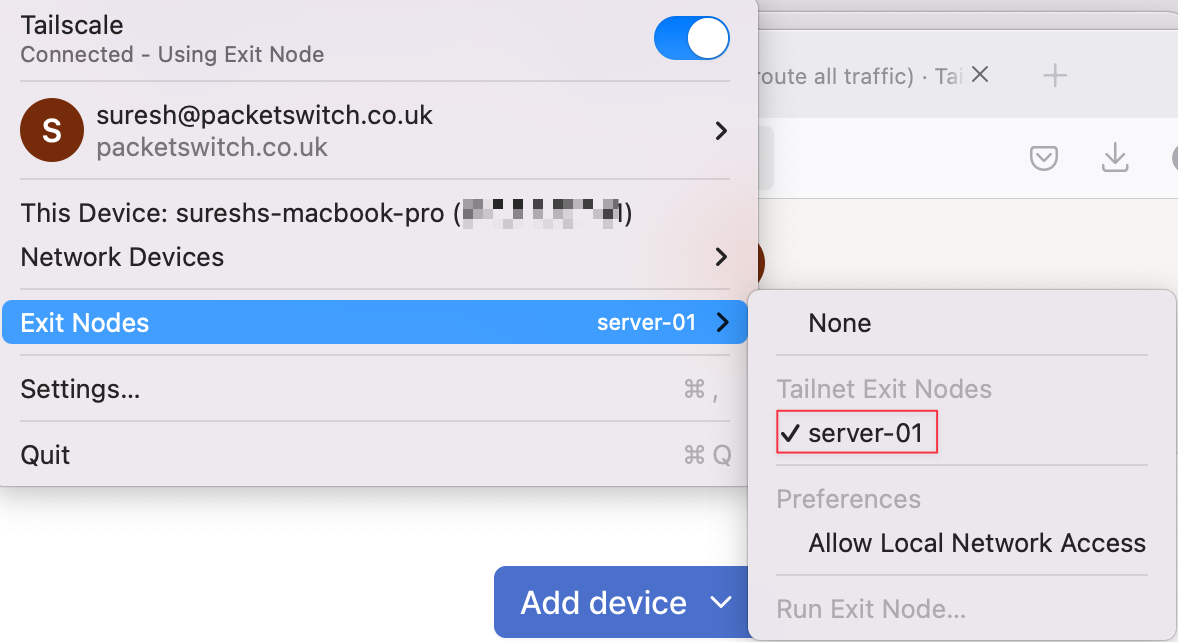
This gives me the flexibility to pick and choose when I want to send all traffic through my home network and when I want to use split-tunnel. All I have to do is select server-01 as the exit node when I need it, or set it to None when I don’t.
Subnet Routers
So far, we’ve looked at how to connect to a single server and how to route all Internet traffic through an exit node. But by now, you might be wondering, do I need to install Tailscale on every single machine?
In my homelab, I have a lot of devices, and I really don’t want to install Tailscale on all of them. That’s where the ‘Subnet Router’ feature comes in. With this, you can designate one device as a subnet router and have it advertise a subnet to your Tailscale network.
In my case, server-01 is in the 10.10.0.0/16 network, and I have several devices on this subnet. I can configure server-01 to advertise this entire subnet to Tailscale. That way, if I want to access any device in 10.10.0.0/16 from my macOS (or any other Tailscale-connected device), the traffic will be routed through this subnet router.
These are the commands I ran on my Linux machine to advertise the routes. Refer to the Tailscale guide if you are unsure or need more information.
echo 'net.ipv4.ip_forward = 1' | sudo tee -a /etc/sysctl.d/99-tailscale.conf
echo 'net.ipv6.conf.all.forwarding = 1' | sudo tee -a /etc/sysctl.d/99-tailscale.conf
sudo sysctl -p /etc/sysctl.d/99-tailscale.conf
sudo tailscale up --advertise-routes=10.10.0.0/16 --advertise-exit-nodeJust like with the exit node, you’ll get a pop-up in the Tailscale admin console to approve this route. There’s also an option to modify the ACL so future requests like this get approved automatically - but you get the idea.
To my surprise, I wanted to see if I could resolve my internal DNS that Tailscale has no knowledge of. For example, my internal DNS domain is packet.lan. server-01 can resolve this without any issues, but when I tried resolving it from my macOS while connected to Tailscale, it actually worked.
ping pihole1.packet.lan

PING pihole1.packet.lan (10.10.100.252): 56 data bytes
64 bytes from 10.10.100.252: icmp_seq=0 ttl=63 time=142.728 ms
64 bytes from 10.10.100.252: icmp_seq=1 ttl=63 time=152.758 ms
I assume this is because when we set up server-01 as a subnet router, our macOS client sends all traffic - including DNS queries through server-01. Please let me know in the comments if there is a better explanation for this.
Subnet Routers Source NAT
Please note that if I try to access 10.10.50.50 for example, my traffic first hits the subnet router. The subnet router then performs Source NAT, meaning it changes the source IP of the traffic to its own IP. As a result, 10.10.50.50 thinks the traffic is coming from server-01. If you want to change this behavior, you can disable Source NAT in the Tailscale settings.
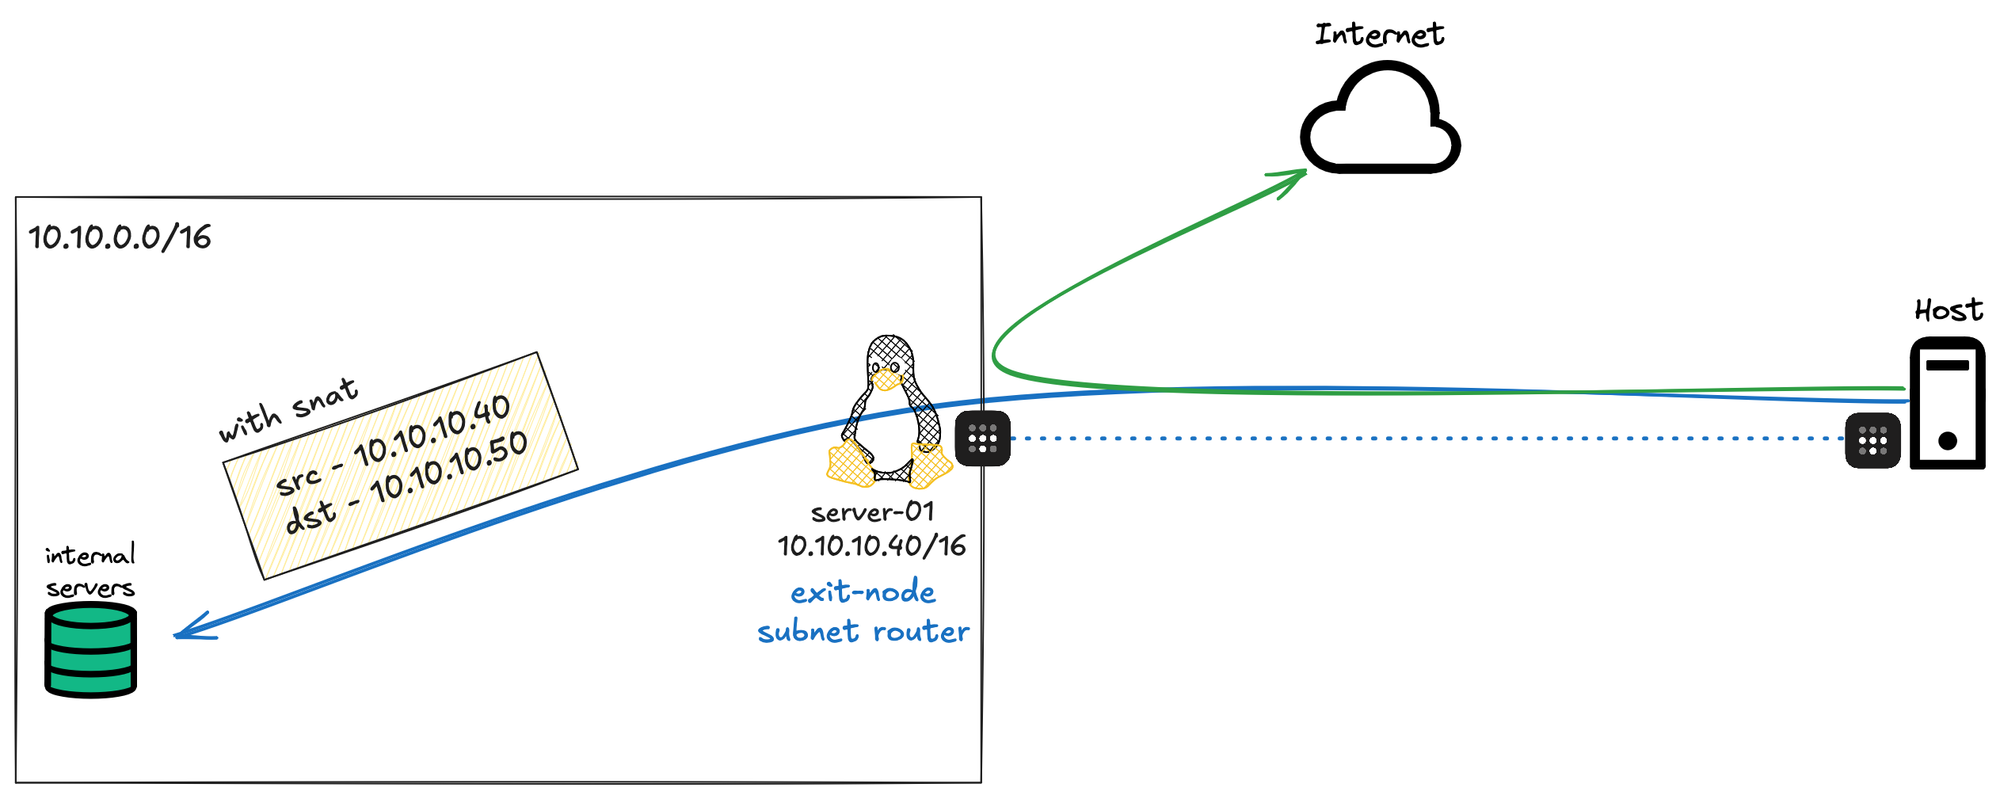
But this introduces another challenge. If I disable SNAT, the other devices on my network will see the real IP of my Tailscale traffic, which falls within 100.64.0.0/10 according to the documentation. That means I’ll need to configure those devices to send any traffic destined for 100.64.0.0/10 to the subnet router, bypassing the default route.
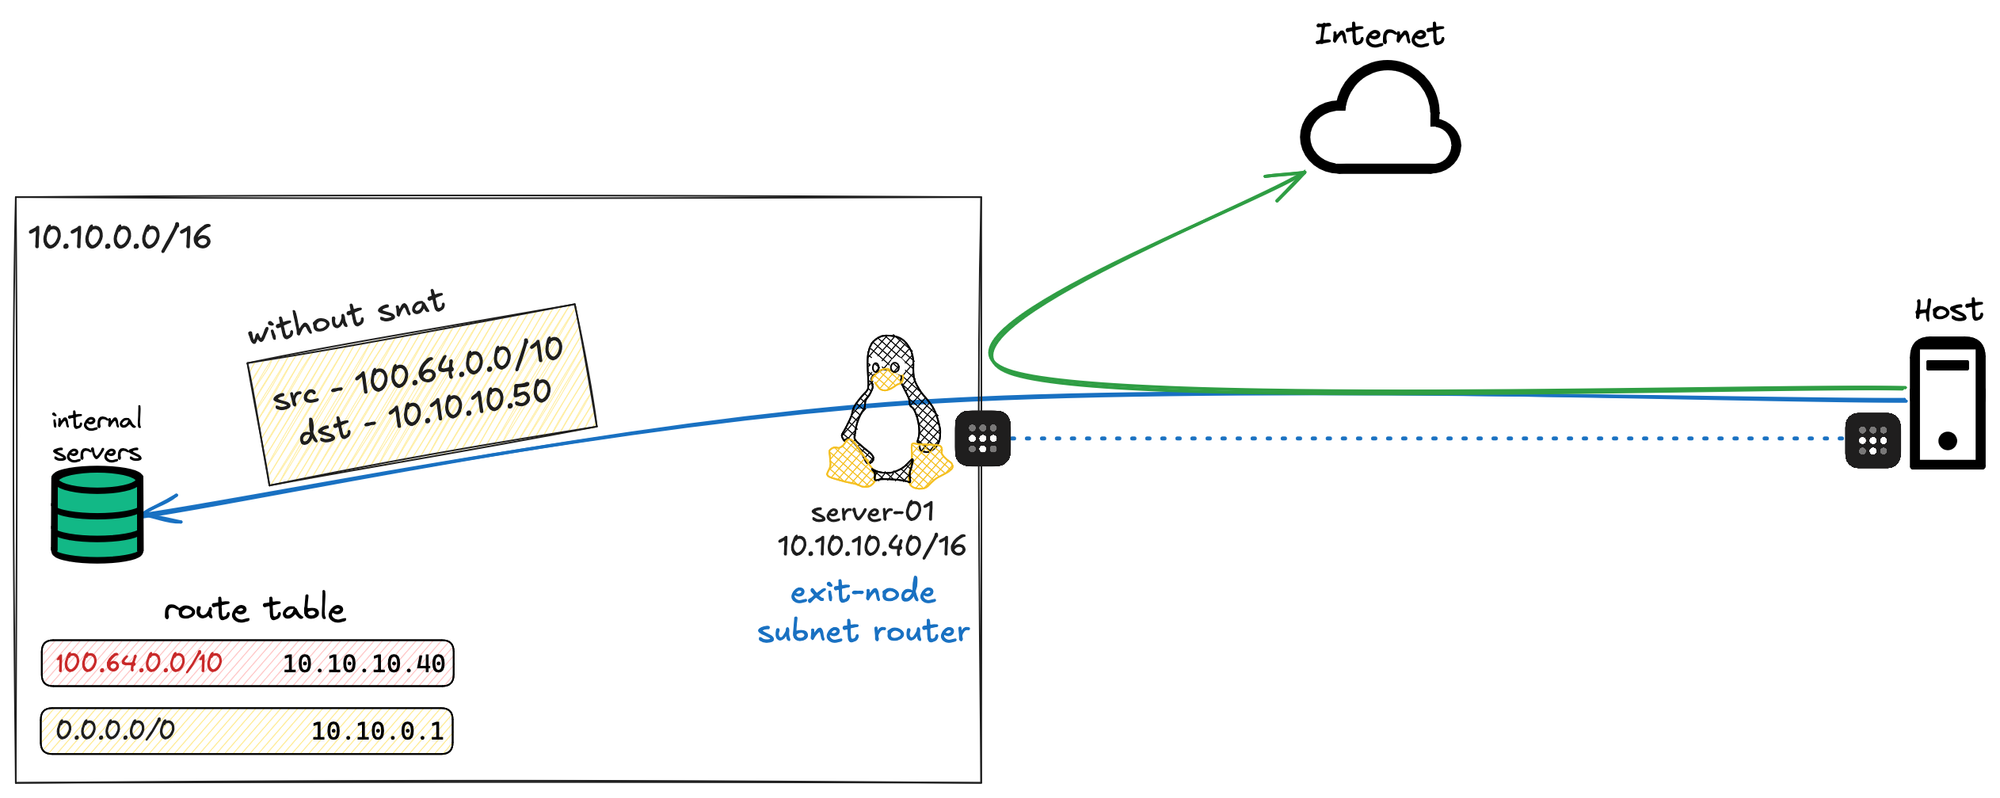
This adds some complexity, especially since I have a lot of devices, and I’d need to remember to set this up everywhere. For now, I’d rather stick with SNAT since I don’t really have a reason for my other devices to see the real Tailscale IPs.
Tailscale ACL
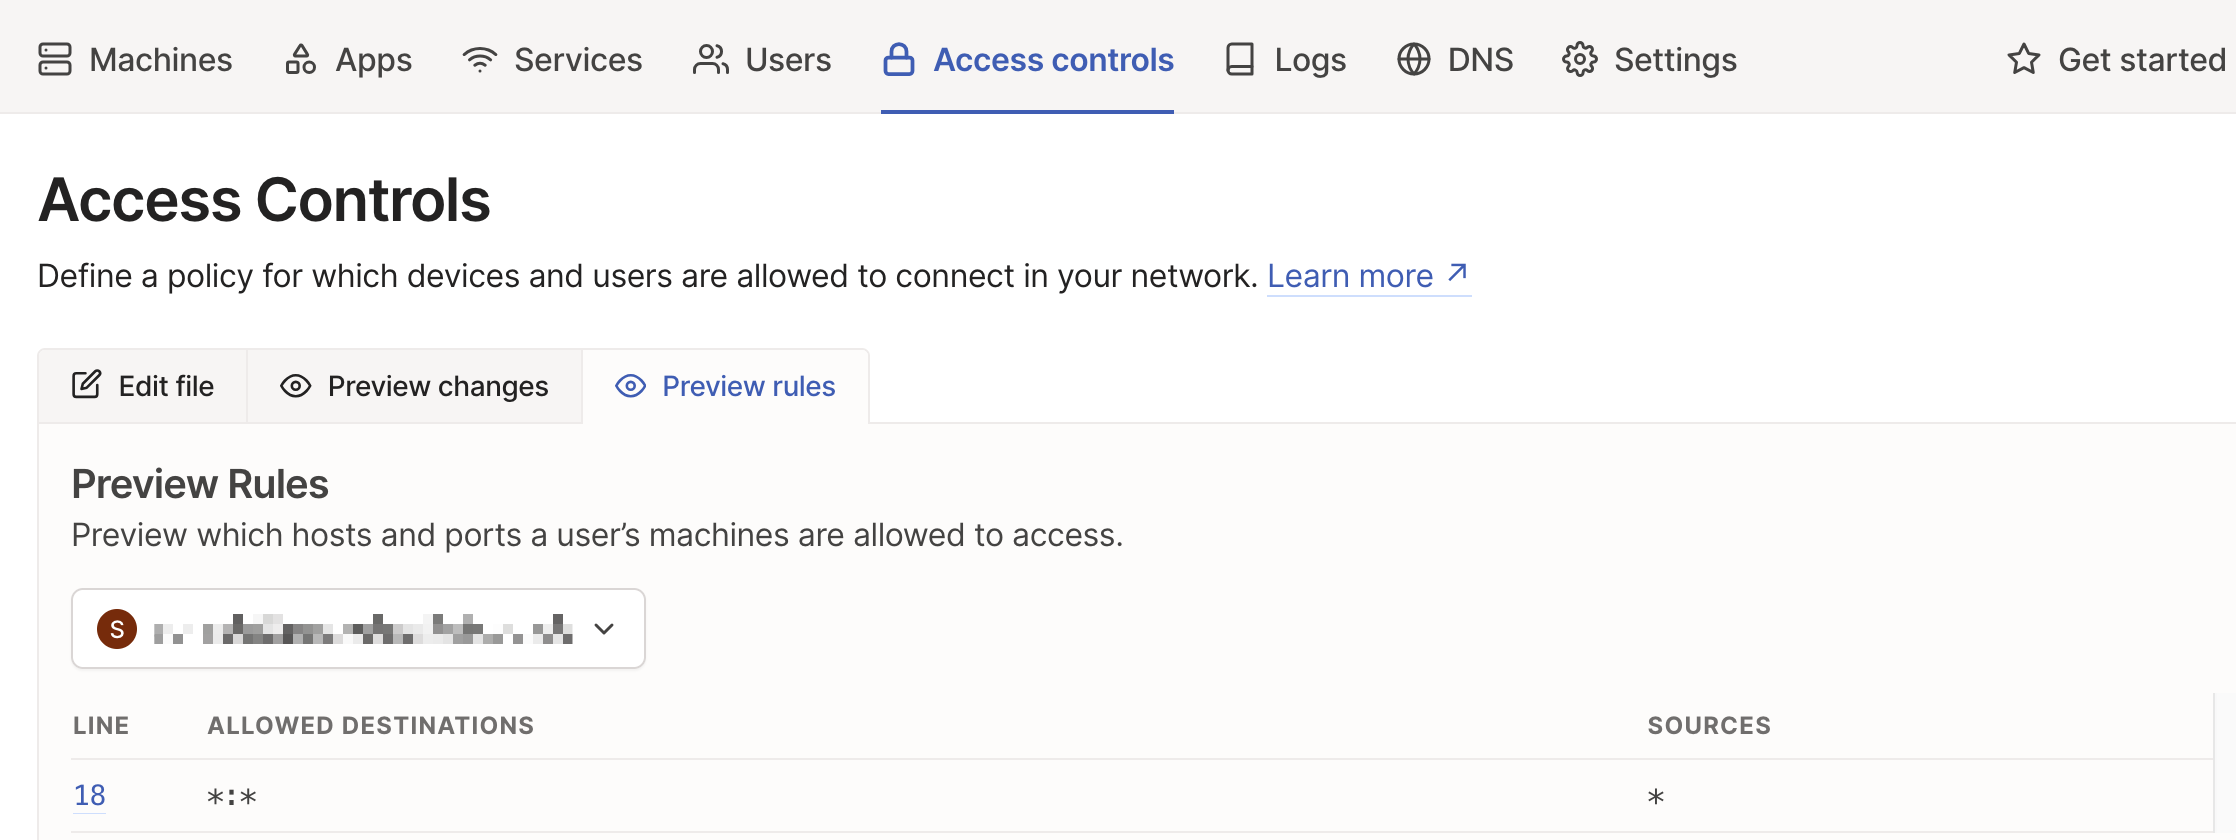
Tailscale also comes with a built-in ACL system, which allows you to control who can access what within your Tailscale network. By default, all devices can talk to each other, but you can customize this using a simple JSON file to allow or block traffic between specific devices, users, or subnets. This is useful if you want to restrict access to sensitive servers or only allow certain users to reach specific services.
My Current VPN Setup and Will I Move to Tailscale?
At the moment, I have a Palo Alto firewall in my home network and use GlobalProtect VPN. It works very well for me, and I have zero issues with it. The only challenge is that I have a residential Internet connection, so if my public IP changes (though it hasn’t changed in over 3 years), I wouldn’t be able to access my VPN. Of course, I could set up a dynamic DNS to work around this.
With GlobalProtect VPN, to put it simply, when I’m working away from home, it’s like having a long cable connecting my machine to my home network. Even if I’m outside, my machine is still part of my home network, and I can access all my devices as if I’m at home.
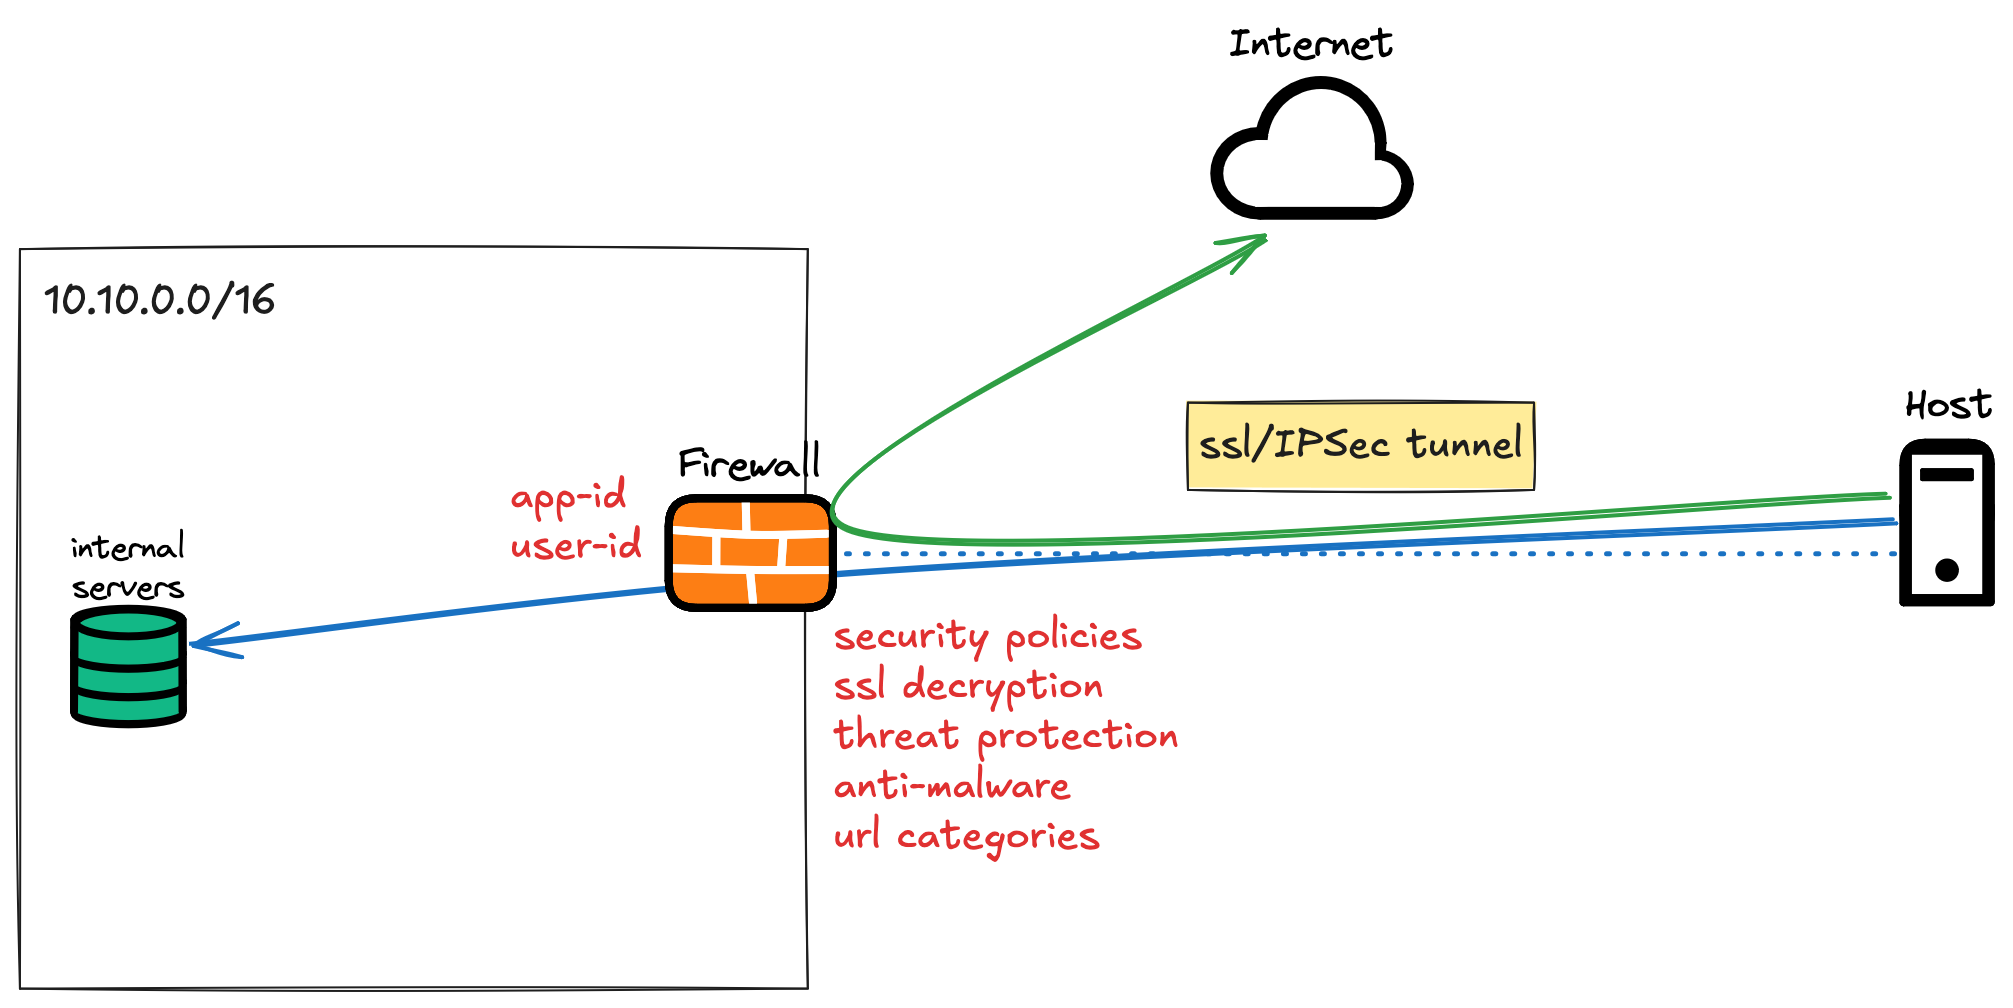
On top of that, I have all the required Palo Alto licenses, so my traffic is always protected by Advanced Threat Protection, which I don’t believe Tailscale offers. My security policies are also based on Palo Alto’s App-ID, rather than just traditional TCP port numbers, which is what Tailscale supports.
So for now, I’m going to stick with GlobalProtect as my main VPN, but I’ll keep Tailscale around as a backup in case my public IP changes or I run into any issues with GlobalProtect.
Running Tailscale on LXC Containers
When running Tailscale inside an LXC container, a few extra steps are needed to make sure it works properly, especially if you plan to use subnet routing or advertise the container as an exit node. I'm going to use Ubuntu 22.04 template for this example.
Enable TUN Device Access
By default, LXC containers do not have access to /dev/net/tun, which Tailscale needs. Add the following lines to your container’s configuration file (i.e /etc/pve/lxc/100.conf)
lxc.cgroup2.devices.allow: c 10:200 rwm
lxc.mount.entry: /dev/net/tun dev/net/tun none bind,create=file
This allows the container to use the TUN device required by Tailscale. Inside the container, update the system and install Tailscale.
apt update
apt upgrade -y
apt install curl
curl -fsSL https://tailscale.com/install.sh | sh
tailscale up
At this point, Tailscale should connect, and you’ll be able to see the node in your Tailscale admin panel. If you want the container to act as a subnet router or exit node, run the following command, but you may see a warning message.
tailscale up --advertise-routes=10.10.0.0/24 --advertise-exit-node
Warning: IP forwarding is disabled, subnet routing/exit nodes will not work.
See https://tailscale.com/s/ip-forwarding
Warning: UDP GRO forwarding is suboptimally configured on eth0, UDP forwarding throughput capability will increase with a configuration change.
See https://tailscale.com/s/ethtool-config-udp-gro
As per the Tailscale documentation, these warnings indicate that IP forwarding and UDP GRO forwarding need to be configured for proper routing and performance.
To fix the IP forwarding warning, run the following which enables forwarding for both IPv4 and IPv6 traffic.
echo 'net.ipv4.ip_forward = 1' | sudo tee -a /etc/sysctl.d/99-tailscale.conf
echo 'net.ipv6.conf.all.forwarding = 1' | sudo tee -a /etc/sysctl.d/99-tailscale.conf
sudo sysctl -p /etc/sysctl.d/99-tailscale.conf
Fix UDP GRO Forwarding
To address the UDP GRO forwarding message, identify the network interface and enable the required settings.
NETDEV=$(ip -o route get 8.8.8.8 | cut -f 5 -d " ")
sudo ethtool -K $NETDEV rx-udp-gro-forwarding on rx-gro-list off
To make this setting persist after a reboot or network change, create a small script under /etc/networkd-dispatcher/routable.d/
printf '#!/bin/sh\n\nethtool -K %s rx-udp-gro-forwarding on rx-gro-list off \n' "$(ip -o route get 8.8.8.8 | cut -f 5 -d " ")" | sudo tee /etc/networkd-dispatcher/routable.d/50-tailscale
sudo chmod 755 /etc/networkd-dispatcher/routable.d/50-tailscale

sudo /etc/networkd-dispatcher/routable.d/50-tailscale
test $? -eq 0 || echo 'An error occurred.'
These changes make sure UDP forwarding is optimized for better Tailscale performance.
https://tailscale.com/kb/1130/lxc-unprivileged
https://tailscale.com/kb/1320/performance-best-practices#ethtool-configuration
Closing Thoughts
Based on what I’ve seen during my testing, am I going to use Tailscale? Absolutely yes. Tailscale is also an enterprise product, so it’s not just for individuals or homelab users.
That being said, I want to touch on something from Tailscale’s own ‘How Tailscale Works’ page, where they compare Tailscale to traditional firewalls. They highlight a few downsides of using firewalls for VPN, but in my opinion, they mostly focus on poorly implemented solutions.
Even with Tailscale, if you install it on every device, that approach will get out of hand eventually. Once you start using Subnet Routers, you also need to think about high availability (which Tailscale supports), and in larger environments, you could end up with multiple Subnet Routers across different locations - this can become hard to manage as well.
I’d say Tailscale is a great fit for enterprises without dedicated networking teams or for those who just want something that ‘just works’ without much effort.
At the same time, I want to point out a few things Tailscale lists as problems with firewalls that I don’t fully agree with.
- “Firewalls are often scattered around the organization and need to be configured individually.” - This is not necessarily true if you have proper central management like FortiManager, Palo Alto Panorama or Cisco FMC.
- “It’s usually a pain to configure some vendor’s VPN/firewall to authenticate against another vendor’s identity system.” - This really depends on the firewall. In my case, with Palo Alto and SAML/LDAP/Radius, it works just fine and is not painful at all.
- “With a mesh network, there’s no central point for firewall rules.” - There are several ways to handle this with proper design, so it’s not a limitation of firewalls but rather how they are deployed.
In short, Tailscale solves a lot of problems and makes life easier, but it’s not always fair to compare it to poorly designed firewall deployments. Every tool has its place.