
Hello readers! I have updated this blog post with new and relevant information. I encourage you to check out the updated version below for the most current and accurate information on the topic. Thank you for your continued support and I hope you find the updated post useful.
 Suresh Vina
 Suresh Vina
Overview
Despite the fact that the Network is one of the critical components of a business, true Network Stack automation is almost non-existent (or very minimal). When companies automate their Networks, they (mostly) deploy proprietary vendor-specific software that requires extensive training.
Manually managing long, extensive, and sophisticated methods of procedure results in delays and diminished organizational agility. As a result, Networking teams are becoming increasingly cut off from the DevOps movement, which can stymie process modernization efforts due to the manual duties necessary to operate Networks.
Why Ansible for Network Automation?
Because of Ansible's easy automation framework, previously separated Network administrators can now speak the same automation language as the rest of the IT team, extending Ansible's capabilities to include native support for both traditional and open Network Infrastructure devices. For a holistic approach to application workload management, Network devices can now be integrated into an organization's entire automation plan.
Your Network teams will be able to:
- Use the same easy-to-use, powerful, and agentless automation framework that IT operations and DevOps do.
- Use a data structure (a playbook or role) that is separate from the execution layer (Automation Execution Environments) and can easily be implemented across different vendors.
- To help expedite Network automation projects, take advantage of a wide range of playbook and role information supported by the community and vendors.
As Network Engineers we mostly manage Network devices by logging into them via SSH, making changes, saving the config and finally logging off. Imagine we need to make the same change to many devices (for example, changing an IP address of the NTP server), we would manually log into each device and repeatedly make this change.
Ansible can help create and manage configuration changes centrally by pushing them out to all/or some devices and requires no extra software to be installed on the devices. One of Ansible's greatest strengths is idempotence where the same configuration is maintained even if we run the playbook multiple times.

Installation
I'm going to install Ansible on my Raspberry Pi for this example. You can use any other OS including Ubuntu, macOS etc. Our end goal here is to manage both of the routers via Ansible. In this example, we will get the 'show version | incl Version' output on both routers using a very basic Ansible Playbook.
pi@raspberrypi:~ $ sudo apt update
pi@raspberrypi:~ $ sudo apt upgrade
pi@raspberrypi:~ $ sudo apt install ansible

pi@raspberrypi:~ $ ansible --version
ansible 2.7.7
  config file = /etc/ansible/ansible.cfg
  configured module search path = ['/home/pi/.ansible/plugins/modules', '/usr/share/ansible/plugins/modules']
  ansible python module location = /usr/lib/python3/dist-packages/ansible
  executable location = /usr/bin/ansible
  python version = 3.7.3 (default, Jul 25 2020, 13:03:44) [GCC 8.3.0]
pi@raspberrypi:~ $
pi@raspberrypi:~ $
pi@raspberrypi:~ $
pi@raspberrypi:~ $
Diagram
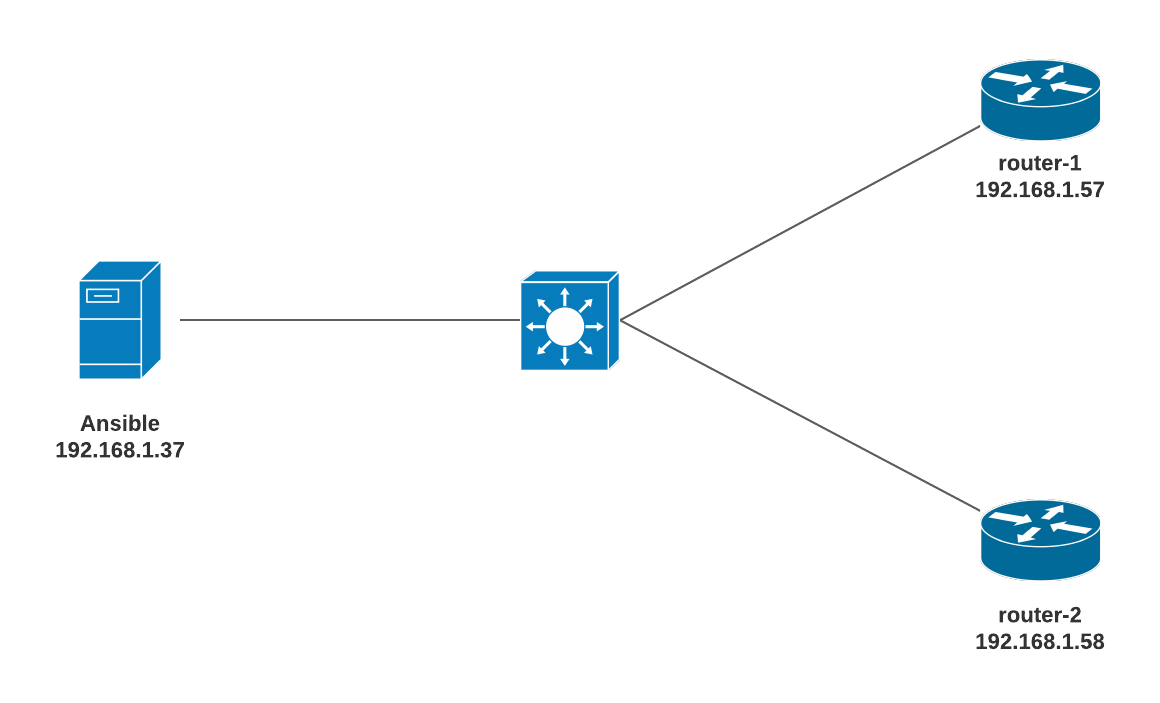
- Make sure Ansible can reach both of the routers
- Ansible should be able to SSH into both routers
pi@raspberrypi:/etc/ansible $ ping 192.168.1.57
PING 192.168.1.57 (192.168.1.57) 56(84) bytes of data.
64 bytes from 192.168.1.57: icmp_seq=1 ttl=255 time=10.10 ms
64 bytes from 192.168.1.57: icmp_seq=2 ttl=255 time=8.08 ms
^C
--- 192.168.1.57 ping statistics ---
2 packets transmitted, 2 received, 0% packet loss, time 2ms
rtt min/avg/max/mdev = 8.084/9.539/10.994/1.455 ms


pi@raspberrypi:/etc/ansible $ ping 192.168.1.58
PING 192.168.1.58 (192.168.1.58) 56(84) bytes of data.
64 bytes from 192.168.1.58: icmp_seq=1 ttl=255 time=12.1 ms
64 bytes from 192.168.1.58: icmp_seq=2 ttl=255 time=5.20 ms
^C
--- 192.168.1.58 ping statistics ---
2 packets transmitted, 2 received, 0% packet loss, time 2ms
rtt min/avg/max/mdev = 5.200/8.640/12.080/3.440 ms
You need to be familiar with three file types in Ansible that are ansible config file, inventory and playbook files. The default files are located in /etc/ansible directory. Certain settings in Ansible are adjustable via a configuration file (ansible.cfg).
Ansible inventory
An inventory file is a YAML or INI configuration file that defines the mapping of hosts into groups. The hosts are the devices that we want Ansible to manage. The default location for inventory is a file called /etc/ansible/hosts. You can specify a different inventory file at the command line using the -i <path> option. Ansible uses the inventory file to communicate with your network devices.
In our example, the inventory file defines the group 'routers'. Let's create a new host file in /etc/ansible/inventory/host_file (You can create the file anywhere you want) and add both of our routers. router-1 and 2 are just arbitrary names. You can also just put the IP or DNS resolvable hostname of the routers.
pi@raspberrypi:/etc/ansible $ cat /etc/ansible/inventory/host-file

[routers]
router-1 ansible_host=192.168.1.57
router-2 ansible_host=192.168.1.58
Variables
Variables in Ansible is exactly the same as in other systems. Think of a variable as a 'name' attached to a specific 'object'. You can define these variables in your playbooks, in your inventory, in re-usable files or roles, or at the command line. To create a variable, you just assign it a value for example, syslog_ip=10.10.5.20. You can then refer to the IP anywhere in the Ansible using the keysyslog_ip rather than the IP.
In this example, I will show you how to define variables directly in the inventory file. The subsequent example shows how to define variables using group_vars I personally prefer to use.
Variables configured within [routers:vars] are not applicable for any other groups.
pi@raspberrypi:/etc/ansible $ cat /etc/ansible/inventory/host-file

[routers]
router-1 ansible_host=192.168.1.57
router-2 ansible_host=192.168.1.58

[routers:vars]
ansible_network_os=ios
ansible_user=ansible
ansible_password=cisco123
ansible_connection=network_cli
variables
Common Inventory Variables
The following variables are required to create a successful SSH connection to Network devices.
-
ansible_connection - Ansible uses the ansible-connection setting to determine how to connect to a remote device. When working with Ansible Networking, set this to an appropriate network connection option, such as
network_cli, so Ansible treats the remote node as a network device with a limited execution environment. Without this setting, Ansible would attempt to use ssh to connect to the remote and execute the Python script on the network device, which would fail because Python generally isn’t available on network devices. -
ansible_network_os - To inform Ansible which Network platform this host corresponds to. This is required when using the
network_cliconnection options. -
ansible_user - The user to connect to the remote device as.
-
ansible_password - The corresponding password for ansible_user to log in as.
-
ansible_become - If enable mode (privilege mode) should be used
-
ansible_become_method - Which type of become should be used, for
network_clithe only valid choice is enable. (more on this later)
Please note that having plain text passwords in the configuration file is NOT recommended. I will show you how to encrypt the password using Ansible Vault in the next section.
Playbook
Ansible defines playbooks as 'Playbooks record and executes Ansible’s configuration, deployment, and orchestration functions.'
We write playbooks that have a list of tasks/instructions that are then played/applied on our devices.
- Playbook files are in YAML format.
- YAML file starts with a triple dash
- There are two types of data formats in the YAML file: List and Key-Value pairs
- List items are designated by a
-(dash) - Key-Value pairs are designated as
Key: Value - Correct indentations should be followed.
Let's create our first Playbook which runs 'show version | incl Version' command on both routers and show us the output.
pi@raspberrypi:/etc/ansible/playbooks $ cat show_version.yml
---

- name: Cisco show version example
  hosts: routers
  gather_facts: false

  tasks:
    - name: run show version on the routers
      ios_command:
        commands: show version | incl Version
      register: output

    - name: print output
      debug:
        var: output.stdout_lines
playbook
- YAML file starts with
--- - name - Any arbitrary name
- hosts - Referring to the inventory group called 'routers'
- gather_facts - We don't need to gather any information from the routers. This may be useful when working with servers.
- connection - Playbook is run against a network device.
- register - You can create variables from the output of an Ansible task with the task keyword register. You can use registered variables in any later tasks in your play
- debug - This module prints statements during execution.
- stdout_lines - Ansible will print the output in an easy to readable format.
We are running two tasks, first one runs show version | incl Version on both routers and saves the output in a variable called output. The Second task prints the variable ouput in a nice format.
Let's have a look at all of our files.
pi@raspberrypi:/etc/ansible $ tree
.
├── ansible.cfg
├── hosts
├── inventory
│   └── host-file
└── playbooks
    ├── show_version.retry
    └── show_version.yml
Run the Playbook
pi@raspberrypi:/etc/ansible/playbooks $ vim show_version.yml
pi@raspberrypi:/etc/ansible/playbooks $ ansible-playbook show_version.yml -i /etc/ansible/inventory/host-file

PLAY [Cisco show version example] ***************************************************************************************************

TASK [run show version on the routers] **********************************************************************************************
ok: [router-1]
ok: [router-2]

TASK [print output] *****************************************************************************************************************
ok: [router-1] => {
    "output.stdout_lines": [
        [
            "Cisco IOS Software, IOSv Software (VIOS-ADVENTERPRISEK9-M), Experimental Version 15.4(20140730:011659) [lucylee-pi25-2 107]"
        ]
    ]
}
ok: [router-2] => {
    "output.stdout_lines": [
        [
            "Cisco IOS Software, IOSv Software (VIOS-ADVENTERPRISEK9-M), Experimental Version 15.4(20140730:011659) [lucylee-pi25-2 107]"
        ]
    ]
}

PLAY RECAP **************************************************************************************************************************
router-1                   : ok=2    changed=0    unreachable=0    failed=0
router-2                   : ok=2    changed=0    unreachable=0    failed=0
As you can see above that Ansible prints the output from both Routers.
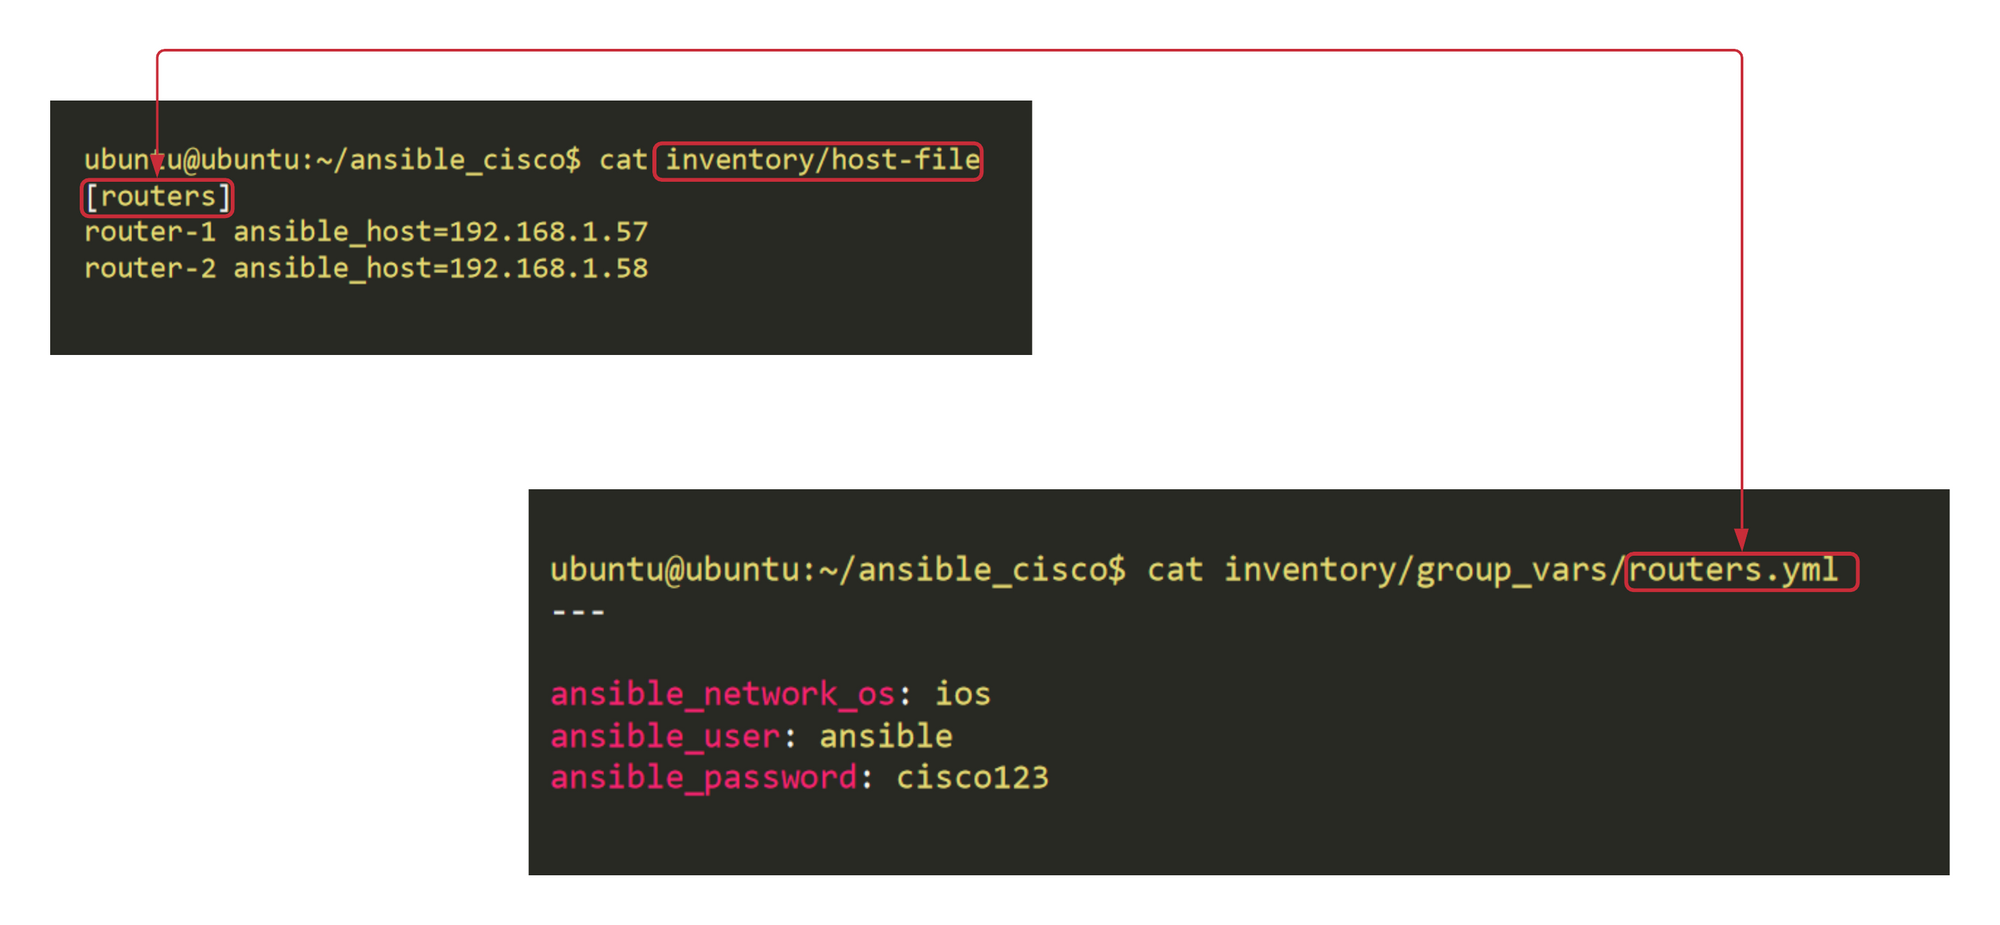
group_vars
We can also specify the variables in a separate yml file which corresponds to the group_name, and is located inside group_vars directory. Let's remove the group_variables from the hosts file and move it under group_vars directory.
A group_vars file contain all the information that is unique for each group of devices.
pi@raspberrypi:/etc/ansible $ tree
.
├── ansible.cfg
├── hosts
├── inventory
│   ├── group_vars        <<< group_vars directory
│   │   └── routers.yml   <<< Variables unique for 'routers' group
│   └── host-file
└── playbooks
    ├── show_version.retry
    └── show_version.yml

3 directories, 6 files
tree
pi@raspberrypi:/etc/ansible/inventory $ cat host-file
[routers]
router-1 ansible_host=192.168.1.57
router-2 ansible_host=192.168.1.58
hosts
pi@raspberrypi:/etc/ansible/inventory/group_vars $ cat routers.yml
---

ansible_network_os: ios
ansible_user: ansible
ansible_password: cisco123
group_vars
The end result is the same however, as you can see the structure looks more organized now.
Encrypting sensitive data with Ansible Vault

Ansible Vault encrypts variables or files so, that sensitive data such as passwords or keys are not visible.
In our example, we can see that the SSH password is visible in the group_vars file. Let's encrypt it.
Inside the group_vars/routers.yml file, we have variables. Some variables, like the network_os and user_name, are not secret. Other variables, like the SSH password, is confidential.
pi@raspberrypi:/etc/ansible/inventory/group_vars $ cat routers.yml
---

#nonsensitive data
ansible_network_os: ios
ansible_user: ansible

#sensitive data
ansible_password: cisco123
We can make a distinction between sensitive and non-sensitive variables using two methods. The first one is to split the variables between two files and encrypt the sensitive file.
I will show you the second method in this example, which I believe is recommended by Ansible.
Step 1 - Create a vault-encrypted file within the directory that will live alongside the unencrypted routers.yml file. In this file, define the sensitive variables that used to be in the group_vars/routers.yml file. Use the same variable names, but prepend the string vault_ to indicate that these variables are defined in the vault-protected file.
pi@raspberrypi:/etc/ansible/inventory/group_vars/routers $ ansible-vault create vault
New Vault password:
Confirm New Vault password:
create vault
---
vault_ansible_password: cisco123
vault yml file
pi@raspberrypi:/etc/ansible/inventory/group_vars/routers $ ls
routers.yml  vault

pi@raspberrypi:/etc/ansible $ cat inventory/group_vars/routers/vault
$ANSIBLE_VAULT;1.1;AES256
31333431656561643635663832663737636338356235313338653765393434636264666339613432
3363626532663731656336653261623933616464646661330a616430373138356234633963306232
34653535663361353937396266643734386632393639626363316135333238303038336431663763
3934343233656339390a663838383165623161333964316636383030343035313330643463316432
36363863636165346265363337346163373833313235356234323237393135316236313763336230
3238303465303063373437386662623366363337376238363532
To view the contents of an encrypted file without editing it, you can use the ansible-vault view command as shown below.
pi@raspberrypi:/etc/ansible/inventory/group_vars/routers $ ansible-vault view vault
Vault password:
---

vault_ansible_password: cisco123ansible-vault edit command. This command decrypts the file to a temporary file, allows you to edit the content, then saves and re-encrypts the content and removes the temporary file when you close the editor. The resulting directory structure should look like this:
pi@raspberrypi:/etc/ansible $ tree
.
├── ansible.cfg
├── hosts
├── inventory
│   ├── group_vars
│   │   └── routers
│   │       ├── routers.yml
│   │       └── vault
│   └── host-file
└── playbooks
    ├── show_version.retry
    └── show_version.yml

4 directories, 7 files
Step 2 - Referencing Vault Variables from Unencrypted Variables
pi@raspberrypi:/etc/ansible $ cat inventory/group_vars/routers/routers.yml
---

ansible_network_os: ios
ansible_user: ansible
ansible_password: "{{ vault_ansible_password }}"
The most straightforward way of decrypting content at runtime is to have Ansible prompt you for the appropriate credentials. You can do this by adding the --ask-vault-pass to any ansible or ansible-playbook command.
pi@raspberrypi:/etc/ansible/playbooks $ ansible-playbook show_version.yml -i /etc/ansible/inventory/host-file --ask-vault-pass
Vault password:

PLAY [Cisco show version example] ********************************************************************************************************************************

TASK [run show version on the routers] ***************************************************************************************************************************
ok: [router-2]
ok: [router-1]

TASK [print output] **********************************************************************************************************************************************
ok: [router-1] => {
    "output.stdout_lines": [
        [
            "Cisco IOS Software, IOSv Software (VIOS-ADVENTERPRISEK9-M), Experimental Version 15.4(20140730:011659) [lucylee-pi25-2 107]"
        ]
    ]
}
ok: [router-2] => {
    "output.stdout_lines": [
        [
            "Cisco IOS Software, IOSv Software (VIOS-ADVENTERPRISEK9-M), Experimental Version 15.4(20140730:011659) [lucylee-pi25-2 107]"
        ]
    ]
}

PLAY RECAP *******************************************************************************************************************************************************
router-1                   : ok=2    changed=0    unreachable=0    failed=0
router-2 : ok=2 changed=0 unreachable=0 failed=0 
Run multiple 'show commands' at once
You can run multiple show commands within the same task.
pi@raspberrypi:/etc/ansible/playbooks $ cat show_ip_int_brief.yml
---

- name: Cisco ip interface brief + ip route
  hosts: routers
  gather_facts: false
  connection: network_cli

  tasks:
    - name: run show ip interface brief + ip route
      ios_command:
        commands:
          - show ip interface brief
          - show ip route
      register: output

    - name: print output
      debug:
        var: output.stdout_lines
playbook
pi@raspberrypi:/etc/ansible/playbooks $ ansible-playbook show_ip_int_brief.yml -i /etc/ansible/inventory/host-file --ask-vault-pass
Vault password:

PLAY [Cisco ip interface brief + ip route] ******************************************************************************************

TASK [run show ip interface brief + ip route] ***************************************************************************************
ok: [router-2]
ok: [router-1]

TASK [print output] *****************************************************************************************************************
ok: [router-1] => {
    "output.stdout_lines": [
        [
            "Interface                  IP-Address      OK? Method Status                Protocol",
            "GigabitEthernet0/0         192.168.1.57    YES manual up                    up      ",
            "GigabitEthernet0/1         unassigned      YES unset  administratively down down    ",
            "GigabitEthernet0/2         unassigned      YES unset  administratively down down    ",
            "GigabitEthernet0/3         unassigned      YES unset  administratively down down"
        ],
        [
            "Codes: L - local, C - connected, S - static, R - RIP, M - mobile, B - BGP",
            "       D - EIGRP, EX - EIGRP external, O - OSPF, IA - OSPF inter area ",
            "       N1 - OSPF NSSA external type 1, N2 - OSPF NSSA external type 2",
            "       E1 - OSPF external type 1, E2 - OSPF external type 2",
            "       i - IS-IS, su - IS-IS summary, L1 - IS-IS level-1, L2 - IS-IS level-2",
            "       ia - IS-IS inter area, * - candidate default, U - per-user static route",
            "       o - ODR, P - periodic downloaded static route, H - NHRP, l - LISP",
            "       a - application route",
            "       + - replicated route, % - next hop override",
            "",
            "Gateway of last resort is not set",
            "",
            "      192.168.1.0/24 is variably subnetted, 2 subnets, 2 masks",
            "C        192.168.1.0/24 is directly connected, GigabitEthernet0/0",
            "L        192.168.1.57/32 is directly connected, GigabitEthernet0/0"
        ]
    ]
}
ok: [router-2] => {
    "output.stdout_lines": [
        [
            "Interface                  IP-Address      OK? Method Status                Protocol",
            "GigabitEthernet0/0         192.168.1.58    YES manual up                    up      ",
            "GigabitEthernet0/1         unassigned      YES unset  administratively down down    ",
            "GigabitEthernet0/2         unassigned      YES unset  administratively down down    ",
            "GigabitEthernet0/3         unassigned      YES unset  administratively down down"
        ],
        [
            "Codes: L - local, C - connected, S - static, R - RIP, M - mobile, B - BGP",
            "       D - EIGRP, EX - EIGRP external, O - OSPF, IA - OSPF inter area ",
            "       N1 - OSPF NSSA external type 1, N2 - OSPF NSSA external type 2",
            "       E1 - OSPF external type 1, E2 - OSPF external type 2",
            "       i - IS-IS, su - IS-IS summary, L1 - IS-IS level-1, L2 - IS-IS level-2",
            "       ia - IS-IS inter area, * - candidate default, U - per-user static route",
            "       o - ODR, P - periodic downloaded static route, H - NHRP, l - LISP",
            "       a - application route",
            "       + - replicated route, % - next hop override",
            "",
            "Gateway of last resort is not set",
            "",
            "      192.168.1.0/24 is variably subnetted, 2 subnets, 2 masks",
            "C        192.168.1.0/24 is directly connected, GigabitEthernet0/0",
            "L        192.168.1.58/32 is directly connected, GigabitEthernet0/0"
        ]
    ]
}

PLAY RECAP **************************************************************************************************************************
router-1                   : ok=2    changed=0    unreachable=0    failed=0
router-2                   : ok=2    changed=0    unreachable=0    failed=0
Privileged EXEC mode
On Cisco devices, privilege level 15 is required to make any config changes or run advanced show commands. As of version 2.6, Ansible supports become for privilege escalation (entering enable mode or privileged EXEC mode) on all Ansible-maintained network platforms that support enable mode.
Adding become: yes and become_method: enable instructs Ansible to enter enable mode before executing the playbook.
Step - 1 Add the enable password to Ansible vault.
pi@raspberrypi:/etc/ansible/playbooks $ ansible-vault view ../inventory/group_vars/routers/vault
Vault password:
---

vault_ansible_password: cisco123
vault_ansible_become_password: cisco123
vault file
Setp - 2 Edit the group_variable file
pi@raspberrypi:/etc/ansible/playbooks $ cat ../inventory/group_vars/routers/routers.yml
---

ansible_network_os: ios
ansible_user: ansible
ansible_become: yes
ansible_become_method: enable
ansible_become_password: "{{ vault_ansible_become_password }}"
ansible_password: "{{ vault_ansible_password }}"
group_variable
Now you should be able to run privileged EXEC commands such as 'show run' from Ansible.
Thanks for reading. As always, your feedback and comments are more than welcome.