In today's blog post, we're going to explore how to interact with a Cisco 9300 switch using RESTCONF and Python. We'll focus on two main tasks, retrieving VLAN information and then configuring new VLANs.
Overview
Although we're using a Cisco 9300 switch for this example, the methods we're going to cover can be applied to any IOS-XE-based device. Before diving in, I assume you have some familiarity with YANG models, Python, and REST APIs. If you're new to YANG, I recommend checking out my previous blog post on the topic.
 Suresh Vina
Retrieving and Configuring VLANs using Restconf
First up, let's walk through a simple Python script that fetches the VLANs from our Cisco switch using Restconf.
import requests
import json

requests.packages.urllib3.disable_warnings()

uri = 'https://192.168.10.10:443/restconf/data/Cisco-IOS-XE-native:native/vlan/Cisco-IOS-XE-vlan:vlan-list'
headers = {
    "accept": "application/yang-data+json",
    "Content-Type": "application/yang-data+json"
}

response = requests.get(
    url=uri,
    headers=headers,
    auth=('username','password'),
    verify=False)

print(json.dumps(response.json(), indent=2))
In this script, we're using the requests library to make a GET request to the device. We disable SSL warnings and specify our target URI. The headers dictionary is where we set the content type we're expecting from the device, in this case, "application/yang-data+json". After sending the request, we print the JSON response, nicely formatted with a 2-space indent.
#output
{
  "Cisco-IOS-XE-vlan:vlan-list": [
    {
      "id": 10,
      "name": "users"
    }
  ]
}Where did I get the URI?
You might be wondering how I got that specific URI /restconf/data/Cisco-IOS-XE-native:native/vlan/Cisco-IOS-XE-vlan:vlan-list. I used Yang Suite to find it, but you can also dig into the YANG model to locate this URI. Either way, this URI helps us target the exact resource we're interested in, VLAN in this case.
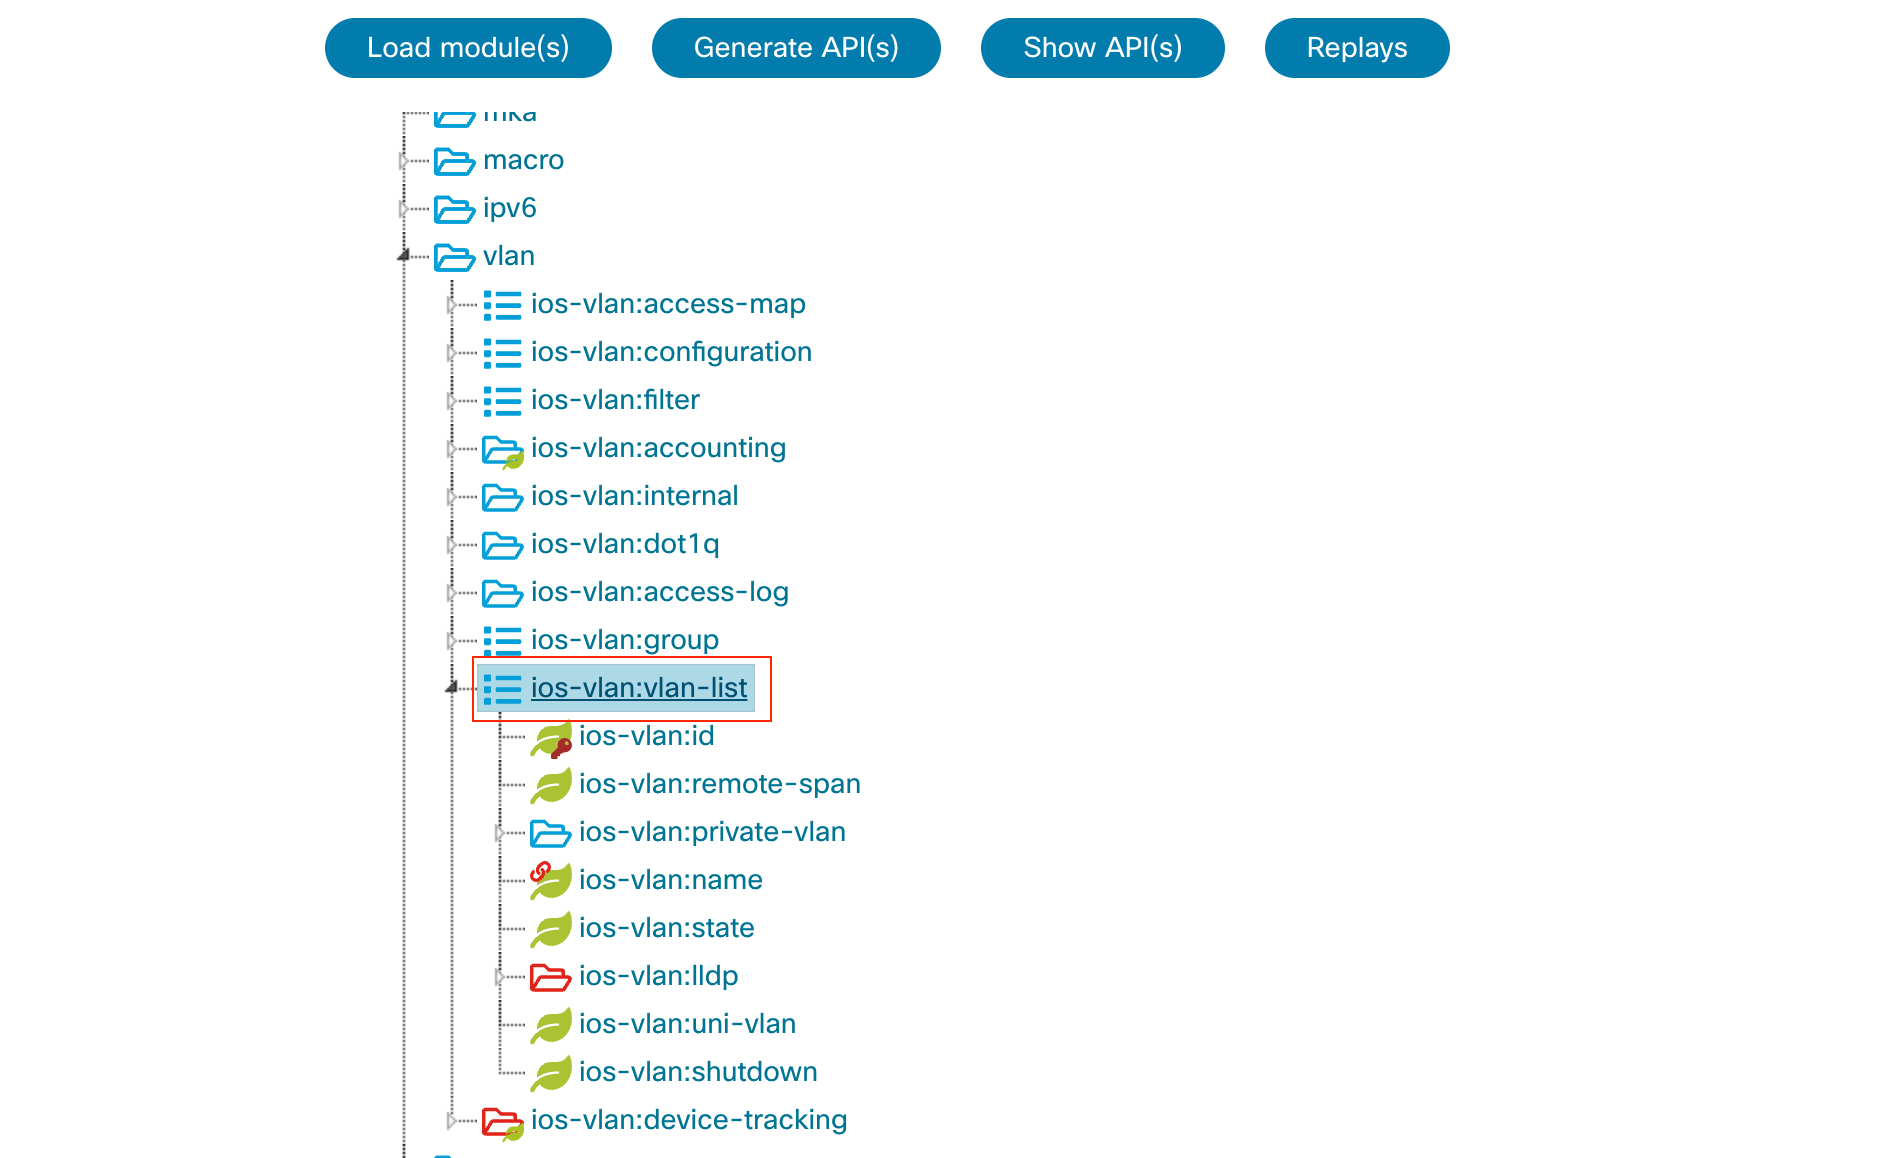
The screenshot shows a hierarchical representation of some portions of the YANG model. Here's what you're seeing.
- Tree Structure - The leftmost panel displays a tree structure. This is typical of YANG models, which have a nested and hierarchical design. Each entry in this tree is a YANG data node.
- Data Nodes
- Container - Represented by folder-like icons, containers group related data together. For example,
vlanis a container that will encompass everything related to VLAN configuration and state. - List - The icon that looks like a stack of items. The
ios-vlan:vlan-listis an example. Lists are collections of data entries. Every entry in the list will have a similar structure, defined by the child nodes underneath. The key differentiation among entries in a list is typically determined by one or more "key" leaves. In the context ofvlan-list, each VLAN entry can be uniquely identified, by theios-vlan:id(representing VLAN ID) in this example. - Leaf - Represented by green icons. These are the most granular pieces of data in a YANG model. Examples include
ios-vlan:id,ios-vlan:name, andios-vlan:state. Leaves hold the actual data values.
- Container - Represented by folder-like icons, containers group related data together. For example,
- Namespace Prefix - Each node has a prefix like
ios-vlan. This denotes the YANG model namespace to which that particular node belongs.
VLAN Configurations
Configuring New VLANs using Restconf
Now, let's dive into how we can use Restconf to configure new VLANs on our Cisco switch. For this demonstration, I'll walk you through the process of creating two VLANs - VLAN 20 and VLAN 21. Here's a Python script to get us started.
import requests
import json

requests.packages.urllib3.disable_warnings()

uri = 'https://192.168.10.10:443/restconf/data/Cisco-IOS-XE-native:native/vlan'
headers = {
    "Content-Type": "application/yang-data+json"
}

body = {
    "Cisco-IOS-XE-vlan:vlan-list": [
        {
            "id": 20,
            "name": "voice"
        },
        {
            "id": 21,
            "name": "servers"
        }
    ]
}

response = requests.post(
    url=uri,headers=headers,
    data=json.dumps(body),
    auth=('username', 'password'),
    verify=False)

print(response)- Import Required Libraries - We start by importing the necessary libraries.
requestsfor making HTTP requests andjsonfor handling JSON data. - URI - This is the address we're targeting on our device to configure VLANs.
- Headers - We specify that our request body will be in the format of YANG data with JSON encoding.
- Body - This is where we define the VLANs we want to create. In our case, we want VLAN 20 named "voice" and VLAN 21 named "servers".
- Making the Request - We use the
post()method of therequestslibrary to create new resources on our device. In this case, the new resources are our VLANs. - Printing the Response - We print the response we get back from the device.
#output
<Response [201]>
The output <Response [201]> indicates the status of our HTTP request. The 201 status code means "Created". It signifies that the request has been fulfilled and has resulted in one or more new resources being created on the device. In layman's terms, our VLANs were successfully created. (Please note that VLAN 10 was already existed on the switch)
c9300#show vlan

VLAN Name                             Status    Ports
---- -------------------------------- --------- -------------------------------
1    default                          active    Te1/0/1, Te1/0/2, Te1/0/3
10   users                            active
20   voice                            active
21   servers                          active
Deleting an existing VLAN
In this next example, we will look at how to delete a specific VLAN (21) from the switch.

import requests
import json

requests.packages.urllib3.disable_warnings()

uri = 'https://192.168.10.10:443/restconf/data/Cisco-IOS-XE-native:native/vlan/Cisco-IOS-XE-vlan:vlan-list=21'
headers = {
    "accept": "application/yang-data+json"
}

response = requests.delete(
    url=uri,headers=headers,
    auth=('username', 'password'),
    verify=False)

print(response)- HTTP Method - We've switched from using a
POSTmethod (used for creating resources) to theDELETEmethod. As the name implies,DELETEis used to remove a resource. - URI Change - Notice the URI includes
vlan-list=21at the end. This is to specifically target VLAN 21. By appending the specific VLAN ID, we're telling the switch exactly which VLAN we wish to remove. - No Body - Unlike our
POSTrequest, we aren't sending a JSON body with our request. This is because the VLAN to delete is specified in the URI, so there's no need for additional data in the request body.
c9300#show vlan

VLAN Name                             Status    Ports
---- -------------------------------- --------- -------------------------------
1    default                          active    Te1/0/1, Te1/0/2, Te1/0/3
10   users                            active
20   voice                            active
Changing the name of the VLAN
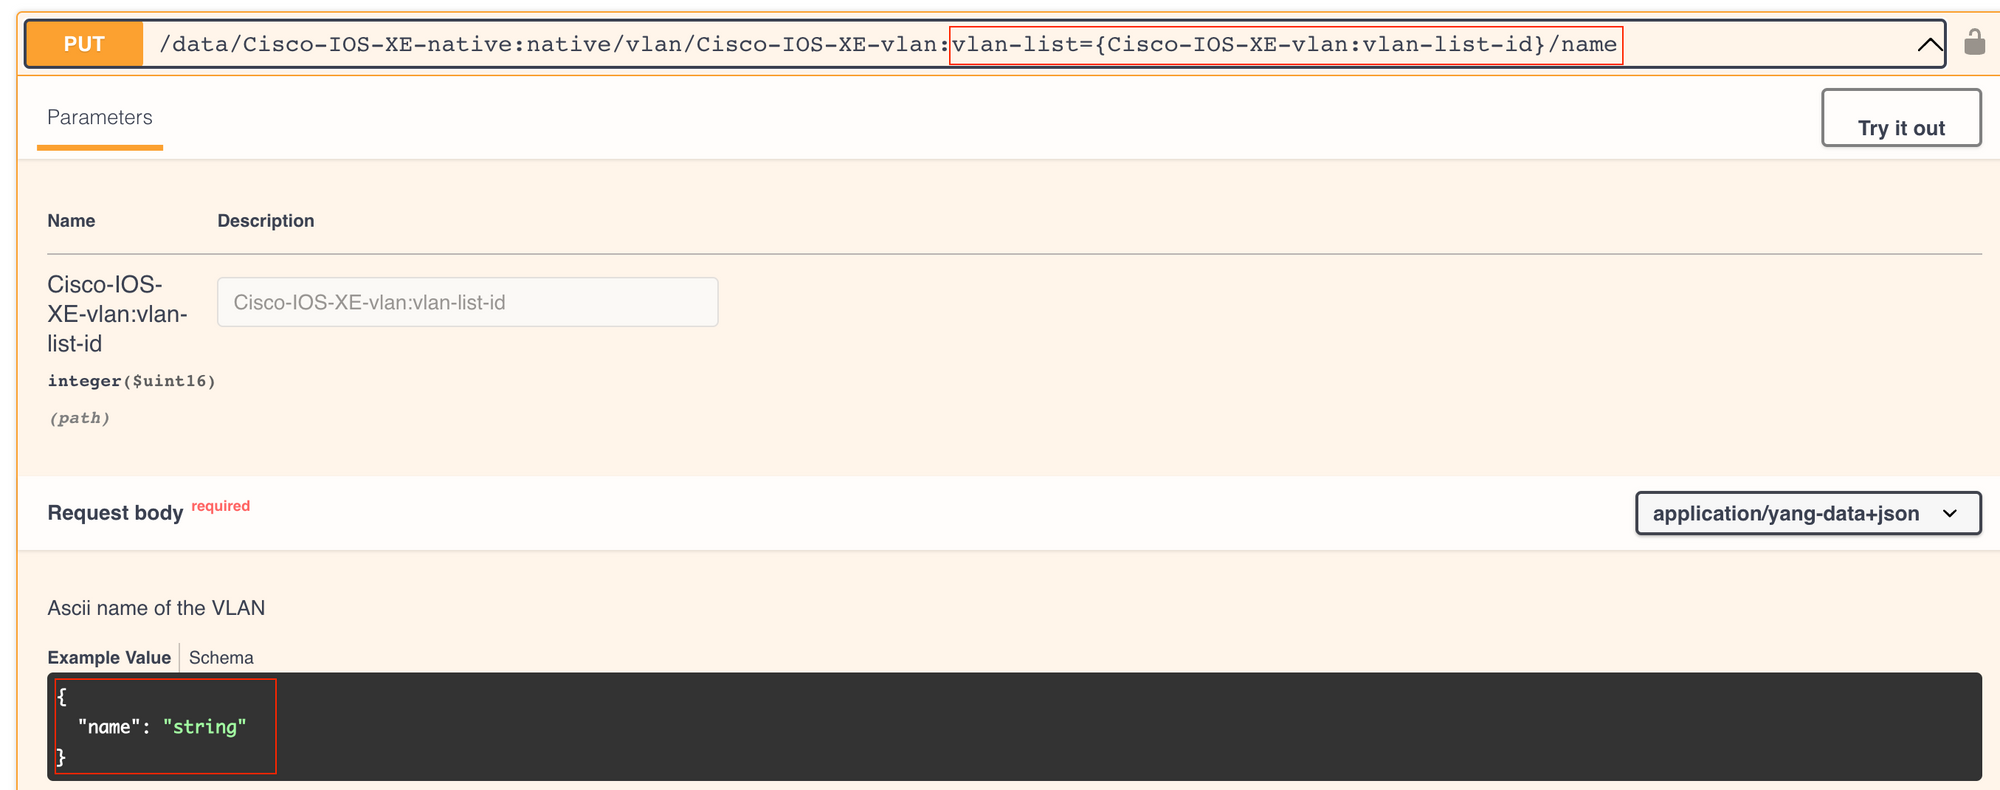
Let's look at an example of how to change the name of an existing VLAN.
import requests
import json

requests.packages.urllib3.disable_warnings()

uri = 'https://192.168.10.10:443/restconf/data/Cisco-IOS-XE-native:native/vlan/Cisco-IOS-XE-vlan:vlan-list=20/name'
headers = {
    "Content-Type": "application/yang-data+json"
}

body = {
    "name": "new_name"
}

response = requests.put(
    url=uri,headers=headers,
    data=json.dumps(body),
    auth=('username', 'password'),
    verify=False)

print(response)- HTTP Method - This time, we're using the
PUTmethod. ThePUTmethod is commonly used to update an existing resource. It signifies that we want to modify an attribute of an existing resource, in this case, the name of VLAN 20. - URI Change - The URI now includes
/nameat the end, right aftervlan-list=20. This narrows down our target to thenameattribute of VLAN 20. It tells the switch that we're specifically interested in changing the name of VLAN 20. - Body Update - The body has been simplified. It now contains just one key-value pair, indicating that we're updating the
nameto new_name.
c9300#show vlan

VLAN Name                             Status    Ports
---- -------------------------------- --------- -------------------------------
1    default                          active    Te1/0/1, Te1/0/2, Te1/0/3
10   users                            active
20   new_name                         active
Conclusion
In wrapping up, we've only scratched the surface of what Restconf has to offer for network automation. As we've seen, Restconf offers a structured, efficient, and standardized way of managing network devices. But this is just the beginning. In upcoming posts, I will try to cover managing interfaces, routes, and other intricate tasks using Restconf.