What if I tell you that all you need is just a YAML file with just a bunch of lines to create a Network Lab that can run easily on your laptop? You'd call me crazy, right?
Well, in this blog post, I'll walk you through what Containerlab is and how it can simplify creating and managing your labs with ease. Let's dive in.
What we will cover?
- What is containerlab?
- Comparing EVE-NG/GNS3 to Containerlab
- Installation and initial setup
- Lab images (Arista cEOS)
- Containerlab terminology
- Lab example
- Cleaning up
- Closing thoughts
 Suresh Vina
What is Containerlab?
The official definition is "Containerlab provides a CLI for orchestrating and managing container-based networking labs. It starts the containers, builds a virtual wiring between them to create lab topologies of users choice and manages labs lifecycle."
Simply put, containerlab is a Lab-as-a-code tool that helps you set up and manage your network labs easily. Instead of dealing with complex setups and configurations, containerlab simplifies everything for you. Containerlab provides a command-line interface (CLI) that lets you easily start containers, connect them together virtually, and create the network topology you want for your lab.
Comparing EVE-NG/GNS3 to Containerlab
It's important to note that comparing EVE-NG or GNS3 to containerlab isn't exactly apples to apples. While containerlab excels in running container-based networking labs efficiently, EVE-NG and GNS3 have their strengths in handling VM based devices like Palo Alto VM, vMX, or vSRX with full functionality (though containerlab also supports running some of the VMs)
So, rather than viewing them as competitors, it's more accurate to see these tools as complementary. containerlab simplifies the setup and management of container-based labs, while EVE-NG and GNS3 offer versatility in running VM-based appliances. Together, they provide a comprehensive toolkit for network engineers to experiment and test various network setups.
Installation and Initial Setup
For this example, I'm using an Ubuntu VM running on VMware Workstation in my lab. Since containerlab relies on Docker, make sure you have Docker installed.
With that prerequisite covered, installing containerlab is as easy as running a single command.
bash -c "$(curl -sL https://get.containerlab.dev)"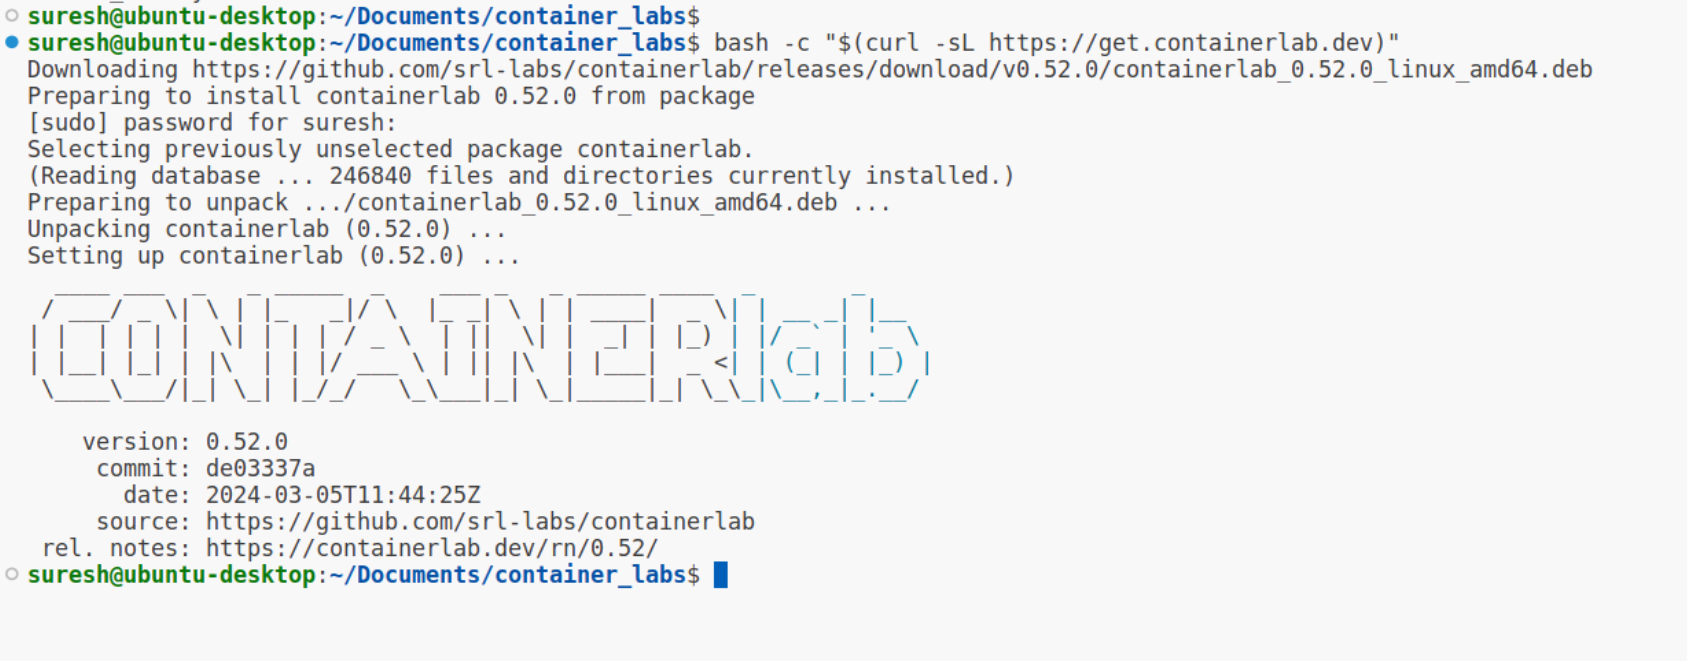 Suresh Vina
Lab Images
Similar to EVE-NG or GNS3, containerlab doesn't come bundled with any images due to license restrictions. However, obtaining the necessary images is relatively straightforward. As long as you have accounts with the respective vendors, you should be able to download the images you need.
EOS-4.28.0F or above to avoid some potential issues (more on this later)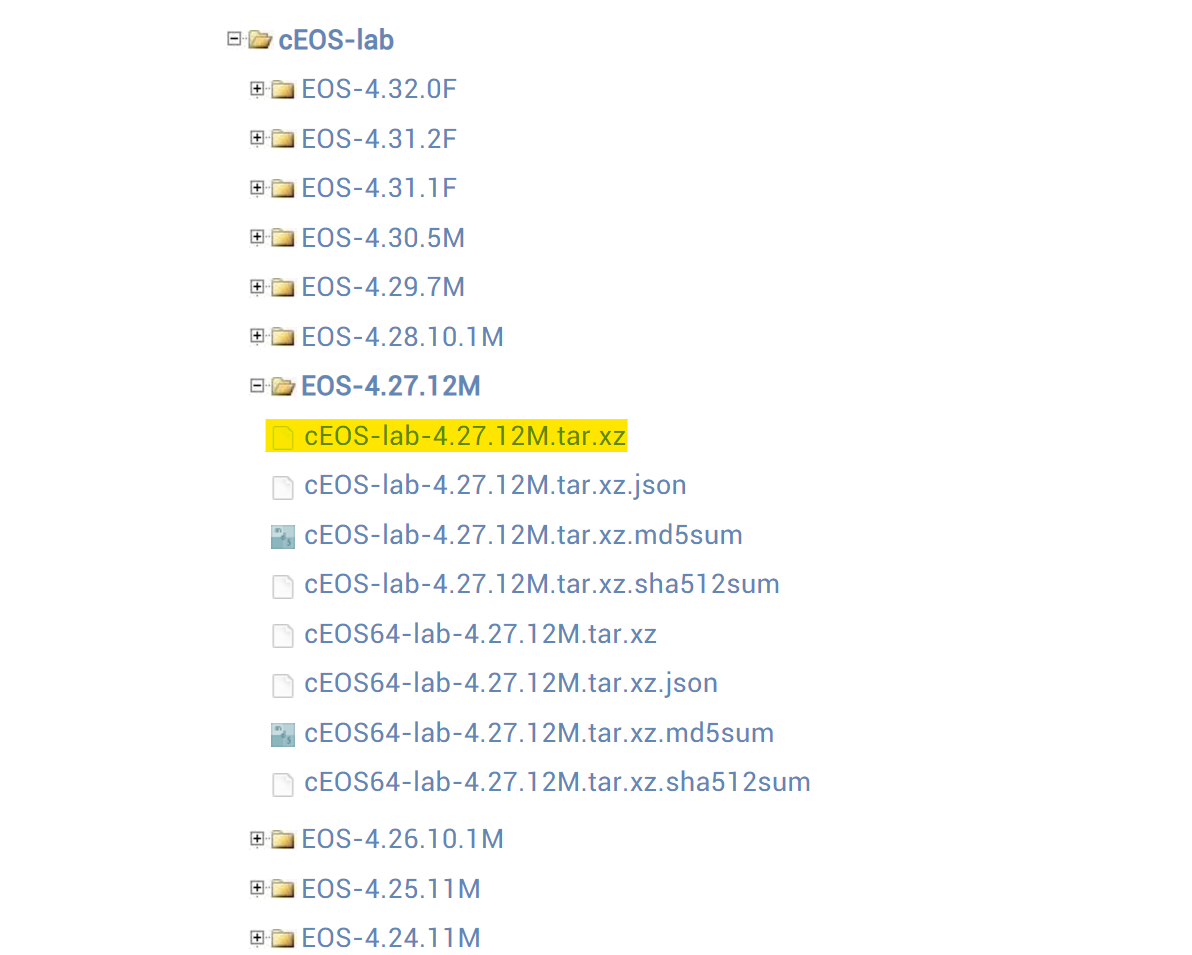
For this example, I've downloaded Arista cEOS images by creating a free account with Arista. Once downloaded, the next step is to import the images into docker.
#downloaded file name - 'cEOS-lab-4.27.12M.tar.tar'

docker import cEOS-lab-4.27.12M.tar.tar ceos:4.27.12M
Containerlab Terminology
Before start using containerlab, there are two main terms you should be familiar with which are topology definition and kinds.
Containerlab builds labs based on the topology information that users pass to it. This topology information is expressed as a code contained in the topology definition file.
Containerlab supports a diverse range of network device vendors. However, the process of launching and setting up these devices varies depending on the vendor. To simplify and abstract this process, containerlab introduces the concept of "kinds." Each vendor or device type is associated with a specific kind, allowing containerlab to differentiate between them. For instance, by using predefined kinds, such as eos or vr-vmx containerlab can identify the type of node being deployed and configure it accordingly during the lab creation process.
Let's Create a Lab
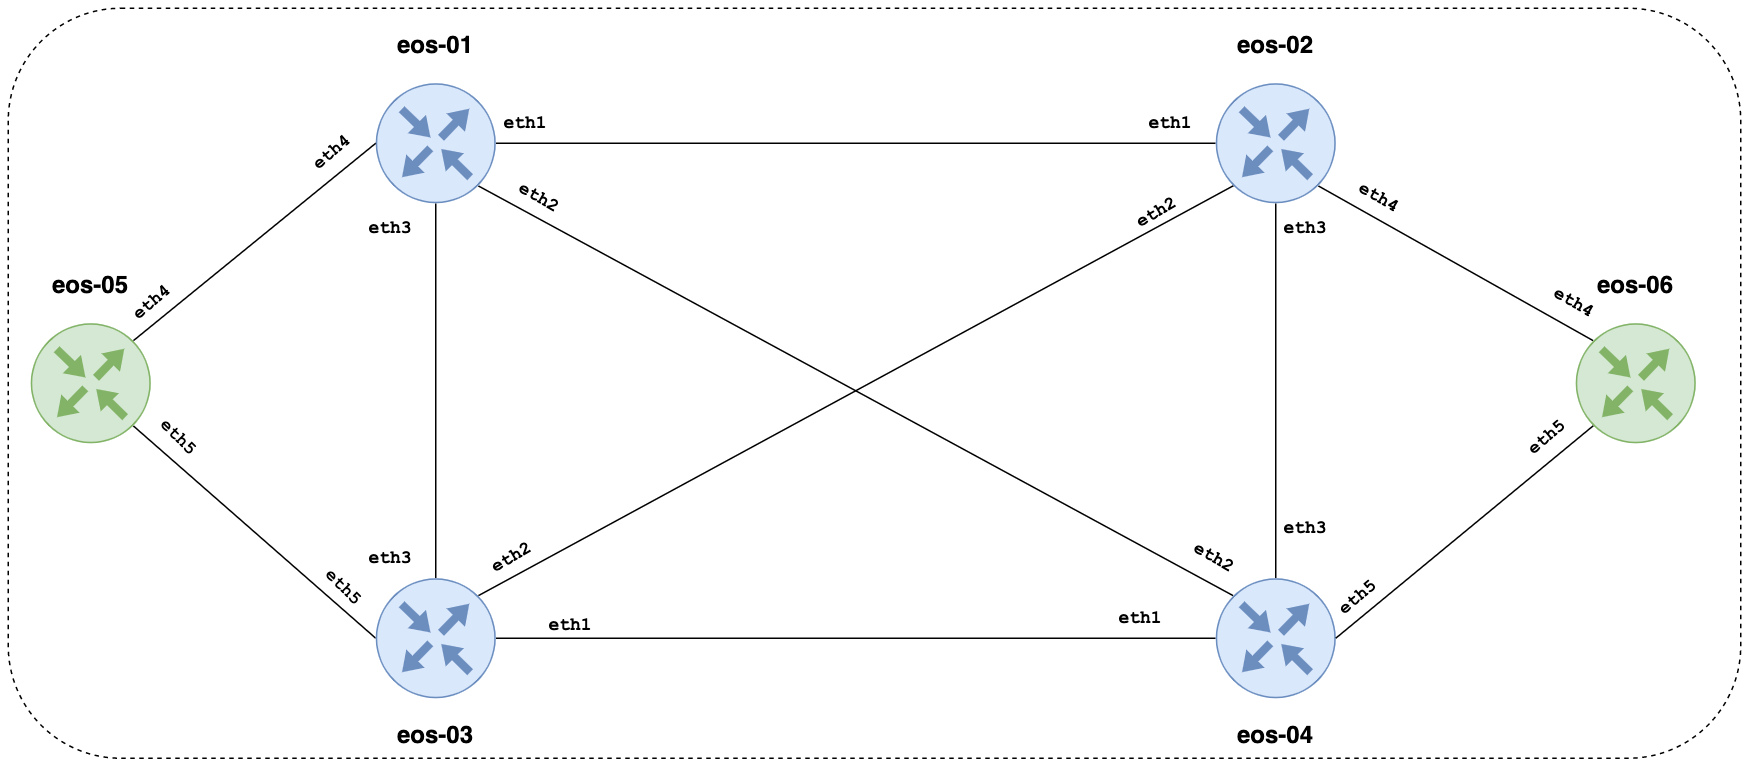
Enough theory, let's jump into an example to demonstrate how straightforward it is to deploy multiple nodes using containerlab. In this example, we'll launch six Arista nodes, create links between them, and configure OSPF on just two of them to show you that it actually works 😀
Topology Definition
To get started, you'll need.
- The Arista cEOS node image imported into Docker (which we've already completed).
- A topology file specifying the desired network setup.
- And finally, just a single command to start the nodes.
I created an empty directory and a YAML file to define the topology. In the arista.clab.yml topology file, we're defining the structure of our lab environment using YAML syntax.
#arista.clab.yml
---
name: arista-labs

mgmt:
  network: mgmt
  ipv4-subnet: 192.168.100.0/24

topology:
  kinds:
    ceos:
      image: ceos:4.27.12M
  nodes:
    eos-01:
      kind: ceos
      mgmt-ipv4: 192.168.100.11
    eos-02:
      kind: ceos
      mgmt-ipv4: 192.168.100.12
    eos-03:
      kind: ceos
      mgmt-ipv4: 192.168.100.13
    eos-04:
      kind: ceos
      mgmt-ipv4: 192.168.100.14
    eos-05:
      kind: ceos
      mgmt-ipv4: 192.168.100.15
    eos-06:
      kind: ceos
      mgmt-ipv4: 192.168.100.16
  links:
    - endpoints: ["eos-01:eth1", "eos-02:eth1"]
    - endpoints: ["eos-01:eth2", "eos-04:eth2"]
    - endpoints: ["eos-01:eth3", "eos-03:eth3"]
    - endpoints: ["eos-01:eth4", "eos-05:eth4"]
    - endpoints: ["eos-02:eth2", "eos-03:eth2"]
    - endpoints: ["eos-02:eth3", "eos-04:eth3"]
    - endpoints: ["eos-02:eth4", "eos-06:eth4"]
    - endpoints: ["eos-03:eth1", "eos-04:eth1"]
    - endpoints: ["eos-03:eth5", "eos-05:eth5"]
- endpoints: ["eos-04:eth5", "eos-06:eth5"]- name - Specifies the name of our lab, in this case,
arista-labs. - mgmt - Defines the management network for our lab. We've assigned it the network name "mgmt" with the IPv4 subnet 192.168.100.0/24.
- topology: Describes the topology of our network lab.
- kinds - Specifies the type of node we'll be using, in this case,
ceos - nodes - Lists the individual nodes we want to deploy, each with a unique identifier ("eos-01" through "eos-06") and management IPv4 address.
- links - Establishes connectivity between the nodes by defining links between their interfaces. Each entry in the "links" section represents a connection/cable between two endpoints, identified by the node name and interface name (e.g., "eos-01:eth1").
- kinds - Specifies the type of node we'll be using, in this case,
Once we've created this YAML file, all that's left to do is run a single command to deploy the nodes and bring the lab environment to life.
sudo containerlab deploy --topo arista.clab.yml+---+-------------------------+--------------+---------------+------+---------+-------------------+--------------+
| # | Name | Container ID | Image | Kind | State | IPv4 Address | IPv6 Address |
+---+-------------------------+--------------+---------------+------+---------+-------------------+--------------+
| 1 | clab-arista-labs-eos-01 | d17114cddea0 | ceos:4.27.12M | ceos | running | 192.168.100.11/24 | N/A |
| 2 | clab-arista-labs-eos-02 | be0d17cffb3f | ceos:4.27.12M | ceos | running | 192.168.100.12/24 | N/A |
| 3 | clab-arista-labs-eos-03 | e1d833ab3bb2 | ceos:4.27.12M | ceos | running | 192.168.100.13/24 | N/A |
| 4 | clab-arista-labs-eos-04 | 209e18831ac0 | ceos:4.27.12M | ceos | running | 192.168.100.14/24 | N/A |
| 5 | clab-arista-labs-eos-05 | 247d1b12a980 | ceos:4.27.12M | ceos | running | 192.168.100.15/24 | N/A |
| 6 | clab-arista-labs-eos-06 | 873f89cfe2d2 | ceos:4.27.12M | ceos | running | 192.168.100.16/24 | N/A |
+---+-------------------------+--------------+---------------+------+---------+-------------------+--------------+
Okay, I hit an issue
Seems like whenever I try to run something on Linux, there's always an issue 🥲. So, when I ran the command to deploy the labs, I got stuck with this error. After some Googling and a bit of reading on this blog, I found a workaround. Made the necessary change, retried the deployment, and voila! Everything started working smoothly. Here is where the deployment got stuck.
INFO[0000] Creating container: eos-01
INFO[0003] Creating virtual wire: eos-01:eth1 <--> eos-02:eth1
INFO[0003] Running postdeploy actions for Arista cEOS 'eos-02' node
INFO[0003] Running postdeploy actions for Arista cEOS 'eos-01' node
suresh@ubuntu-desktop:~$ docker logs clab-arista-labs-eos-01
Waiting for all 1 interfaces to be connected
Sleeping 0 seconds before boot
Failed to mount cgroup at /sys/fs/cgroup/systemd: Operation not permitted
systemd 219 running in system mode. (+PAM +AUDIT +SELINUX +IMA -APPARMOR +SMACK +SYSVINIT +UTMP +LIBCRYPTSETUP +GCRYPT +GNUTLS +ACL +XZ +LZ4 -SECCOMP +BLKID +ELFUTILS +KMOD +IDN)
Detected virtualization docker.
Detected architecture x86-64.I've added the line to this file /etc/default/grub as explained here (Please use it with caution and make sure this doesn't affect existing resources on the linux box)
GRUB_CMDLINE_LINUX_DEFAULT="quiet systemd.unified_cgroup_hierarchy=0"Update - As per the containerlab page, starting with EOS-4.28.0F, ceos-lab will automatically determine whether the container host is using cgroups v1 or cgroups v2 and act appropriately. No additional configuration is required. I've successfully tested this with version ceos:4.28.10.1M and didn't face any issues.
Moving on
As I mentioned earlier, after making the necessary changes, I successfully deployed all the nodes. Once deployed, accessing them is as simple as SSHing to each node with the IP address, username and password set to admin. From there, it's business as usual—configure them just like you would if they were physical devices or accessed via EVE-NG.
suresh@ubuntu-desktop:~/Documents/container_labs$ ssh admin@192.168.100.11
(admin@192.168.100.11) Password:

eos-01>en
eos-01#show run | sec ospf
router ospf 1
   network 10.10.100.0/24 area 0.0.0.0
   max-lsa 12000
eos-01#show ip ospf neighbor
Neighbor ID     Instance VRF      Pri State                  Dead Time   Address         Interface
192.168.100.12  1        default  1   FULL/DR                00:00:34    10.10.100.12    Ethernet1
eos-01#show ip interface brief
Address
Interface IP Address Status Protocol MTU Owner
----------------- ----------------------- ------------ -------------- ---------- -------
Ethernet1 10.10.100.11/24 up up 1500
Management0 192.168.100.11/24 up up 1500suresh@ubuntu-desktop:~/Documents/container_labs$ ssh admin@192.168.100.12
(admin@192.168.100.12) Password:
eos-02>en
eos-02#show ip ospf neighbor
Neighbor ID Instance VRF Pri State Dead Time Address Interface
192.168.100.11 1 default 1 FULL/BDR 00:00:29 10.10.100.11 Ethernet1eos-02#show ip interface brief
Address
Interface IP Address Status Protocol MTU Owner
----------------- ----------------------- ------------ -------------- ---------- -------
Ethernet1 10.10.100.12/24 up up 1500
Management0 192.168.100.12/24 up up 1500Here is a resource usage on the VM while running six nodes.
Cleaning Up
When you're finished with your lab and want to shut it down, simply run containerlab destroy --topo arista.clab.yml. Although the term "destroying" might sound drastic, this command simply shuts down the instances. You can always bring them back up without losing your configurations.
However, if you want to completely remove the configurations, you can add the --cleanup flag to the command.
So How does this work?
Behind the scenes, here's what's happening.
Node Deployment
Containerlab takes the topology definition file where you've specified six cEOS nodes and their configurations. It then spins up six Docker containers from the image we imported earlier. If you run docker ps while the lab is running, you'll see these containers active and running.
suresh@ubuntu-desktop:~$ docker ps
CONTAINER ID   IMAGE           COMMAND                  CREATED         STATUS         PORTS     NAMES
0966d03d9990   ceos:4.27.12M   "bash -c '/mnt/flash…"   9 seconds ago   Up 7 seconds             clab-arista-labs-eos-06
92e01de6eb7f   ceos:4.27.12M   "bash -c '/mnt/flash…"   9 seconds ago   Up 7 seconds             clab-arista-labs-eos-03
216b6741df53   ceos:4.27.12M   "bash -c '/mnt/flash…"   9 seconds ago   Up 8 seconds             clab-arista-labs-eos-01
99dad7af050e   ceos:4.27.12M   "bash -c '/mnt/flash…"   9 seconds ago   Up 8 seconds             clab-arista-labs-eos-04
eaa62290fc11   ceos:4.27.12M   "bash -c '/mnt/flash…"   9 seconds ago   Up 6 seconds             clab-arista-labs-eos-02
48594b2e7d2d   ceos:4.27.12M   "bash -c '/mnt/flash…"   9 seconds ago   Up 7 seconds             clab-arista-labs-eos-05
Management Network
The management network we defined in the YAML file is facilitated by a Docker bridge network driver. When the lab is created, Containerlab automatically creates this network for us. You can verify this by running docker network ls, which will display all available network drivers. Among them, you'll find the one Containerlab created for us, named 'mgmt', with the type set as 'bridge'.
suresh@ubuntu-desktop:~$ docker network ls
NETWORK ID     NAME             DRIVER    SCOPE
9aa9e0dc779a   bridge           bridge    local
2e1bfbeb9511   host             host      local
1adbf4b4c9da   mgmt             bridge    local  <<< here
ca338427b662   none             null      local
451502b7e790   pihole_default   bridge    local
Inspecting the Management Bridge
If you're curious about the details of this management bridge, you can use the docker inspect mgmt command. This command will provide you with a wealth of information about the bridge network, giving insights into its configuration and properties. Here you can see, all the 6 nodes and their IP address listed.
[
    {
        "Name": "mgmt",
        "Id": "1adbf4b4c9da982587ab7c0d956b9a8fa1c1ac57acd5fc617650256727e6fd53",
        "Created": "2024-03-15T18:31:27.704019477Z",
        "Scope": "local",
        "Driver": "bridge",
        "EnableIPv6": false,
        "IPAM": {
            "Driver": "default",
            "Options": null,
            "Config": [
                {
                    "Subnet": "192.168.100.0/24"
                }
            ]
        },
        "Internal": false,
        "Attachable": false,
        "Ingress": false,
        "ConfigFrom": {
            "Network": ""
        },
        "ConfigOnly": false,
        "Containers": {
            "0966d03d99902e75ee333e7d28fd238033f02693e1599119c8e89f98aa6ee120": {
                "Name": "clab-arista-labs-eos-06",
                "EndpointID": "52c73249e233f396f614af87990536fc13526c6210719c7e3b63709c7d464e7a",
                "MacAddress": "00:1c:73:0d:d7:66",
                "IPv4Address": "192.168.100.16/24",
                "IPv6Address": ""
            },
            "216b6741df534886acfc481d5a3ddb446f0d1c3496c20b43dcfc6adae70e7471": {
                "Name": "clab-arista-labs-eos-01",
                "EndpointID": "29578949d0b57a369bc69c273eb0520d2d32c11c6880c1dc09bbae4cabf9aa87",
                "MacAddress": "00:1c:73:81:4b:52",
                "IPv4Address": "192.168.100.11/24",
                "IPv6Address": ""
            },
            "48594b2e7d2dd0cb579e1c48b55850c2bd9fd4cf1086641337c16b1c3b6ff871": {
                "Name": "clab-arista-labs-eos-05",
                "EndpointID": "8ed07001f86291be0743cd6b0ca18309d59cfd3f3b88cf0599377f25de5834f0",
                "MacAddress": "00:1c:73:75:ce:b5",
                "IPv4Address": "192.168.100.15/24",
                "IPv6Address": ""
            },
            "92e01de6eb7f89bf8c0ea2cc46ff6327738d9a717359cfaf9d76410c035dad91": {
                "Name": "clab-arista-labs-eos-03",
                "EndpointID": "bc76eb211ea028d93959794aff4612d8b3a7ed73484630e5627b7a9633074f5f",
                "MacAddress": "00:1c:73:2a:f0:1a",
                "IPv4Address": "192.168.100.13/24",
                "IPv6Address": ""
            },
            "99dad7af050e69f78d1b3db9eb9ddc945bd0eaf5ef24fc96f54fe860e5247d3c": {
                "Name": "clab-arista-labs-eos-04",
                "EndpointID": "5ae7fd3a23c6339c3f86761930f23c9efe5e6b9af408ad2fd900dc47347e7120",
                "MacAddress": "00:1c:73:ca:3f:d4",
                "IPv4Address": "192.168.100.14/24",
                "IPv6Address": ""
            },
            "eaa62290fc1109ff5852c9cee60c5b22c45e8374fb6fecc78c54cc137f18133a": {
                "Name": "clab-arista-labs-eos-02",
                "EndpointID": "721ee0dc608c2942c571d5125321022e42afe3bd26402a476753ea32c319f5f8",
                "MacAddress": "00:1c:73:71:05:89",
                "IPv4Address": "192.168.100.12/24",
                "IPv6Address": ""
            }
        },
        "Options": {
            "com.docker.network.driver.mtu": "1500"
        },
        "Labels": {
            "containerlab": ""
        }
    }
]
As you can see in the diagram below, the management (mgmt) network is only reachable from the host machine. This means that external systems like NMS or syslog servers on your network won't be able to reach the containers hosted within the host machine. However, there are alternative Docker network drivers available that allow you to integrate containers directly with your physical network infrastructure.
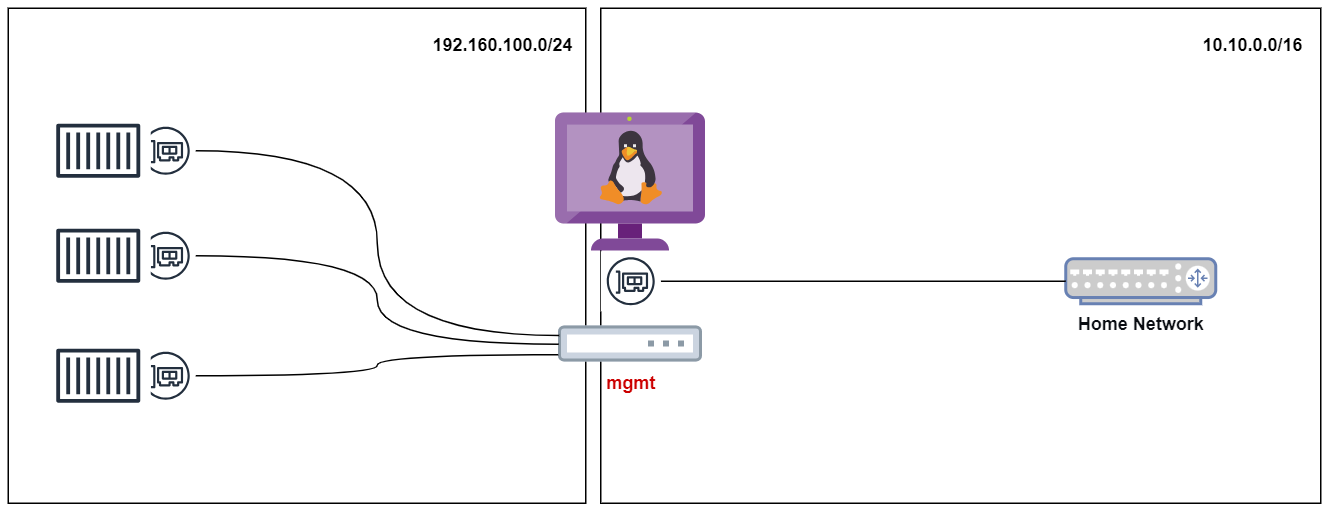
Using a different network driver is something I would like to explore further in my upcoming blog posts. To stay updated and learn more about containerlabs, make sure to subscribe below and keep an eye out for my next blog post.
Adding VM Based Nodes
Containerlab also supports adding VM based nodes such as Palo Alto Firewall, Cisco FTDv, Juniper vMX etc. For this example, I'm going to use Palo Alto firewall and Junos L2 Switch.
The process of adding VM nodes are done by vrnetlab which packages a regular VM inside a container and makes it runnable as if it was a container image. Here is an exmaple of how to add both Palo Alto and Junos vSwitch.
To get started, ensure you've downloaded the appropriate images from the vendors in KVM or qcow format. Once downloaded, clone the vrnetlab repo from here, navigate to the relevant vendor directory, and copy the downloaded image there. For instance, for Palo Alto, navigate to the Palo Alto directory, copy the downloaded image, and run make (make sure you have make installed). This process might take a while to complete. Once done, simply create a topology file, and you're all set.
suresh@ubuntu-desktop:~/Documents$ git clone https://github.com/hellt/vrnetlab.gitsuresh@ubuntu-desktop:~/Documents$ cd vrnetlab/pan/
suresh@ubuntu-desktop:~/Documents/vrnetlab/pan$ ls
docker Makefile PA-VM-KVM-10.1.3.qcow2 README.mdsuresh@ubuntu-desktop:~/Documents/vrnetlab/pan$ make
for IMAGE in PA-VM-KVM-10.1.3.qcow2; do \
echo "Making $IMAGE"; \
make IMAGE=$IMAGE docker-build; \
done
Making PA-VM-KVM-10.1.3.qcow2
make[1]: Entering directory '/home/suresh/Documents/vrnetlab/pan'
rm -f docker/*.qcow2* docker/*.tgz* docker/*.vmdk* docker/*.iso
Building docker image using PA-VM-KVM-10.1.3.qcow2 as vrnetlab/vr-pan:10.1.3
cp ../common/* docker/
make IMAGE=$IMAGE docker-build-image-copy
make[2]: Entering directory '/home/suresh/Documents/vrnetlab/pan'
cp PA-VM-KVM-10.1.3.qcow2* docker/
make[2]: Leaving directory '/home/suresh/Documents/vrnetlab/pan'
(cd docker; docker build --build-arg http_proxy= --build-arg https_proxy= --build-arg IMAGE=PA-VM-KVM-10.1.3.qcow2 -t vrnetlab/vr-pan:10.1.3 .)
[+] Building 352.8s (9/9) FINISHED docker:default
=> [internal] load build definition from Dockerfile sha256:17d0386c2fff30a5b92652bbef2b84639dba9b9f17bdbb819c8d10badd827fdb 27.51MB / 27.51MB
=> => writing image sha256:c5dc6108ea8f787c5a51f6fa8b3cd9d76b5581489aaf9ba171d83c4a46130250 0.0s
=> => naming to docker.io/vrnetlab/vr-pan:10.1.3 0.0s
make[1]: Leaving directory '/home/suresh/Documents/vrnetlab/pan'
suresh@ubuntu-desktop:~/Documents/vrnetlab/pan$ suresh@ubuntu-desktop:~/Documents/vrnetlab/pan$ docker images
REPOSITORY TAG IMAGE ID CREATED SIZE
vrnetlab/vr-pan 10.1.3 c5dc6108ea8f About a minute ago 8.57GBHere is an example topology file that creates a palo alto firewall, vJunos L2 switch and an alpine host.
name: main-labs

mgmt:
  network: mgmt
  ipv4-subnet: 192.168.100.0/24

topology:
  kinds:
    paloalto_panos:
      image: vrnetlab/vr-pan:10.1.3
    juniper_vjunosswitch:
      image: vrnetlab/vr-vjunosswitch:23.2R1.14
    linux:
      image: alpine:latest
  nodes:
    palo-01:
      kind: paloalto_panos
      mgmt-ipv4: 192.168.100.30
    j-switch-01:
      kind: juniper_vjunosswitch
      mgmt-ipv4: 192.168.100.31
    alpine-01:
      kind: linux
      mgmt-ipv4: 192.168.100.32
  links:
    - endpoints: ["palo-01:eth1", "j-switch-01:eth1"]
    - endpoints: ["alpine-01:eth1", "j-switch-01:eth2"]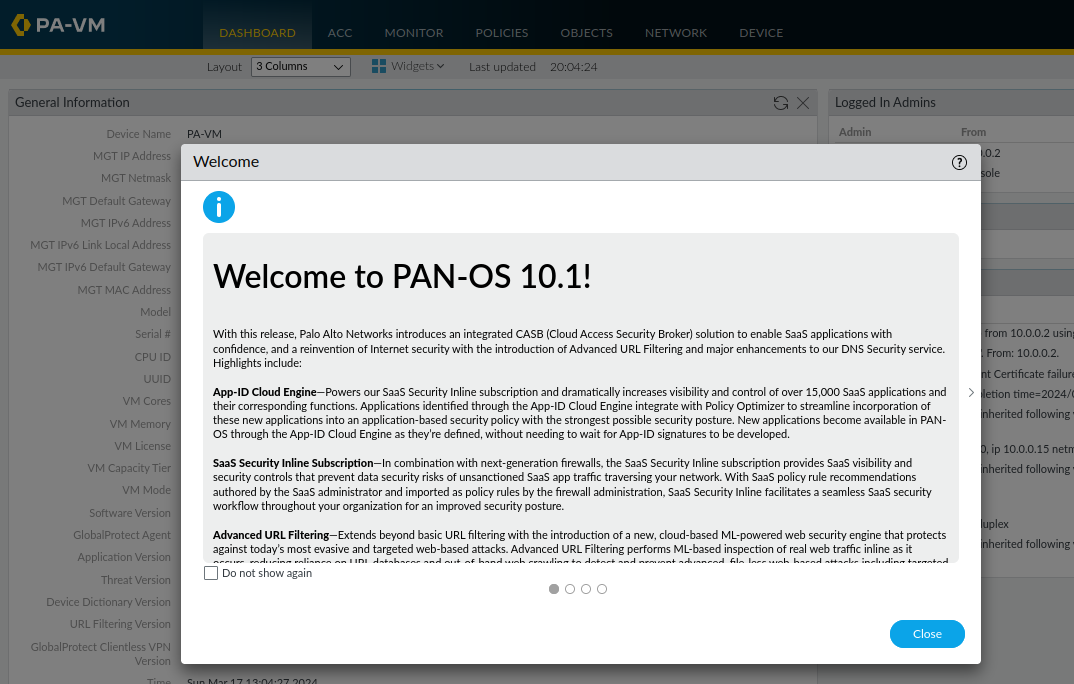
Viewing the topology
Here is a cool thing about it - You can view the diagram/topology easily by running a single command. Here is an example of one of my labs that has a Juniper Switch and two alpines nodes.
suresh@ubuntu-desktop:~/Documents/container_labs/common-lab$ sudo containerlab graph -t my-lab.yml

INFO[0000] Parsing & checking topology file: my-lab.yml
INFO[0000] Serving static files from directory: /etc/containerlab/templates/graph/nextui/static
INFO[0000] Serving topology graph on http://0.0.0.0:50080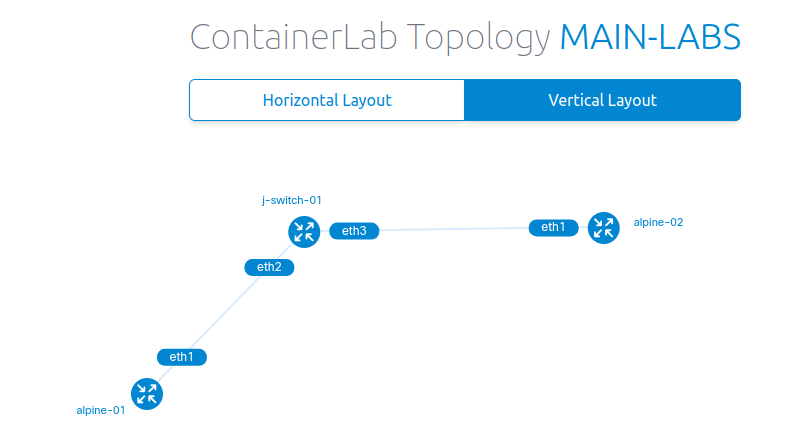 Suresh Vina
Closing Thoughts
And that wraps up the introduction. I'm eager to dive deeper into using more labs and sharing my experiences here on the blog. As I mentioned earlier, while I'll continue to rely on EVE-NG for heavier tasks like running Active Directory, Cisco ISE, or multiple Palo Alto VMs, containerlab proves to be incredibly useful for quickly spinning up labs to test various protocols such as OSPF or BGP.
References
https://juliopdx.com/2021/12/10/my-journey-and-experience-with-containerlab/
https://blog.thomarite.uk/index.php/2021/09/11/containerlab/