In today's post, we're diving into Cisco YANG Suite, a tool that makes using netconf/restconf a breeze. If you want to easily configure and manage your network devices programmatically or if you want to learn more about YANG, NETCONF and RESTCONF, you're in the right place.
What is YANG?
YANG (Yet Another Next Generation) is a data modeling language designed to define the structure and constraints of data for applications such as network configuration and monitoring. YANG provides a formalized abstract structure for both configuration and operational state data, which can be used by various protocols and services to interpret and manipulate the data.
It's essentially a universal language for describing how data should be represented, organized, and manipulated, serving as a foundational component for automation and management.
What exactly is Cisco YANG Suite?
Cisco defines the YANG suite as - Cisco YANG Suite provides a set of tools and plugins to learn, test, and adopt YANG programmable interfaces such as NETCONF, RESTCONF, gNMI and more. YANG Suite will provides network operators with a common tool to interact with Cisco IOS XE, IOS XR, and the NX-OS Network Operating Systems.
Now that we know the official definition, let's see what exactly it does. Cisco YANG Suite is a user-friendly tool designed to help you manage and configure network devices using YANG data models. With this tool, you can easily explore available configurations and even test them out. It's particularly useful when you don't know the exact xpath or URI to be used with Netconf and Restconf.
Let's say you're looking to configure VLANs or add descriptions to your interfaces using netconf or restconf, you've got a couple of options. If you're comfortable with tech details, you can dive into the YANG modules to find the specific xpath/URI you need for these configurations. But if you want to keep things simple, the Cisco YANG Suite is your go-to.
It not only shows you the exact XPATH/URI you need but also lets you test configurations right from the tool. You can then take this info and plug it into your own automation scripts, or even execute the changes directly from the YANG Suite. Well, it can be confusing now but once we go through an example, it will start to make sense.
Some Considerations
Before diving further into installing the Cisco YANG Suite, I want to share some insights based on my own experience. Initially, I installed (using docker compose) it on my MacBook which has an M1 chip and 16GB of memory. While the installation itself went fine, I ran into issues when trying to add a YANG model via a Git repository. The process kept failing, and some tasks took way too long to complete. I also tried installing it on an AWS t2.micro instance and faced similar problems.
I finally switched to a t2.large instance on AWS, and everything worked smoothly. So, if you're planning to use YANG Suite, consider the system resources.
Configure the Cisco Device
You just need a couple of commands on the device to use Restconf and Netconf assuming everything else is setup correctly. I setup a local user account, enabled aaa and configured IP address on the management interface.
netconf-yang
restconf

ip http secure-serverHow to Install Cisco YANG Suite?
Installing Cisco YANG Suite is pretty straightforward, especially if you've got some experience with Docker and Git. I'm doing the installation on an EC2 instance, but you should find the process similar on other platforms.
To kick things off, clone the repository and make your way into the Docker directory. Here, you'll find a shell script named start_yang_suite.sh. Run it by typing ./start_yang_suite.sh in the terminal.
git clone git@github.com:CiscoDevNet/yangsuite.git

Cloning into 'yangsuite'...
remote: Enumerating objects: 876, done.
remote: Counting objects: 100% (81/81), done.
remote: Compressing objects: 100% (44/44), done.
remote: Total 876 (delta 43), reused 71 (delta 37), pack-reused 795
Receiving objects: 100% (876/876), 44.86 MiB | 11.54 MiB/s, done.
Resolving deltas: 100% (369/369), done.

cd yangsuite/docker
During the installation, you'll be asked to set up an admin account and password. You'll also get prompts to install a self-signed certificate. Just follow the instructions; the script will handle the heavy lifting. Be patient, as it can take up to 20 minutes for everything to get set up. This script also runs docker-compose up for you.
confirm password:
Will you access the system from a remote host? (y/n): n
email: random@my.com

Setup test certificates? (y/n): y
################################################################
## Generating self-signed certificates...                     ##
##                                                            ##
## WARNING: Obtain certificates from a trusted authority!     ##
##                                                            ##
## NOTE: Some browsers may still reject these certificates!!  ##
################################################################

!! Abbreviated!!

Certificates generated...
Building docker containers...
After the installation is completed, head over to https://host_ip:8443 to sign in and start exploring the tool.
Step 1 - Adding YANG Repository
Now that we've got YANG Suite up and running, the next step is to add the YANG models. You can do this in several ways, but I opted to download them directly from Git. For context, I'm working with a C9300 switch running version 17.6.3. You can also get the model directly from the switch itself.
To get started, head over to the Setup section and look for YANG Module Repositories. From there, click on New Repository and give it a name you'll remember. Now you'll need to enter some specifics, copy the Git repo URL, which in this case is https://github.com/YangModels/yang.git. Also, specify the path where you want to download the modules.
For my setup, it's vendor/cisco/xe/1761. Finally, pick the branch you're interested in, main in this case. (The switch is running 17.6.3 hence I went with /xe/1761 )

Once all the information is in, go ahead and click on "Import YANG files". If everything goes well (it takes a while to download the models, be patient), you will get the message 'xxx modules added'
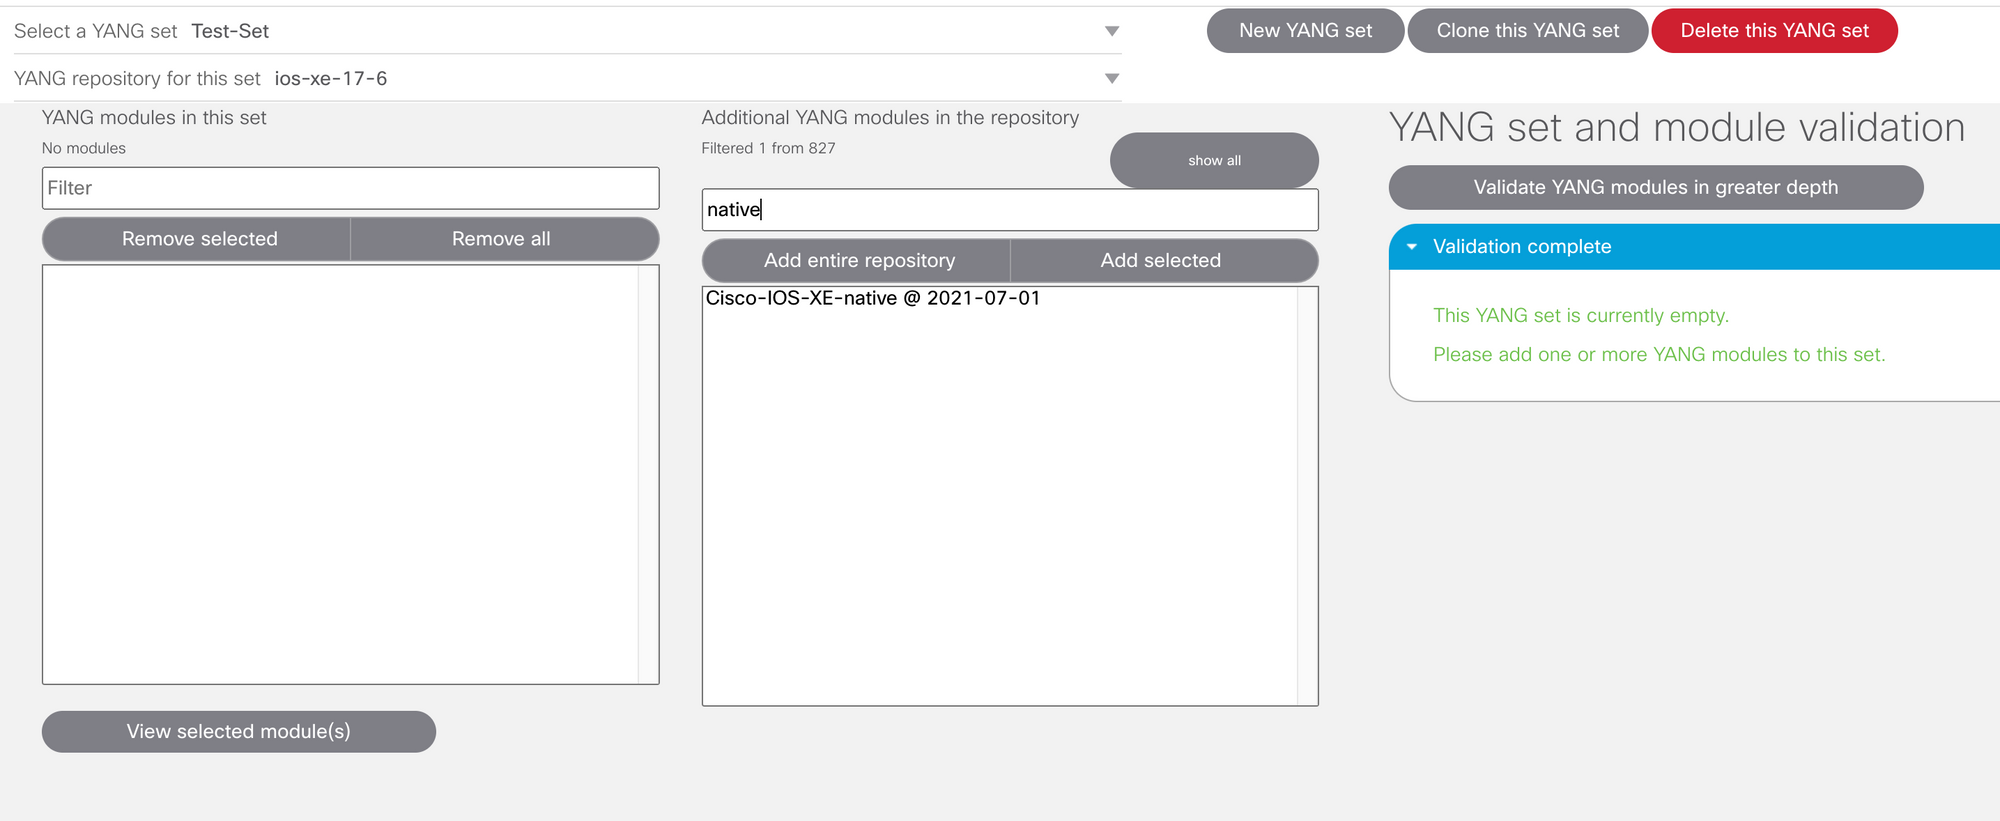
Step 2 - YANG Module Set
After successfully importing the YANG models, the next step is to create a Module Set. This allows you to work with subsets of models, making it easier to focus on specific configurations. To do this, head back to the Setup section and find YANG Module Sets. Click on Create New Set and give it a name that makes sense to you.
You have the option to add the entire repository or just a subset of models.
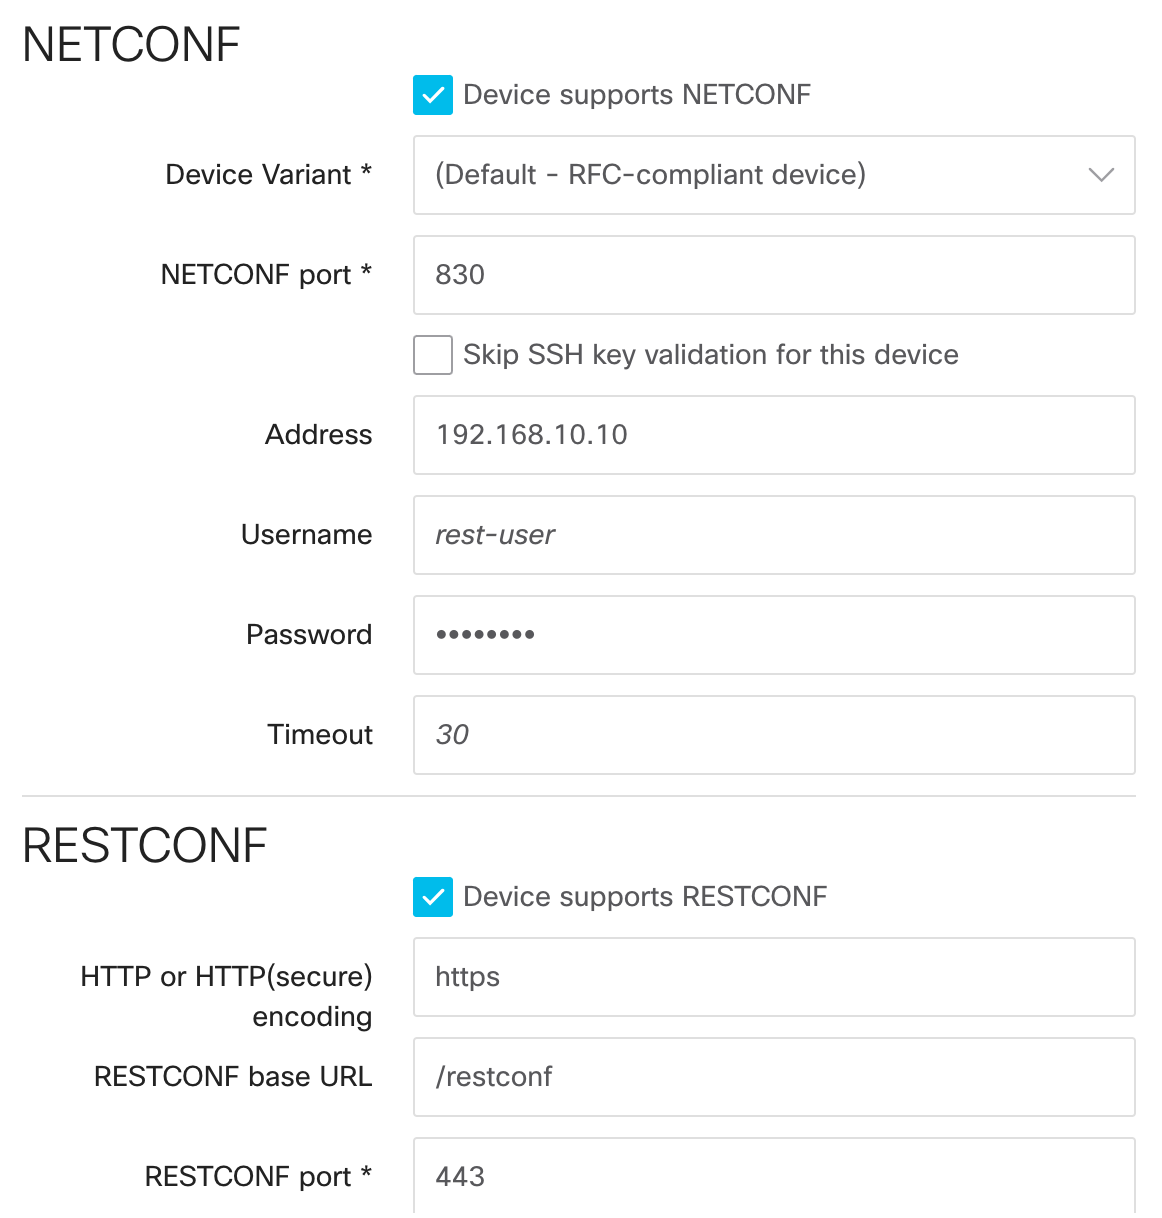
Step 3 - Device Profile
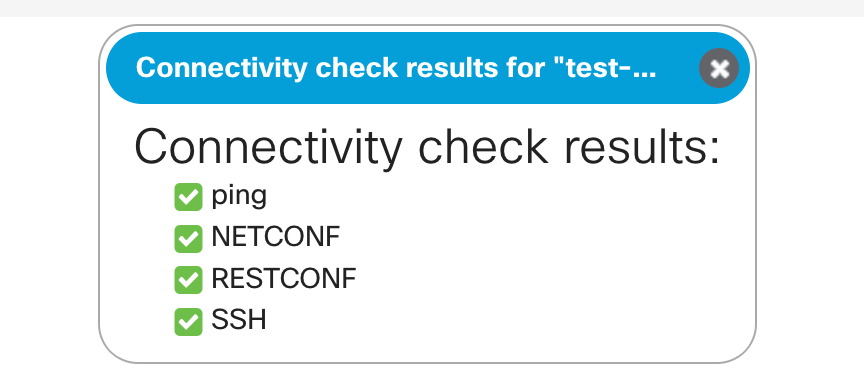
The final step is to add your device to the YANG Suite. Navigate to the Setup section and look for Device Profiles. Here, you can add your device and run a reachability test to ensure everything is in order.
Finding the Rest API URI
Whew, we've done a lot, haven't we? But stick with me, because now we're getting to the good part. Now that everything is setup correctly, we can go about our initial goal which finding the xpath or URI of specific configuration. For example, the URI would be different for OSPF, Interface config, VLAN, hostname etc.
Let's say I want to find/change the hostname of the device I'm working with. You must be thinking, seriously, is that all you are going to do? Well, let's start small and then we can look at another example later.
Navigate your way to the Protocols section, and then select Restconf. From here, you'll need to pick the Module Set and the Device Profile we set up earlier and hit Load Modules. The Model should show up after a few seconds as shown below.
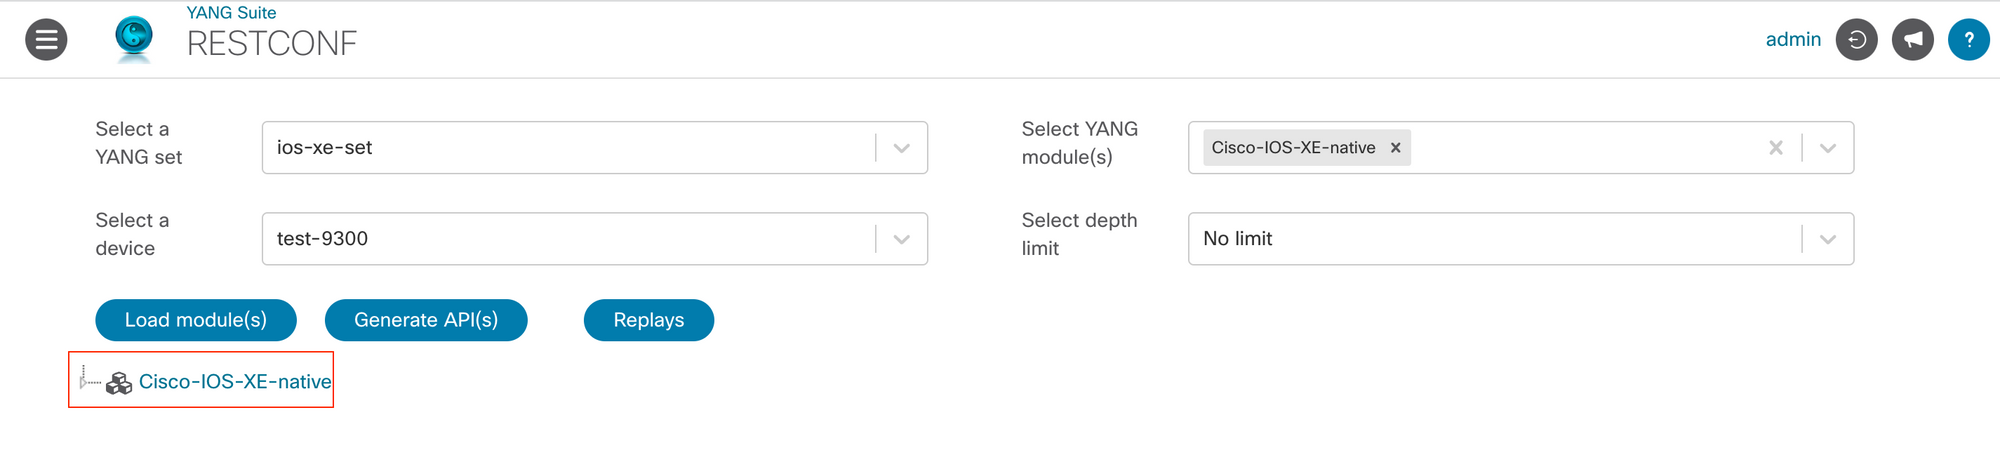
As I mentioned before, for the sake of simplicity, we're going to find the URI of 'hostname' Once you drill down the yang tree and find the hostname, click Generate API(s) button.
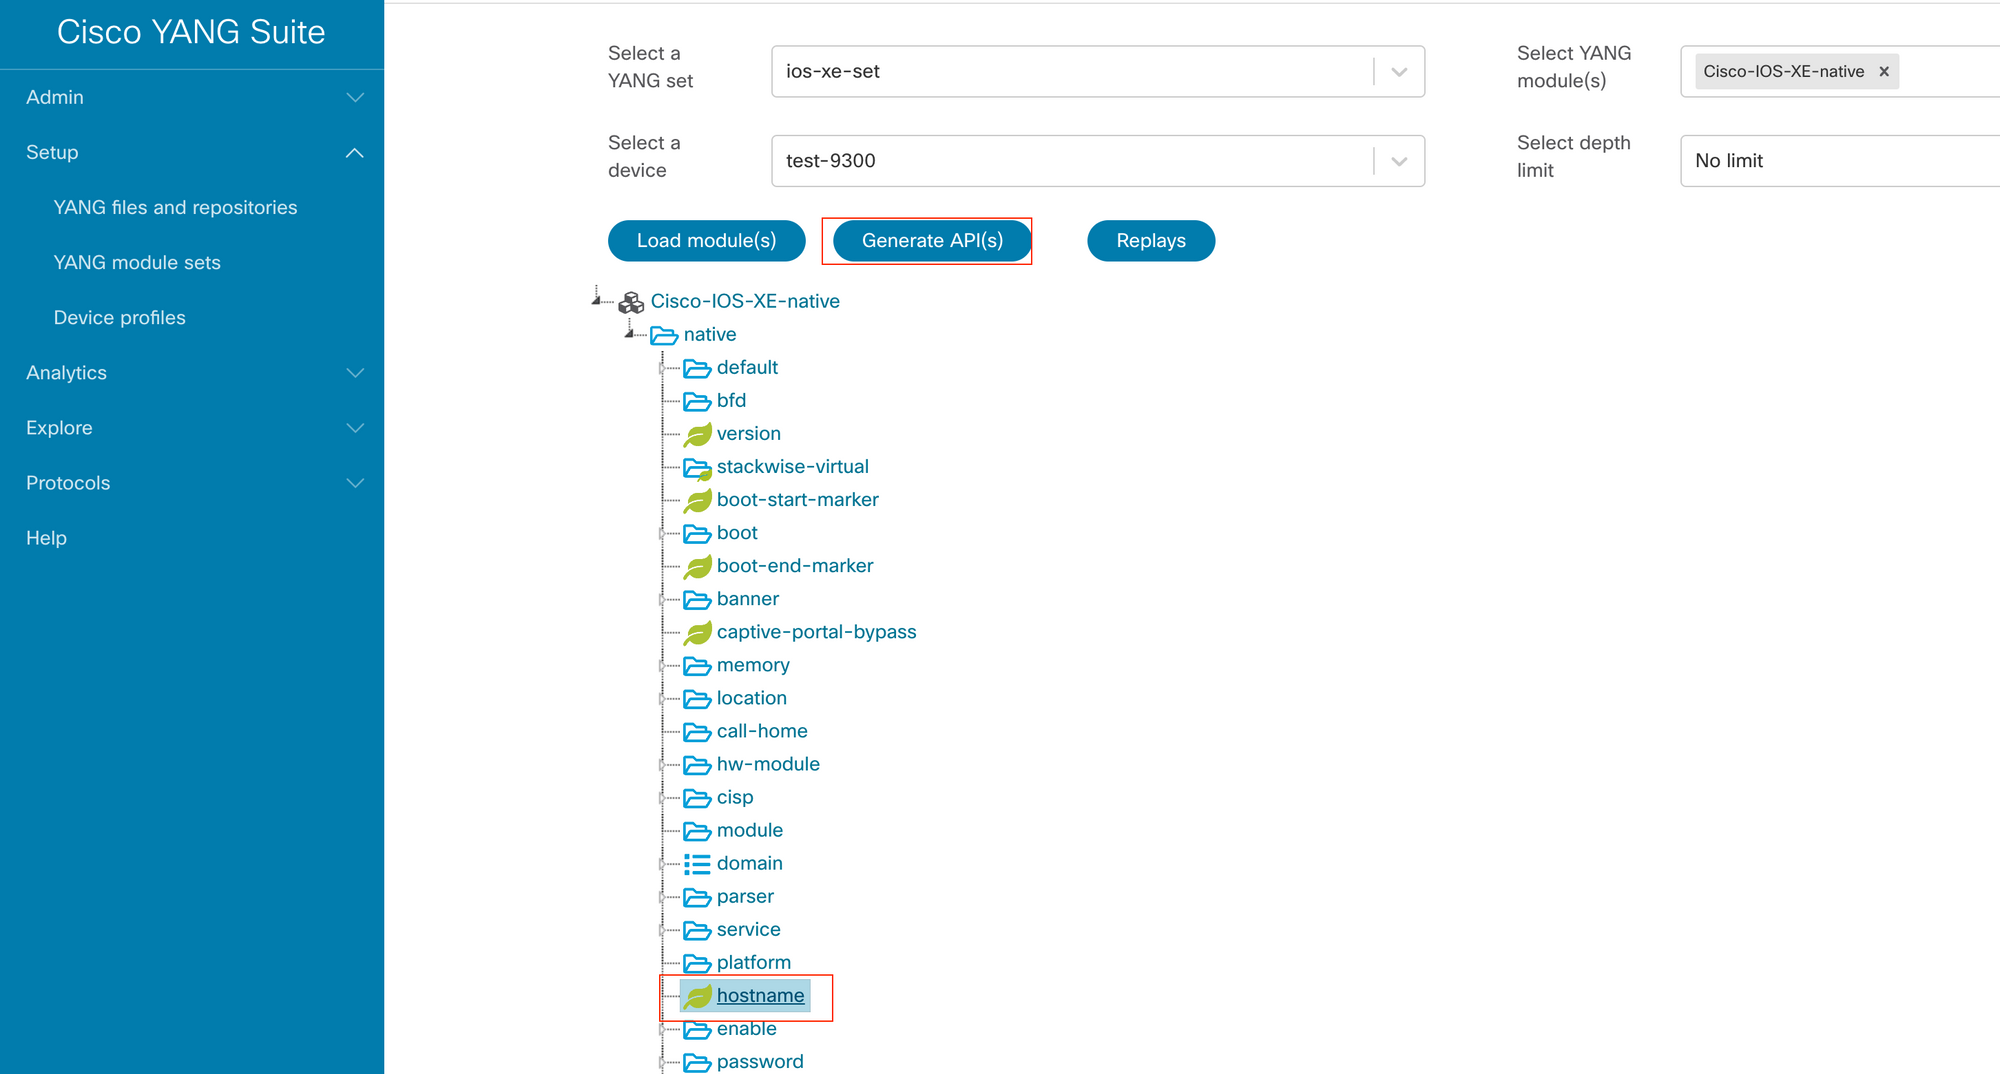
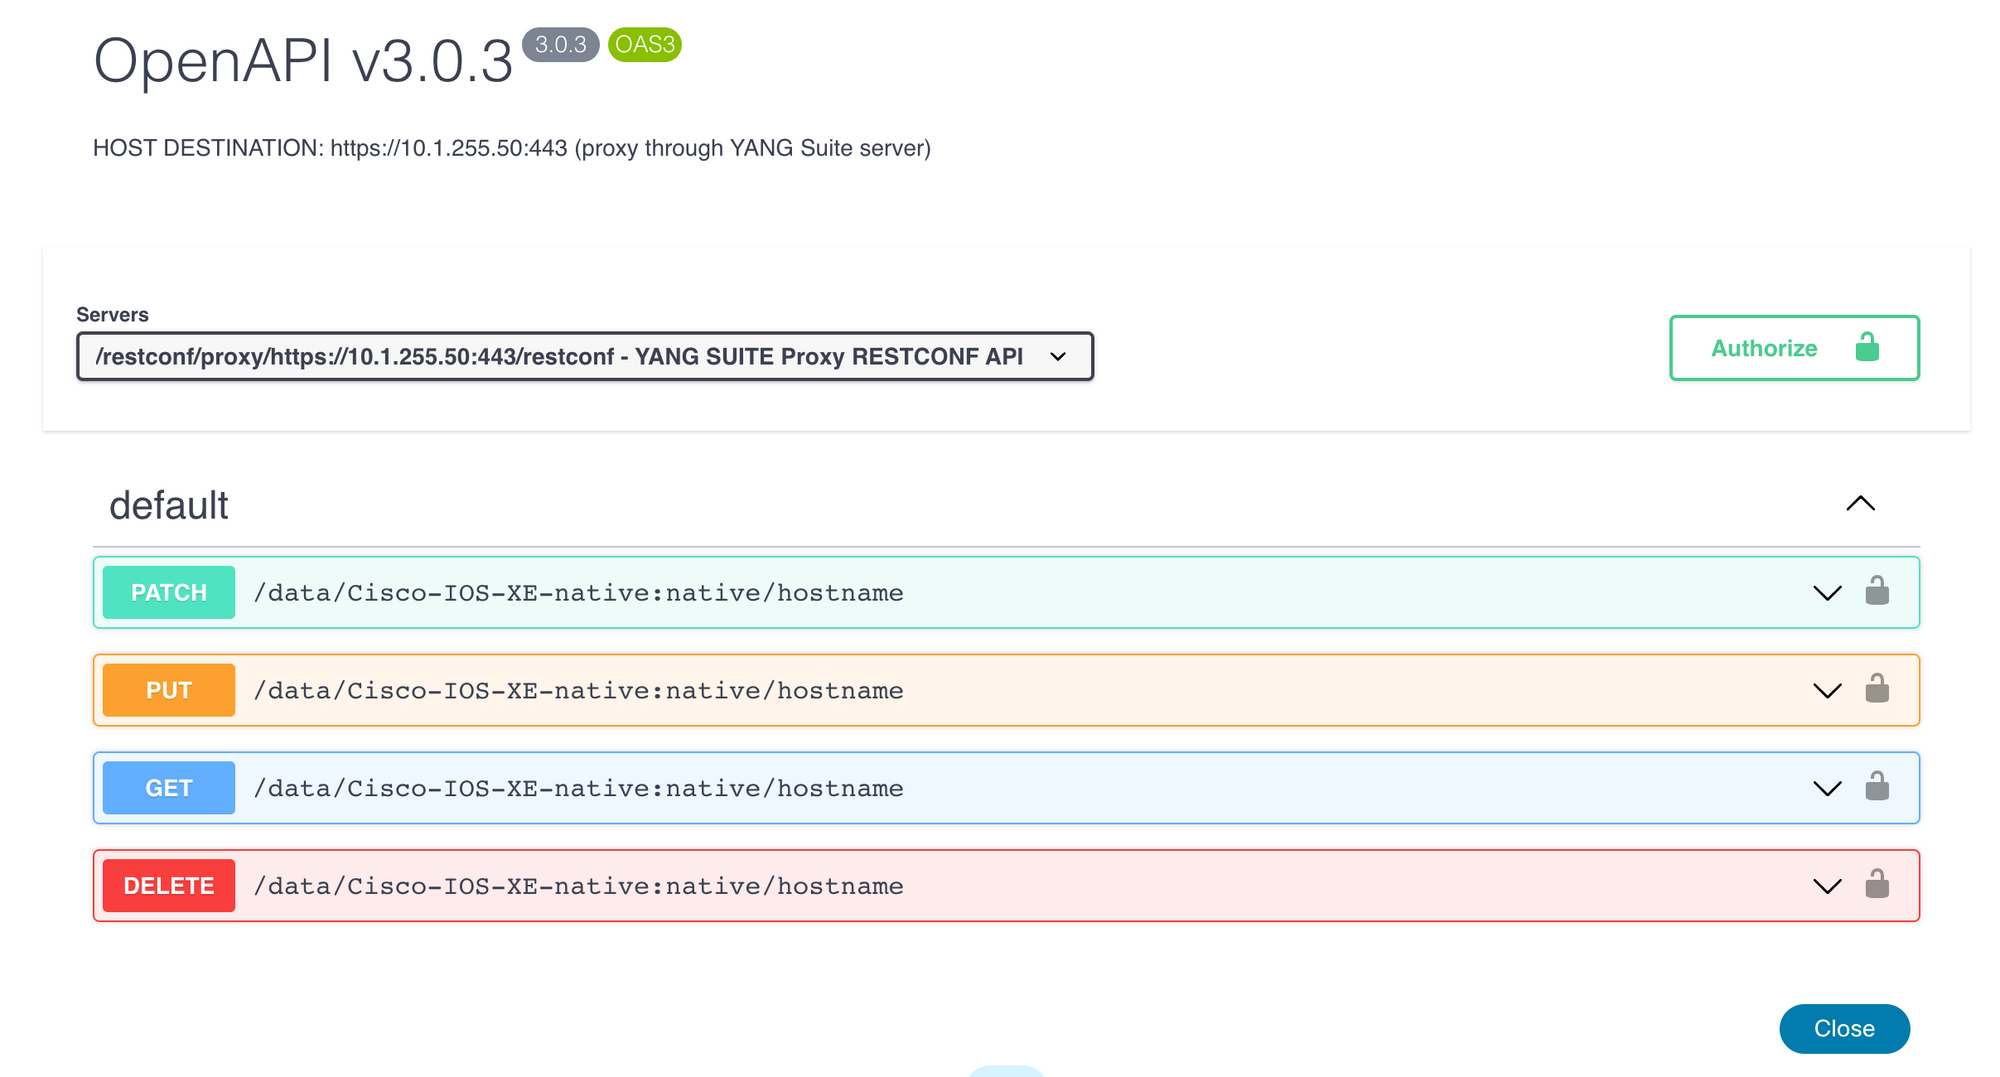
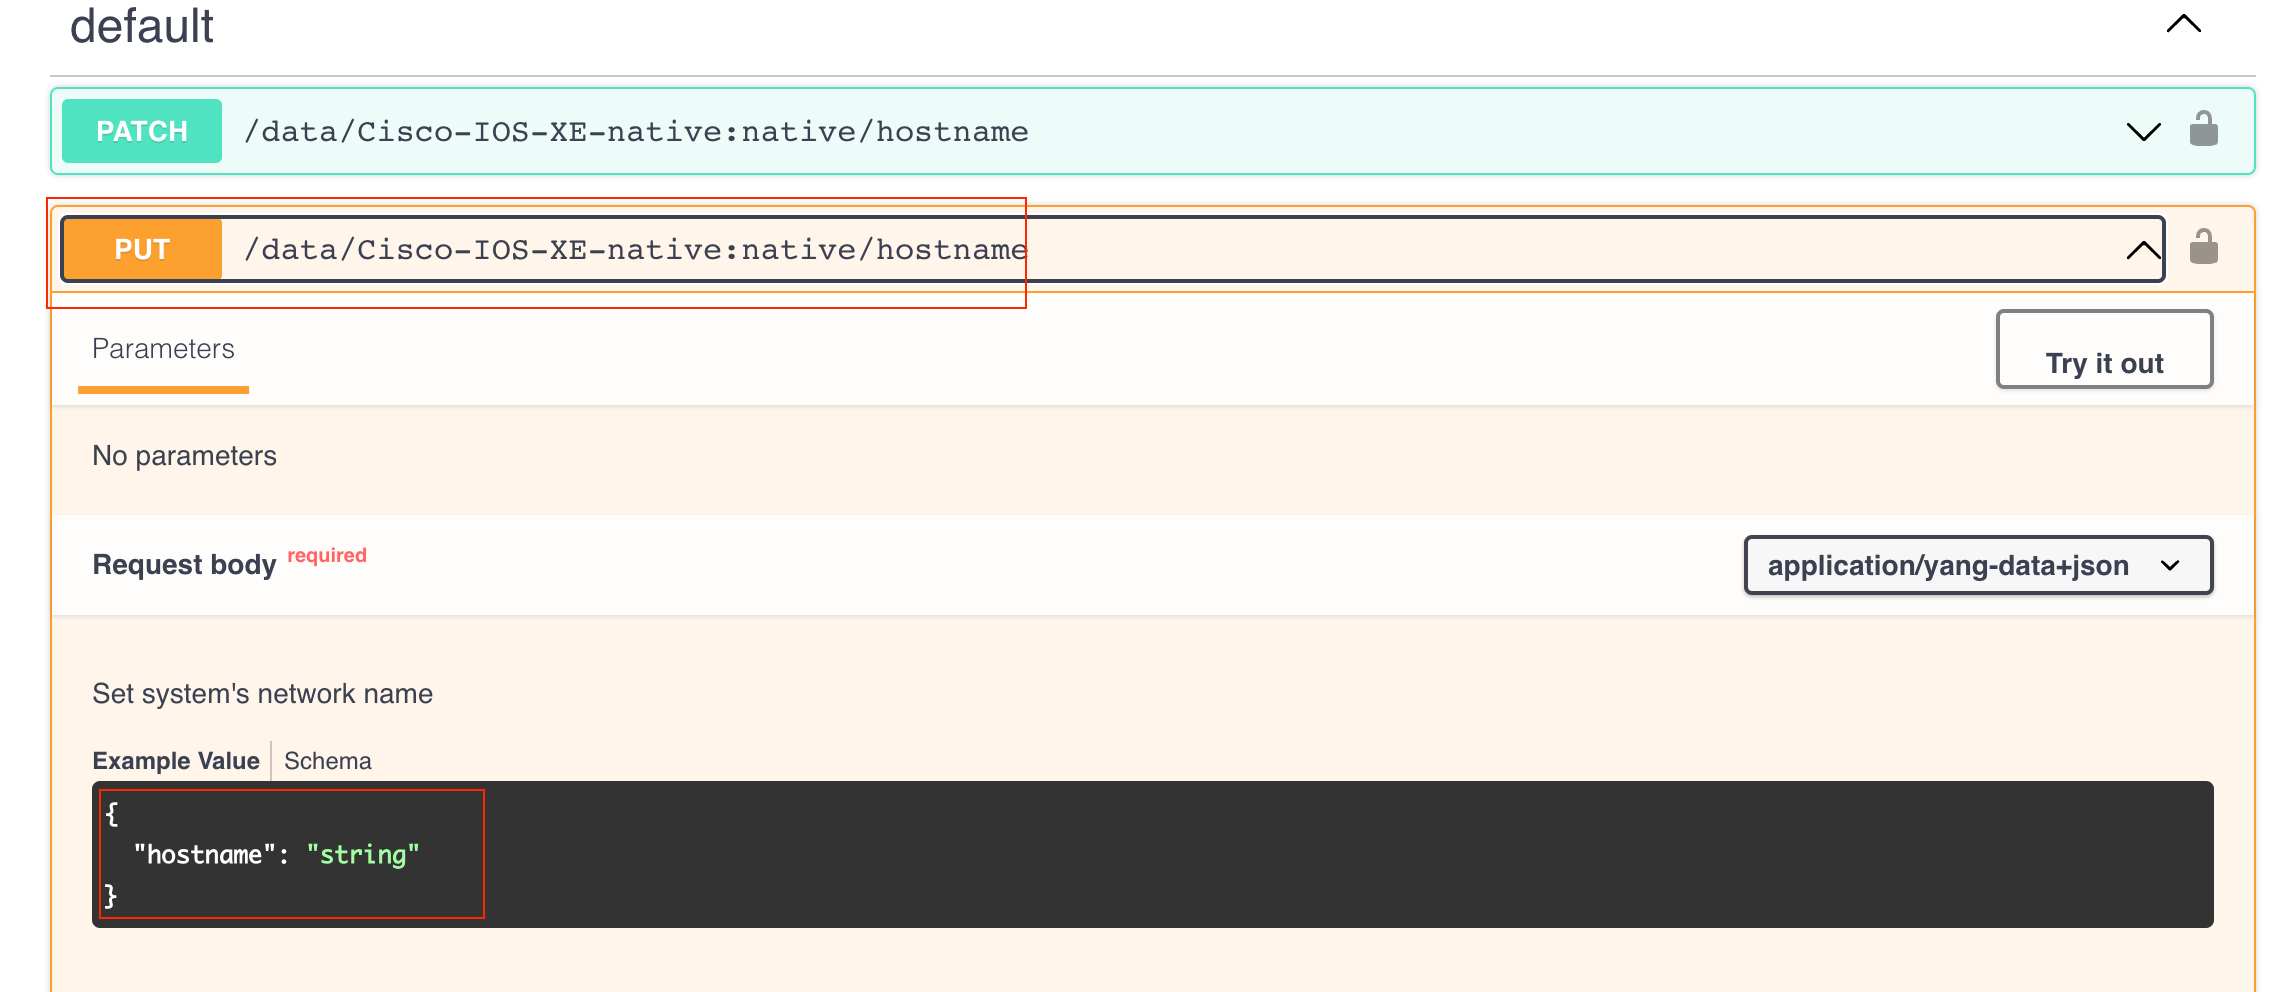
You should now be greeted with the URIs that you need to make appropriate REST API calls. So, if I need to view or configure the 'hostname', this is the URI I should use.
You also have the option to run the API call directly from the YANG Suites, if I run a GET request to my test device, here is the output showing my current hostname.

Why all the hassle?
At this point, you might be wondering, "Okay, I have the URI, what now?" Well, this is where the fun begins. With that URI in hand, you can now use a programming language like Python to interact with your network device. You can make configuration changes, view existing configs, and much more.
GET some info
For instance, I've included a simple Python script below that connects to the network device and fetches its hostname. The script uses the requests library to send a GET request to the URI we obtained. It specifies the type of data we want (application/yang-data+json) and then sends the request. The device responds with the hostname information, which the script then prints out.
import requests
requests.packages.urllib3.disable_warnings()

uri = 'https://<switch_ip>:443/restconf/data/Cisco-IOS-XE-native:native/hostname'
headers = {
      "Accept" : "application/yang-data+json"
   }

response = requests.get(
    url=uri,
    headers=headers,
    auth=('username','password'),
    verify=False)

print(response.json())
#output
{'Cisco-IOS-XE-native:hostname': 'TEST-C9300'}With YANG models and structured data, you open up a world of opportunities that go beyond the limitations of CLI commands and unstructured data output.
Change/Create some Info
Now, let's say we want to change the hostname using Restconf, all you have to do is find the URI (which we already know) and the body information from yangsuite. Please remember, that we will need to use a PUT request instead of the POST because the hostname already exists and we are trying to change it. (POST request is used for creating new resources)
import requests
import json

requests.packages.urllib3.disable_warnings()

uri = 'https://<switch_ip>:443/restconf/data/Cisco-IOS-XE-native:native/hostname'
headers = {
      "Content-Type": "application/yang-data+json"
   }

payload = {
  "hostname": "new_hostname_rest"
}

response = requests.put(
    url=uri, headers=headers,
    data=json.dumps(payload),
    auth=('username','password'),
    verify=False)

print(response)
#show run | incl hostname
hostname new_hostname_restYou must have noticed a leaf icon next to the hostname, which means it's a single piece of data that holds the hostname of the device. A leaf holds a single value of a specific type, like a string, integer, or boolean, among others. Because it's a leaf, it won't contain any nested or child elements; it's a simple data point that holds one piece of information.
VLAN Example
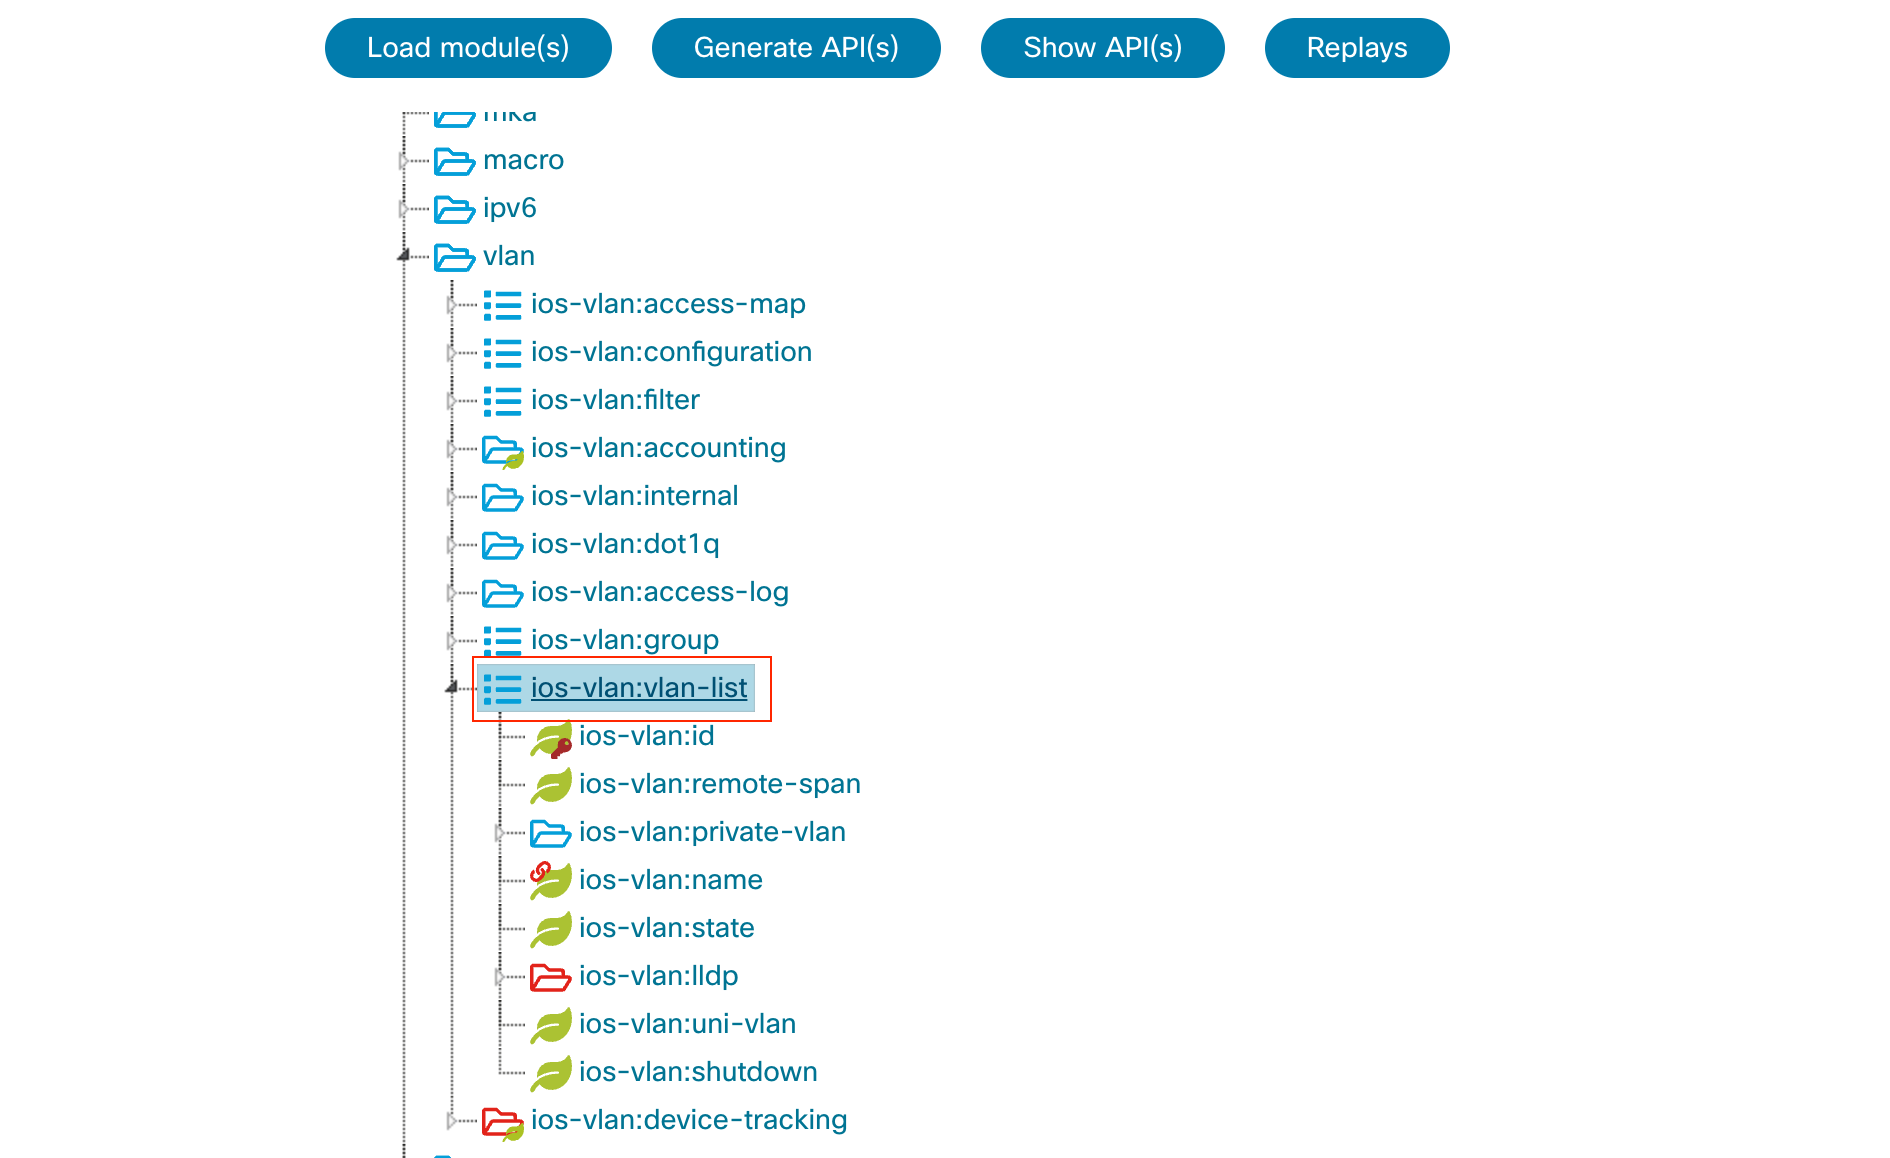
The screenshot above shows a hierarchical representation of some portions of the YANG model. Here's what you're seeing.
- Tree Structure - The leftmost panel displays a tree structure. This is typical of YANG models, which have a nested and hierarchical design. Each entry in this tree is a YANG data node.
- Data Nodes
- Container - Represented by folder-like icons, containers group related data together. For example,
vlanis a container that will encompass everything related to VLAN configuration and state. - List - The icon that looks like a stack of items. The
ios-vlan:vlan-listis an example. Lists are collections of data entries. Every entry in the list will have a similar structure, defined by the child nodes underneath. The key differentiation among entries in a list is typically determined by one or more "key" leaves. In the context ofvlan-list, each VLAN entry can be uniquely identified, by theios-vlan:id(representing VLAN ID) in this example. - Leaf - Represented by green icons. These are the most granular pieces of data in a YANG model. Examples include
ios-vlan:id,ios-vlan:name, andios-vlan:state. Leaves hold the actual data values.
- Container - Represented by folder-like icons, containers group related data together. For example,
- Namespace Prefix - Each node has a prefix like
ios-vlan. This denotes the YANG model namespace to which that particular node belongs.
How do other vendors do it?
While YANG, RESTCONF, and NETCONF offer standardized ways to manage devices, it's worth noting that other vendors like Palo Alto and Infoblox approach API-based management differently. They might not use standard models like YANG, but they often provide their own intuitive ways to work with REST API.
Take Palo Alto, for example. All I had to do was navigate to a specific URL (https://firewall_ip/restapi-doc), and I got straightforward documentation on how to use their REST API. It's as simple as that! It made learning and using REST API pretty easy.
I do wish it was just as simple with Cisco devices—being able to browse to the switch and get all the info you need right there. But, perhaps there are technical limitations I'm not aware of that make that a non-option for now. Regardless, it's good to know there are multiple approaches to API-based network management, each with its own set of pros and cons.
References
Great video tutorial - https://www.youtube.com/watch?v=nnd4KqeeqIw&t=1591s
https://blog.networktocode.com/post/using-cisco-yang-suite-to-build-restconf-requests/