As a Network Engineer, I often receive messages on LinkedIn and through my blog with people asking, “How do I start learning about Cloud?” After getting so many similar messages, I thought it would be more easier to write a dedicated blog post to address this. If you’re looking for a quick answer, I’ll tell you this, Learning about Cloud is easier than you might think, especially if you’re already familiar with networking concepts like BGP, Subnets and Routing.
Please note, this blog post isn’t intended to teach you everything about AWS but rather to point you in the right direction on how to begin learning. The best way to learn is by actively doing something in AWS and picking up more knowledge as you go.
If You Use Cloud in Your Work
If you already use cloud in your work environment and have access to it, there’s no better teacher than hands-on experience. You might not even need to read the rest of this post! I was fortunate enough to learn about the cloud directly through my job. Even if you’re starting from scratch, try to get involved with some basic tasks, such as creating new VPCs or subnets. It’s important to start understanding how traffic flows within the AWS environment or any cloud environment, for that matter.
If You Don't Use Cloud in Your Work
Even if you don’t use the cloud at work, don’t worry, there are still plenty of ways to learn easily. For those interested in AWS networking, I’ve previously written a detailed blog post on this topic; feel free to check it out for a deeper understanding. Here, I’ll provide a higher-level overview to keep things simple.
The best approach is to actually use AWS for a practical project. I usually recommend starting with something manageable, like running a WordPress website. Your ultimate goal could be to host a website on AWS and ensure it’s accessible from the Internet. AWS offers a 1-year free tier, which should cover you well during your learning phase. I ran my blog on AWS for a year without any issues, it’s a great way to learn by doing.
Getting Started with AWS
The first step is to create an AWS account, which may require you to provide your email address and credit card details. Once your account is set up and you’ve logged in, you’ll need to make a few key decisions and take some initial steps. AWS operates across various geographic regions, each serving as a physical location for its data centers. For example, if you’re in the UK, you can select a region there, and similarly, there are regions specific to the USA or Asia. While you can choose any region globally, it makes sense to select one closer to your location for better performance.
Once you’ve decided on a region, think of setting up your WordPress site as if you were configuring it in a data centre or at home. Typically, you would need a subnet, likely a private IP, and some firewall rules to allow HTTPS traffic from the Internet, and maybe SSH access from your own IP. You would also set up NAT to route the incoming Internet traffic to your private IP. The setup in AWS follows a similar concept, helping you transition your on-premises knowledge to the cloud environment.
Understanding AWS VPC
Now, take some time to read about or watch videos on what a ‘VPC’ (Virtual Private Cloud) is in AWS. This is a fundamental building block for anything you do in AWS from a networking perspective. You can think of a VPC as an isolated data centre in the cloud. Inside your VPC, you’ll need to create some ‘subnets’. AWS does not use the concept of ‘VLANs’ as you might in traditional networking.
Subnets are where your virtual machines, or ‘EC2 instances’ (AWS’s term for virtual machines), will live. When you set up an EC2 instance, you must specify the subnet it will reside in. You also get to choose the operating system you want to install on it, from a variety of options like Ubuntu or Fedora. AWS even offers a prebuilt WordPress image. If you’re comfortable with Linux, you could spin up an Ubuntu instance and install WordPress yourself, or you could opt for the prebuilt image, known in AWS as an AMI (Amazon Machine Image)
AWS Subnets and Security Groups
Unlike traditional on-premises environments, AWS does not use ‘Destination NAT’ (where traffic destined for a public IP is translated to a private IP). However, you do have the option for ‘Source NAT’, where you change the source IP address of the traffic to a public IP. But in our case, we actually need Destination NAT because people will be accessing our website from the Internet. By default, when you launch an instance, AWS allocates a private IP from the specified subnet. You also have the option to request a public IP, so once the instance is up and running, it will have a public IP too. (so, we don't need to setup a NAT)
Now, about setting up firewall rules. AWS manages this through ‘Security Groups’. You can think of security group as a mini firewall attached to the EC2 instance.
When you launch an instance, AWS allows you to create a new security group. Here, you can configure it to allow all outbound traffic, permit inbound access to port 443 from any IP, and restrict SSH access to just your IP. This ensures that your environment is secure yet accessible as needed.
Understanding AWS Key Pairs
Please note, when you’re launching an instance in AWS, you’ll be prompted to choose an SSH key pair. If you don’t have one already, you can easily create it during this step. Once you create a key pair, you can download the private key directly from the AWS console. It’s important to keep this private key secure, as you won’t be able to download it again after this point.
You need this key for connecting to your instance via SSH. Remember, you won’t be able to use a username and password to SSH into your instance. Instead, you must use this key pair when making your initial SSH connection.
Internet Gateway and NAT Gateway
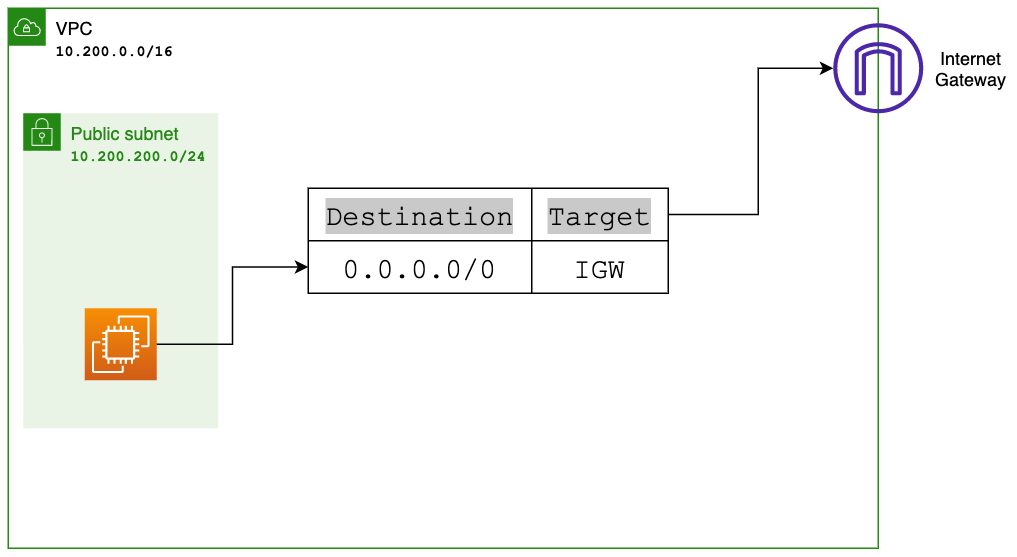
Now that you have an EC2 instance up and running with a public IP, you might think you’re ready to SSH into it, but there’s a catch. If you try connecting and it doesn’t work, you might wonder why? In a traditional on-premises environment, your subnet usually has some sort of default route to reach the Internet. In AWS, we don’t use a physical router; instead, we manage connectivity with routing tables and something called an ‘Internet Gateway’. Internet Gateway acts as the exit point for all your AWS services to the Internet.
To enable Internet reachability for your instance, you need to create an ‘Internet Gateway’. Once it’s set up, you need to configure the routing table associated with your subnet to include a default route pointing to the Internet Gateway you just created. I’ve detailed the setup process in another blog post, so feel free to check that out for a step-by-step guide.
Additionally, AWS offers a ‘NAT Gateway’, which is particularly useful when you want to provide outbound-only connections from your EC2 instances.
Moment of Truth
Now with these settings in place, you should now be able to SSH into your instance and install WordPress, or perform any other tasks you need. Just like that you have an instance up and running in the Cloud.
We’ve just scratched the surface here, and my goal was to give you a high-level overview of the steps needed to launch an instance and start understanding the basics of AWS. From here, you should build on this foundation. There are plenty of free resources available that can teach you AWS in detail.
Please let me know in the comments if you have successfully launched your instance or if you have any questions about the process. I’m here to help.
Here are the two videos I recommend everyone to watch to get a good understanding of AWS networking.
https://www.youtube.com/watch?v=hiKPPy584Mg
https://www.youtube.com/watch?v=8nNurTFy-h4
