In my Python journey, I've always stuck to just one version of Python at a time. I happily used Python 3.9 for quite a while, then switched to Python 3.10 without any issues. Everything was perfect until recently when I tried installing a Python application using pip, but no matter what I did, the installation kept failing. I couldn't fix the issue even after hours of Googling.
That's when I finally decided to check the documentation (which I should have done from the start), and there it was, this application requires a minimum Python version of 3.8 and was only tested on versions 3.8 and 3.9. That made me think, maybe I should have installed it using Python 3.9, but how? I'm no expert in Linux or Unix systems, and I worried that reinstalling Python 3.9 could mess up other projects I'd built on 3.10.
So, I started exploring how to manage multiple Python versions on the same machine, and that's when I stumbled upon a tool called 'pyenv'. This seemed like the perfect solution to my problem, so I decided to learn more about it.
 Suresh Vina
What is pyenv?
Pyenv is a tool that helps you manage multiple Python versions on a single machine. It lets you switch between versions easily. With pyenv, you can have Python 3.8, 3.9, 3.10, and any other version installed simultaneously without them interfering with each other.
You simply choose which version you want to use for each project, and pyenv handles the rest. This is incredibly useful for maintaining compatibility and testing across various Python versions.
How to Install pyenv?
Let's go through the steps you'll follow to install and use pyenv on your system. I'm using my Ubuntu desktop (and a Mac) for this example.
Linux (Ubuntu)
First, let's update your package list to ensure all your software is up to date. Then, you'll install the prerequisites needed for pyenv to work properly, including tools and libraries that support building Python versions from source.
# Update your package list
sudo apt update
sudo apt install -y make build-essential libssl-dev zlib1g-dev \
libbz2-dev libreadline-dev libsqlite3-dev wget curl llvm libncurses5-dev \
libncursesw5-dev xz-utils tk-dev libffi-dev liblzma-dev gitAfter that, you'll install pyenv itself using a simple script that does most of the heavy lifting for you. Once pyenv is installed, you'll add a few lines to your shell configuration file to ensure pyenv is initialized whenever you open a terminal.
# Install pyenv
curl https://pyenv.run | bash
#output after the installation completes
WARNING: seems you still have not added 'pyenv' to the load path.
# Load pyenv automatically by appending
# the following to
# ~/.bash_profile if it exists, otherwise ~/.profile (for login shells)
# and ~/.bashrc (for interactive shells) :
export PYENV_ROOT="$HOME/.pyenv"
[[ -d $PYENV_ROOT/bin ]] && export PATH="$PYENV_ROOT/bin:$PATH"
eval "$(pyenv init -)"
# Restart your shell for the changes to take effect.
# Load pyenv-virtualenv automatically by adding
# the following to ~/.bashrc:
eval "$(pyenv virtualenv-init -)"I've added the following lines at the end of the ~/.bashrc file as shown below.
#~/.bashrc
!! TRUNCATED !!

export PYENV_ROOT="$HOME/.pyenv"
[[ -d $PYENV_ROOT/bin ]] && export PATH="$PYENV_ROOT/bin:$PATH"
eval "$(pyenv init -)"

eval "$(pyenv virtualenv-init -)"
Finally, you'll restart your shell to apply these changes. With these steps complete, pyenv will be ready to use and you can verify the installation with a simple pyenv --version command.
# Restart your shell
exec "$SHELL"
suresh@ubuntu-desktop:~/Documents/projetcs/suzieq$ pyenv --version
pyenv 2.4.0MacOS
Installing on a Mac is as simple as running a brew command.
brew update
brew install pyenv
pyenv --version
pyenv 2.4.0
How to Use pyenv?
Now that we've installed pyenv, the next step is to start managing multiple Python versions. Since our goal is to install Python 3.9 while keeping the current version 3.10, let's see how we can achieve that.
First, to check which versions of Python 3.9 are available for installation, you can use the following command. This command will list all the minor releases under Python 3.9, such as the ones shown below.
pyenv install --list | grep 3.9
  3.9.0
  3.9-dev
  3.9.1
  3.9.2
  3.9.4
  3.9.5
  3.9.6
  3.9.7
  3.9.8
  3.9.9
  3.9.10
  3.9.11
  3.9.12
Now, let's say you want to install Python 3.9.11. To do this, you only need to run a single command.
pyenv install -v 3.9.11This command tells pyenv to install Python 3.9.11, and the -v flag is for verbose output, which shows you more details about the installation process as it happens. Once the installation is complete, you'll have Python 3.9.11 available alongside your existing Python 3.10.
View the Installation Location - To see where your Python versions are installed, run the following command. This command lists all the Python versions you have installed through pyenv.
ls ~/.pyenv/versions/Uninstalling a Python Version - If you need to remove a specific Python version, you can do so easily. For example, to uninstall Python 3.9.11, run
pyenv uninstall 3.9.11View All Installed Versions - To see all the Python versions installed on your system (both through pyenv and externally), you can use the following command. This command will list all installed versions, indicating (via *) which one is currently set as the global version
pyenv versions
* system (set by /home/suresh/.pyenv/version)
  3.9.1
Setting a Global Python Version - If you decide that you want to use Python 3.9.11 as your main Python version across all your projects, you can set it globally with this command.
pyenv global 3.9.11

python --version
Python 3.9.11
After running this command, you can check that the change has taken effect by running python --version. It should now return Python 3.9.11, switching from the previously set 3.10. This global setting ensures that any generic call to Python from your terminal will use Python 3.9.11 unless specified otherwise by a local project setting.
Now that you've set up pyenv and chosen your preferred Python version (globally), you can use Python as you normally would. This includes installing packages with pip and setting up virtual environments using venv. Everything works just the same as before but with the added flexibility of switching between different Python versions as needed.
Suresh Vina
Project-specific Python Versions
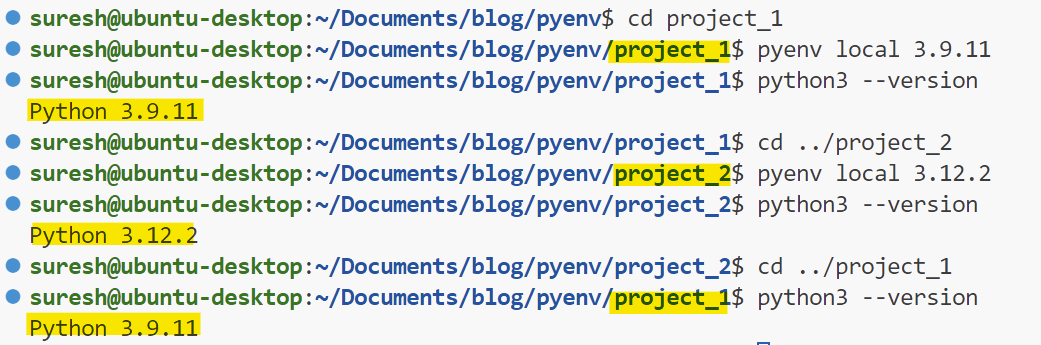
Now let's say I don't want to switch between Python versions manually every time I move to different projects (I'm just lazy). Pyenv has a solution for this with project-specific Python versions. In this example, I have two projects, project_1 and project_2. Suppose project_1 requires Python 3.9.11 and project_2 requires Python 3.12.2.
.
├── project_1
└── project_2

2 directories, 0 files
First, we need to install Python 3.12.2 using the command pyenv install 3.12.2. Once the installation is completed, if you run pyenv versions, you should see three versions, including the system.
pyenv install -v 3.12.2pyenv versions
* system (set by /home/suresh/.pyenv/version)
3.9.11
3.12.2Now, navigate to the project_1 directory and run the command pyenv local 3.9.11, which will create a .python-version file inside this directory with the version in it. So, as long as you are within this directory (or subdirectories), pyenv will automatically select Python 3.9.11.
Do the same for project_2, but use Python 3.12.2. This way, each project automatically uses its required Python version without any need for manual intervention.
 Suresh Vina
Managing Virtual Environments
Pyenv Virtualenv is an extension for pyenv that allows you to manage virtual environments for different Python versions. It integrates with pyenv's version management capabilities, making it easier to handle project-specific dependencies across multiple Python versions.
How It Compares to Normal Virtualenv/venv
While the standard virtualenv or venv modules provide the functionality to create isolated Python environments, they're tied to the Python version they're created with. Pyenv virtualenv extends this by allowing you to create virtual environments across any Python version you have installed through pyenv, without needing to manually manage the Python executables.
This integration means you can switch between complete environments including the Python interpreter and all installed packages.
Example and Syntax
Suppose you have Python 3.9.11 installed (using pyenv) and you want to create a virtual environment for it.
pyenv virtualenv 3.9.11 env_1Once the environment is created, you will need to activate it (similar to the usual venv). Once you are done, you can run pyenv deactivate to deactivate the environment.
pyenv local env_1In summary, pyenv not only allows for easy management of project dependencies but also enables you to work with multiple projects that require different Python versions and sets of libraries, all while keeping your global environment clean and uncluttered.
References
https://realpython.com/intro-to-pyenv/#using-pyenv-to-install-python