Terraform fans, don't beat me up just yet. I've got my reasons for preferring Pulumi in my personal projects, and I'm going to lay them all out for you in this blog post. I'm not saying Terraform is lacking; I just have a soft spot for Pulumi.
And to show you exactly why I like Pulumi so much, I'll even walk you through a hands-on example. We'll use Pulumi to create a VPC, some subnets, a NAT gateway, an Internet Gateway and some routes.
Why Pulumi?
If you're looking for a short answer, here it is - I just like Python's syntax more than HCL and love working with Python and expanding my knowledge. Simple as that.
Alright, if you're still here, let's get into the nitty-gritty. As I said earlier, I started using Pulumi mainly for my personal projects. I write a lot of posts about AWS, and while Terraform was my go-to tool for spinning up and tearing down resources, I've recently shifted to Pulumi.
As a Network Engineer who's pretty much in love with Python, this switch just made sense. I use Python for automating networks as well, and I jump at any chance to get better at it. That's reason number one for my switch to Pulumi.
Now, don't get me wrong. I've got nothing against HCL; it's a solid syntax. But when it comes to things like loops and conditionals, HCL just doesn't do it for me. Python's way of handling for-loops and conditionals feels more intuitive and easier to manage (at least for me)
That said, if you're working in a team, the choice of tooling should suit everyone involved and the project's specific needs. At the moment, Terraform is more mature and widely adopted, so sticking with it for team projects makes sense.
So, that's my two cents on why I personally prefer Pulumi. Whether you're a Python enthusiast like me, or you're just looking to try something new, give Pulumi a go and see if it works for you.
Installing and Initial Setup
I'm on a MacOS system, and I found it super easy to install Pulumi using Homebrew. Don't worry, the installation process should be similar if you're using a different operating system. Here's the command to get it installed.
brew install pulumi/tap/pulumiOnce you've got Pulumi installed, it's time to create a new project directory and move into it.
mkdir vpc-pulumi && cd vpc-pulumiBy default, Pulumi uses cloud-based state management. But for this example, I'm keeping it simple and using the local file system to manage the state. Run the following command to do that.
pulumi login --localNow let's kick off our new Pulumi project. pulumi new vpc-pulumi will prompt you for some details. Just follow the prompts, and you can either enter your own values or hit <ENTER> to go with the default options.
This command will walk you through creating a new Pulumi project.

Enter a value or leave blank to accept the (default), and press <ENTER>.
Press ^C at any time to quit.

project name (vpc-pulumi):
project description (A minimal Python Pulumi program): AWS VPC and Subnets
Created project 'vpc-pulumi'

stack name (dev):
Created stack 'dev'
Enter your passphrase to protect config/secrets:
Re-enter your passphrase to confirm:

Installing dependencies...

Creating virtual environment...
Finished creating virtual environment
Updating pip, setuptools, and wheel in virtual environment...
Requirement already satisfied: pip in ./venv/lib/python3.11/site-packages (23.2.1)
Requirement already satisfied: setuptools in ./venv/lib/python3.11/site-packages (68.1.2)
After you finish the setup, you'll see a bunch of files have been created in your project directory. Here's what it will look like.
ls
Pulumi.dev.yaml  Pulumi.yaml      __main__.py      requirements.txt venv
And there you have it—your new Pulumi project is all setup and ready to go! In the next section, we'll dive into writing some code to create AWS resources.
Creating AWS Resources with Pulumi
#__main__.py
import pulumi
from pulumi_aws import ec2

vpc1 = {
    'name': 'vpc-1',
    'cidr': '10.210.0.0/16'
}

subnets = {
    "private-subnet-1": {
        "cidr": '10.210.1.0/24',
        "az": 'eu-west-1a'
    },
    "private-subnet-2": {
        "cidr": '10.210.2.0/24',
        "az": 'eu-west-1b'
    },
    "private-subnet-3": {
        "cidr": '10.210.3.0/24',
        "az": 'eu-west-1c'
    }
}

# Create the VPC
vpc = ec2.Vpc(
    vpc1['name'],
    cidr_block=vpc1['cidr'],
    tags={
        "Name": 'vpc-1',
        "Owner": 'Suresh'
    }
)

# Create the subnets as pulumi resources
pulumi_subnets = {}
for name, properties in subnets.items():
    pulumi_subnets[name] = ec2.Subnet(
        name,
        cidr_block=properties['cidr'],
        availability_zone=properties['az'],
        vpc_id=vpc.id,
        tags={
            "Name": f"{name}-{properties['az']}",
            "Owner": 'Suresh'
        }
    )

eip = ec2.Eip(
    'eip_1',
    tags={
        'Name': 'test-eip_1',
        "Owner": 'Suresh'
    }
)

igw = ec2.InternetGateway(
    "igw",
    vpc_id=vpc.id,
    tags={
        "Name": "test-igw",
        "Owner": "Suresh"
    }
)

nat_gw = ec2.NatGateway(
    "nat_gw",
    allocation_id=eip.id,
    subnet_id=pulumi_subnets[list(subnets.keys())[0]].id,
    tags={
        "Name": "test-nat-gw",
        "Owner": 'Suresh'
    }
)

private_rtable = ec2.RouteTable(
    "pri_rtable",
    vpc_id=vpc.id,
    routes=[
        ec2.RouteTableRouteArgs(
            cidr_block="0.0.0.0/0",
            gateway_id=igw.id,
        )
    ],
    tags={
        "Name": "test-vpc-rtable",
        "Owner": "Suresh"
    }
)

for name, subnet in pulumi_subnets.items():
    ec2.RouteTableAssociation(
        f"{name}-rtable-association",
        subnet_id=subnet.id,
        route_table_id=private_rtable.id,
)

# Export the IDs of the VPC and subnets
pulumi.export('vpc-ID', vpc.id)
for name, subnet in pulumi_subnets.items():
    pulumi.export(f'{name}-ID', subnet.id)
If you've worked with Python, the syntax will look familiar. Pulumi's Python SDK offers classes that map to AWS resources, such as VPCs and subnets. For instance, ec2.Vpc and ec2.Subnet are Python classes provided by the Pulumi AWS package.
To create a VPC, you instantiate the ec2.Vpc class, passing in the name and CIDR block as arguments. You can also include optional tags. For subnets, it's pretty much the same game. Loop through your defined subnets and create instances of the ec2.Subnet class, linking them to your VPC by providing the VPC's ID. We also create other resources like Elastic IPs, Internet Gateways, and NAT Gateways in a similar fashion.
Lastly, Pulumi provides a way to associate route tables with your subnets. Loop through your previously created subnets, creating ec2.RouteTableAssociation objects for each.
So, it's as simple as using Python classes and methods to set up your AWS resources. All the heavy lifting is done by Pulumi behind the scenes, but you still get to write Pythonic code.
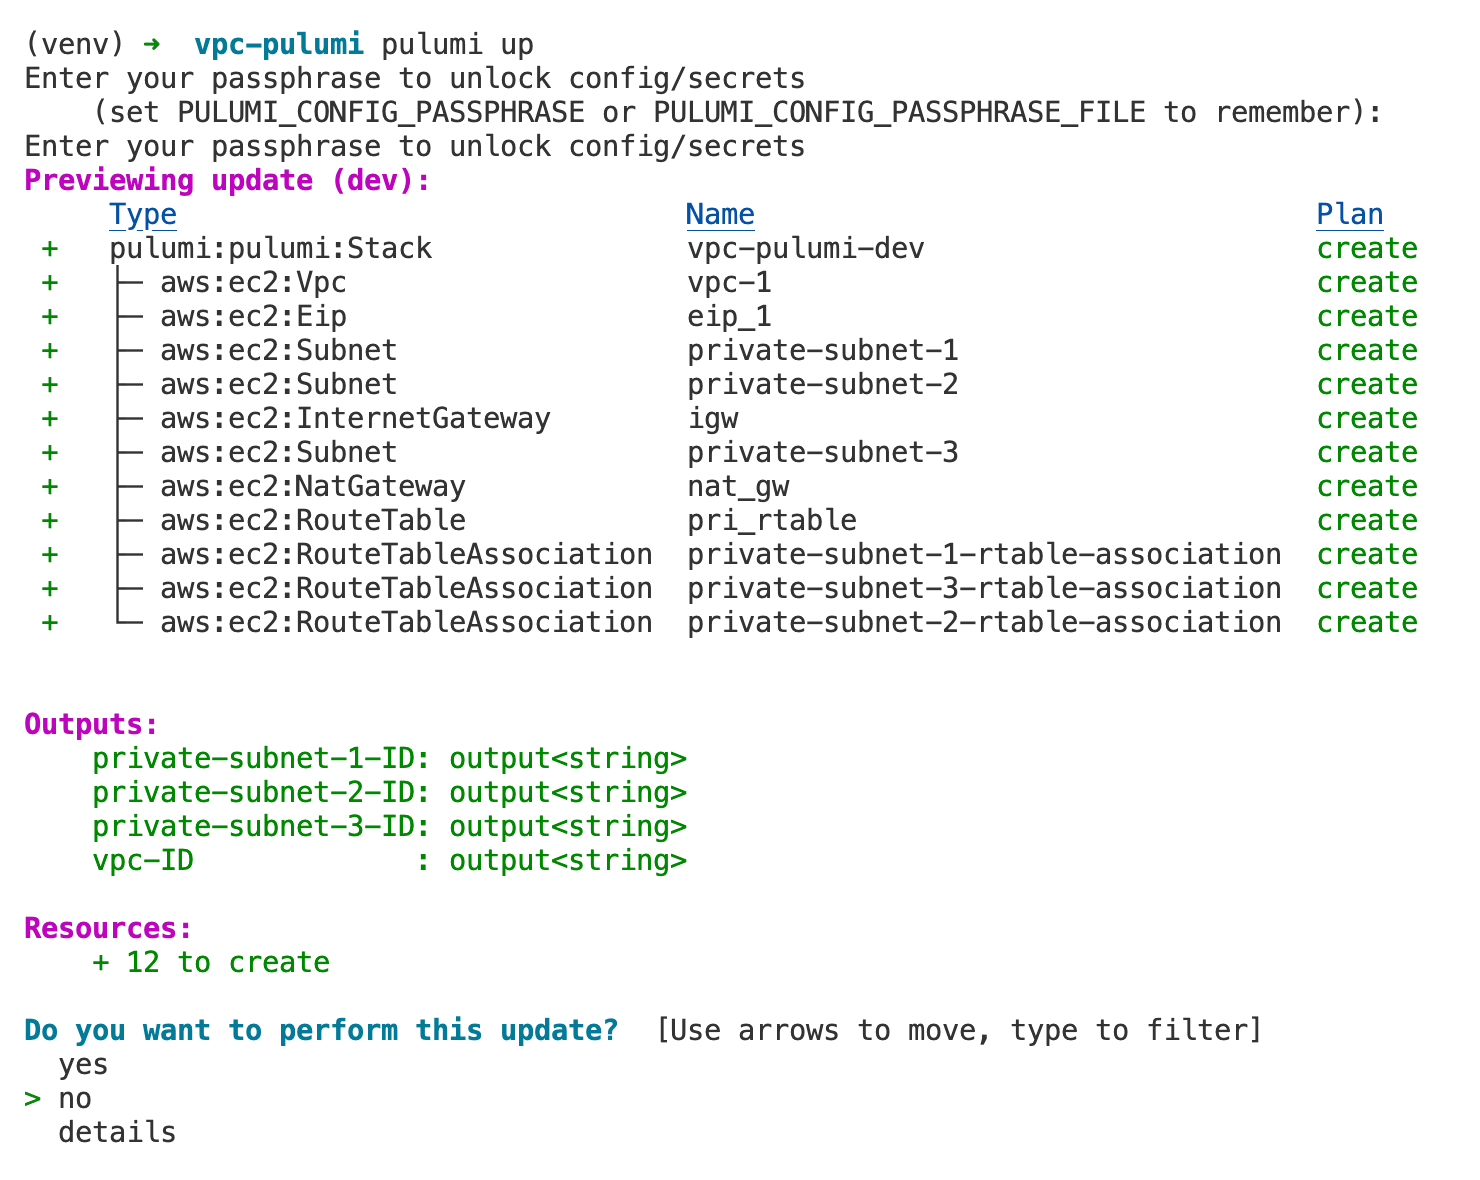
Pulumi up
Similar to terraform apply, you can use pulumi up to deploy your resources. If you select 'yes', Pulumi will deploy the resources laid out in your code.
pulumi.export
So, you've set up your resources and everything seems good, but you probably want a way to see or use the IDs or other details of these resources, right? That's where pulumi.export comes into play (similar to Terraform Outputs)
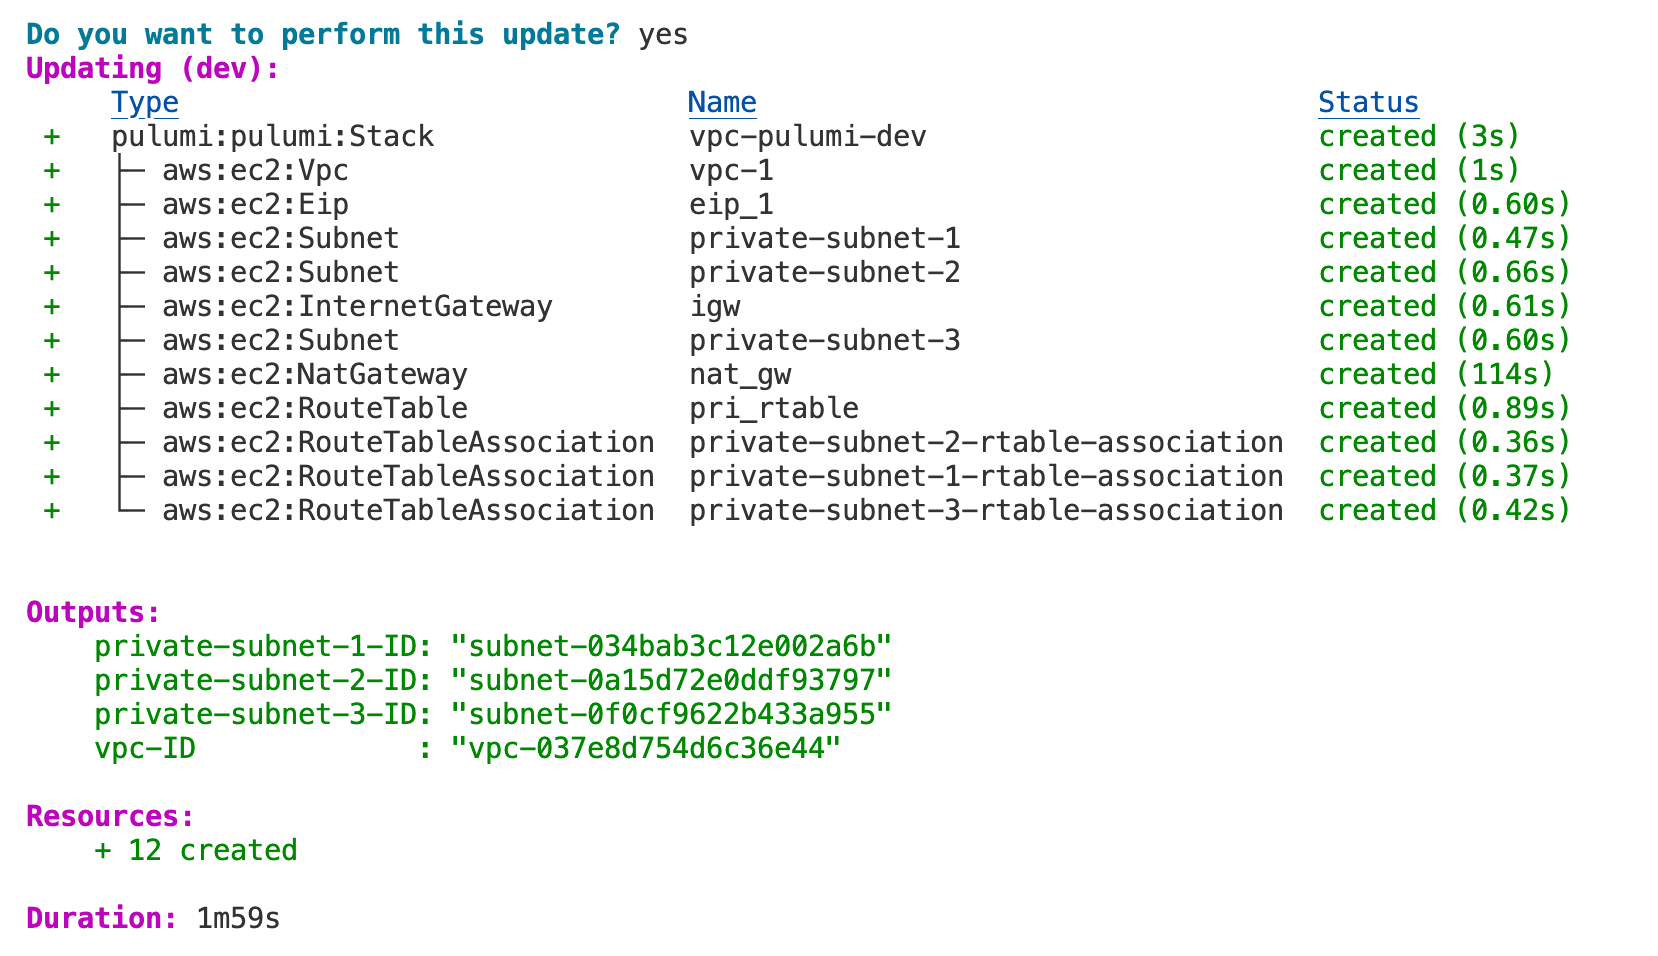
In Pulumi, export is used to expose certain variables so you can easily access their values once the program has been executed. This is especially useful if you need the IDs of resources like VPCs or subnets for other parts of your infrastructure setup or simply for verification.
Here's a simple example, After creating a VPC, you might want to know its ID. You would use pulumi.export('vpc-ID', vpc.id) to make this information accessible. What this does is make the ID of the VPC available as an output when your Pulumi program finishes running.
Exporting is not limited to just IDs. You can export any attribute of an AWS resource that Pulumi tracks. For example, you can export the Elastic IP address with pulumi.export('eip', eip.public_ip).
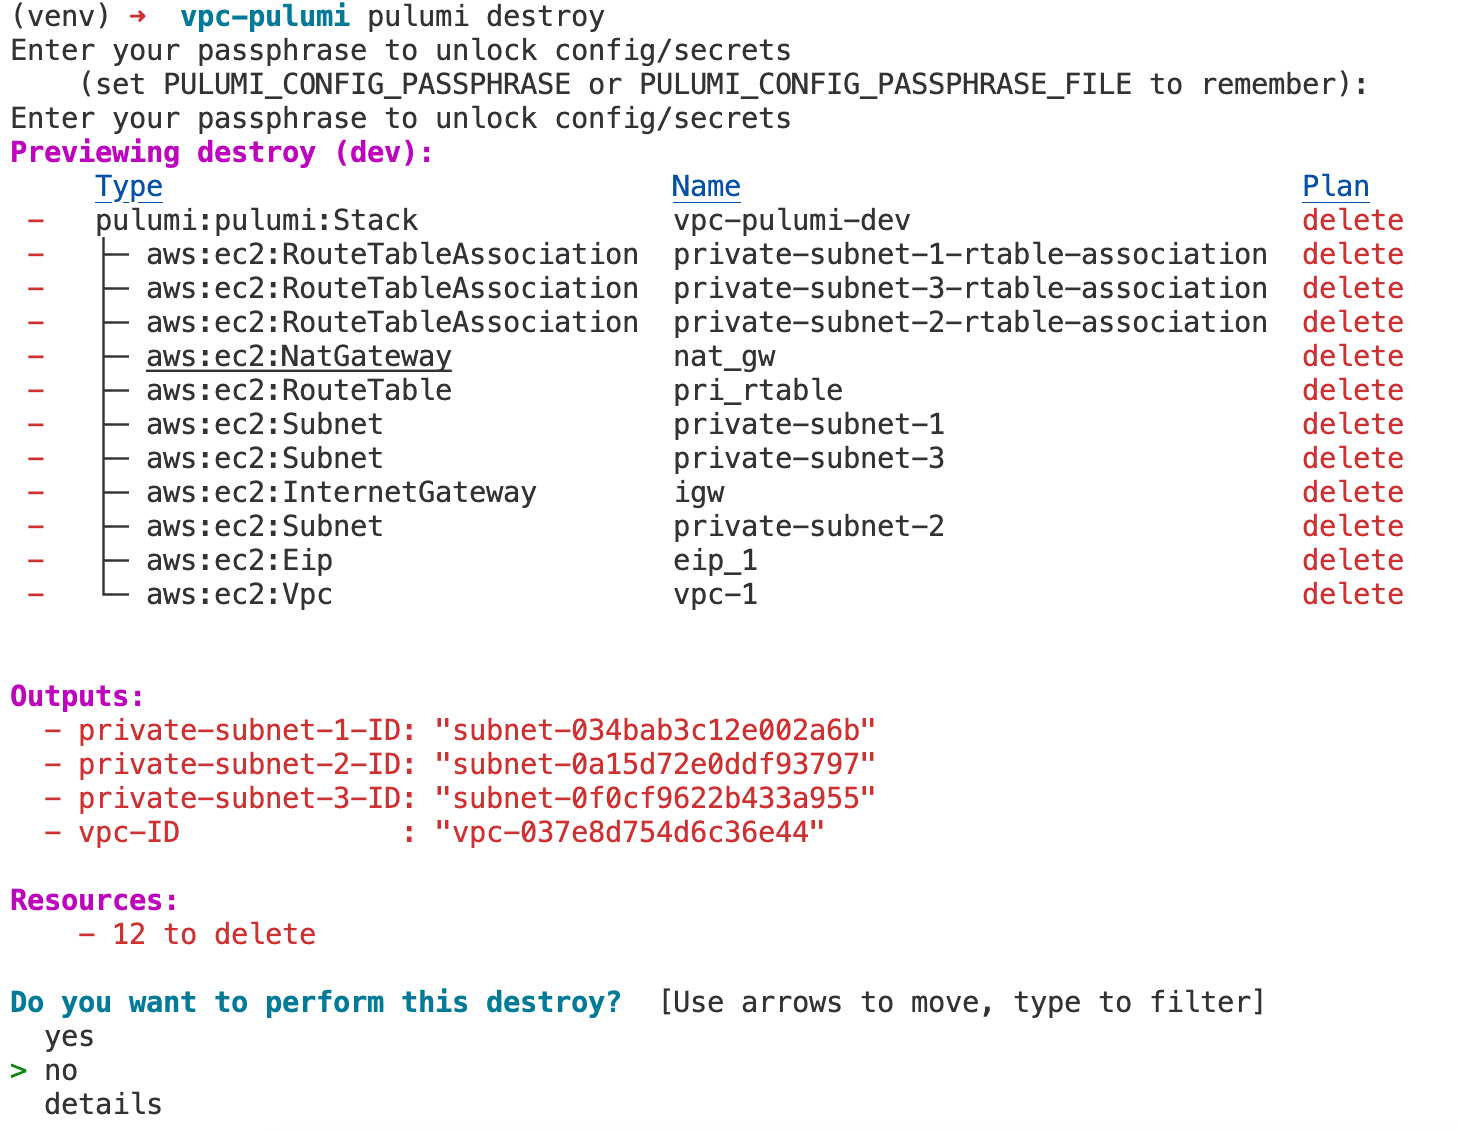
Pulumi Destroy
If you're familiar with terraform destroy, you'll be right at home with pulumi destroy. Just run this command, and Pulumi will take care of tearing down all the resources you've created. It's a straightforward way to clean up when you're done or if you want to start from scratch.
What's Not So Good About Pulumi?
- First, Pulumi supports multiple languages. While that's cool, it can be a double-edged sword. I use Python, but if I switch jobs and the new place uses Go, I'll need to learn another language.
- Second, because it's multi-language, people sprinkle in language-specific tricks. So, if you're new and trying to understand the code, it can be a maze.
- Third, I wonder about the stability and consistency of Pulumi across languages. A module that works well with Python might not be as smooth with TypeScript.
Lastly, let's give some credit to HCL. Sure, it can be a headache sometimes, but it's known to work very well. It works the same way no matter where you are or who you're working with.
Closing Thoughts
At the end of the day, the tool you choose really depends on what's best for your project or organization. If you're the lone Python wizard in a team full of HCL experts, pushing for Pulumi might not be the best move. Terraform has been around for a while; it's mature and has wide-ranging support. So, use what makes the most sense for you and your team. Happy coding.