Are you a beginner looking to learn Terraform? Don't worry, you've come to the right place! In this blog post, we will discuss how Terraform is easier than you might think to learn, even if you have just a basic understanding of AWS or any other Cloud Provider.
Overview
Firstly, let's start with what Terraform is. Terraform is an open-source Infrastructure as Code (IaC) tool developed by HashiCorp. It allows you to write, plan, and create infrastructure as code using a declarative language called HashiCorp Configuration Language (HCL). Terraform works with multiple cloud providers, including AWS, Azure, and Google Cloud Platform.
Now, you might be thinking that learning a new tool can be challenging, especially if you are new to the world of cloud computing. However, Terraform is designed to be easy to learn and use, even for beginners.
One reason for this is the simple and intuitive syntax of HCL (HashiCorp Configuration Language) which is designed to be easy to read and write, making it accessible to users with no prior programming experience. Additionally, Terraform's documentation is comprehensive and user-friendly, with plenty of examples and tutorials to help you get started.
Why Terraform?
Before we jump into Terraform, let's discuss how would you create resources in AWS without any IaC tools. A simplified version of creating an EC2 instance via the GUI is shown below.
- Login to AWS Web Console
- Create the following resources by navigating to various web pages and clicking various resources.
- VPC
- Subnets
- Route Table
- Internet Gateway
- NAT Gateway
- Routes
- EC2
- Test Connectivity
The above works well if all you have to create is a single instance. Now imagine that you need to repeat this process across multiple accounts multiple times.
Firstly, using the web GUI can be error-prone as it relies on manual input and clicking through multiple screens. Secondly, using the web GUI is not efficient when it comes to repeating the same process across multiple accounts.
Terraform, on the other hand, uses declarative syntax, making it less prone to human error. Terraform allows for the creation of reusable code and modules, making it easy to replicate the same infrastructure across multiple accounts. Additionally, Terraform enables the tracking of changes (via git) made to the infrastructure, providing better visibility and control over the cloud environment.
In a nutshell, you define what do you want to create in a text file using the HCL syntax. Terraform will go and create the resources you defined in that file.
Prerequisites
Now that we've learnt the basics, let's go through some of the prerequisites. You must install both aws-cli and terraform on your local machine. You also need to create an AWS IAM user and add the credentials to your machine.
1. Install AWS CLI
Please refer to this guide on how to install AWS CLI across various OS. The following example shows how to install it on MacOS.
Download the file using the curl command. The -o option specifies the file name that the downloaded package is written to. In this example, the file is written to AWSCLIV2.pkg in the current folder.
curl "https://awscli.amazonaws.com/AWSCLIV2.pkg" -o "AWSCLIV2.pkg"Run the standard macOS installer program, specifying the downloaded .pkg file as the source. Use the -pkg parameter to specify the name of the package to install, and the -target / parameter for which drive to install the package to. The files are installed to /usr/local/aws-cli, and a symlink is automatically created in /usr/local/bin. You must include sudo on the command to grant write permissions to those folders.
sudo installer -pkg ./AWSCLIV2.pkg -target /You can verify the installation by using the following commands.
suresh@mac:~/Documents|⇒  which aws
/usr/local/bin/aws
suresh@mac:~/Documents|⇒  aws --version
aws-cli/2.11.1 Python/3.11.2 Darwin/22.3.0 exe/x86_64 prompt/off
2. Install Terraform
Please refer to this guide on how to install Terraform across various OS. The following example shows how to install Terraform on MacOS.
To install Terraform, find the appropriate package for your system and download it as a zip archive.
After downloading Terraform, unzip the package. Terraform runs as a single binary named terraform. Any other files in the package can be safely removed and Terraform will still function.
Finally, make sure that the terraform binary is available on your PATH.
Move the Terraform binary to one of the listed locations. This command assumes that the binary is currently in your downloads folder and that your PATH includes /usr/local/bin, but you can customize it if your locations are different.
$ mv ~/Downloads/terraform /usr/local/bin/You can verify the installation by running one of the Terraform commands as shown below.
suresh@mac:~/Documents|⇒  terraform --version
Terraform v1.4.0
on darwin_amd64
3. Create an IAM user in AWS
For Terraform to access your AWS account, you need to provide Terraform with the credentials to use. Unlike web console login where you would use Username and Password, AWS-CLI/Terraform uses a concept call secret-key and secret-id. Once you created a new user account in AWS IAM, you can generate the ID and Key and add them to your local machine.
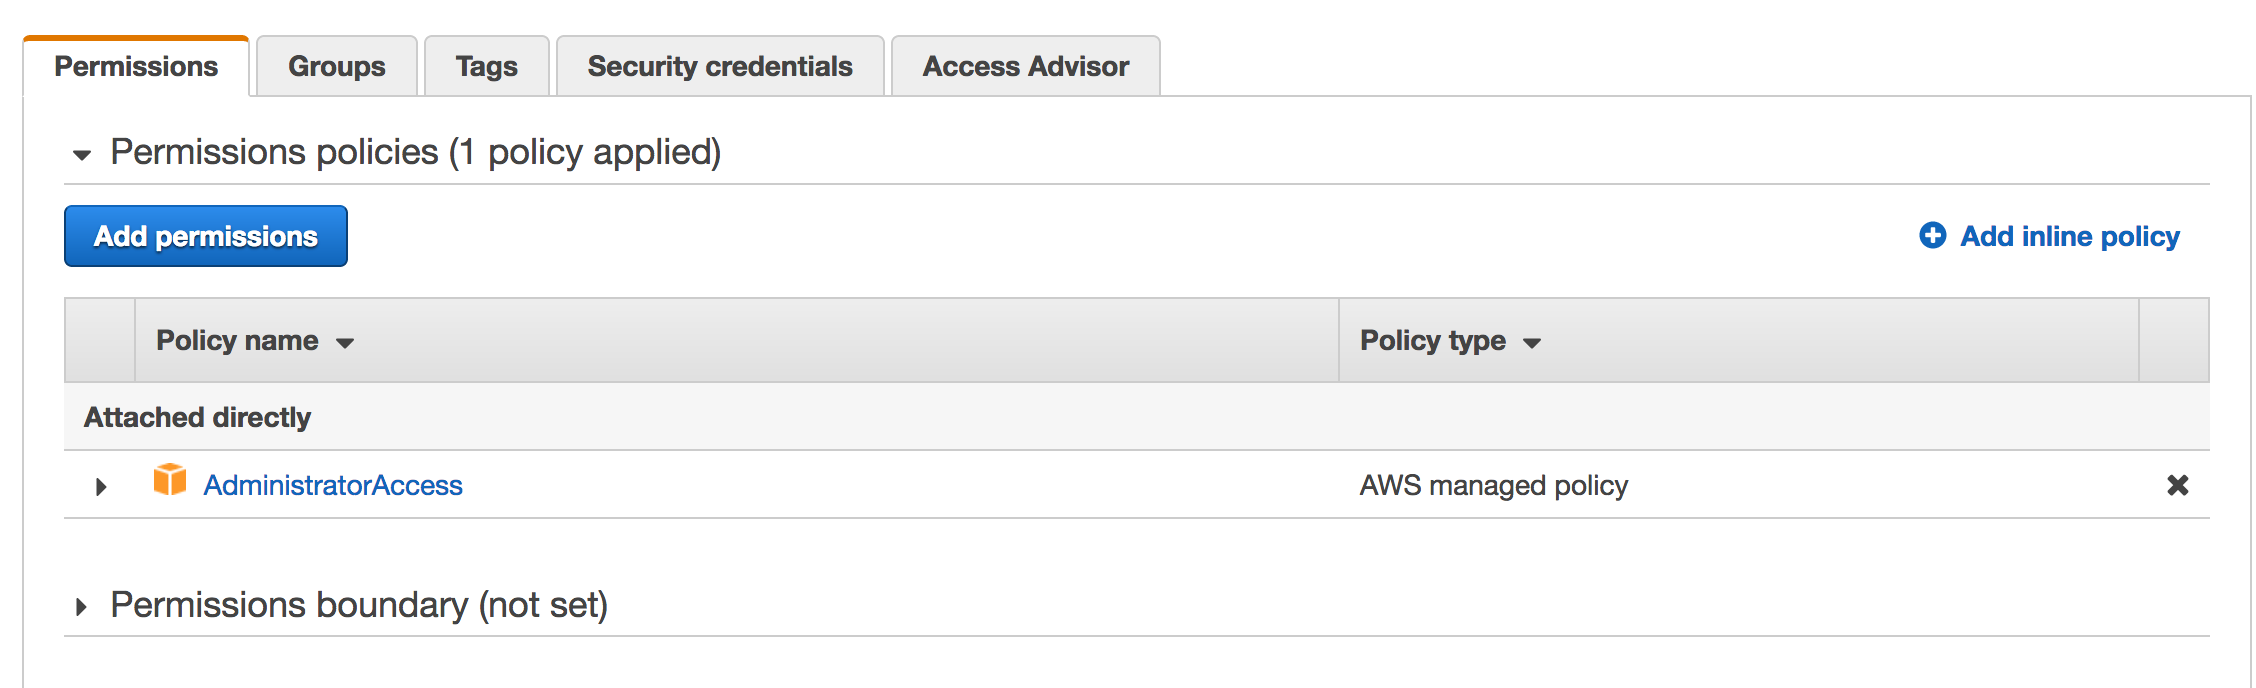
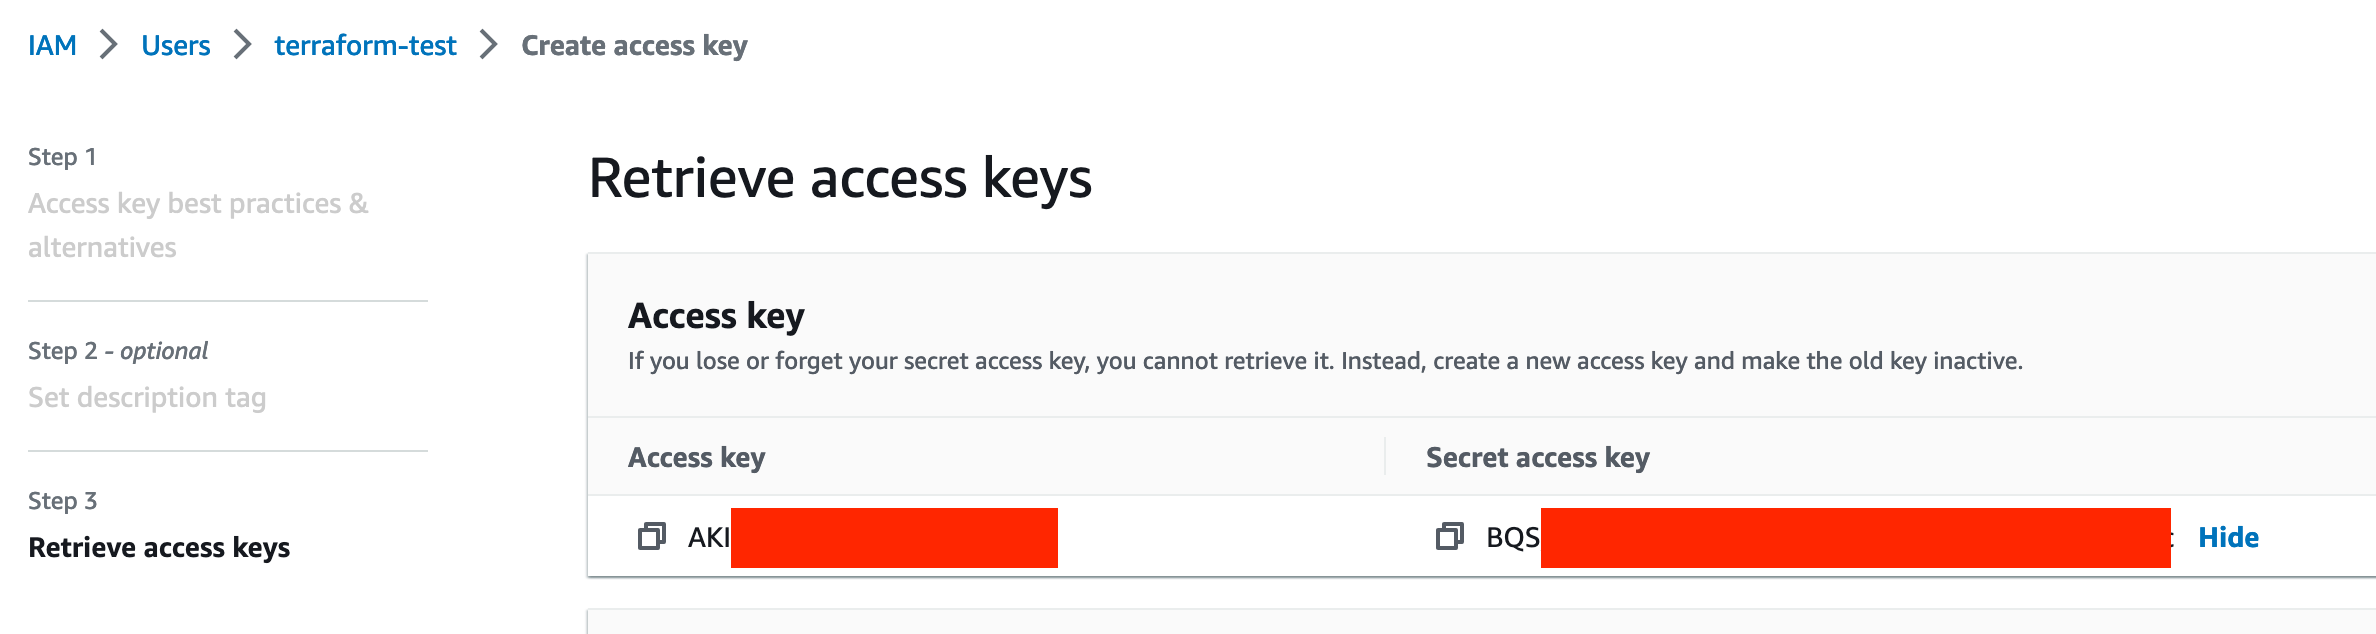
Navigate to IAM > Users and select Add Users and create a new user with 'AdministratorAccess'. Once a new user is created, click on the user and navigate to Security Credentials and create a new Access Key/ID.
As you can see below, I already created a user and provide full admin access. Copy the Access key ID and Secret access key under Security Credentials which will enable Terraform to make changes in AWS.
You can run aws configure command on the CLI to add the credentials.
$ aws configure
AWS Access Key ID [None]: <YOUR-KEY-ID>
AWS Secret Access Key [None]: <YOUR-ACCESS-KEY>
Default region name [None]: eu-west-1
Default output format [None]: json
You can alternatively provide your credentials via the AWS_ACCESS_KEY_ID and AWS_SECRET_ACCESS_KEY environment variables, representing your AWS Access Key and AWS Secret Key.
$ export AWS_ACCESS_KEY_ID="accesskey"
$ export AWS_SECRET_ACCESS_KEY="secretkey"
Terraform Example
Now that we have installed Terraform, let's look at a simple example of how to deploy an EC2 instance within a new VPC.
- Go to your terminal, and create a new directory (I created one called
Terraform) and go inside the directory. - Create a file called
main.tfand add the following contents to it.
Suresh-MacBook:Terraform suresh$  ls
main.tf
Provider and Region
provider "aws" {
  region  = "eu-west-2"
}- provider - we are using AWS, if you want to use another cloud provider you need to change this to the appropriate provider.
- region - we will deploy the resources into
eu-west-2region (London)
VPC
resource "aws_vpc" "test-vpc" {
  cidr_block       = "10.0.0.0/16"
  tags = {
    Name = "terraform-test"

  }
}- A resource block declares a resource of a given type. In our case, we are creating a VPC
- Name (test-vpc) - The name is an identifier that we can use throughout the Terraform code to refer to this resource
- cidrblock - The CIDR block for the VPC
- tags - A mapping of tags to assign to the resource.
- Name - Name of the tag
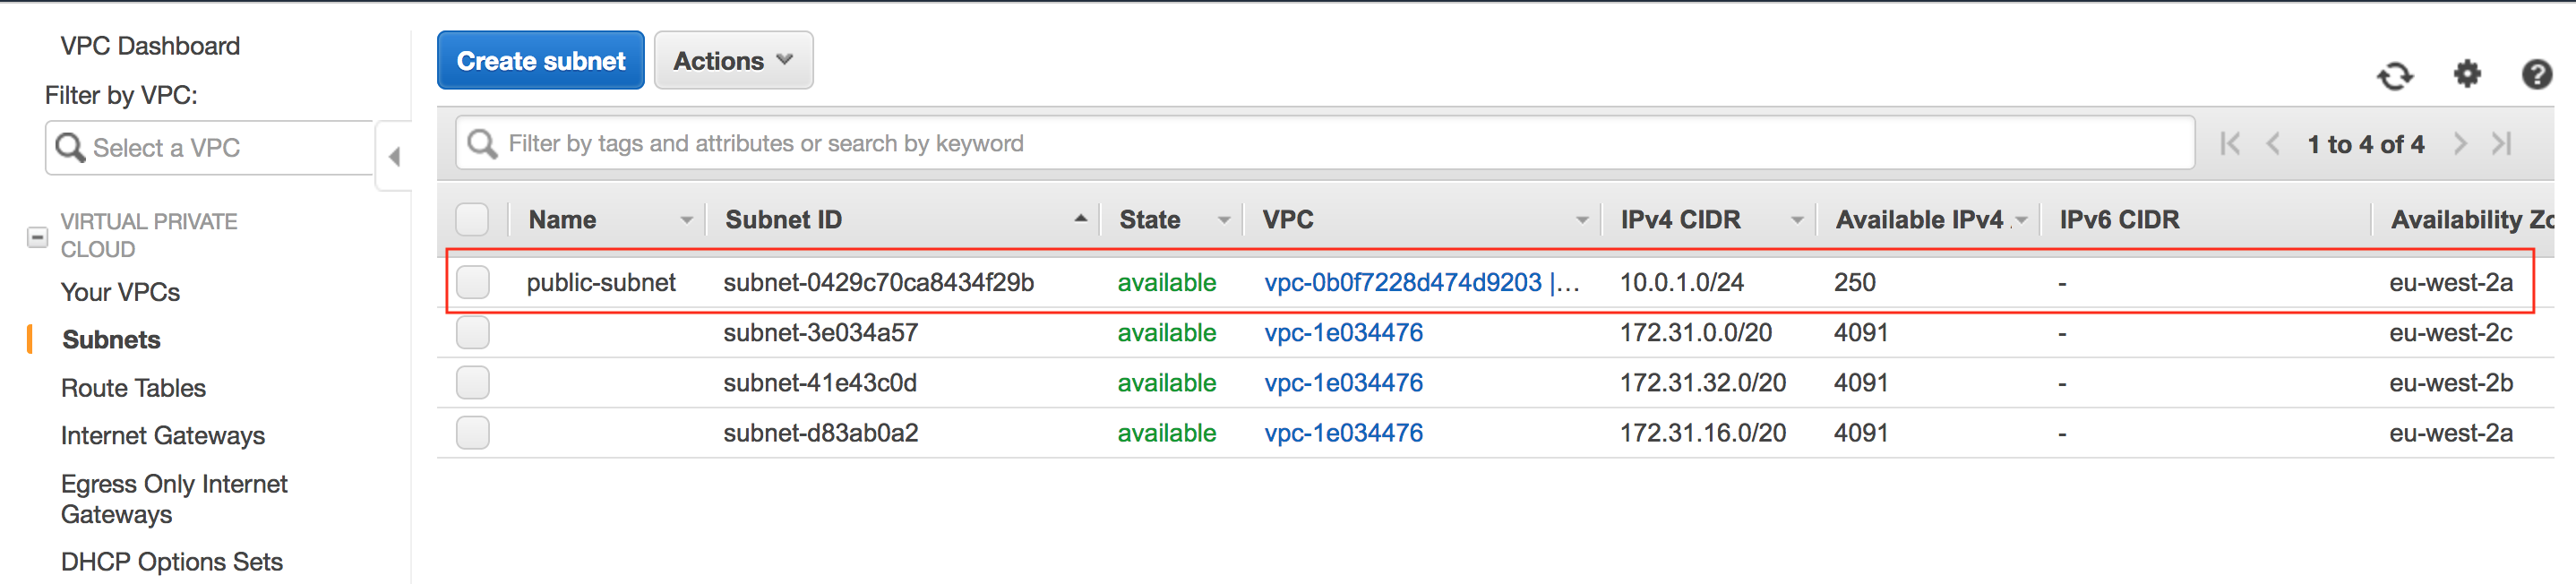
Subnet
resource "aws_subnet" "test-public-subnet" {
    vpc_id = aws_vpc.test-vpc.id
    cidr_block = "10.0.1.0/24"
    map_public_ip_on_launch = "true"
    availability_zone = "eu-west-2a"
    tags = {
        Name = "public-subnet"
    }
}- vpcid - We don't know the VPC ID yet, so we are telling Terraform to go and pick up the vpc_id from the previous step once created.
- map_public_ip_onlaunch - Assign a public IP to the instances launched in this subnet
- availability_zone - Launch the subnet into eu-west-2a AZ
Route table
Creating a new route table
resource "aws_route_table" "public-route" {
vpc_id = aws_vpc.test-vpc.id
tags = {
Name = "public-route"
}
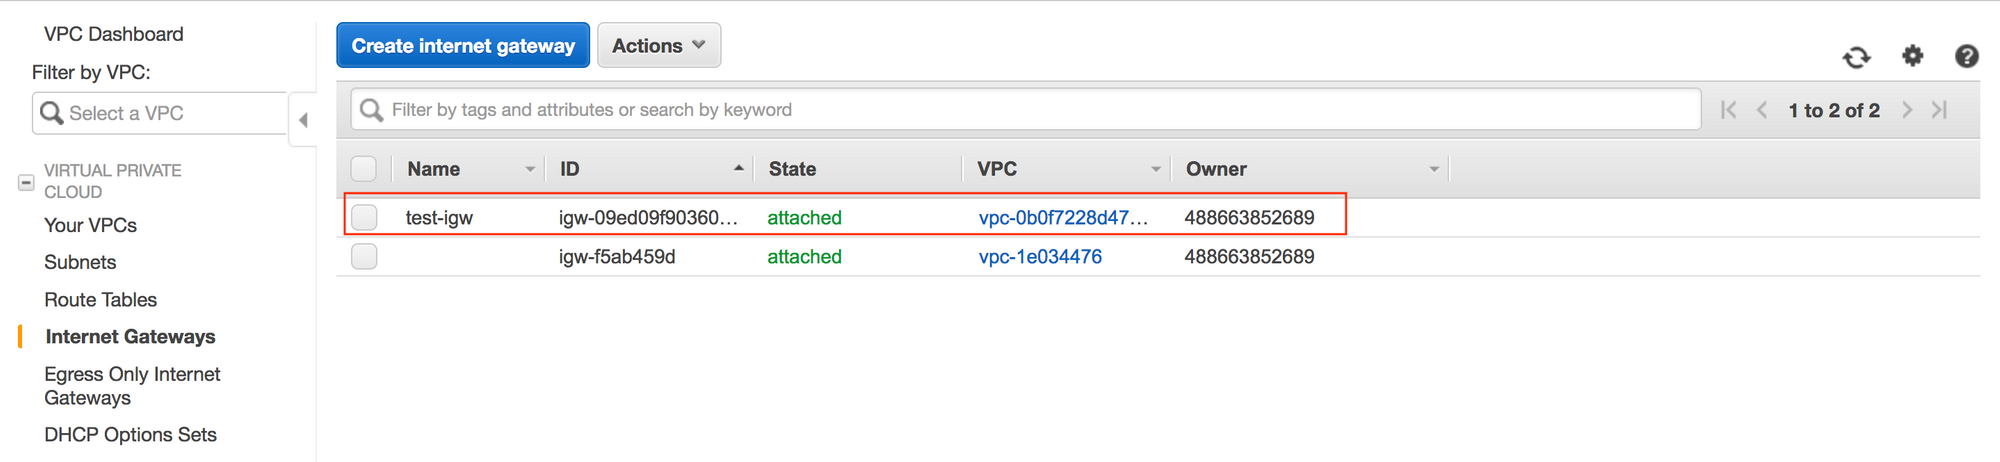
} Internet Gateway
Creating a new Internet Gateway in the new VPC.
resource "aws_internet_gateway" "test-igw" {
vpc_id = aws_vpc.test-vpc.id
tags = {
Name = "test-igw"
}
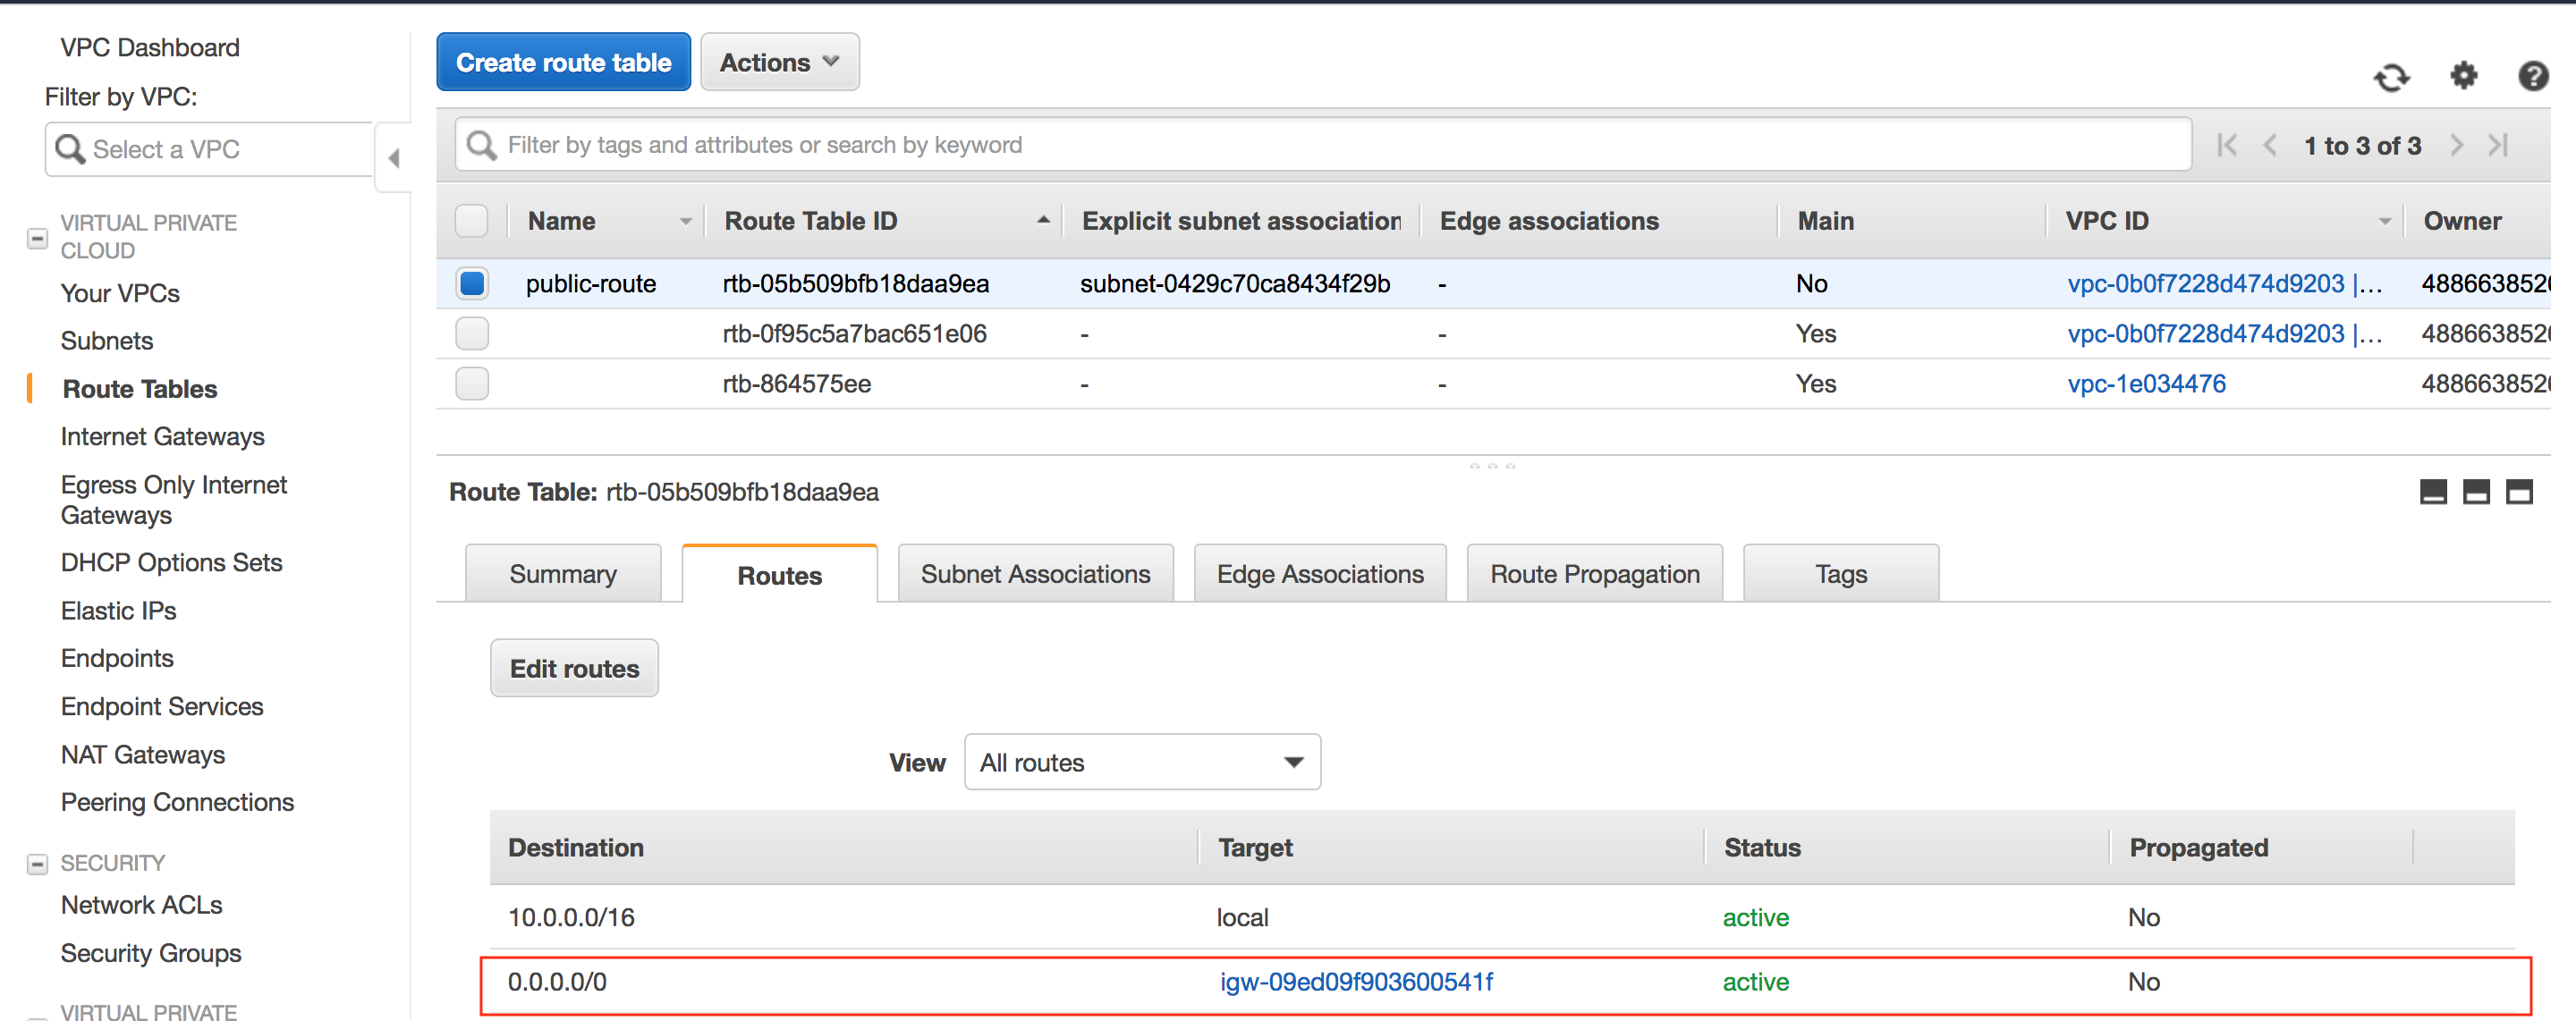
} Modify the Routing table
resource "aws_route" "internet-access" {
  route_table_id         = aws_route_table.public-route.id
  destination_cidr_block = "0.0.0.0/0"
  gateway_id             = aws_internet_gateway.test-igw.id

} - Adding a default route with a next-hop as the IGW created in the previous step.
Route table association
resource "aws_route_table_association" "subnet-association" {
  subnet_id      = aws_subnet.test-public-subnet.id
  route_table_id = aws_route_table.public-route.id
} - Associate the route-table with the public-subnet we created in the previous steps.
Launch the EC2 instance
resource "aws_instance" "test-ubuntu" {
  ami                    = "ami-006a0174c6c25ac06"
  instance_type          = "t2.micro"
  subnet_id              = aws_subnet.test-public-subnet.id
  key_name               = "test-key"

  tags = {
    Name = "Test-Ubuntu"
    }
}- ami - AMI id for Ubuntu 18.04
- instancetype - We are using
t2.microinstance - subnetid - Launching the instance into the public-subnet
- keyname - key pair we will be using to log in to the instance. (I have already created a key pair called "test-key" manually)
Your complete main.tf file would look like the following.
provider "aws" {
  region  = "eu-west-2"
}

resource "aws_vpc" "test-vpc" {
  cidr_block       = "10.0.0.0/16"
  tags = {
    Name = "terraform-test"

  }
}

resource "aws_subnet" "test-public-subnet" {
    vpc_id = aws_vpc.test-vpc.id
    cidr_block = "10.0.1.0/24"
    map_public_ip_on_launch = "true"
    availability_zone = "eu-west-2a"
    tags = {
        Name = "public-subnet"
    }
}

resource "aws_route_table" "public-route" {
 vpc_id = aws_vpc.test-vpc.id
 tags = {
   Name = "public-route"
  }
}

resource "aws_internet_gateway" "test-igw" {
 vpc_id = aws_vpc.test-vpc.id
 tags = {
        Name = "test-igw"
  }
}

resource "aws_route" "internet-access" {
  route_table_id         = aws_route_table.public-route.id
  destination_cidr_block = "0.0.0.0/0"
  gateway_id             = aws_internet_gateway.test-igw.id

}

resource "aws_route_table_association" "subnet-association" {
  subnet_id      = aws_subnet.test-public-subnet.id
  route_table_id = aws_route_table.public-route.id
}

resource "aws_instance" "test-ubuntu" {
  ami                    = "ami-006a0174c6c25ac06"
  instance_type          = "t2.micro"
  subnet_id              = aws_subnet.test-public-subnet.id
  key_name               = "test-key"

  tags = {
    Name = "Test-Ubuntu"
    }
}
Deployment
There are four Terraform commands that you need to remember.
- Terraform init - This command initializes a working directory containing Terraform configuration files. This is the first command that should be run after writing a new Terraform configuration
- Terraform plan - This command creates an execution plan, which lets you preview the changes that Terraform plans to make to your infrastructure.
- Terraform apply - This command executes the actions proposed in a Terraform plan.
- Terraform destroy - This command is a convenient way to destroy all remote objects managed by a particular Terraform configuration.
Terraform init
Run terraform init CLI command to download the provider code and required modules.
Suresh-MacBook:Terraform suresh$ terraform init

Initializing the backend...

Initializing provider plugins...

The following providers do not have any version constraints in configuration,
so the latest version was installed.

To prevent automatic upgrades to new major versions that may contain breaking
changes, it is recommended to add version = "..." constraints to the
corresponding provider blocks in configuration, with the constraint strings
suggested below.

* provider.aws: version = "~> 2.57"

Terraform has been successfully initialized!

You may now begin working with Terraform. Try running "terraform plan" to see
any changes that are required for your infrastructure. All Terraform commands
should now work.

If you ever set or change modules or backend configuration for Terraform,
rerun this command to reinitialize your working directory. If you forget, other
commands will detect it and remind you to do so if necessary.
Terraform plan
You can run terraform plan CLI command to check and prepare the deployment. It will not apply any changes or create any resources on AWS. The plan command is just to view the changes that Terraform would make.
Terraform apply
To apply the changes run terraform apply which will start provisioning the resources defined in the main.tf file.
Suresh-MacBook:Terraform suresh$ terraform apply

An execution plan has been generated and is shown below.
Resource actions are indicated with the following symbols:
  + create

Terraform will perform the following actions:

  # aws_instance.test-ubuntu will be created
  + resource "aws_instance" "test-ubuntu" {

****output ommited***

Plan: 7 to add, 0 to change, 0 to destroy.

Do you want to perform these actions?
  Terraform will perform the actions described above.
  Only 'yes' will be accepted to approve.

  Enter a value: yes

aws_vpc.test-vpc: Creating...
aws_vpc.test-vpc: Creation complete after 2s [id=vpc-0f15344ace746e043]
aws_internet_gateway.test-igw: Creating...
aws_route_table.public-route: Creating...
aws_subnet.test-public-subnet: Creating...
aws_route_table.public-route: Creation complete after 1s [id=rtb-027d72975ce69bedf]
aws_internet_gateway.test-igw: Creation complete after 1s [id=igw-0bbdfe05e4b6ccbe4]
aws_route.internet-access: Creating...
aws_subnet.test-public-subnet: Creation complete after 2s [id=subnet-04352871522d6cc58]
aws_route_table_association.subnet-association: Creating...
aws_instance.test-ubuntu: Creating...
aws_route.internet-access: Creation complete after 1s [id=r-rtb-027d72975ce69bedf1080289494]
aws_route_table_association.subnet-association: Creation complete after 0s [id=rtbassoc-0ac9bcf9a2d2e0f9c]
aws_instance.test-ubuntu: Still creating... [10s elapsed]
aws_instance.test-ubuntu: Still creating... [20s elapsed]
aws_instance.test-ubuntu: Creation complete after 22s [id=i-07c5a9606eeb59fa2]

Apply complete! Resources: 7 added, 0 changed, 0 destroyed.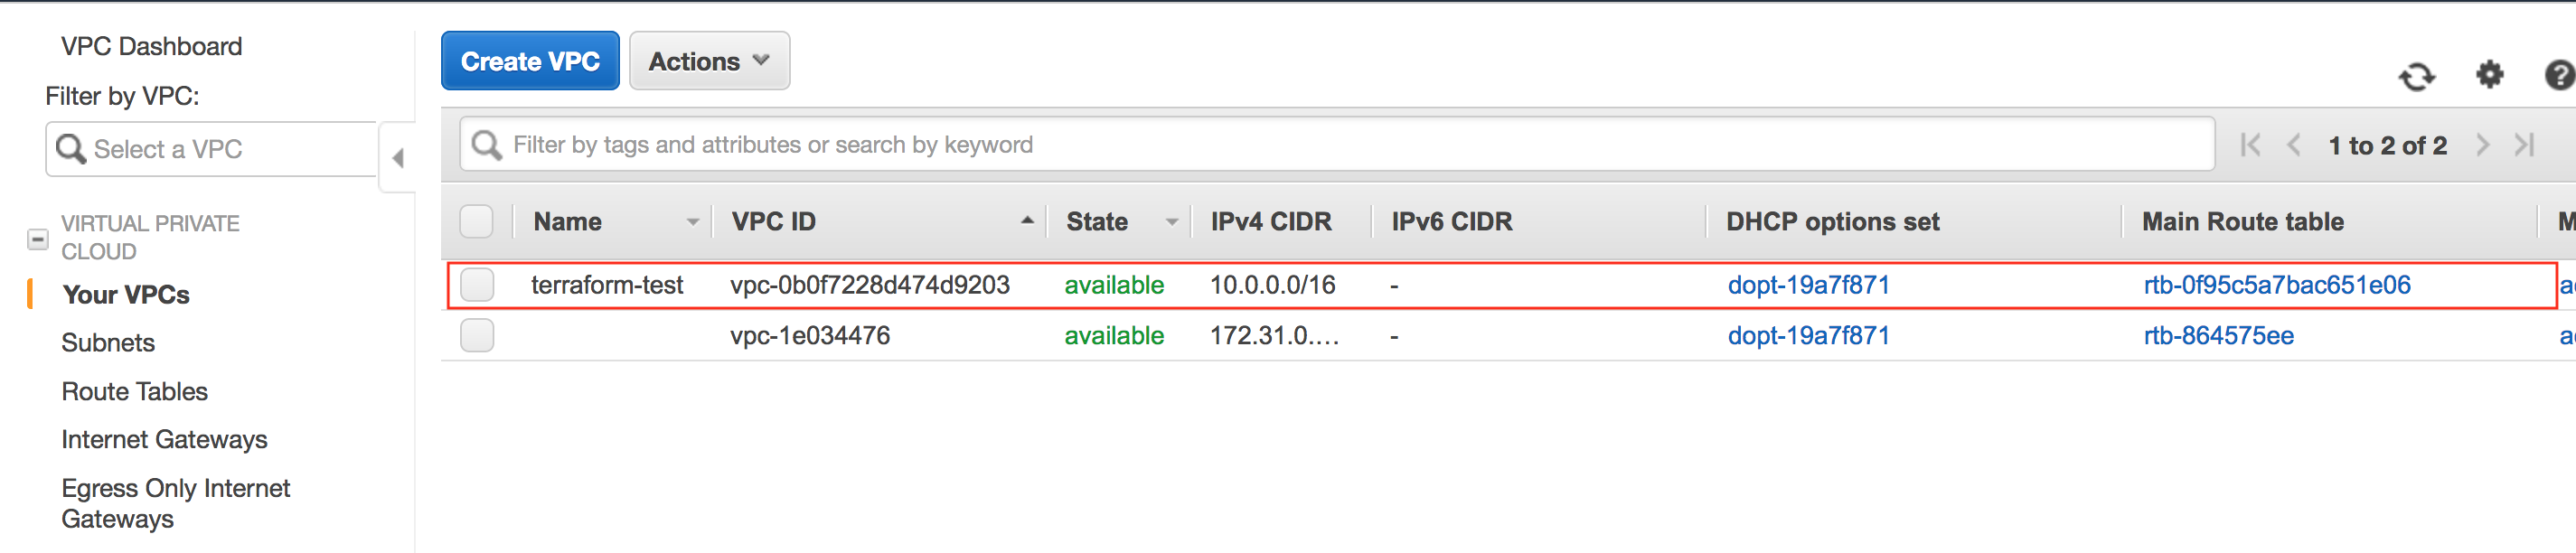

Now that we've deployed the VPC and instance, we can try SSH to it to verify everything is working as expected.
Welcome to Ubuntu 18.04.3 LTS (GNU/Linux 4.15.0-1057-aws x86_64)

 * Documentation:  https://help.ubuntu.com
 * Management:     https://landscape.canonical.com
 * Support:        https://ubuntu.com/advantage

  System information as of Tue Apr 21 12:46:04 UTC 2020

  System load:  0.0               Processes:           89
  Usage of /:   13.6% of 7.69GB   Users logged in:     0
  Memory usage: 15%               IP address for eth0: 10.0.1.204
  Swap usage:   0%

0 packages can be updated.
0 updates are security updates.


The programs included with the Ubuntu system are free software;
the exact distribution terms for each program are described in the
individual files in /usr/share/doc/*/copyright.

Ubuntu comes with ABSOLUTELY NO WARRANTY, to the extent permitted by
applicable law.

To run a command as administrator (user "root"), use "sudo <command>".
See "man sudo_root" for details.

ubuntu@ip-10-0-1-204:~$
Terraform destroy
As the name suggests you can use terraform destroy command to remove all the resources you just created.
Suresh-MacBook:Terraform suresh$ terraform destroy

aws_vpc.test-vpc: Refreshing state... [id=vpc-0b0f7228d474d9203]
aws_route_table.public-route: Refreshing state... [id=rtb-05b509bfb18daa9ea]
aws_internet_gateway.test-igw: Refreshing state... [id=igw-09ed09f903600541f]
aws_subnet.test-public-subnet: Refreshing state... [id=subnet-0429c70ca8434f29b]
aws_instance.test-ubuntu: Refreshing state... [id=i-01617bb7327b1571d]
aws_route_table_association.subnet-association: Refreshing state... [id=rtbassoc-0f396d421944908d8]
aws_route.internet-access: Refreshing state... [id=r-rtb-05b509bfb18daa9ea1080289494]

An execution plan has been generated and is shown below.
Resource actions are indicated with the following symbols:
  - destroy

Terraform will perform the following actions:

Do you really want to destroy all resources?
  Terraform will destroy all your managed infrastructure, as shown above.
  There is no undo. Only 'yes' will be accepted to confirm.

  Enter a value: yes

aws_route_table_association.subnet-association: Destroying... [id=rtbassoc-0f396d421944908d8]
aws_route.internet-access: Destroying... [id=r-rtb-05b509bfb18daa9ea1080289494]
aws_instance.test-ubuntu: Destroying... [id=i-01617bb7327b1571d]
aws_route_table_association.subnet-association: Destruction complete after 0s
aws_route.internet-access: Destruction complete after 0s
aws_internet_gateway.test-igw: Destroying... [id=igw-09ed09f903600541f]
aws_route_table.public-route: Destroying... [id=rtb-05b509bfb18daa9ea]
aws_route_table.public-route: Destruction complete after 0s
aws_instance.test-ubuntu: Still destroying... [id=i-01617bb7327b1571d, 10s elapsed]
aws_internet_gateway.test-igw: Still destroying... [id=igw-09ed09f903600541f, 10s elapsed]
aws_instance.test-ubuntu: Still destroying... [id=i-01617bb7327b1571d, 20s elapsed]
aws_internet_gateway.test-igw: Still destroying... [id=igw-09ed09f903600541f, 20s elapsed]
aws_internet_gateway.test-igw: Destruction complete after 25s
aws_instance.test-ubuntu: Destruction complete after 29s
aws_subnet.test-public-subnet: Destroying... [id=subnet-0429c70ca8434f29b]
aws_subnet.test-public-subnet: Destruction complete after 0s
aws_vpc.test-vpc: Destroying... [id=vpc-0b0f7228d474d9203]
aws_vpc.test-vpc: Destruction complete after 0s

Destroy complete! Resources: 7 destroyed.
Closing Thoughts
In conclusion, if you're an absolute beginner looking to learn about Terraform, don't be intimidated. Terraform is easier than you might think to learn, even if you have just a basic understanding of AWS.
With its simple and intuitive syntax, comprehensive documentation, flexible approach to IaC, and modularity, Terraform is an excellent tool for managing your infrastructure as code. So why not give it a try?
References
https://docs.aws.amazon.com/cli/latest/userguide/getting-started-install.html
https://registry.terraform.io/providers/hashicorp/aws/latest/docs
https://developer.hashicorp.com/terraform/cli