In this blog post, we will look at how to configure a remote backend for Terraform using an AWS S3 bucket.
What is a Remote Backend?
Before we dive into the configuration of a remote backend, let's take a step back and look at what it is.
Terraform must store the state of your managed infrastructure and configuration. This state is used by Terraform to map real-world resources to your configuration, keep track of metadata, and improve performance for large infrastructures.
This state is stored by default in a local file named terraform.tfstate, but it can also be stored remotely, which works better in a team environment. This state file is used to determine what changes need to be made to your infrastructure when you apply a new configuration.
Local state files can create problems when working in a team, as they can lead to conflicts and inconsistencies between different team members. To solve this problem, Terraform allows you to use a remote backend to store your state file in a centralized location.
Configuring a Remote Backend using AWS S3 Bucket
AWS S3 bucket is one of the most commonly used remote backends for Terraform, and it is relatively easy to configure. Here are the steps you need to follow to set it up:
Step 1: Create an S3 bucket
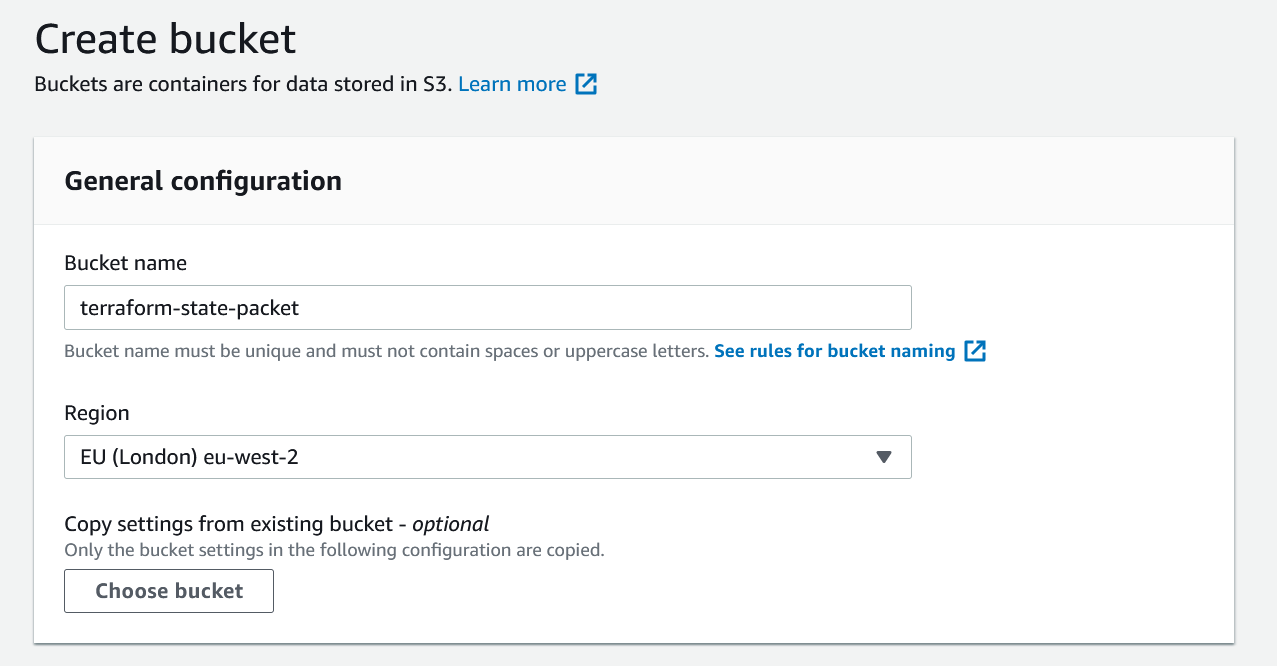
The first step is to create an S3 bucket that will be used to store your Terraform state file. You can create an S3 bucket through the AWS Management Console, Terraform or by using the AWS CLI.

Step 2: Create an IAM user
Next, you need to create an IAM user that Terraform will use to access the S3 bucket. Of course, if you are using Terraform to deploy resources, the IAM user should have been created already.
Step 3: Configure Terraform
Now that you have an S3 bucket and an IAM user, you can configure Terraform to use them as a remote backend.
I created a separate backend.tf file in the same directory. With this configuration, we are telling Terraform to save the state file in terraform-state-packet bucket. The key is the name that you assign to an object which uniquely identifies the object in the bucket. (The file path)
#backend.tf
terraform {
  backend "s3" {
    bucket  = "terraform-state-packet"
    key     = "packetswitch/demo"
    region  = "eu-west-2"

  }
}
To demonstrate this, I am going to create a VPC and a subnet in eu-west-2 region. Once we apply this, Terraform should update the remote state file with the changes.
#main.tf
provider "aws" {
  region  = "eu-west-2"
}

resource "aws_vpc" "test-vpc" {
  cidr_block       = "10.0.0.0/16"
  tags = {
    Name = "terraform-test"

  }
}

resource "aws_subnet" "test-public-subnet" {
    vpc_id = aws_vpc.test-vpc.id
    cidr_block = "10.0.1.0/24"
    map_public_ip_on_launch = "true"
    availability_zone = "eu-west-2a"
    tags = {
        Name = "public-subnet"
    }
}
Terraform should now save this new state file in S3.
Suresh-MacBook:my-account suresh$ terraform init

Initializing the backend...

Successfully configured the backend "s3"! Terraform will automatically
use this backend unless the backend configuration changes.

Suresh-MacBook:my-account suresh$ terraform apply

An execution plan has been generated and is shown below.
Resource actions are indicated with the following symbols:
  + create

Terraform will perform the following actions:

  # aws_subnet.test-public-subnet will be created
  + resource "aws_subnet" "test-public-subnet" {
      + arn                             = (known after apply)
      + assign_ipv6_address_on_creation = false
      + availability_zone               = "eu-west-2a"
      + availability_zone_id            = (known after apply)
      + cidr_block                      = "10.0.1.0/24"
      + id                              = (known after apply)
      + ipv6_cidr_block                 = (known after apply)
      + ipv6_cidr_block_association_id  = (known after apply)
      + map_public_ip_on_launch         = true
      + owner_id                        = (known after apply)
      + tags                            = {
          + "Name" = "public-subnet"
        }
      + vpc_id                          = (known after apply)
    }

  # aws_vpc.test-vpc will be created
  + resource "aws_vpc" "test-vpc" {
      + arn                              = (known after apply)
      + assign_generated_ipv6_cidr_block = false
      + cidr_block                       = "10.0.0.0/16"
      + default_network_acl_id           = (known after apply)
      + default_route_table_id           = (known after apply)
      + default_security_group_id        = (known after apply)
      + dhcp_options_id                  = (known after apply)
      + enable_classiclink               = (known after apply)
      + enable_classiclink_dns_support   = (known after apply)
      + enable_dns_hostnames             = (known after apply)
      + enable_dns_support               = true
      + id                               = (known after apply)
      + instance_tenancy                 = "default"
      + ipv6_association_id              = (known after apply)
      + ipv6_cidr_block                  = (known after apply)
      + main_route_table_id              = (known after apply)
      + owner_id                         = (known after apply)
      + tags                             = {
          + "Name" = "terraform-test"
        }
    }

Plan: 2 to add, 0 to change, 0 to destroy.

Do you want to perform these actions?
  Terraform will perform the actions described above.
  Only 'yes' will be accepted to approve.

  Enter a value: yes

aws_vpc.test-vpc: Creating...
aws_vpc.test-vpc: Creation complete after 2s [id=vpc-032195d344c8b0c2f]
aws_subnet.test-public-subnet: Creating...
aws_subnet.test-public-subnet: Creation complete after 1s [id=subnet-09e471b369f939c0e]

Apply complete! Resources: 2 added, 0 changed, 0 destroyed.
If you head over to S3, you should be able to see the state file in the bucket.

The file contains the state of the VPC and subnet we just created.
{
  "version": 4,
  "terraform_version": "0.12.24",
  "serial": 2,
  "lineage": "b1164ae3-2977-8cce-9a0f-ad8474c46d79",
  "outputs": {},
  "resources": [
    {
      "mode": "managed",
      "type": "aws_subnet",
      "name": "test-public-subnet",
      "provider": "provider.aws",
      "instances": [
        {
          "schema_version": 1,
          "attributes": {
            "arn": "arn:aws:ec2:eu-west-2:488663852689:subnet/subnet-09e471b369f939c0e",
            "assign_ipv6_address_on_creation": false,
            "availability_zone": "eu-west-2a",
            "availability_zone_id": "euw2-az2",
            "cidr_block": "10.0.1.0/24",
            "id": "subnet-09e471b369f939c0e",
            "ipv6_cidr_block": "",
            "ipv6_cidr_block_association_id": "",
            "map_public_ip_on_launch": true,
            "owner_id": "**********",
            "tags": {
              "Name": "public-subnet"
            },
            "timeouts": null,
            "vpc_id": "vpc-032195d344c8b0c2f"
          },
          "private": "eyJlMmJmYjczMC1lY2FhLTExZTYtOGY4OC0zNDM2M2JjN2M0YzAiOnsiY3JlYXRlIjo2MDAwMDAwMDAwMDAsImRlbGV0ZSI6MTIwMDAwMDAwMDAwMH0sInNjaGVtYV92ZXJzaW9uIjoiMSJ9",
          "dependencies": [
            "aws_vpc.test-vpc"
          ]
        }
      ]
    },
    {
      "mode": "managed",
      "type": "aws_vpc",
      "name": "test-vpc",
      "provider": "provider.aws",
      "instances": [
        {
          "schema_version": 1,
          "attributes": {
            "arn": "arn:aws:ec2:eu-west-2:488663852689:vpc/vpc-032195d344c8b0c2f",
            "assign_generated_ipv6_cidr_block": false,
            "cidr_block": "10.0.0.0/16",
            "default_network_acl_id": "acl-026e7af044870168c",
            "default_route_table_id": "rtb-0fdab40d378fa9466",
            "default_security_group_id": "sg-015d16faa69f6d395",
            "dhcp_options_id": "dopt-19a7f871",
            "enable_classiclink": null,
            "enable_classiclink_dns_support": null,
            "enable_dns_hostnames": false,
            "enable_dns_support": true,
            "id": "vpc-032195d344c8b0c2f",
            "instance_tenancy": "default",
            "ipv6_association_id": "",
            "ipv6_cidr_block": "",
            "main_route_table_id": "rtb-0fdab40d378fa9466",
            "owner_id": "**********",
            "tags": {
              "Name": "terraform-test"
            }
          },
          "private": "eyJzY2hlbWFfdmVyc2lvbiI6IjEifQ=="
        }
      ]
    }
  ]
}
Closing Thoughts
When working in a team, using a remote backend allows multiple team members to access and update the state file simultaneously, which can help prevent conflicts and reduce the likelihood of errors. Using a remote backend also ensures that all team members are working with the same state file, which can help maintain consistency across your infrastructure.


